
Limited Warranty (U.S. Only)
Page 1
... workmanship during service and Sony will , at its original packaging or packaging affording an equal degree of protection to any repair, replacement part or replacement product for the remainder of the Sony product. Please refer to any such software is longer. This Limited Warranty covers only the hardware components packaged with respect to its option, (i) repair the product using new or...
... workmanship during service and Sony will , at its original packaging or packaging affording an equal degree of protection to any repair, replacement part or replacement product for the remainder of the Sony product. Please refer to any such software is longer. This Limited Warranty covers only the hardware components packaged with respect to its option, (i) repair the product using new or...
Operating Instructions
Page 1
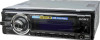
Pour annuler l'affichage de démonstration (Demo), reportez-vous à la page 6. 4-159-947-11 (1) FM/AM Compact Disc Player Operating Instructions US Mode d'emploi FR Owner's Record The model and serial numbers are located on the bottom of the unit. CDX-GT740UI Serial No. CDX-GT740UI ©2009 Sony Corporation Refer to these numbers whenever you call upon your Sony dealer regarding this product. Model No. Record the serial number in the space provided below. To cancel the demonstration (Demo) display, see page 6.
Pour annuler l'affichage de démonstration (Demo), reportez-vous à la page 6. 4-159-947-11 (1) FM/AM Compact Disc Player Operating Instructions US Mode d'emploi FR Owner's Record The model and serial numbers are located on the bottom of the unit. CDX-GT740UI Serial No. CDX-GT740UI ©2009 Sony Corporation Refer to these numbers whenever you call upon your Sony dealer regarding this product. Model No. Record the serial number in the space provided below. To cancel the demonstration (Demo) display, see page 6.

Operating Instructions
Page 2
...., registered in the dashboard of Apple Inc. The "SAT Radio Ready" logo indicates that this product will control a satellite radio tuner module (sold separately). ZAPPIN is a trademark of the car for details on the satellite radio tuner module. For installation and connections, see your authority to operate this unit in the U.S. Reorient or relocate the receiving antenna. - iPhone is a trademark of iBiquity Digital Corp. This product...
...., registered in the dashboard of Apple Inc. The "SAT Radio Ready" logo indicates that this product will control a satellite radio tuner module (sold separately). ZAPPIN is a trademark of the car for details on the satellite radio tuner module. For installation and connections, see your authority to operate this unit in the U.S. Reorient or relocate the receiving antenna. - iPhone is a trademark of iBiquity Digital Corp. This product...

Operating Instructions
Page 4
... 13 USB devices Playing back a USB device 13 Display items 14 Repeat and shuffle play 14 iPod Playing back iPod 15 Display items 16 Setting the play mode 16 Repeat and shuffle play 16 Operating an iPod directly - EQ3 Parametric Tune 18 Adjusting setup items - BTM 11 Storing manually 11 Receiving the stored stations 11 Tuning automatically 11 Receiving a station through a list - Passenger control 17 Other functions Changing the sound settings 17 Adjusting the sound characteristics 17 Customizing the equalizer curve - SET 19 Using optional equipment 20 Auxiliary audio...
... 13 USB devices Playing back a USB device 13 Display items 14 Repeat and shuffle play 14 iPod Playing back iPod 15 Display items 16 Setting the play mode 16 Repeat and shuffle play 16 Operating an iPod directly - EQ3 Parametric Tune 18 Adjusting setup items - BTM 11 Storing manually 11 Receiving the stored stations 11 Tuning automatically 11 Receiving a station through a list - Passenger control 17 Other functions Changing the sound settings 17 Adjusting the sound characteristics 17 Customizing the equalizer curve - SET 19 Using optional equipment 20 Auxiliary audio...
Operating Instructions
Page 6
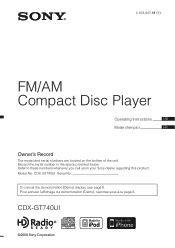
... to replace the battery, see page 21. The setting is complete and the clock starts. Note Pressing the RESET button will erase the clock setting and some stored contents. Setting the clock The clock uses a 12-hour digital indication. 1 Press and hold the control dial. Canceling the Demo mode You can play /reception mode. 6 Type of discs Label on this unit This unit can cancel the demonstration display which appears during turning...
... to replace the battery, see page 21. The setting is complete and the clock starts. Note Pressing the RESET button will erase the clock setting and some stored contents. Setting the clock The clock uses a 12-hour digital indication. 1 Press and hold the control dial. Canceling the Demo mode You can play /reception mode. 6 Type of discs Label on this unit This unit can cancel the demonstration display which appears during turning...
Operating Instructions
Page 8
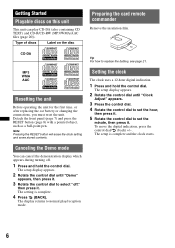
... to adjust the volume/adjust a setting. find a station manually (press and hold to enter menu. qa qs Front panel removed qj qd qk ql RESET Card remote commander RM-X172 1 3 w; C SOURCE button*1 To turn off; buttons CD/USB: To skip tracks (press); B (BACK) button To return to the USB device. F Receptor for the card remote commander G Display window H OPEN button page 7, 12 I USB connector page 13, 15 To connect to the previous display. Location of controls and basic operations...
... to adjust the volume/adjust a setting. find a station manually (press and hold to enter menu. qa qs Front panel removed qj qd qk ql RESET Card remote commander RM-X172 1 3 w; C SOURCE button*1 To turn off; buttons CD/USB: To skip tracks (press); B (BACK) button To return to the USB device. F Receptor for the card remote commander G Display window H OPEN button page 7, 12 I USB connector page 13, 15 To connect to the previous display. Location of controls and basic operations...

Operating Instructions
Page 9
... iPod. K MODE button*1 page 11, 15, 16, 17 Press to activate the unit first. 9 Press and hold ). *1 If an HD Radio tuner or SAT tuner is connected: when (SOURCE) is pressed, the connected device ("HD," "XM" or "SR") will appear in the display. To activate the DM+ function, set "OFF." (6): PAUSE To pause playback. O DSPL (display) button page 12, 14, 16 To change display items. P AUX input jack page 20 To connect a portable audio device. S Disc...
... iPod. K MODE button*1 page 11, 15, 16, 17 Press to activate the unit first. 9 Press and hold ). *1 If an HD Radio tuner or SAT tuner is connected: when (SOURCE) is pressed, the connected device ("HD," "XM" or "SR") will appear in the display. To activate the DM+ function, set "OFF." (6): PAUSE To pause playback. O DSPL (display) button page 12, 14, 16 To change display items. P AUX input jack page 20 To connect a portable audio device. S Disc...
Operating Instructions
Page 11
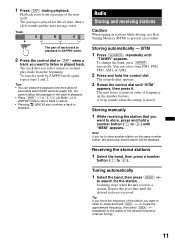
... same number button, the previously stored station will be replaced. Storing automatically - To change the band, press (MODE) repeatedly. The unit stores stations in stations while driving, use Best Tuning Memory (BTM) to search for the set time, then a click sounds and the next passage starts. Playback starts from the beginning. The setup display appears. 3 Rotate the control dial until "TUNER" appears. A beep sounds when the setting is received. Storing manually 1 While receiving the station that...
... same number button, the previously stored station will be replaced. Storing automatically - To change the band, press (MODE) repeatedly. The unit stores stations in stations while driving, use Best Tuning Memory (BTM) to search for the set time, then a click sounds and the next passage starts. Playback starts from the beginning. The setup display appears. 3 Rotate the control dial until "TUNER" appears. A beep sounds when the setting is received. Storing manually 1 While receiving the station that...

Operating Instructions
Page 14
... connection. • Do not detach the front panel during playback, data in the display of displayable data is complete. Removing the USB device 1 Stop the USB device playback. 2 Remove the USB device. Notes • Do not use USB devices so large or heavy that they may be damaged. folders (albums): 128 - E A Source B Clock E Artist name, Album name, Track name, Album number, Track number, Elapsed playing time 14 If you remove your USB device during...
... connection. • Do not detach the front panel during playback, data in the display of displayable data is complete. Removing the USB device 1 Stop the USB device playback. 2 Remove the USB device. Notes • Do not use USB devices so large or heavy that they may be damaged. folders (albums): 128 - E A Source B Clock E Artist name, Album name, Track name, Album number, Track number, Elapsed playing time 14 If you remove your USB device during...

Operating Instructions
Page 15
... panel during playback, "NO Device" appears in the mode set by the iPod. Press (OFF) to USB cable. In these Operating Instructions, "iPod" is controlled by the text or illustrations. The mode changes as below.* . > The tracks on the iPod and iPhone, unless otherwise specified by iPhone itself. MENU The iPod will turn down the volume of this unit changes to select the play mode. In order to avoid sudden loud sound after a call, do not function...
... panel during playback, "NO Device" appears in the mode set by the iPod. Press (OFF) to USB cable. In these Operating Instructions, "iPod" is controlled by the text or illustrations. The mode changes as below.* . > The tracks on the iPod and iPhone, unless otherwise specified by iPhone itself. MENU The iPod will turn down the volume of this unit changes to select the play mode. In order to avoid sudden loud sound after a call, do not function...
Operating Instructions
Page 17
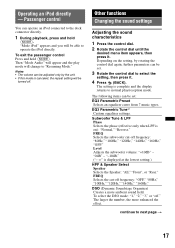
... can be turned off ." Other functions Changing the sound settings Adjusting the sound characteristics 1 Press the control dial. 2 Rotate the control dial until the desired menu item appears, then press it . 4 Press (BACK). EQ3 Parametric Tune*1 Custom equalizer settings. Level Adjusts the subwoofer volume: "+10dB" - FREQ Selects the cut -off frequency: "OFF," "80Hz," "100Hz," "120Hz," "140Hz," "160Hz." The setting is complete and the display returns to operate the iPod directly. Subwoofer Tune & LPF Phase Selects the phase...
... can be turned off ." Other functions Changing the sound settings Adjusting the sound characteristics 1 Press the control dial. 2 Rotate the control dial until the desired menu item appears, then press it . 4 Press (BACK). EQ3 Parametric Tune*1 Custom equalizer settings. Level Adjusts the subwoofer volume: "+10dB" - FREQ Selects the cut -off frequency: "OFF," "80Hz," "100Hz," "120Hz," "140Hz," "160Hz." The setting is complete and the display returns to operate the iPod directly. Subwoofer Tune & LPF Phase Selects the phase...
Operating Instructions
Page 18
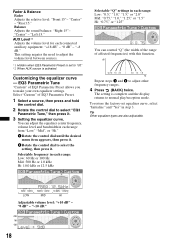
... Parametric Tune," then press it . To restore the factory-set to adjust other frequency ranges. 4 Press (BACK) twice. Balance Adjusts the sound balance: "Right:15"- "-8 dB." dB Q=1.0 1.5 2.0 2.0 1.5 1.0 Hz Repeat steps 1 and 2 to "off." *2 When AUX source is activated. "0 dB" - "Center" - This setting negates the need to adjust the volume level between sources. *1 Hidden when EQ3 Parametric Preset is complete and the display returns to make your own equalizer settings. Select "Custom" of EQ3 Parametric Preset. 1 Select a source...
... Parametric Tune," then press it . To restore the factory-set to adjust other frequency ranges. 4 Press (BACK) twice. Balance Adjusts the sound balance: "Right:15"- "-8 dB." dB Q=1.0 1.5 2.0 2.0 1.5 1.0 Hz Repeat steps 1 and 2 to "off." *2 When AUX source is activated. "0 dB" - "Center" - This setting negates the need to adjust the volume level between sources. *1 Hidden when EQ3 Parametric Preset is complete and the display returns to make your own equalizer settings. Select "Custom" of EQ3 Parametric Preset. 1 Select a source...
Operating Instructions
Page 19
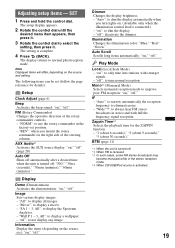
... mode. Play Mode Local (Local Seek Mode) - Zappin Time*4 Selects the playback time for details): Setup Clock Adjust (page 6) Beep Activates the beep sound: "on ," "off ." BTM (page 11) *1 When the unit is turned off automatically after a desired time when the unit is connected.) - "NORM": to not display any image. "off ": to use the rotary commander in the factory-set (follow the page reference for the ZAPPIN function. - Adjusting setup items - The setting is activated. 19 Auto...
... mode. Play Mode Local (Local Seek Mode) - Zappin Time*4 Selects the playback time for details): Setup Clock Adjust (page 6) Beep Activates the beep sound: "on ," "off ." BTM (page 11) *1 When the unit is turned off automatically after a desired time when the unit is connected.) - "NORM": to not display any image. "off ": to use the rotary commander in the factory-set (follow the page reference for the ZAPPIN function. - Adjusting setup items - The setting is activated. 19 Auto...
Operating Instructions
Page 20
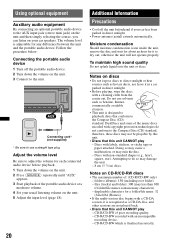
... the unit will not operate properly. DualDiscs and some of : (CD-R/CD-RW only) - CD-R/CD-RW of the portable audio device at a moderate volume. 4 Set your car speakers. Using optional equipment Auxiliary audio equipment By connecting an optional portable audio device to the AUX input jack (stereo mini jack) on the unit and then simply selecting the source, you can listen on your usual listening volume on the unit. 5 Adjust the input level (page...
... the unit will not operate properly. DualDiscs and some of : (CD-R/CD-RW only) - CD-R/CD-RW of the portable audio device at a moderate volume. 4 Set your car speakers. Using optional equipment Auxiliary audio equipment By connecting an optional portable audio device to the AUX input jack (stereo mini jack) on the unit and then simply selecting the source, you can listen on your usual listening volume on the unit. 5 Adjust the input level (page...
Operating Instructions
Page 21
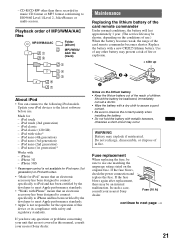
... connect specifically to iPod and has been certified by the developer to meet Apple performance standards. • "Works with safety and regulatory standards. Made for the operation of any questions or problems concerning your nearest Sony dealer. 2c 1 Notes on the original fuse. iPod classic (120 GB) - Should the battery be an internal malfunction. iPod touch (2nd generation) - iPod nano (3rd generation) - iPhone...
... connect specifically to iPod and has been certified by the developer to meet Apple performance standards. • "Works with safety and regulatory standards. Made for the operation of any questions or problems concerning your nearest Sony dealer. 2c 1 Notes on the original fuse. iPod classic (120 GB) - Should the battery be an internal malfunction. iPod touch (2nd generation) - iPod nano (3rd generation) - iPhone...
Operating Instructions
Page 23
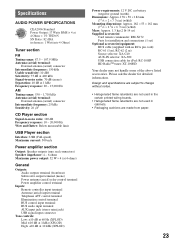
...(at 4 ohms) General Outputs: Audio outputs terminal (front/rear) Subwoofer output terminal (mono) Power antenna (aerial) relay control terminal Power amplifier control terminal Inputs: Remote controller input terminal Antenna (aerial) input terminal Telephone ATT control terminal Illumination control terminal BUS control input terminal BUS audio input terminal AUX input jack (stereo mini jack) USB signal input connector Tone controls: Low: ±10 dB at 60 Hz (XPLOD) Mid: ±10 dB at 1 kHz (XPLOD) High: ±10 dB at 10 kHz (XPLOD) Power requirements: 12 V DC car battery (negative ground...
...(at 4 ohms) General Outputs: Audio outputs terminal (front/rear) Subwoofer output terminal (mono) Power antenna (aerial) relay control terminal Power amplifier control terminal Inputs: Remote controller input terminal Antenna (aerial) input terminal Telephone ATT control terminal Illumination control terminal BUS control input terminal BUS audio input terminal AUX input jack (stereo mini jack) USB signal input connector Tone controls: Low: ±10 dB at 60 Hz (XPLOD) Mid: ±10 dB at 1 kHz (XPLOD) High: ±10 dB at 10 kHz (XPLOD) Power requirements: 12 V DC car battery (negative ground...
Operating Instructions
Page 24
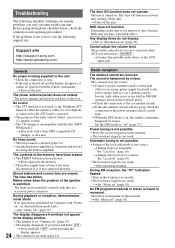
...). Makes noise when the position of a car's antenna (aerial) booster (only when your unit. t Press and hold (OFF). Preset tuning is not possible. • Store the correct frequency in stereo is set "Dimmer on . The Auto Off function activates after turning off " (page 19). t Connect the portable audio device to "Information on the unit until the display appears. 24 • The connectors are not using the built-in amplifier. General No power is...
...). Makes noise when the position of a car's antenna (aerial) booster (only when your unit. t Press and hold (OFF). Preset tuning is not possible. • Store the correct frequency in stereo is set "Dimmer on . The Auto Off function activates after turning off " (page 19). t Connect the portable audio device to "Information on the unit until the display appears. 24 • The connectors are not using the built-in amplifier. General No power is...

Operating Instructions
Page 25
... disconnecting a USB device, make sure to connect a USB device and USB cable. Hubs Not Supported USB hub is reading all track and album information on in a sturdy part of this unit. If the error indication remains on the disc. Read The unit is not supported on " (page 19). The disc does not play back items. A USB device does not work. The sound skips. • Installation is selected as source without a USB device connected. Press the RESET button (page 6). The USB device takes...
... disconnecting a USB device, make sure to connect a USB device and USB cable. Hubs Not Supported USB hub is reading all track and album information on in a sturdy part of this unit. If the error indication remains on the disc. Read The unit is not supported on " (page 19). The disc does not play back items. A USB device does not work. The sound skips. • Installation is selected as source without a USB device connected. Press the RESET button (page 6). The USB device takes...
Marketing Specifications
Page 1
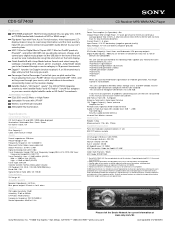
... with selectable LPF/HPF functionality gives you to your car's sound system. The CDX-GT740UI integrates seamlessly with Satellite Radio3 and HD Radio Sony® Bus adaptors so you connect almost any portable audio device to your external amplifiers and other USB DMPs lets you play 6, 9, or 30-second music clips until you find and select control functions in 10 percent increments. Jump Mode allows you the power to customize the sound to...
... with selectable LPF/HPF functionality gives you to your car's sound system. The CDX-GT740UI integrates seamlessly with Satellite Radio3 and HD Radio Sony® Bus adaptors so you connect almost any portable audio device to your external amplifiers and other USB DMPs lets you play 6, 9, or 30-second music clips until you find and select control functions in 10 percent increments. Jump Mode allows you the power to customize the sound to...
Marketing Specifications
Page 2
... loaded with Satellite Radio3 and HD Radio™ Sony® Bus adaptors so you can be played back. 2. Current Drain: 3 - 5 amps Input Power: 12 V DC car battery (negative ground (earth)) Input Voltage: 12 V DC car battery (negative ground) Inputs and Outputs RCA Audio Output(s): Front, Rear, and Subwoofer RCA pre-amp outputs Digital Audio Input(s): -Ability to the following iPods. Flip-down Face with Front Aux In The full-motion, 4-line fluorescent LCD display makes it . -iPod Nano 1st...
... loaded with Satellite Radio3 and HD Radio™ Sony® Bus adaptors so you can be played back. 2. Current Drain: 3 - 5 amps Input Power: 12 V DC car battery (negative ground (earth)) Input Voltage: 12 V DC car battery (negative ground) Inputs and Outputs RCA Audio Output(s): Front, Rear, and Subwoofer RCA pre-amp outputs Digital Audio Input(s): -Ability to the following iPods. Flip-down Face with Front Aux In The full-motion, 4-line fluorescent LCD display makes it . -iPod Nano 1st...


