

Limited Warranty (U.S. Only)
Page 1
...Limited Warranty only covers product issues caused by any repair, replacement part or replacement product for the time periods and as fuses or batteries). Some states do so for hardware or software ...unit. For specific instructions on your authorized dealer, call the Sony Customer Information Service Center 1-800-222-SONY(7669) For an accessory or part not available from the original date of purchase of the product ("Labor Warranty"), Sony will be lost or reformatted during ordinary consumer use , acts of God, misuse, limitations of technology, or modification of or to replace...
...Limited Warranty only covers product issues caused by any repair, replacement part or replacement product for the time periods and as fuses or batteries). Some states do so for hardware or software ...unit. For specific instructions on your authorized dealer, call the Sony Customer Information Service Center 1-800-222-SONY(7669) For an accessory or part not available from the original date of purchase of the product ("Labor Warranty"), Sony will be lost or reformatted during ordinary consumer use , acts of God, misuse, limitations of technology, or modification of or to replace...
Operating Instructions
Page 1
... 6. Serial No. 4-113-865-31 (1) FM/AM Compact Disc Player Operating Instructions US Mode d'emploi FR Manual de instrucciones ES Owner's Record The model and serial numbers are located on the bottom of the unit. Model No. CDX-GT630UI CDX-GT63UIW ©2008 Sony Corporation To cancel the demonstration (DEMO) display, see page 6. Para cancelar la pantalla de demostración (DEMO), consulte la página 6. Record these numbers whenever you call upon your...
... 6. Serial No. 4-113-865-31 (1) FM/AM Compact Disc Player Operating Instructions US Mode d'emploi FR Manual de instrucciones ES Owner's Record The model and serial numbers are located on the bottom of the unit. Model No. CDX-GT630UI CDX-GT63UIW ©2008 Sony Corporation To cancel the demonstration (DEMO) display, see page 6. Para cancelar la pantalla de demostración (DEMO), consulte la página 6. Record these numbers whenever you call upon your...
Operating Instructions
Page 2
... of Sirius Satellite Radio Inc. You are trademarks of Apple Inc. For HD RadioTM tuner operation, please refer to radio or television reception, which the receiver is no guarantee that this product will control a Sony HD RadioTM tuner (sold separately). HD RadioTM and the HD Radio Ready logo are designed to which can radiate radio frequency energy and, if not installed and used in a residential installation...
... of Sirius Satellite Radio Inc. You are trademarks of Apple Inc. For HD RadioTM tuner operation, please refer to radio or television reception, which the receiver is no guarantee that this product will control a Sony HD RadioTM tuner (sold separately). HD RadioTM and the HD Radio Ready logo are designed to which can radiate radio frequency energy and, if not installed and used in a residential installation...
Operating Instructions
Page 4
... Notes on this unit 6 Resetting the unit 6 Canceling the DEMO mode 6 Preparing the card remote commander 6 Setting the clock 6 Detaching the front panel 7 Attaching the front panel 7 Location of MP3/WMA/AAC files 20 About iPod 20 Maintenance 20 Removing the unit 21 Specifications 21 Troubleshooting 22 Error displays/Messages 24 4 Table of Contents Getting Started Playable discs on discs 19 Playback order of controls and basic operations Main unit 8 Card remote commander RM...
... Notes on this unit 6 Resetting the unit 6 Canceling the DEMO mode 6 Preparing the card remote commander 6 Setting the clock 6 Detaching the front panel 7 Attaching the front panel 7 Location of MP3/WMA/AAC files 20 About iPod 20 Maintenance 20 Removing the unit 21 Specifications 21 Troubleshooting 22 Error displays/Messages 24 4 Table of Contents Getting Started Playable discs on discs 19 Playback order of controls and basic operations Main unit 8 Card remote commander RM...
Operating Instructions
Page 6
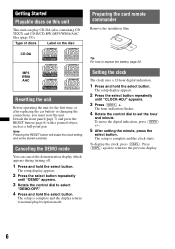
.... The setup is complete and the clock starts. Setting the clock The clock uses a 12-hour digital indication. 1 Press and hold the select button. Detach the front panel (page 7) and press the RESET button (page 8) with a pointed object, such as a ball-point pen. MP3 WMA AAC Resetting the unit Before operating the unit for the first time, or after replacing the car battery or changing the connections, you must reset the unit. Press...
.... The setup is complete and the clock starts. Setting the clock The clock uses a 12-hour digital indication. 1 Press and hold the select button. Detach the front panel (page 7) and press the RESET button (page 8) with a pointed object, such as a ball-point pen. MP3 WMA AAC Resetting the unit Before operating the unit for the first time, or after replacing the car battery or changing the connections, you must reset the unit. Press...
Operating Instructions
Page 8
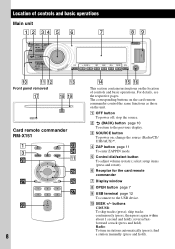
... ). change the source (Radio/CD/ USB/AUX)*1. skip tracks continuously (press, then press again within about 1 second and hold); J SEEK +/- qa qs Front panel removed qj qd qk ql RESET Card remote commander RM-X151 1 3 w; stop the source. Radio: To tune in stations automatically (press); wa OFF ATT SOURCE SEL MODE + - select setup items (press and rotate). Location of controls and basic operations. F Receptor for the card remote commander G Display window H OPEN button page 7 I USB...
... ). change the source (Radio/CD/ USB/AUX)*1. skip tracks continuously (press, then press again within about 1 second and hold); J SEEK +/- qa qs Front panel removed qj qd qk ql RESET Card remote commander RM-X151 1 3 w; stop the source. Radio: To tune in stations automatically (press); wa OFF ATT SOURCE SEL MODE + - select setup items (press and rotate). Location of controls and basic operations. F Receptor for the card remote commander G Display window H OPEN button page 7 I USB...
Operating Instructions
Page 9
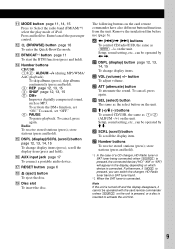
... iPod. Radio: To receive stored stations (press); Setup, sound setting, etc., can be operated with the card remote commander unless (SOURCE) on which device is connected. wf SEL (select) button The same as (SEEK) -/+ on the unit. wh SCRL (scroll) button To scroll the display item. O DSPL (display)/SCRL (scroll) button page 12, 13, 14, 15 To change display items. ws VOL (volume) +/- Q RESET button page 6 R Z (eject) button To eject the disc. S Disc slot To insert the disc. w buttons To control CD/radio/USB...
... iPod. Radio: To receive stored stations (press); Setup, sound setting, etc., can be operated with the card remote commander unless (SOURCE) on which device is connected. wf SEL (select) button The same as (SEEK) -/+ on the unit. wh SCRL (scroll) button To scroll the display item. O DSPL (display)/SCRL (scroll) button page 12, 13, 14, 15 To change display items. ws VOL (volume) +/- Q RESET button page 6 R Z (eject) button To eject the disc. S Disc slot To insert the disc. w buttons To control CD/radio/USB...
Operating Instructions
Page 11
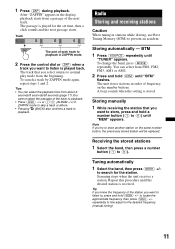
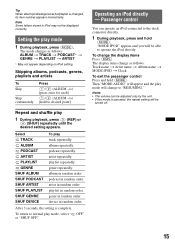
... frequency on the same number button, the previously stored station will be replaced. BTM 1 Press (SOURCE) repeatedly until "BTM" flashes. The unit stores stations in the display, playback starts from the beginning. A beep sounds when the setting is played for the station. Tuning automatically 1 Select the band, then press (SEEK) +/- The passage is stored. To change the band, press (MODE) repeatedly. to the desired frequency (manual tuning). 11 repeatedly to fine adjust...
... frequency on the same number button, the previously stored station will be replaced. BTM 1 Press (SOURCE) repeatedly until "BTM" flashes. The unit stores stations in the display, playback starts from the beginning. A beep sounds when the setting is played for the station. Tuning automatically 1 Select the band, then press (SEEK) +/- The passage is stored. To change the band, press (MODE) repeatedly. to the desired frequency (manual tuning). 11 repeatedly to fine adjust...
Operating Instructions
Page 12
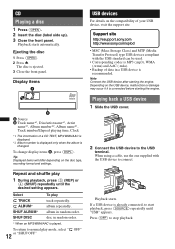
... Connect the USB device after starting the engine. Playing back a USB device 1 Slide the USB cover. disc in random order. If a USB device is played. To change display items B, press (DSPL). album repeatedly. Playback starts. A Source B Track name*1, Disc/artist name*1, Artist name*1, Album number*2, Album name*1, Track number/Elapsed playing time, Clock *1 The information of data in a USB device is changed. Press (OFF) to start playback, press (SOURCE) repeatedly until the desired setting appears. Select...
... Connect the USB device after starting the engine. Playing back a USB device 1 Slide the USB cover. disc in random order. If a USB device is played. To change display items B, press (DSPL). album repeatedly. Playback starts. A Source B Track name*1, Disc/artist name*1, Artist name*1, Album number*2, Album name*1, Track number/Elapsed playing time, Clock *1 The information of data in a USB device is changed. Press (OFF) to start playback, press (SOURCE) repeatedly until the desired setting appears. Select...
Operating Instructions
Page 13
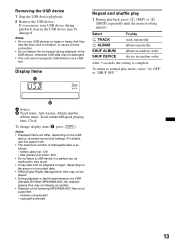
... (3) (REP) or (4) (SHUF) repeatedly until the desired setting appears. album in random order. copyright-protected 13 Notes • Do not use USB devices so large or heavy that they may be damaged. • This unit cannot recognize USB devices via a USB hub. To return to normal play mode, select " OFF" or "SHUF OFF. If you remove your USB device during playback of displayable data is complete.
... (3) (REP) or (4) (SHUF) repeatedly until the desired setting appears. album in random order. copyright-protected 13 Notes • Do not use USB devices so large or heavy that they may be damaged. • This unit cannot recognize USB devices via a USB hub. To return to normal play mode, select " OFF" or "SHUF OFF. If you remove your USB device during playback of displayable data is complete.
Operating Instructions
Page 14
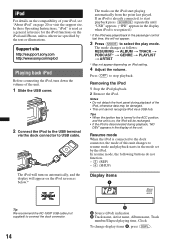
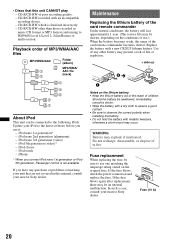
... USB terminal via a USB hub. Support site http://esupport.sony.com http://www.sony.com/xplod Playing back iPod Before connecting the iPod, turn on automatically, and the display will not appear. 3 Press (MODE) to resume mode and playback starts in the display of this will appear on the iPod screen as follows: RESUMING t ALBUM t TRACK t PODCAST* t GENRE t PLAYLIST t ARTIST * May not appear depending on iPod setting. 4 Adjust the volume. Resume mode...
... USB terminal via a USB hub. Support site http://esupport.sony.com http://www.sony.com/xplod Playing back iPod Before connecting the iPod, turn on automatically, and the display will not appear. 3 Press (MODE) to resume mode and playback starts in the display of this will appear on the iPod screen as follows: RESUMING t ALBUM t TRACK t PODCAST* t GENRE t PLAYLIST t ARTIST * May not appear depending on iPod setting. 4 Adjust the volume. Resume mode...
Operating Instructions
Page 15
... displayed correctly. device in random order. Operating an iPod directly - To change as follows: ALBUM t TRACK t PODCAST* t GENRE t PLAYLIST t ARTIST * May not appear depending on iPod setting. Then "MODE AUDIO" will change to the dock connector directly. 1 During playback, press and hold (MODE). Notes • The volume can operate an iPod connected to "RESUMING." Setting the play mode, select " OFF" or "SHUF OFF." The mode changes as follows: Track name t Artist name t Album name t MODE IPOD t Clock...
... displayed correctly. device in random order. Operating an iPod directly - To change as follows: ALBUM t TRACK t PODCAST* t GENRE t PLAYLIST t ARTIST * May not appear depending on iPod setting. Then "MODE AUDIO" will change to the dock connector directly. 1 During playback, press and hold (MODE). Notes • The volume can operate an iPod connected to "RESUMING." Setting the play mode, select " OFF" or "SHUF OFF." The mode changes as follows: Track name t Artist name t Album name t MODE IPOD t Clock...
Operating Instructions
Page 16
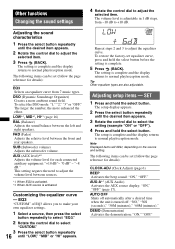
... select "CUSTOM." 3 Press the select button repeatedly 16 until the desired item appears. 2 Rotate the control dial to normal play/reception mode. The following items can be set equalizer curve, press and hold the select button before the setting is activated. DEMO (Demonstration) Activates the demonstration: "ON," "OFF." Note Displayed items will differ, depending on the source and setting. SUB (Subwoofer volume) Adjusts the subwoofer volume. This setting negates the need to +10 dB. AUX-A*1 (AUX Audio) Activates the AUX source display...
... select "CUSTOM." 3 Press the select button repeatedly 16 until the desired item appears. 2 Rotate the control dial to normal play/reception mode. The following items can be set equalizer curve, press and hold the select button before the setting is activated. DEMO (Demonstration) Activates the demonstration: "ON," "OFF." Note Displayed items will differ, depending on the source and setting. SUB (Subwoofer volume) Adjusts the subwoofer volume. This setting negates the need to +10 dB. AUX-A*1 (AUX Audio) Activates the AUX source display...
Operating Instructions
Page 17
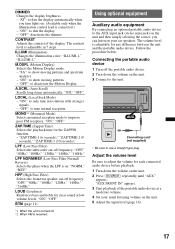
"ON": to only tune into stations with stronger signals. - ILLUMI (Illumination) Changes the illumination color: "ILLUMI-1," "ILLUMI-2." M.DSPL (Motion Display) Selects the Motion Display mode. - "ON": to dim the display. - Using optional equipment Auxiliary audio equipment By connecting an optional portable audio device to show moving patterns and spectrum analyzer. - The volume level is adjustable for clear sound at a moderate volume. 4 Set your car speakers. DIMMER Changes the display brightness. - "OFF": deactivate the dimmer. LPF NORM/REV (Low...
"ON": to only tune into stations with stronger signals. - ILLUMI (Illumination) Changes the illumination color: "ILLUMI-1," "ILLUMI-2." M.DSPL (Motion Display) Selects the Motion Display mode. - "ON": to dim the display. - Using optional equipment Auxiliary audio equipment By connecting an optional portable audio device to show moving patterns and spectrum analyzer. - The volume level is adjustable for clear sound at a moderate volume. 4 Set your car speakers. DIMMER Changes the display brightness. - "OFF": deactivate the dimmer. LPF NORM/REV (Low...

Operating Instructions
Page 19
... discs • The maximum number of: (CD-R/CD-RW only) - displayable characters for it is recognized as hot air ducts, nor leave it in a car parked in direct sunlight. • Power antenna (aerial) extends automatically. continue to next page t 19 Changing the operative direction The operative direction of the controls is factoryset as benzine, thinner, commercially available cleaners. • Discs that conform to the Compact Disc...
... discs • The maximum number of: (CD-R/CD-RW only) - displayable characters for it is recognized as hot air ducts, nor leave it in a car parked in direct sunlight. • Power antenna (aerial) extends automatically. continue to next page t 19 Changing the operative direction The operative direction of the controls is factoryset as benzine, thinner, commercially available cleaners. • Discs that conform to the Compact Disc...
Operating Instructions
Page 20
... in fire. Update your nearest Sony dealer. iPod 5th generation (video)* - CD-R/CD-RW recorded with a new CR2025 lithium battery. Playback order of any questions or problems concerning your unit that this manual, consult your nearest Sony dealer. WARNING Battery may present a risk of the card remote commander becomes shorter. iPod classic - • Discs that are not covered in this unit CANNOT play - CD-R/CD...
... in fire. Update your nearest Sony dealer. iPod 5th generation (video)* - CD-R/CD-RW recorded with a new CR2025 lithium battery. Playback order of any questions or problems concerning your unit that this manual, consult your nearest Sony dealer. WARNING Battery may present a risk of the card remote commander becomes shorter. iPod classic - • Discs that are not covered in this unit CANNOT play - CD-R/CD...
Operating Instructions
Page 21
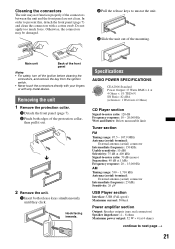
... Hz AM Tuning range: 530 - 1,710 kHz Antenna (aerial) terminal: External antenna (aerial) connector Intermediate frequency: 25 kHz Sensitivity: 26 µV USB Player section Interface: USB (Full-speed) Maximum current: 500mA Power amplifier section Output: Speaker outputs (sure seal connectors) Speaker impedance: 4 - 8 ohms Maximum power output: 52 W × 4 (at 4 ohms) continue to unseat the unit. 3 Slide the unit out of the mounting. x 2 Remove the unit. 1 Insert both edges of the front panel Notes...
... Hz AM Tuning range: 530 - 1,710 kHz Antenna (aerial) terminal: External antenna (aerial) connector Intermediate frequency: 25 kHz Sensitivity: 26 µV USB Player section Interface: USB (Full-speed) Maximum current: 500mA Power amplifier section Output: Speaker outputs (sure seal connectors) Speaker impedance: 4 - 8 ohms Maximum power output: 52 W × 4 (at 4 ohms) continue to unseat the unit. 3 Slide the unit out of the mounting. x 2 Remove the unit. 1 Insert both edges of the front panel Notes...
Operating Instructions
Page 22
... button has been pressed. General Outputs: Audio outputs terminal (front/rear) Subwoofer output terminal (mono) Power antenna (aerial) relay control terminal Power amplifier control terminal Inputs: Remote controller input terminal Antenna (aerial) input terminal Telephone ATT control terminal Illumination control terminal BUS control input terminal BUS audio input terminal AUX input jack (stereo mini jack) USB signal input terminal Tone controls: Low: ±10 dB at 60 Hz (XPLOD) Mid: ±10 dB at 1 kHz (XPLOD) High: ±10 dB at 10 kHz (XPLOD) Power requirements: 12 V DC car battery...
... button has been pressed. General Outputs: Audio outputs terminal (front/rear) Subwoofer output terminal (mono) Power antenna (aerial) relay control terminal Power amplifier control terminal Inputs: Remote controller input terminal Antenna (aerial) input terminal Telephone ATT control terminal Illumination control terminal BUS control input terminal BUS audio input terminal AUX input jack (stereo mini jack) USB signal input terminal Tone controls: Low: ±10 dB at 60 Hz (XPLOD) Mid: ±10 dB at 1 kHz (XPLOD) High: ±10 dB at 10 kHz (XPLOD) Power requirements: 12 V DC car battery...
Operating Instructions
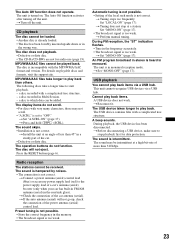
Page 23
... cannot play back than 45° in the memory. • The broadcast signal is intermittent. During playback, the USB device has been disconnected. The Auto Off function activates after turning off the unit. Press the RESET button (page 6). t Tuning does not stop playback first for audio use (page 19). t Set "MONO-OFF" (page 17). t Reconnect it. a disc to "OFF." Radio reception The stations cannot be added. t If the auto antenna...
... cannot play back than 45° in the memory. • The broadcast signal is intermittent. During playback, the USB device has been disconnected. The Auto Off function activates after turning off the unit. Press the RESET button (page 6). t Tuning does not stop playback first for audio use (page 19). t Set "MONO-OFF" (page 17). t Reconnect it. a disc to "OFF." Radio reception The stations cannot be added. t If the auto antenna...
Operating Instructions
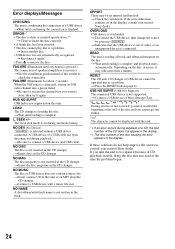
Page 24
... model to a problem. t Press the RESET button (page 6). If these solutions do not help improve the situation, consult your nearest Sony dealer. The local seek mode is dirty or inserted upside down.*2 t Clean or insert the disc correctly. • A blank disc has been inserted. • The disc cannot play due to remove the disc. t Insert the disc magazine in the display. t Connect a USB device with the unit. *1 If an error...
... model to a problem. t Press the RESET button (page 6). If these solutions do not help improve the situation, consult your nearest Sony dealer. The local seek mode is dirty or inserted upside down.*2 t Clean or insert the disc correctly. • A blank disc has been inserted. • The disc cannot play due to remove the disc. t Insert the disc magazine in the display. t Connect a USB device with the unit. *1 If an error...


