Operating Instructions
Page 3
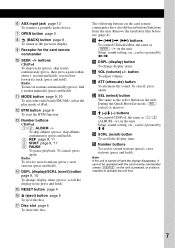
...automatically 9 iPod Playing back iPod 10 Playing tracks 10 Display items 10 Setting the play mode 11 Repeat and shuffle play 9 Radio Storing and receiving stations 9 Storing automatically - Table of Contents Welcome 4 Getting Started Resetting the unit 4 Preparing the card remote commander 4 Setting the clock ...4 Detaching the front panel 5 Attaching the front panel 5 Inserting the disc in the unit 5 Ejecting the disc 5 Location of MP3/WMA/AAC files (CD-R/RW 16 About MP3 files 16 About WMA files 16 About AAC files 16 About iPod 16 ...
...automatically 9 iPod Playing back iPod 10 Playing tracks 10 Display items 10 Setting the play mode 11 Repeat and shuffle play 9 Radio Storing and receiving stations 9 Storing automatically - Table of Contents Welcome 4 Getting Started Resetting the unit 4 Preparing the card remote commander 4 Setting the clock ...4 Detaching the front panel 5 Attaching the front panel 5 Inserting the disc in the unit 5 Ejecting the disc 5 Location of MP3/WMA/AAC files (CD-R/RW 16 About MP3 files 16 About WMA files 16 About AAC files 16 About iPod 16 ...
Operating Instructions
Page 7
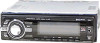
...second and hold ). The following buttons on the unit. wg Number buttons To receive stored stations (press); Q Disc slot page 5 To insert the disc. Remove the insulation film before use (page 4). qk buttons To control CD/radio/iPod, the same as the select button on the unit is pressed,...station manually (press and hold ); Setup, sound setting, etc., can be operated by < ,. K MODE button page 9, 10 To select the radio band (FM/AM); L BTM button page 9 To start the BTM function. store stations (press and hold). ql DSPL (display) button To change display items (press); ...
...second and hold ). The following buttons on the unit. wg Number buttons To receive stored stations (press); Q Disc slot page 5 To insert the disc. Remove the insulation film before use (page 4). qk buttons To control CD/radio/iPod, the same as the select button on the unit is pressed,...station manually (press and hold ); Setup, sound setting, etc., can be operated by < ,. K MODE button page 9, 10 To select the radio band (FM/AM); L BTM button page 9 To start the BTM function. store stations (press and hold). ql DSPL (display) button To change display items (press); ...

Operating Instructions
Page 9
... repeatedly. A beep sounds when the setting is played. Receiving the stored stations 1 Select the band, then press a number button ((1) to search for the station. For details on the disc type, recording format and settings. disc in random order. Tuning automatically 1 Select the band, ...(6)) until the desired station is changed. CD Display items A Source B Track number/Elapsed playing time, Disc/ artist name, Album number*, Album name, Track name, Text information, Clock * Album number is displayed only when the album is received. BTM 1 Press (SOURCE) repeatedly until...
... repeatedly. A beep sounds when the setting is played. Receiving the stored stations 1 Select the band, then press a number button ((1) to search for the station. For details on the disc type, recording format and settings. disc in random order. Tuning automatically 1 Select the band, ...(6)) until the desired station is changed. CD Display items A Source B Track number/Elapsed playing time, Disc/ artist name, Album number*, Album name, Track name, Text information, Clock * Album number is displayed only when the album is received. BTM 1 Press (SOURCE) repeatedly until...

Operating Instructions
Page 14
... change display items. To decrease If you need to mount the rotary commander on the right hand side of the controls is inactive. • PRESET/DISC control CD/iPod: The same as (1)/(2) (ALBUM -/+) on the unit (push in and rotate). • VOL (volume) control The same as the control... DISC MODE SOURCE OFF DSPL VOL SEEK/AMS OFF The following controls on this unit. To cancel, press again. • SEL (select) button The same as those on the rotary commander require a different operation from the unit. • ATT (attenuate) button To attenuate the sound. Radio: To receive stored...
... change display items. To decrease If you need to mount the rotary commander on the right hand side of the controls is inactive. • PRESET/DISC control CD/iPod: The same as (1)/(2) (ALBUM -/+) on the unit (push in and rotate). • VOL (volume) control The same as the control... DISC MODE SOURCE OFF DSPL VOL SEEK/AMS OFF The following controls on this unit. To cancel, press again. • SEL (select) button The same as those on the rotary commander require a different operation from the unit. • ATT (attenuate) button To attenuate the sound. Radio: To receive stored...
Operating Instructions
Page 20
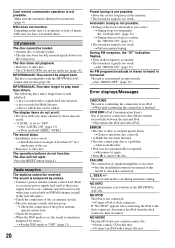
...this unit. t See the installation/connections manual of the car. • Defective or dirty disc. NO MUSIC The disc/iPod does not contain a music file. MP3/WMA/AAC files cannot be received. a disc to incorrect connection, data did not transfer successfully between the unit and iPod. t Set "A..... An FM program broadcast in the MP3/WMA/ AAC file. t Insert another disc. • iPod was not automatically recognized. L. If "NO IPOD" appears after connecting the iPod to dock connector. The disc does not playback. • Defective or dirty disc. • The CD-Rs/CD-RWs are...
...this unit. t See the installation/connections manual of the car. • Defective or dirty disc. NO MUSIC The disc/iPod does not contain a music file. MP3/WMA/AAC files cannot be received. a disc to incorrect connection, data did not transfer successfully between the unit and iPod. t Set "A..... An FM program broadcast in the MP3/WMA/ AAC file. t Insert another disc. • iPod was not automatically recognized. L. If "NO IPOD" appears after connecting the iPod to dock connector. The disc does not playback. • Defective or dirty disc. • The CD-Rs/CD-RWs are...

