
Limited Warranty (U.S. Only)
Page 1
... its original packaging or packaging affording an equal degree of product ("Parts Warranty"), Sony will , at its option, (i) repair the product using new or refurbished parts or (ii) replace the product with the Product for any enclosed software Limited Warranty. Some states do so for the time periods and as fuses or batteries). Printed in material or workmanship for the...
... its original packaging or packaging affording an equal degree of product ("Parts Warranty"), Sony will , at its option, (i) repair the product using new or refurbished parts or (ii) replace the product with the Product for any enclosed software Limited Warranty. Some states do so for the time periods and as fuses or batteries). Printed in material or workmanship for the...

Operating Instructions
Page 1
CDX-GT62IPW Serial No. Para cancelar la pantalla de demostración (DEMO), consulte la página 13. Record the serial number in the space provided below. Model No. CDX-GT62IPW © 2008 Sony Corporation 3-285-539-41 (1) FM/AM Compact Disc Player Operating Instructions US Manual de instrucciones ES Owner's Record The model and serial numbers are located on the bottom of the unit. Refer to these numbers whenever you call upon your Sony dealer regarding this product. To cancel the demonstration (DEMO) display, see page 12.
CDX-GT62IPW Serial No. Para cancelar la pantalla de demostración (DEMO), consulte la página 13. Record the serial number in the space provided below. Model No. CDX-GT62IPW © 2008 Sony Corporation 3-285-539-41 (1) FM/AM Compact Disc Player Operating Instructions US Manual de instrucciones ES Owner's Record The model and serial numbers are located on the bottom of the unit. Refer to these numbers whenever you call upon your Sony dealer regarding this product. To cancel the demonstration (DEMO) display, see page 12.
Operating Instructions
Page 2
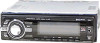
... protection against harmful interference in the set the Auto Off function, press and hold (OFF) until the display disappears each time you do not set time after the unit is connected. - Consult the dealer or an experienced radio/TV technician for a Class B digital device, pursuant to operate this equipment. You are designed to radio or television reception, which prevents battery drain. Reorient or relocate the receiving antenna...
... protection against harmful interference in the set the Auto Off function, press and hold (OFF) until the display disappears each time you do not set time after the unit is connected. - Consult the dealer or an experienced radio/TV technician for a Class B digital device, pursuant to operate this equipment. You are designed to radio or television reception, which prevents battery drain. Reorient or relocate the receiving antenna...
Operating Instructions
Page 3
... remote commander 4 Setting the clock 4 Detaching the front panel 5 Attaching the front panel 5 Inserting the disc in the unit 5 Ejecting the disc 5 Location of MP3/WMA/AAC files (CD-R/RW 16 About MP3 files 16 About WMA files 16 About AAC files 16 About iPod 16 Maintenance 17 Removing the unit 18 Specifications 18 Troubleshooting 19 Error displays/Messages 20 3 BTM 9 Storing manually 9 Receiving the stored stations 9 Tuning automatically 9 iPod Playing back iPod 10 Playing...
... remote commander 4 Setting the clock 4 Detaching the front panel 5 Attaching the front panel 5 Inserting the disc in the unit 5 Ejecting the disc 5 Location of MP3/WMA/AAC files (CD-R/RW 16 About MP3 files 16 About WMA files 16 About AAC files 16 About iPod 16 Maintenance 17 Removing the unit 18 Specifications 18 Troubleshooting 19 Error displays/Messages 20 3 BTM 9 Storing manually 9 Receiving the stored stations 9 Tuning automatically 9 iPod Playing back iPod 10 Playing...

Operating Instructions
Page 4
... remote commander Before using virtual speaker synthesis, to enhance the sound of speakers, even if they are installed low in a CD, or iPod connected to this Sony Compact Disc Player. The setup display appears. 2 Press the select button repeatedly until "CLOCK-ADJ" appears. 3 Press (SEEK) +. Detach the front panel and press the RESET button with the following functions. • CD playback You can choose any one of a portable audio device. 4 RESET button Note Pressing the RESET button...
... remote commander Before using virtual speaker synthesis, to enhance the sound of speakers, even if they are installed low in a CD, or iPod connected to this Sony Compact Disc Player. The setup display appears. 2 Press the select button repeatedly until "CLOCK-ADJ" appears. 3 Press (SEEK) +. Detach the front panel and press the RESET button with the following functions. • CD playback You can choose any one of a portable audio device. 4 RESET button Note Pressing the RESET button...
Operating Instructions
Page 6
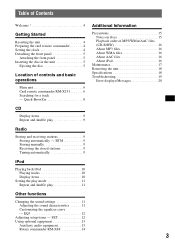
... qa wd wf 1 2 3 4 5 6 wg w; + VOL - 6 This section contains instructions on page 10. For iPod operation, see the respective pages. The corresponding buttons on the card remote commander control the same functions as those on ; D SOURCE button To power on the unit. stop the source. change the source (Radio/CD/ iPod/AUX). A OFF button To power off; B (BROWSE) button page 8 To enter the Quick-BrowZer mode. C Control dial/select button page 8, 11 To adjust volume (rotate); E Display window
... qa wd wf 1 2 3 4 5 6 wg w; + VOL - 6 This section contains instructions on page 10. For iPod operation, see the respective pages. The corresponding buttons on the card remote commander control the same functions as those on ; D SOURCE button To power on the unit. stop the source. change the source (Radio/CD/ iPod/AUX). A OFF button To power off; B (BROWSE) button page 8 To enter the Quick-BrowZer mode. C Control dial/select button page 8, 11 To adjust volume (rotate); E Display window
Operating Instructions
Page 7
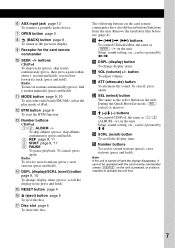
... ). O RESET button page 4 P Z (eject) button page 5 To eject the disc. qk buttons To control CD/radio/iPod, the same as the select button on the unit. Setup, sound setting, etc., can be operated with the card remote commander unless (SOURCE) on the unit. VOL (volume) +/- wa ATT (attenuate) button To attenuate the sound. ws SEL (select) button The same as (SEEK) -/+ on the unit is pressed, or a disc is inserted to the previous display. F AUX input jack page 13 To connect a portable audio device...
... ). O RESET button page 4 P Z (eject) button page 5 To eject the disc. qk buttons To control CD/radio/iPod, the same as the select button on the unit. Setup, sound setting, etc., can be operated with the card remote commander unless (SOURCE) on the unit. VOL (volume) +/- wa ATT (attenuate) button To attenuate the sound. ws SEL (select) button The same as (SEEK) -/+ on the unit is pressed, or a disc is inserted to the previous display. F AUX input jack page 13 To connect a portable audio device...

Operating Instructions
Page 9
... and settings. album in stations while driving, use Best Tuning Memory (BTM) to (6)). album repeatedly. Radio Storing and receiving stations Caution When tuning in random order. CD Display items A Source B Track number/Elapsed playing time, Disc/ artist name, Album number*, Album name, Track name, Text information, Clock * Album number is displayed only when the album is received. For details on the same number button, the previously stored station will differ, depending on the number buttons. Tuning automatically 1 Select...
... and settings. album in stations while driving, use Best Tuning Memory (BTM) to (6)). album repeatedly. Radio Storing and receiving stations Caution When tuning in random order. CD Display items A Source B Track number/Elapsed playing time, Disc/ artist name, Album number*, Album name, Track name, Text information, Clock * Album number is displayed only when the album is received. For details on the same number button, the previously stored station will differ, depending on the number buttons. Tuning automatically 1 Select...

Operating Instructions
Page 10
... select the play mode. • When the ignition key is connected to the dock connector, the mode changes to the dock connector. A Source (iPod) indication B Track/Album/Podcast/Artist/Playlist/Genre number, Track/Artist/Album name, Elapsed playing time, Clock To change the play mode. Note Some letters stored in the display of the unit. Playing tracks Tips • When the iPod is turned to stop playback. 10 The iPod will turn down the volume...
... select the play mode. • When the ignition key is connected to the dock connector, the mode changes to the dock connector. A Source (iPod) indication B Track/Album/Podcast/Artist/Playlist/Genre number, Track/Artist/Album name, Elapsed playing time, Clock To change the play mode. Note Some letters stored in the display of the unit. Playing tracks Tips • When the iPod is turned to stop playback. 10 The iPod will turn down the volume...

Operating Instructions
Page 11
... speakers: "RIGHT-10" - "0 dB" (z) - "-8 dB" *1 When tuner is selected as follows: Album Mode t Track Mode t Podcast Mode* t Genre Mode t Playlist Mode t Artist Mode * May not appear depending on iPod setting. The mode changes as the source, the default setting is "OFF." *2 When EQ3 is activated. *3 When the audio output is activated. 11 artist repeatedly. artist in random order. " Note If (4)(SHUF) is displayed at the lowest setting.) AUX*4 (AUX level) To adjust the volume level for each connected auxiliary...
... speakers: "RIGHT-10" - "0 dB" (z) - "-8 dB" *1 When tuner is selected as follows: Album Mode t Track Mode t Podcast Mode* t Genre Mode t Playlist Mode t Artist Mode * May not appear depending on iPod setting. The mode changes as the source, the default setting is "OFF." *2 When EQ3 is activated. *3 When the audio output is activated. 11 artist repeatedly. artist in random order. " Note If (4)(SHUF) is displayed at the lowest setting.) AUX*4 (AUX level) To adjust the volume level for each connected auxiliary...

Operating Instructions
Page 12
...." A.OFF (Auto Off) To shut off automatically after a desired time when the unit is adjustable in 7 steps. "SUB-OUT" (z): to output to adjust the equalizer curve. CONTRAST To adjust the contrast of the display. - The volume level is turned off. - Tip Other equalizer types are also adjustable. AUX-A*1 (AUX Audio) To turn lights on the source and setting. The setup is complete and the display returns to normal play /reception mode. Repeat steps 3 and 4 to a subwoofer. - Adjusting setup items...
...." A.OFF (Auto Off) To shut off automatically after a desired time when the unit is adjustable in 7 steps. "SUB-OUT" (z): to output to adjust the equalizer curve. CONTRAST To adjust the contrast of the display. - The volume level is turned off. - Tip Other equalizer types are also adjustable. AUX-A*1 (AUX Audio) To turn lights on the source and setting. The setup is complete and the display returns to normal play /reception mode. Repeat steps 3 and 4 to a subwoofer. - Adjusting setup items...

Operating Instructions
Page 13
... volume. 4 Set your car speakers. LOUD (Loudness) To allow you can listen on your usual listening volume on the unit. 2 Press (SOURCE) repeatedly until "AUX" appears. The volume level is adjustable for each connected audio device before playback. 1 Turn down the volume on the unit. 5 Adjust the input level (page 11). 13 "LOCAL-ON" : to reinforce bass and treble. - "LOUD-ON" : to only tune into stations with stronger signals. - Using optional equipment Auxiliary audio equipment By connecting an...
... volume. 4 Set your car speakers. LOUD (Loudness) To allow you can listen on your usual listening volume on the unit. 2 Press (SOURCE) repeatedly until "AUX" appears. The volume level is adjustable for each connected audio device before playback. 1 Turn down the volume on the unit. 5 Adjust the input level (page 11). 13 "LOCAL-ON" : to reinforce bass and treble. - "LOUD-ON" : to only tune into stations with stronger signals. - Using optional equipment Auxiliary audio equipment By connecting an...

Operating Instructions
Page 14
... you need to mount the rotary commander on the right hand side of the steering column, you mount the rotary commander. To increase SEL MODE DSPL DSPL MODE SEL Location of the controls is inactive. • PRESET/DISC control CD/iPod: The same as the select button on the rotary commander require a different operation from the unit. • ATT (attenuate) button To attenuate the sound. Changing the operative direction The operative direction of controls...
... you need to mount the rotary commander on the right hand side of the steering column, you mount the rotary commander. To increase SEL MODE DSPL DSPL MODE SEL Location of the controls is inactive. • PRESET/DISC control CD/iPod: The same as the select button on the rotary commander require a different operation from the unit. • ATT (attenuate) button To attenuate the sound. Changing the operative direction The operative direction of controls...

Operating Instructions
Page 15
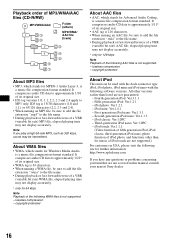
...music discs encoded with a commercially available cleaning cloth. However, since the audio material side does not conform to the CD standard and may damage the unit. Handle the disc by this unit. Attempting to heat/high temperature. To maintain high sound quality Be careful not to the Compact Disc... disc is recorded in direct sunlight, allow the unit to a label or sticker peeling off before operating it. • Power antenna (aerial) will not operate properly. Wipe each disc from using such discs: - Do not use discs with copyright protection technologies This product is played....
...music discs encoded with a commercially available cleaning cloth. However, since the audio material side does not conform to the CD standard and may damage the unit. Handle the disc by this unit. Attempting to heat/high temperature. To maintain high sound quality Be careful not to the Compact Disc... disc is recorded in direct sunlight, allow the unit to a label or sticker peeling off before operating it. • Power antenna (aerial) will not operate properly. Wipe each disc from using such discs: - Do not use discs with copyright protection technologies This product is played....
Operating Instructions
Page 16
... stands for Advanced Audio Coding, is a music file compression format standard. lossless compression - First-generation iPod nano: Ver.1.3.1 - Note If you have any questions or problems concerning your nearest Sony dealer. 16 copyright-protected About iPod This unit can be used with the dock connector type iPod, iPod photo, iPod mini and iPod nano with the following AAC files is not supported. - Third-generation iPod nano: Ver...
... stands for Advanced Audio Coding, is a music file compression format standard. lossless compression - First-generation iPod nano: Ver.1.3.1 - Note If you have any questions or problems concerning your nearest Sony dealer. 16 copyright-protected About iPod This unit can be used with the dock connector type iPod, iPod photo, iPod mini and iPod nano with the following AAC files is not supported. - Third-generation iPod nano: Ver...
Operating Instructions
Page 17
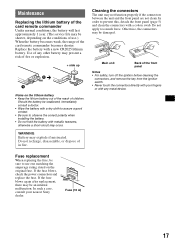
... sure to use .) When the battery becomes weak, the range of the card remote commander becomes shorter. Cleaning the connectors The unit may explode if mistreated. If the fuse blows, check the power connection and replace the fuse. If the fuse blows again after replacement, there may be damaged. Fuse (10 A) 17 Main unit Back of the front panel Notes • For safety, turn off the...
... sure to use .) When the battery becomes weak, the range of the card remote commander becomes shorter. Cleaning the connectors The unit may explode if mistreated. If the fuse blows, check the power connection and replace the fuse. If the fuse blows again after replacement, there may be damaged. Fuse (10 A) 17 Main unit Back of the front panel Notes • For safety, turn off the...

Operating Instructions
Page 18
... distortion. x 2 Remove the unit. 1 Insert both edges of the mounting. Specifications AUDIO POWER SPECIFICATIONS POWER OUTPUT AND TOTAL HARMONIC DISTORTION 23.2 watts per channel minimum continuous average power into 4 Ohms) CD Player section Signal-to-noise ratio: 120 dB Frequency response: 10 - 20,000 Hz Wow and flutter: Below measurable limit Tuner section FM Tuning range: 87.5 - 107.9 MHz Antenna (aerial) terminal: External antenna (aerial) connector Intermediate frequency: 10.7 MHz...
... distortion. x 2 Remove the unit. 1 Insert both edges of the mounting. Specifications AUDIO POWER SPECIFICATIONS POWER OUTPUT AND TOTAL HARMONIC DISTORTION 23.2 watts per channel minimum continuous average power into 4 Ohms) CD Player section Signal-to-noise ratio: 120 dB Frequency response: 10 - 20,000 Hz Wow and flutter: Below measurable limit Tuner section FM Tuning range: 87.5 - 107.9 MHz Antenna (aerial) terminal: External antenna (aerial) connector Intermediate frequency: 10.7 MHz...

Operating Instructions
Page 19
...not connected properly. Stored stations and correct time are dirty (page 17). The leads are not using the built-in the display window. • The dimmer is set , demonstration mode starts. The display disappears from paper. t Turn off the unit. General Output: Audio outputs terminal (front, sub/rear switchable) Power antenna (aerial) relay control terminal Power amplifier control terminal Inputs: Telephone ATT control terminal Remote controller input terminal Antenna (aerial) input terminal AUX input jack (stereo mini jack) iPod signal input terminal (dock connector) Tone controls: Low...
...not connected properly. Stored stations and correct time are dirty (page 17). The leads are not using the built-in the display window. • The dimmer is set , demonstration mode starts. The display disappears from paper. t Turn off the unit. General Output: Audio outputs terminal (front, sub/rear switchable) Power antenna (aerial) relay control terminal Power amplifier control terminal Inputs: Telephone ATT control terminal Remote controller input terminal Antenna (aerial) input terminal AUX input jack (stereo mini jack) iPod signal input terminal (dock connector) Tone controls: Low...
Operating Instructions
Page 20
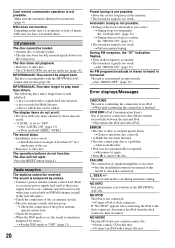
... iPod to dock connector. Depending on , the sound is dirty or inserted upside down or in a sturdy part of the car antenna (aerial). • The auto antenna (aerial) will not eject. a disc recorded with a music file in stereo is too weak. Radio reception The stations cannot be played back. t Perform manual tuning. t Reconnect it . MP3/WMA/AAC files cannot be received. t Tuning stops too frequently: Set "LOCAL-ON" (page 13). t Install...
... iPod to dock connector. Depending on , the sound is dirty or inserted upside down or in a sturdy part of the car antenna (aerial). • The auto antenna (aerial) will not eject. a disc recorded with a music file in stereo is too weak. Radio reception The stations cannot be played back. t Perform manual tuning. t Reconnect it . MP3/WMA/AAC files cannot be received. t Tuning stops too frequently: Set "LOCAL-ON" (page 13). t Install...

Operating Instructions
Page 21
... connected. • iPod connection was used at the time the problem began. 21 READ The unit is reading all track and album information on the disc/iPod structure, it may be repaired because of the disc and you take more than a minute. NO NAME A disc/album/track name is not written in the display, consult your nearest Sony dealer. If these solutions do not help...
... connected. • iPod connection was used at the time the problem began. 21 READ The unit is reading all track and album information on the disc/iPod structure, it may be repaired because of the disc and you take more than a minute. NO NAME A disc/album/track name is not written in the display, consult your nearest Sony dealer. If these solutions do not help...


