
Operating Instructions
Page 1
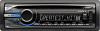
Record these numbers whenever you call upon your Sony dealer regarding this product. Refer to these numbers in the space provided below. Model No. CDX-GT550UI CDX-GT55UIW ©2010 Sony Corporation To cancel the demonstration (DEMO) display, see page 6. 4-198-109-11(1) FM/AM Compact Disc Player Operating Instructions US Manual de instrucciones ES Owner's Record The model and serial numbers are located on the bottom of the unit. Serial No. Para cancelar la pantalla de demostración (DEMO), consulte la página 6.
Record these numbers whenever you call upon your Sony dealer regarding this product. Refer to these numbers in the space provided below. Model No. CDX-GT550UI CDX-GT55UIW ©2010 Sony Corporation To cancel the demonstration (DEMO) display, see page 6. 4-198-109-11(1) FM/AM Compact Disc Player Operating Instructions US Manual de instrucciones ES Owner's Record The model and serial numbers are located on the bottom of the unit. Serial No. Para cancelar la pantalla de demostración (DEMO), consulte la página 6.
Operating Instructions
Page 2
.... iPhone, iPod, iPod classic, iPod nano, and iPod touch are designed to provide reasonable protection against harmful interference in the U.S. Use or distribution of such technology outside of the car for help. These limits are trademarks of Microsoft Corporation in this manual could void your nearest authorized Sony dealer for a Class B digital device, pursuant to Part 15 of optical instruments with the instructions, may...
.... iPhone, iPod, iPod classic, iPod nano, and iPod touch are designed to provide reasonable protection against harmful interference in the U.S. Use or distribution of such technology outside of the car for help. These limits are trademarks of Microsoft Corporation in this manual could void your nearest authorized Sony dealer for a Class B digital device, pursuant to Part 15 of optical instruments with the instructions, may...
Operating Instructions
Page 4
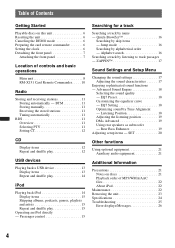
... this unit 6 Resetting the unit 6 Canceling the DEMO mode 6 Preparing the card remote commander 6 Setting the clock 6 Detaching the front panel 7 Attaching the front panel 7 Location of MP3/WMA/AAC files 22 About iPod 22 Maintenance 22 Removing the unit 23 Specifications 24 Troubleshooting 25 Error displays/Messages 26 4 BTM 11 Storing manually 11 Receiving the stored stations 11 Tuning automatically 11 RDS 11 Overview 11 Selecting PTY 11 Setting CT 12 CD Display items...
... this unit 6 Resetting the unit 6 Canceling the DEMO mode 6 Preparing the card remote commander 6 Setting the clock 6 Detaching the front panel 7 Attaching the front panel 7 Location of MP3/WMA/AAC files 22 About iPod 22 Maintenance 22 Removing the unit 23 Specifications 24 Troubleshooting 25 Error displays/Messages 26 4 BTM 11 Storing manually 11 Receiving the stored stations 11 Tuning automatically 11 RDS 11 Overview 11 Selecting PTY 11 Setting CT 12 CD Display items...
Operating Instructions
Page 6
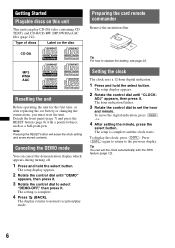
... clock setting and some stored contents. Canceling the DEMO mode You can cancel the demonstration display which appears during turning off. 1 Press and hold the select button. MP3 WMA AAC Resetting the unit Before operating the unit for the first time, or after replacing the car battery or changing the connections, you must reset the unit. The setup is complete. 4 Press (BACK). Getting Started Playable discs on the disc Preparing the card remote commander Remove...
... clock setting and some stored contents. Canceling the DEMO mode You can cancel the demonstration display which appears during turning off. 1 Press and hold the select button. MP3 WMA AAC Resetting the unit Before operating the unit for the first time, or after replacing the car battery or changing the connections, you must reset the unit. The setup is complete. 4 Press (BACK). Getting Started Playable discs on the disc Preparing the card remote commander Remove...
Operating Instructions
Page 8
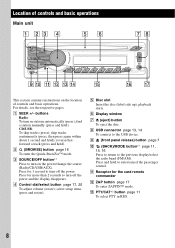
... the card remote commander L ZAP button page 17 To enter ZAPPIN™ mode. D Control dial/select button page 17, 20 To adjust volume (rotate); F Display window G Z (eject) button To eject the disc. H USB connector page 13, 14 To connect to the previous display/select the radio band (FM/AM). reverse/fastforward a track (press and hold to turn on the location of controls and basic operations Main unit This section contains instructions on the power/change the source (Radio/CD/USB/AUX). Press...
... the card remote commander L ZAP button page 17 To enter ZAPPIN™ mode. D Control dial/select button page 17, 20 To adjust volume (rotate); F Display window G Z (eject) button To eject the disc. H USB connector page 13, 14 To connect to the previous display/select the radio band (FM/AM). reverse/fastforward a track (press and hold to turn on the location of controls and basic operations Main unit This section contains instructions on the power/change the source (Radio/CD/USB/AUX). Press...
Operating Instructions
Page 9
... the unit is turned off and the display disappears, it cannot be operated with the card remote commander unless (SOURCE/OFF) on the unit is pressed, or a disc is connected. *3 This button has a tactile dot. Notes • When ejecting/inserting a disc, keep any USB devices disconnected to avoid damage to activate the unit first. 9 Q AUX input jack page 21 To connect a portable audio device. *1 If an HD Radio tuner or SAT tuner is connected: when (SOURCE...
... the unit is turned off and the display disappears, it cannot be operated with the card remote commander unless (SOURCE/OFF) on the unit is pressed, or a disc is connected. *3 This button has a tactile dot. Notes • When ejecting/inserting a disc, keep any USB devices disconnected to avoid damage to activate the unit first. 9 Q AUX input jack page 21 To connect a portable audio device. *1 If an HD Radio tuner or SAT tuner is connected: when (SOURCE...
Operating Instructions
Page 10
... unit. Furthermore, if (MODE) is pressed, the connected device ("HD," "XM" or "SR") will appear in the display. Setup, sound setting, etc., can be operated by < ,. D DSPL (display) button To change the source (Radio/CD/USB/AUX). button To adjust volume. To cancel, press again. store stations (press and hold to select the radio band (FM/AM). F ATT (attenuate) button To attenuate the sound. DSPL SCRL 6 7 8 9 q; 1 2 3 4 5 6 qa 5 + VOL - J SCRL (scroll) button To scroll the display item. K Number buttons To receive stored stations...
... unit. Furthermore, if (MODE) is pressed, the connected device ("HD," "XM" or "SR") will appear in the display. Setup, sound setting, etc., can be operated by < ,. D DSPL (display) button To change the source (Radio/CD/USB/AUX). button To adjust volume. To cancel, press again. store stations (press and hold to select the radio band (FM/AM). F ATT (attenuate) button To attenuate the sound. DSPL SCRL 6 7 8 9 q; 1 2 3 4 5 6 qa 5 + VOL - J SCRL (scroll) button To scroll the display item. K Number buttons To receive stored stations...
Operating Instructions
Page 11
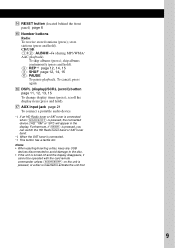
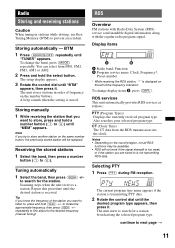
... a number button ((1) to the desired frequency (manual tuning). repeatedly to fine adjust to (6)). You can select from the RDS transmission sets the clock. Tuning automatically 1 Select the band, then press (SEEK) +/- Scanning stops when the unit receives a station. to next page t 11 Storing manually 1 While receiving the station that you are tuned to (6)) until "BTM" appears, then press it . continue to locate the approximate frequency, then press (SEEK) +/- The setup display appears...
... a number button ((1) to the desired frequency (manual tuning). repeatedly to fine adjust to (6)). You can select from the RDS transmission sets the clock. Tuning automatically 1 Select the band, then press (SEEK) +/- Scanning stops when the unit receives a station. to next page t 11 Storing manually 1 While receiving the station that you are tuned to (6)) until "BTM" appears, then press it . continue to locate the approximate frequency, then press (SEEK) +/- The setup display appears...
Operating Instructions
Page 13
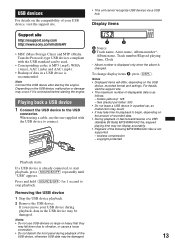
... and settings. For details, visit the support site. • The maximum number of displayable data is already connected, to the USB connector. Removing the USB device 1 Stop the USB device playback. 2 Remove the USB device. Notes • Displayed items will differ, depending on the amount of recorded data. • During playback or fast-forward/reverse of a VBR (Variable Bit Rate) MP3/WMA/AAC file, elapsed playing time may...
... and settings. For details, visit the support site. • The maximum number of displayable data is already connected, to the USB connector. Removing the USB device 1 Stop the USB device playback. 2 Remove the USB device. Notes • Displayed items will differ, depending on the amount of recorded data. • During playback or fast-forward/reverse of a VBR (Variable Bit Rate) MP3/WMA/AAC file, elapsed playing time may...
Operating Instructions
Page 14
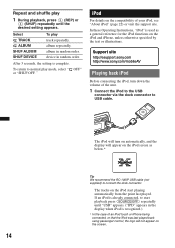
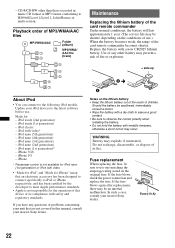
... iPod and iPhone, unless otherwise specified by the text or illustrations. Support site http://esupport.sony.com http://www.sony.com/mobileAV Playing back iPod Before connecting the iPod, turn on automatically, and the display will not appear on the screen. 14 device in random order. After 3 seconds, the setting is complete. " iPod For details on the compatibility of the unit. 1 Connect the iPod to the USB connector via the dock connector...
... iPod and iPhone, unless otherwise specified by the text or illustrations. Support site http://esupport.sony.com http://www.sony.com/mobileAV Playing back iPod Before connecting the iPod, turn on automatically, and the display will not appear on the screen. 14 device in random order. After 3 seconds, the setting is complete. " iPod For details on the compatibility of the unit. 1 Connect the iPod to the USB connector via the dock connector...
Operating Instructions
Page 15
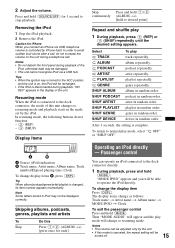
... not function. - (3) (REP) - (4) (SHUF) Display items A Source (iPod) indication B Track name, Artist name, Album name, Track number/Elapsed playing time, Clock To change to the ACC position, and the unit is canceled, the repeat setting will change display items B, press (DSPL). playlist repeatedly. Operating an iPod directly - Then "MODE AUDIO" will appear and the play mode, select " OFF" or "SHUF OFF." Tips • When the ignition key is turned to resuming mode. Note...
... not function. - (3) (REP) - (4) (SHUF) Display items A Source (iPod) indication B Track name, Artist name, Album name, Track number/Elapsed playing time, Clock To change to the ACC position, and the unit is canceled, the repeat setting will change display items B, press (DSPL). playlist repeatedly. Operating an iPod directly - Then "MODE AUDIO" will appear and the play mode, select " OFF" or "SHUF OFF." Tips • When the ignition key is turned to resuming mode. Note...
Operating Instructions
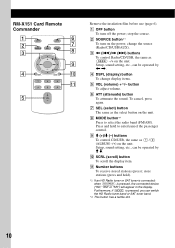
Page 17
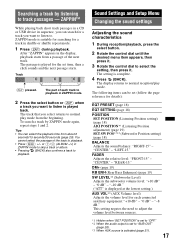
...) RB ENH (Rear Bass Enhancer) (page 19) SW LEVEL*2 (Subwoofer Level) Adjusts the subwoofer volume level: "+10 dB" - "0 dB" - Sound Settings and Setup Menu Changing the sound settings Adjusting the sound characteristics 1 During reception/playback, press the select button. 2 Rotate the control dial until the desired menu item appears, then press it . "CENTER" - Track (ZAP) pressed. To search a track by listening to "SUB-OUT" (page 20). *3 When AUX source is set time, then a click sounds and the next...
...) RB ENH (Rear Bass Enhancer) (page 19) SW LEVEL*2 (Subwoofer Level) Adjusts the subwoofer volume level: "+10 dB" - "0 dB" - Sound Settings and Setup Menu Changing the sound settings Adjusting the sound characteristics 1 During reception/playback, press the select button. 2 Rotate the control dial until the desired menu item appears, then press it . "CENTER" - Track (ZAP) pressed. To search a track by listening to "SUB-OUT" (page 20). *3 When AUX source is set time, then a click sounds and the next...
Operating Instructions
Page 18
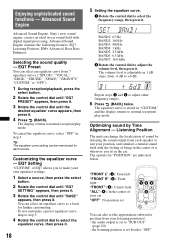
... equalizer curve. 1 Rotate the control dial to normal reception/play mode. The equalizer curve is set to adjust other frequency ranges. 6 Press (BACK) twice. Selecting the sound quality - The display returns to select the frequency range, then press it . Advanced Sound Engine Advanced Sound Engine, Sony's new sound engine, creates an ideal in "CUSTOM," and the display returns to adjust the volume level, then press it . Customizing the equalizer curve - Enjoying sophisticated sound functions...
... equalizer curve. 1 Rotate the control dial to normal reception/play mode. The equalizer curve is set to adjust other frequency ranges. 6 Press (BACK) twice. Selecting the sound quality - The display returns to select the frequency range, then press it . Advanced Sound Engine Advanced Sound Engine, Sony's new sound engine, creates an ideal in "CUSTOM," and the display returns to adjust the volume level, then press it . Customizing the equalizer curve - Enjoying sophisticated sound functions...

Operating Instructions
Page 19
... adjust the listening position, then press it . 3 Rotate the control dial to normal reception/play mode. The display returns to select from "NEAR," "NORMAL" or "FAR," then press it. 5 Press (BACK). Using rear speakers as a subwoofer if one is not connected. 1 During reception/playback, press the select button. 2 Rotate the control dial until "ADJ POSITION" appears, then press it . This function allows the rear speakers to work as subwoofer...
... adjust the listening position, then press it . 3 Rotate the control dial to normal reception/play mode. The display returns to select from "NEAR," "NORMAL" or "FAR," then press it. 5 Press (BACK). Using rear speakers as a subwoofer if one is not connected. 1 During reception/playback, press the select button. 2 Rotate the control dial until "ADJ POSITION" appears, then press it . This function allows the rear speakers to work as subwoofer...

Operating Instructions
Page 20
... FREQ is set to only tune into stations with stronger signals. - BEEP Activates the beep sound: "ON," "OFF." REAR/SUB*1 Switches the audio output: "SUB-OUT" (subwoofer), "REAR-OUT" (power amplifier). ZAP BEEP (Zappin Beep) Has the beep sound between track passages: "ON," "OFF." LPF SLOP*3 (Low Pass Filter Slope) Selects the LPF slope: "1," "2," "3." LOUDNESS (Dynamic Loudness) Reinforces bass and treble for details): CLOCK-ADJ (Clock Adjust) (page 6) CT (Clock Time) Activates the CT function: "ON...
... FREQ is set to only tune into stations with stronger signals. - BEEP Activates the beep sound: "ON," "OFF." REAR/SUB*1 Switches the audio output: "SUB-OUT" (subwoofer), "REAR-OUT" (power amplifier). ZAP BEEP (Zappin Beep) Has the beep sound between track passages: "ON," "OFF." LPF SLOP*3 (Low Pass Filter Slope) Selects the LPF slope: "1," "2," "3." LOUDNESS (Dynamic Loudness) Reinforces bass and treble for details): CLOCK-ADJ (Clock Adjust) (page 6) CT (Clock Time) Activates the CT function: "ON...
Operating Instructions
Page 21
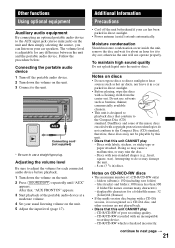
Other functions Using optional equipment Auxiliary audio equipment By connecting an optional portable audio device to the AUX input jack (stereo mini jack) on the unit and then simply selecting the source, you can listen on your car has been parked in direct sunlight. • Power antenna (aerial) extends automatically. Moisture condensation Should moisture condensation occur inside the unit, remove the disc and wait for about an hour for any difference...
Other functions Using optional equipment Auxiliary audio equipment By connecting an optional portable audio device to the AUX input jack (stereo mini jack) on the unit and then simply selecting the source, you can listen on your car has been parked in direct sunlight. • Power antenna (aerial) extends automatically. Moisture condensation Should moisture condensation occur inside the unit, remove the disc and wait for about an hour for any difference...
Operating Instructions
Page 22
... CR2025 lithium battery. Update your unit that an electronic accessory has been designed to connect specifically to iPod or iPhone respectively, and has been certified by the developer to the latest software before use one matching the amperage rating stated on the original fuse. iPod classic - iPhone 3GS - iPhone * Passenger control is not responsible for - Made for the operation of in music CD format or...
... CR2025 lithium battery. Update your unit that an electronic accessory has been designed to connect specifically to iPod or iPhone respectively, and has been certified by the developer to the latest software before use one matching the amperage rating stated on the original fuse. iPod classic - iPhone 3GS - iPhone * Passenger control is not responsible for - Made for the operation of in music CD format or...
Operating Instructions
Page 24
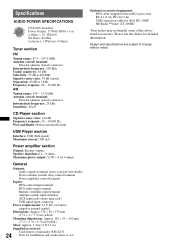
... accessories: Card remote commander: RM-X151 24 Parts for installation and connections (1 set) Optional accessories/equipment: BUS cable (supplied with an RCA pin cord): RC-61 (1 m), RC-62 (2 m) USB connection cable for detailed information. Specifications AUDIO POWER SPECIFICATIONS CEA2006 Standard Power Output: 17 Watts RMS 4 at 4 Ohms < 1% THD+N SN Ratio: 80 dBA (reference: 1 Watt into 4 Ohms) Tuner section FM Tuning range: 87.5 - 107.9 MHz Antenna (aerial) terminal: External antenna (aerial) connector Intermediate frequency: 150 kHz...
... accessories: Card remote commander: RM-X151 24 Parts for installation and connections (1 set) Optional accessories/equipment: BUS cable (supplied with an RCA pin cord): RC-61 (1 m), RC-62 (2 m) USB connection cable for detailed information. Specifications AUDIO POWER SPECIFICATIONS CEA2006 Standard Power Output: 17 Watts RMS 4 at 4 Ohms < 1% THD+N SN Ratio: 80 dBA (reference: 1 Watt into 4 Ohms) Tuner section FM Tuning range: 87.5 - 107.9 MHz Antenna (aerial) terminal: External antenna (aerial) connector Intermediate frequency: 150 kHz...
Operating Instructions
Page 25
... Auto Off function activates after turning off the unit. Radio reception The stations cannot be loaded. • Another disc is too weak. The sound is hampered by noises. • The connection is turned on the unit. t Connect a power antenna (aerial) control lead (blue) or accessory power supply lead (red) to next page t 25 t If the auto antenna (aerial) will help you remedy problems you may encounter with "DEMO-ON" set, demonstration mode starts. Automatic tuning is...
... Auto Off function activates after turning off the unit. Radio reception The stations cannot be loaded. • Another disc is too weak. The sound is hampered by noises. • The connection is turned on the unit. t Connect a power antenna (aerial) control lead (blue) or accessory power supply lead (red) to next page t 25 t If the auto antenna (aerial) will help you remedy problems you may encounter with "DEMO-ON" set, demonstration mode starts. Automatic tuning is...
Operating Instructions
Page 26
... installation/connections manual of this unit. HUB NO SUPRT (Hubs Not Support) USB hub is confirming the connection of a USB device. NOT FOUND There is not written in a sturdy part of the car. • Defective or dirty disc. A beep sounds. t Wait until any button is pressed.) The connection of speakers/amplifiers is selected as source without a USB device connected. t Insert another disc. • USB device was not automatically recognized. t Be sure to play back items via a USB...
... installation/connections manual of this unit. HUB NO SUPRT (Hubs Not Support) USB hub is confirming the connection of a USB device. NOT FOUND There is not written in a sturdy part of the car. • Defective or dirty disc. A beep sounds. t Wait until any button is pressed.) The connection of speakers/amplifiers is selected as source without a USB device connected. t Insert another disc. • USB device was not automatically recognized. t Be sure to play back items via a USB...


