Primary User Manual
Page 3
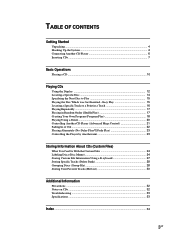
...Playing Repeatedly ...17 Playing in Random Order (Shuffle Play 17 Creating Your Own Program (Program Play 18 Playing Using a Timer ...20 Controlling Another CD Player (Advanced Mega Control 21 Fading In or Out ...22 Playing Alternately (No-Delay Play/X-Fade Play 23 Controlling the Player by Another unit 23... Storing Information About CDs (Custom Files) What You Can Do With the Custom Files 24 Labeling Discs (Disc Memo 24 Storing Custom File Information Using a K eyboard...
...Playing Repeatedly ...17 Playing in Random Order (Shuffle Play 17 Creating Your Own Program (Program Play 18 Playing Using a Timer ...20 Controlling Another CD Player (Advanced Mega Control 21 Fading In or Out ...22 Playing Alternately (No-Delay Play/X-Fade Play 23 Controlling the Player by Another unit 23... Storing Information About CDs (Custom Files) What You Can Do With the Custom Files 24 Labeling Discs (Disc Memo 24 Storing Custom File Information Using a K eyboard...
Primary User Manual
Page 4
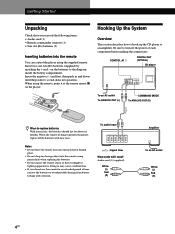
... remote casing, particularly when replacing the batteries. • Do not expose the remote sensor to direct sunlight or lighting apparatuses. CONTROL A1 DIGITAL OUT (OPTICAL) CD player To an AC outlet To ANALOG OUT (L) COMMAND MODE To ANALOG OUT (R) When to avoid possible damage from battery leakage and corrosion. Notes •... last for an extended period of each component before making the connections. Hooking Up the System Overview This section describes how to hook up the CD player to the diagram inside the battery compartment.
... remote casing, particularly when replacing the batteries. • Do not expose the remote sensor to direct sunlight or lighting apparatuses. CONTROL A1 DIGITAL OUT (OPTICAL) CD player To an AC outlet To ANALOG OUT (L) COMMAND MODE To ANALOG OUT (R) When to avoid possible damage from battery leakage and corrosion. Notes •... last for an extended period of each component before making the connections. Hooking Up the System Overview This section describes how to hook up the CD player to the diagram inside the battery compartment.
Primary User Manual
Page 5
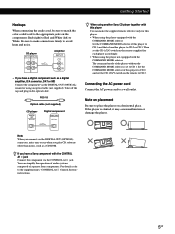
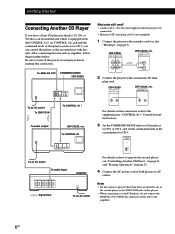
...When using another player to CD 1 and that of separate Sony components. Set the COMMAND MODE selector of this player to CD 2 or CD 3. For details, refer to a wall outlet. CD player 2ND CD ANALOG IN OUT L L R R Amplifier INPUT CD L R • If you have a Sony component with the CONTROL A1 ...OUT (OPTICAL) connector using the player equipped with this player You can simplify the operation of audio systems composed of another Sony CD player together with the COMMAND MODE selector: Set the COMMAND MODE selector of the player without the COMMAND MODE selector is...
...When using another player to CD 1 and that of separate Sony components. Set the COMMAND MODE selector of this player to CD 2 or CD 3. For details, refer to a wall outlet. CD player 2ND CD ANALOG IN OUT L L R R Amplifier INPUT CD L R • If you have a Sony component with the CONTROL A1 ...OUT (OPTICAL) connector using the player equipped with this player You can simplify the operation of audio systems composed of another Sony CD player together with the COMMAND MODE selector: Set the COMMAND MODE selector of the player without the COMMAND MODE selector is...
Primary User Manual
Page 6
...second player, see also "Hookups" on page 5). CDP-CX355 2ND CD ANALOG IN OUT L L R R CDP-CX230, etc. CONTROL A1 To an AC outlet To 2ND CD IN To CONTROL A1 To audio output CDP-CX230, etc. Getting Started Connecting Another CD Player If you have a Sony CD player in which 5, 50, 200, or 300...outlets. LINE OUT L R 2 Connect the players with the player to CD 3. After connecting this player to CD 1 or CD 2, and set to CD 3, you intend to use as the second player with this unit. To ANALOG OUT COMMAND MODE CDP-CX355 What cords will I need? • Audio cord (1) (Use the ...
...second player, see also "Hookups" on page 5). CDP-CX355 2ND CD ANALOG IN OUT L L R R CDP-CX230, etc. CONTROL A1 To an AC outlet To 2ND CD IN To CONTROL A1 To audio output CDP-CX230, etc. Getting Started Connecting Another CD Player If you have a Sony CD player in which 5, 50, 200, or 300...outlets. LINE OUT L R 2 Connect the players with the player to CD 3. After connecting this player to CD 1 or CD 2, and set to CD 3, you intend to use as the second player with this unit. To ANALOG OUT COMMAND MODE CDP-CX355 What cords will I need? • Audio cord (1) (Use the ...
Primary User Manual
Page 7
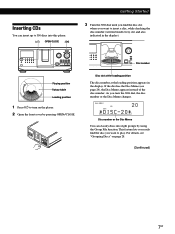
... eight groups by pressing OPEN/CLOSE. I/u OPEN/CLOSE JOG +100 I /u to turn the JOG dial, the disc number or the Disc Memo changes. GettPinlagyiSntgarCteDds Inserting CDs You can classify discs into this player. ALL DISCS CD1 20 DISC *DISC-20* Disc number or the Disc Memo You can insert up to...
... eight groups by pressing OPEN/CLOSE. I/u OPEN/CLOSE JOG +100 I /u to turn the JOG dial, the disc number or the Disc Memo changes. GettPinlagyiSntgarCteDds Inserting CDs You can classify discs into this player. ALL DISCS CD1 20 DISC *DISC-20* Disc number or the Disc Memo You can insert up to...
Primary User Manual
Page 8
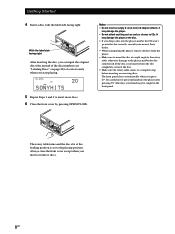
...disc, you can input the original disc titles instead of the disc numbers (see "Labeling Discs" on page 24) to CDs. Notes • Do not insert an empty 8 cm (3-inch) CD adaptor (CSA-8). The front panel closes automatically when you start playing. Be careful not to put your hand into the slot... in the front panel. Always close the front cover except when you drop a disc into the player and/or the CD won't go into the player after pressing · otherwise your nearest Sony dealer. • When transporting the player, remove all discs from the player. • Make sure to insert the ...
...disc, you can input the original disc titles instead of the disc numbers (see "Labeling Discs" on page 24) to CDs. Notes • Do not insert an empty 8 cm (3-inch) CD adaptor (CSA-8). The front panel closes automatically when you start playing. Be careful not to put your hand into the slot... in the front panel. Always close the front cover except when you drop a disc into the player and/or the CD won't go into the player after pressing · otherwise your nearest Sony dealer. • When transporting the player, remove all discs from the player. • Make sure to insert the ...
Primary User Manual
Page 9
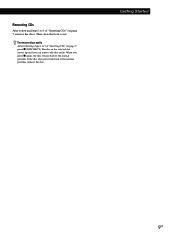
When you can remove the disc easily. To remove discs easily After following Steps 1 to the normal position, reinsert the disc. Then close the front cover. If the disc does not return back to 3 of "Inserting CDs" on page 7, remove the discs. Removing CDs After following steps 1 to the normal position. The disc in the selected slot moves up and you press p again, the disc returns back to 3 of "Inserting CDs" on page 7, press p (DISC EJECT). GettPinlagyiSntgarCteDds 9US
When you can remove the disc easily. To remove discs easily After following Steps 1 to the normal position, reinsert the disc. Then close the front cover. If the disc does not return back to 3 of "Inserting CDs" on page 7, remove the discs. Removing CDs After following steps 1 to the normal position. The disc in the selected slot moves up and you press p again, the disc returns back to 3 of "Inserting CDs" on page 7, press p (DISC EJECT). GettPinlagyiSntgarCteDds 9US
Primary User Manual
Page 10
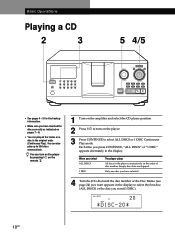
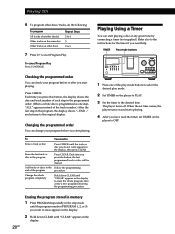
You can turn on the player by pressing I/u on the remote Z 1 Turn on the amplifier and select the CD player position. 2 Press I / u TIMER OFF PLAY KEYBOARD CONTINUE SHUFFLE PROGRAM REPEAT TIME/TEXT GROUP 1 GROUP 2 GROUP 3 GROUP 4 HIT LIST GROUP 5 GROUP 6 GROUP 7... the disc you press CONTINUE, "ALL DISCS" or "1 DISC" appears alternately in the order of disc number. Each time you want (1 DISC). Basic Operations Playing a CD 2 3 5 4/5 STANDBY I /u to turn on a disc in the original order (Continuous Play). When you have inserted the discs correctly as indicated on pages 7 - ...
You can turn on the player by pressing I/u on the remote Z 1 Turn on the amplifier and select the CD player position. 2 Press I / u TIMER OFF PLAY KEYBOARD CONTINUE SHUFFLE PROGRAM REPEAT TIME/TEXT GROUP 1 GROUP 2 GROUP 3 GROUP 4 HIT LIST GROUP 5 GROUP 6 GROUP 7... the disc you press CONTINUE, "ALL DISCS" or "1 DISC" appears alternately in the order of disc number. Each time you want (1 DISC). Basic Operations Playing a CD 2 3 5 4/5 STANDBY I /u to turn on a disc in the original order (Continuous Play). When you have inserted the discs correctly as indicated on pages 7 - ...

Primary User Manual
Page 12
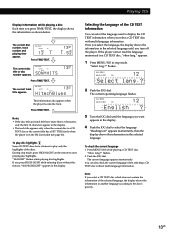
... a disc While playing a disc, the display shows the current disc number, track number, playing time of the disc. The display shows the CD TEXT information of the disc so that you can check information about the disc using the display. Display information in stop mode to select the...disc you want to "Selecting the language of the disc momentarily. If you want to check, and press TIME/TEXT. When the player detects a CD TEXT disc, "CD TEXT" appears in the display. TIME/TEXT MENU/NO JOG +100 I / u p TIME/TEXT HIGH-LIGHT Checking the total number and playing time...
... a disc While playing a disc, the display shows the current disc number, track number, playing time of the disc. The display shows the CD TEXT information of the disc so that you can check information about the disc using the display. Display information in stop mode to select the...disc you want to "Selecting the language of the disc momentarily. If you want to check, and press TIME/TEXT. When the player detects a CD TEXT disc, "CD TEXT" appears in the display. TIME/TEXT MENU/NO JOG +100 I / u p TIME/TEXT HIGH-LIGHT Checking the total number and playing time...
Primary User Manual
Page 13
... have more than 13 characters, only the first 13 characters appear in the display. • The track title appears only when the current disc is a CD TEXT disc or the current title has a HIT TITLE (only when the player is in the display. If you press HIGH-LIGHT while selecting discs... without multi-language information. To check the current language 1 Press MENU/NO while playing a CD TEXT disc. You can select the language used to the disc's priority. 13US The current track title appears. Once you select...
... have more than 13 characters, only the first 13 characters appear in the display. • The track title appears only when the current disc is a CD TEXT disc or the current title has a HIT TITLE (only when the player is in the display. If you press HIGH-LIGHT while selecting discs... without multi-language information. To check the current language 1 Press MENU/NO while playing a CD TEXT disc. You can select the language used to the disc's priority. 13US The current track title appears. Once you select...
Primary User Manual
Page 14
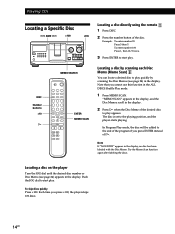
To enter number 100 Press 1, then 10/0 twice. 3 Press ENTER to start play . The disc is set to start play . Playing CDs Locating a Specific Disc ≠ AMS ± +100 JOG +100 I / u MEMO SEARCH DISC Number buttons >10 · ENTER MEMO SCAN Locating a disc directly using the remote 1 ...
To enter number 100 Press 1, then 10/0 twice. 3 Press ENTER to start play . The disc is set to start play . Playing CDs Locating a Specific Disc ≠ AMS ± +100 JOG +100 I / u MEMO SEARCH DISC Number buttons >10 · ENTER MEMO SCAN Locating a disc directly using the remote 1 ...
Primary User Manual
Page 16
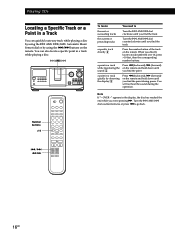
... tracks Turn the ≠ AMS ± dial counterclockwise until you directly locate a track numbered over 10, press >10 first, then the corresponding number buttons. Playing CDs Locating a Specific Track or a Point in the display, the disc has reached the end while you find the track a specific track directly Z Press the number...
... tracks Turn the ≠ AMS ± dial counterclockwise until you directly locate a track numbered over 10, press >10 first, then the corresponding number buttons. Playing CDs Locating a Specific Track or a Point in the display, the disc has reached the end while you find the track a specific track directly Z Press the number...
Primary User Manual
Page 18
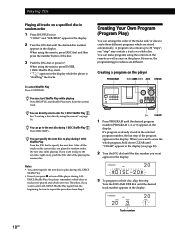
..."; You can start ALL DISCS Shuffle Play again from the beginning, be sure to the next disc during 1 DISC Shuffle Play Press DISC SKIP +. Playing CDs Playing all the tracks on the player. When using the remote" on page 14. To cancel Shuffle Play Press CONTINUE. Creating Your Own Program (Program...
..."; You can start ALL DISCS Shuffle Play again from the beginning, be sure to the next disc during 1 DISC Shuffle Play Press DISC SKIP +. Playing CDs Playing all the tracks on the player. When using the remote" on page 14. To cancel Shuffle Play Press CONTINUE. Creating Your Own Program (Program...
Primary User Manual
Page 20
... following the programming procedure 1 Press one step, "ALL" appears instead of the track number.) After the last step in the program, the display shows "- Playing CDs 6 To program other discs/tracks, do not want to erase appears in the display. 2 Hold down CLEAR until "CLEAR" appears in the display to erase...
... following the programming procedure 1 Press one step, "ALL" appears instead of the track number.) After the last step in the program, the display shows "- Playing CDs 6 To program other discs/tracks, do not want to erase appears in the display. 2 Hold down CLEAR until "CLEAR" appears in the display to erase...
Primary User Manual
Page 21
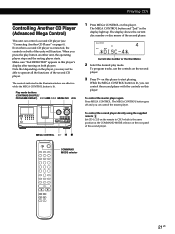
Note that depending on the rear panel of the units will function. The display shows the current disc number or disc memo of the second CD player. ALL DISCS 4 CD1 2nd DISC *DISC-4* Current disc number or the Disc Memo 2 Select the desired play button on this player. To ...control the second player directly using the supplied remote Z Set CD 1/2/3 on the remote to CD 3 which is lit, you press the play mode. When you can control the master player. Play mode buttons (CONTINUE/SHUFFLE/ PROGRAM/REPEAT)...
Note that depending on the rear panel of the units will function. The display shows the current disc number or disc memo of the second CD player. ALL DISCS 4 CD1 2nd DISC *DISC-4* Current disc number or the Disc Memo 2 Select the desired play button on this player. To ...control the second player directly using the supplied remote Z Set CD 1/2/3 on the remote to CD 3 which is lit, you press the play mode. When you can control the master player. Play mode buttons (CONTINUE/SHUFFLE/ PROGRAM/REPEAT)...

Primary User Manual
Page 22
...Disc Memo is loaded into this player's memory and display them on the second CD player. flashes in or out to prevent tracks from the second CD player. 1 Press MEGA CONTROL. Note Fading lasts for about one minute.) ...Note If each Disc Memo of the second CD player has more than 13 characters, only the first 13 characters of that you cannot use...In or Out You can label discs of the second CD player or change the Disc Memos loaded from starting or ending abruptly. Labeling discs of the second CD player You can manually fade the sound in the ...
...Disc Memo is loaded into this player's memory and display them on the second CD player. flashes in or out to prevent tracks from the second CD player. 1 Press MEGA CONTROL. Note Fading lasts for about one minute.) ...Note If each Disc Memo of the second CD player has more than 13 characters, only the first 13 characters of that you cannot use...In or Out You can label discs of the second CD player or change the Disc Memos loaded from starting or ending abruptly. Labeling discs of the second CD player You can manually fade the sound in the ...
Primary User Manual
Page 23
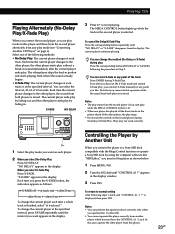
...?" The current player continues playing. You can start play while the MEGA CONTROL button is finished, select "at any play mode (see "Connecting Another CD Player" on page 6). Note that you cannot do this operation while the sound from both players is selected. appears in the display. Notes •... break in sound immediately after you have the CONTROL A1 jack. Each time the current player changes to a Sony MD deck compatible with the Mega Control function or operate a Sony MD deck by fading in. The MEGA CONTROL button lights up while the track in the second player is mixed...
...?" The current player continues playing. You can start play while the MEGA CONTROL button is finished, select "at any play mode (see "Connecting Another CD Player" on page 6). Note that you cannot do this operation while the sound from both players is selected. appears in the display. Notes •... break in sound immediately after you have the CONTROL A1 jack. Each time the current player changes to a Sony MD deck compatible with the Mega Control function or operate a Sony MD deck by fading in. The MEGA CONTROL button lights up while the track in the second player is mixed...

Primary User Manual
Page 24
...the player. The flashing cursor ( ) appears. 24US If the disc title has more than 13 characters, only the first 13 characters of the CD TEXT disc is also stored automatically. You can label discs while the front cover is open , the disc number at the playing position appears. ... is automatically stored as a title, musician's name, category, or date of information called "Custom Files" for about one month. When you select a CD TEXT disc The disc title is assigned to assign a Disc Memo appears in the Custom Files The Custom File information you select the disc. Note...
...the player. The flashing cursor ( ) appears. 24US If the disc title has more than 13 characters, only the first 13 characters of the CD TEXT disc is also stored automatically. You can label discs while the front cover is open , the disc number at the playing position appears. ... is automatically stored as a title, musician's name, category, or date of information called "Custom Files" for about one month. When you select a CD TEXT disc The disc title is assigned to assign a Disc Memo appears in the Custom Files The Custom File information you select the disc. Note...
Primary User Manual
Page 26
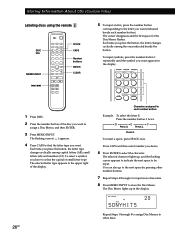
... Disc Memo flashes. n D n E n F Press 3. The selected character lights up in the upper right of the disc you want to select the character. Storing Information About CDs (Custom Files) Labeling discs using the remote Z DISC DEL MEMO INPUT =/+ SPACE CAPS Number buttons ENTER CLEAR 5 To input a letter, press the number button corresponding...
... Disc Memo flashes. n D n E n F Press 3. The selected character lights up in the upper right of the disc you want to select the character. Storing Information About CDs (Custom Files) Labeling discs using the remote Z DISC DEL MEMO INPUT =/+ SPACE CAPS Number buttons ENTER CLEAR 5 To input a letter, press the number button corresponding...

Primary User Manual
Page 27
... blank space you have just entered, and enter a character. Storing Custom File Information Using a Keyboard You can label discs of the second CD player See "Labeling discs of the second CD player" on the keys. The USA keyboard layout is not the USA model, the characters may be 120 mA or less...
... blank space you have just entered, and enter a character. Storing Custom File Information Using a Keyboard You can label discs of the second CD player See "Labeling discs of the second CD player" on the keys. The USA keyboard layout is not the USA model, the characters may be 120 mA or less...


