Operating Instructions
Page 2
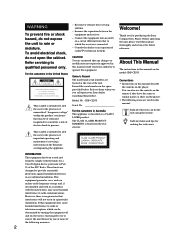
... radio communications. To avoid electrical shock, do not expose the unit to operate this manual thoroughly and retain it for purchasing the Sony Compact Disc Player. Connect the equipment into an outlet on , the user is no guarantee that you for future reference. Refer to them whenever ...on the remote if they have the same or similar names as a CLASS 1 LASER product. WARNING To prevent fire or shock hazard, do not open the cabinet. Refer servicing to provide reasonable protection against harmful interference in accordance with the limits for model CDP-CE535. Consult ...
... radio communications. To avoid electrical shock, do not expose the unit to operate this manual thoroughly and retain it for purchasing the Sony Compact Disc Player. Connect the equipment into an outlet on , the user is no guarantee that you for future reference. Refer to them whenever ...on the remote if they have the same or similar names as a CLASS 1 LASER product. WARNING To prevent fire or shock hazard, do not open the cabinet. Refer servicing to provide reasonable protection against harmful interference in accordance with the limits for model CDP-CE535. Consult ...
Operating Instructions
Page 4
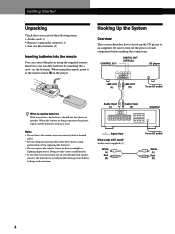
...? Be sure to an amplifier. Notes • Do not leave the remote near an extremely hot or humid place. • Do not drop any foreign object into the remote You can control the player using the remote, point it at the remote sensor g on the batteries. CONTROL A1 DIGITAL OUT (OPTICAL) CD... player LINE OUT (L) LINE OUT (R) To an AC outlet When to replace batteries With...
...? Be sure to an amplifier. Notes • Do not leave the remote near an extremely hot or humid place. • Do not drop any foreign object into the remote You can control the player using the remote, point it at the remote sensor g on the batteries. CONTROL A1 DIGITAL OUT (OPTICAL) CD... player LINE OUT (L) LINE OUT (R) To an AC outlet When to replace batteries With...
Operating Instructions
Page 5
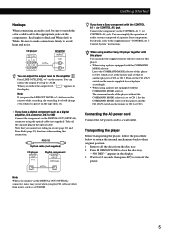
... to the amplifier Press LINE OUT LEVEL +/- Take off the player. Transporting the player Before transporting the player, follow the procedure below to return the internal mechanisms back to their original position. 1 Remove all the discs from the disc tray. 2 Press § OPEN/CLOSE to the supplementary "CONTROL... level to -20 dB. Set the COMMAND MODE selector of the player without the COMMAND MODE selector is preset on the remote supplied for 10 seconds, then press 1/u to White. When you have a Sony component with this connection. Note If you play CD software other than...
... to the amplifier Press LINE OUT LEVEL +/- Take off the player. Transporting the player Before transporting the player, follow the procedure below to return the internal mechanisms back to their original position. 1 Remove all the discs from the disc tray. 2 Press § OPEN/CLOSE to the supplementary "CONTROL... level to -20 dB. Set the COMMAND MODE selector of the player without the COMMAND MODE selector is preset on the remote supplied for 10 seconds, then press 1/u to White. When you have a Sony component with this connection. Note If you play CD software other than...

Operating Instructions
Page 9
...appears in the display. The disc tray closes and the player plays all the tracks once (Continuous Play). You can adjust the output level to the amplifier Z Press LINE OUT LEVEL +/- When you press the LINE OUT LEVEL +/- buttons on the remote while recording, the recording level ...even when it is preset on the tape deck, etc. 6 Press ·. Adjust the volume on the remote. DISC 1 - 5 · P p DISC SKIP I / u CONTINUE SHUFFLE PROGRAM REPEAT DISC CHECK DISC 1 DISC 2 DISC 3 DISC 4 DISC 5 PHONES INPUT FADER TIME/ EDIT/ PEAK TEXT TIME FADE SEARCH To Pause Resume play after pause Go ...
...appears in the display. The disc tray closes and the player plays all the tracks once (Continuous Play). You can adjust the output level to the amplifier Z Press LINE OUT LEVEL +/- When you press the LINE OUT LEVEL +/- buttons on the remote while recording, the recording level ...even when it is preset on the tape deck, etc. 6 Press ·. Adjust the volume on the remote. DISC 1 - 5 · P p DISC SKIP I / u CONTINUE SHUFFLE PROGRAM REPEAT DISC CHECK DISC 1 DISC 2 DISC 3 DISC 4 DISC 5 PHONES INPUT FADER TIME/ EDIT/ PEAK TEXT TIME FADE SEARCH To Pause Resume play after pause Go ...

Operating Instructions
Page 11
...player detects CD TEXT discs, the "CD-TEXT" indication lights up after all the characters scrolled in the display. Press TIME/TEXT. ALL DISCS 12345 CD-TEXT ART. Sony Band CD1 12345 6 7 8 9 10 Press TIME/TEXT.* * The display shows the current disc number, total number of tracks and total playing time of the disc...9 10 This information is available only in the display. Press TIME/TEXT. Remaining time on the remote to start playing Disc title Artist name ALL DISCS 12345 CD-TEXT DISC SONYHITS CD1 12345 6 7 8 9 10 Press TIME/TEXT. If each CD TEXT information has...
...player detects CD TEXT discs, the "CD-TEXT" indication lights up after all the characters scrolled in the display. Press TIME/TEXT. ALL DISCS 12345 CD-TEXT ART. Sony Band CD1 12345 6 7 8 9 10 Press TIME/TEXT.* * The display shows the current disc number, total number of tracks and total playing time of the disc...9 10 This information is available only in the display. Press TIME/TEXT. Remaining time on the remote to start playing Disc title Artist name ALL DISCS 12345 CD-TEXT DISC SONYHITS CD1 12345 6 7 8 9 10 Press TIME/TEXT. If each CD TEXT information has...

Operating Instructions
Page 13
... playing. When using the remote, follow the procedure below. 1 Press DISC. 2 Press the number button of each disc label. A disc by pressing the EX-CHANGE button, you cannot use the DISC CHECK function. • Even if you press the DISC CHECK button while "REPEAT" appears in the display (see page 14), the player stops after scanning all...
... playing. When using the remote, follow the procedure below. 1 Press DISC. 2 Press the number button of each disc label. A disc by pressing the EX-CHANGE button, you cannot use the DISC CHECK function. • Even if you press the DISC CHECK button while "REPEAT" appears in the display (see page 14), the player stops after scanning all...

Operating Instructions
Page 14
... the sound hold down until you find the point A point quickly by scanning each track for 10 seconds Z (Music Scan) Press MUSIC SCAN on the remote A track by ) (forward) or 0 (backward) and observing the display hold down until you start playing. Example: To play track number 30 Press >...10 first, then 3 and 10/0. The player repeats the discs/tracks as follows: 14 Note If "OVER" appears in the display, the disc has reached the end while you want (10, 20 or 30) appears in the display. A specific track...
... the sound hold down until you find the point A point quickly by scanning each track for 10 seconds Z (Music Scan) Press MUSIC SCAN on the remote A track by ) (forward) or 0 (backward) and observing the display hold down until you start playing. Example: To play track number 30 Press >...10 first, then 3 and 10/0. The player repeats the discs/tracks as follows: 14 Note If "OVER" appears in the display, the disc has reached the end while you want (10, 20 or 30) appears in the display. A specific track...

Operating Instructions
Page 17
...The total playing time of the track in the display. "PROGRAM" appears in the programmed order. You can select a track directly using the remote Z 1 Press PROGRAM. To select a track numbered over 10, use the >10 button (see page 14). You can play the same ...whose number exceeds 20. -The total playing time of the disc. So, the player plays only the existing disc and track numbers. PROGRAM 12345 2 A 8 DISC-[_] CD1 3 Press the number button of the program exceeds 200 minutes. 17 PROGRAM 12345 A DISC-[1] CD1 4 Press ENTER to select the track. If ...
...The total playing time of the track in the display. "PROGRAM" appears in the programmed order. You can select a track directly using the remote Z 1 Press PROGRAM. To select a track numbered over 10, use the >10 button (see page 14). You can play the same ...whose number exceeds 20. -The total playing time of the disc. So, the player plays only the existing disc and track numbers. PROGRAM 12345 2 A 8 DISC-[_] CD1 3 Press the number button of the program exceeds 200 minutes. 17 PROGRAM 12345 A DISC-[1] CD1 4 Press ENTER to select the track. If ...

Operating Instructions
Page 19
... track of the second player using the supplied remote Set CD 1/2/3 on the remote to 26. Note The new Disc Memos are loaded to this player's memory and display them on the second CD player. 19 Playing CDs To Pause Stop play Locate a disc while the second player is the same position... the second player or the supplied remote. • The AMS buttons (=/+) and search buttons (0/)) on the remote operate the second player as the COMMAND MODE selector on this player again Press MEGA CONTROL. Loading the Disc Memos of the second CD player If the second CD player has the Disc Memo function ...
... track of the second player using the supplied remote Set CD 1/2/3 on the remote to 26. Note The new Disc Memos are loaded to this player's memory and display them on the second CD player. 19 Playing CDs To Pause Stop play Locate a disc while the second player is the same position... the second player or the supplied remote. • The AMS buttons (=/+) and search buttons (0/)) on the remote operate the second player as the COMMAND MODE selector on this player again Press MEGA CONTROL. Loading the Disc Memos of the second CD player If the second CD player has the Disc Memo function ...

Operating Instructions
Page 25
...8 Press MEMO INPUT to select the character. ABC DEF GHI JKL MNO PRS TUV WXY >10 QZ ENTER Characters assigned to assign a Disc Memo, and then ENTER. 3 Press MEMO INPUT. The selected character lights up, and the flashing cursor appears to indicate the next space..., press SPACE once. Repeat Steps 1 to 7 to assign Disc Memos to find the letter type you want . Labeling discs using the remote Z DISC/CAPS Number buttons MEMO INPUT SPACE DEL ENTER CLEAR 0/) 1 Press DISC/CAPS. 2 Press the number button of the disc you want to each number button). The flashing cursor (") appears...
...8 Press MEMO INPUT to select the character. ABC DEF GHI JKL MNO PRS TUV WXY >10 QZ ENTER Characters assigned to assign a Disc Memo, and then ENTER. 3 Press MEMO INPUT. The selected character lights up, and the flashing cursor appears to indicate the next space..., press SPACE once. Repeat Steps 1 to 7 to assign Disc Memos to find the letter type you want . Labeling discs using the remote Z DISC/CAPS Number buttons MEMO INPUT SPACE DEL ENTER CLEAR 0/) 1 Press DISC/CAPS. 2 Press the number button of the disc you want to each number button). The flashing cursor (") appears...
Operating Instructions
Page 28
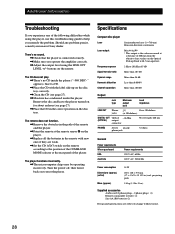
... Phono jacks 2 V Over 10 kilohms (at the rear panel of the remote and the player. /Point the remote at the remote sensor g on the player. /Replace all the batteries in the path of the player. Insert a CD. /Place the CD with the label side up block ...Compact disc player Laser Laser output Frequency response Signal-to the position of the following difficulties while using the LINE OUT LEVEL +/- There's no CD inside the player. Additional Information Troubleshooting If you experience any problem persist, consult your nearest Sony dealer. Remove the disc and leave the player...
... Phono jacks 2 V Over 10 kilohms (at the rear panel of the remote and the player. /Point the remote at the remote sensor g on the player. /Replace all the batteries in the path of the player. Insert a CD. /Place the CD with the label side up block ...Compact disc player Laser Laser output Frequency response Signal-to the position of the following difficulties while using the LINE OUT LEVEL +/- There's no CD inside the player. Additional Information Troubleshooting If you experience any problem persist, consult your nearest Sony dealer. Remove the disc and leave the player...

Operating Instructions
Page 29
...> 10 14 Control ≠ AMS (DISC) ± 14, 18 Jack PHONES 8 Switch 1/u 8 Others Disc tray 8 Display 10 g4 29 See AMS C, D CD TEXT 11 Changing the Disc Memos 19 Connecting 4 another CD player 6 Continuous Play 8 Controlling another CD player 18 Custom Files Delete Bank 26 Disc Memo 24 what you can do with ...Program 16 changing 18 checking 18 for recording 21 R Recording 21 a program 21 using Time Edit 21 Remaining time 10 Remote control 4 Repeating 14 Replacing discs while playing a disc 12 S Scanning. Index Index A, B Advanced Mega Control 18 AMS 14 Automatic Music Sensor.
...> 10 14 Control ≠ AMS (DISC) ± 14, 18 Jack PHONES 8 Switch 1/u 8 Others Disc tray 8 Display 10 g4 29 See AMS C, D CD TEXT 11 Changing the Disc Memos 19 Connecting 4 another CD player 6 Continuous Play 8 Controlling another CD player 18 Custom Files Delete Bank 26 Disc Memo 24 what you can do with ...Program 16 changing 18 checking 18 for recording 21 R Recording 21 a program 21 using Time Edit 21 Remaining time 10 Remote control 4 Repeating 14 Replacing discs while playing a disc 12 S Scanning. Index Index A, B Advanced Mega Control 18 AMS 14 Automatic Music Sensor.


