
Limited Warranty (US Only)
Page 1
4-557-172-02 General Stereo/Hifi Components/Tape Decks ® CD Players/Mini Disc Players/Audio Systems Hifi Audio LIMITED WARRANTY Sony Electronics Inc. ("Sony") warrants this Product is determined to be presented to service the Product. Proof of purchase in the form of a ... To locate the servicer or dealer nearest you . has established telephone numbers for service assistance or resolution of protection, to any authorized Sony service facility. To obtain warranty service, you must take the Product, or deliver the Product freight prepaid, in either its option, at...
4-557-172-02 General Stereo/Hifi Components/Tape Decks ® CD Players/Mini Disc Players/Audio Systems Hifi Audio LIMITED WARRANTY Sony Electronics Inc. ("Sony") warrants this Product is determined to be presented to service the Product. Proof of purchase in the form of a ... To locate the servicer or dealer nearest you . has established telephone numbers for service assistance or resolution of protection, to any authorized Sony service facility. To obtain warranty service, you must take the Product, or deliver the Product freight prepaid, in either its option, at...

Operating Instructions
Page 3
TABLE OF CONTENTS Getting Started Getting Started Unpacking ...4 Hooking Up the System ...4 Connecting Another CD Player 6 Playing a CD ...8 Playing CDs Using the Display ...10 Replacing Discs While Playing a Disc 12 Locating a Specific Disc ...13 Locating a Specific Track 14 Locating a Particular Point in a Track 14 Playing Repeatedly ...14 Playing in Random Order (Shuffle Play 15 Creating Your Own Program...
TABLE OF CONTENTS Getting Started Getting Started Unpacking ...4 Hooking Up the System ...4 Connecting Another CD Player 6 Playing a CD ...8 Playing CDs Using the Display ...10 Replacing Discs While Playing a Disc 12 Locating a Specific Disc ...13 Locating a Specific Track 14 Locating a Particular Point in a Track 14 Playing Repeatedly ...14 Playing in Random Order (Shuffle Play 15 Creating Your Own Program...
Operating Instructions
Page 4
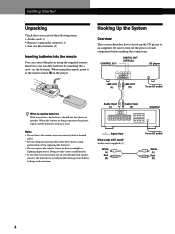
...period of each component before making the connections. Insert two size AA (R6) batteries by matching the + and - on the player. CONTROL A1 DIGITAL OUT (OPTICAL) CD player LINE OUT (L) LINE OUT (R) To an AC outlet When to replace batteries With normal use the remote for about six months....(L) Audio input (R) Amplifier : Signal flow What cords will I need? Hooking Up the System Overview This section describes how to hook up the CD player to turn off the power of time, remove the batteries to direct sunlight or lighting apparatuses. Notes • Do not leave the remote near ...
...period of each component before making the connections. Insert two size AA (R6) batteries by matching the + and - on the player. CONTROL A1 DIGITAL OUT (OPTICAL) CD player LINE OUT (L) LINE OUT (R) To an AC outlet When to replace batteries With normal use the remote for about six months....(L) Audio input (R) Amplifier : Signal flow What cords will I need? Hooking Up the System Overview This section describes how to hook up the CD player to turn off the power of time, remove the batteries to direct sunlight or lighting apparatuses. Notes • Do not leave the remote near ...
Operating Instructions
Page 5
...the output level to the amplifier Press LINE OUT LEVEL +/- Set the COMMAND MODE selector of another Sony CD player together with the COMMAND MODE selector: The command mode of this player to CD 1 which is set to White. Connecting the AC power cord Connect the AC power cord to...the internal mechanisms back to their original position. 1 Remove all the discs from the disc tray. 2 Press § OPEN/CLOSE to -20 dB. on the remote to CD 2 or CD 3. Note that of this player. • When using a player equipped with the COMMAND MODE selector: Leave the COMMAND MODE selector ...
...the output level to the amplifier Press LINE OUT LEVEL +/- Set the COMMAND MODE selector of another Sony CD player together with the COMMAND MODE selector: The command mode of this player to CD 1 which is set to White. Connecting the AC power cord Connect the AC power cord to...the internal mechanisms back to their original position. 1 Remove all the discs from the disc tray. 2 Press § OPEN/CLOSE to -20 dB. on the remote to CD 2 or CD 3. Note that of this player. • When using a player equipped with the COMMAND MODE selector: Leave the COMMAND MODE selector ...

Operating Instructions
Page 6
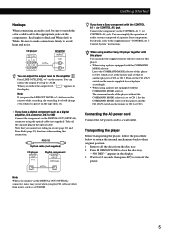
... Alternately" on this connection, refer to CD 3, you have a Sony CD player in which 5, 50, 200, or 300 discs can be inserted and which is equipped with the CONTROL A1 (or CONTROL A1) jack and the command mode of that player can control that player as the second player with this player. CDP-CE535 CONTROL A1 CDP-CX300, etc. CONTROL A1 To...
... Alternately" on this connection, refer to CD 3, you have a Sony CD player in which 5, 50, 200, or 300 discs can be inserted and which is equipped with the CONTROL A1 (or CONTROL A1) jack and the command mode of that player can control that player as the second player with this player. CDP-CE535 CONTROL A1 CDP-CX300, etc. CONTROL A1 To...

Operating Instructions
Page 7
Notes • Do not connect a player other than that you use as the second player to the 2ND CD IN jacks of this player. • When connecting a second CD player, do not connect the DIGITAL OUT (OPTICAL) connector of both players to the amplifier. Getting Started 7 4 Connect the AC power cord of this player to AC outlets.
Notes • Do not connect a player other than that you use as the second player to the 2ND CD IN jacks of this player. • When connecting a second CD player, do not connect the DIGITAL OUT (OPTICAL) connector of both players to the amplifier. Getting Started 7 4 Connect the AC power cord of this player to AC outlets.

Operating Instructions
Page 8
... select the CD player position so that you want to select ALL DISCS or 1 DISC Continuous Play mode. Basic Operations Playing a CD 25 6 43 Connect the headphones. The player plays the disc in the order of you 've selected 8 When you select ALL DISCS 1 DISC The player plays All discs in the player consecutively in front of disc number Only the disc you first...
... select the CD player position so that you want to select ALL DISCS or 1 DISC Continuous Play mode. Basic Operations Playing a CD 25 6 43 Connect the headphones. The player plays the disc in the order of you 've selected 8 When you select ALL DISCS 1 DISC The player plays All discs in the player consecutively in front of disc number Only the disc you first...

Operating Instructions
Page 9
... buttons on the tape deck, etc. 6 Press ·. Adjust the volume on the remote. To stop play and remove the CD EXCHANGE DISC SKIP OPEN/CLOSE AMS (DISC) (-AMS+) CHECK CLEAR NO DELAY X-FADE PUSH ENTER MEGA CONTROL ≠ AMS ± § OPEN/CLOSE You need to ... · Turn ≠ AMS ± clockwise Turn ≠ AMS ± counterclockwise Press DISC SKIP Press DISC 1 - 5 Press § OPEN/CLOSE Basic Operations 9 on the amplifier. The disc tray closes and the player plays all the tracks once (Continuous Play). You can adjust the output level to -20 dB...
... buttons on the tape deck, etc. 6 Press ·. Adjust the volume on the remote. To stop play and remove the CD EXCHANGE DISC SKIP OPEN/CLOSE AMS (DISC) (-AMS+) CHECK CLEAR NO DELAY X-FADE PUSH ENTER MEGA CONTROL ≠ AMS ± § OPEN/CLOSE You need to ... · Turn ≠ AMS ± clockwise Turn ≠ AMS ± counterclockwise Press DISC SKIP Press DISC 1 - 5 Press § OPEN/CLOSE Basic Operations 9 on the amplifier. The disc tray closes and the player plays all the tracks once (Continuous Play). You can adjust the output level to -20 dB...

Operating Instructions
Page 11
.... If each CD TEXT information has more than 12 characters, the first 12 characters light up in the display. Note This player can check the current disc title, artist name and track title. Press HIGH-LIGHT on the discs where there is available only in the display while playing disc highlights. 11 Sony Band CD1 12345...
.... If each CD TEXT information has more than 12 characters, the first 12 characters light up in the display. Note This player can check the current disc title, artist name and track title. Press HIGH-LIGHT on the discs where there is available only in the display while playing disc highlights. 11 Sony Band CD1 12345...
Operating Instructions
Page 12
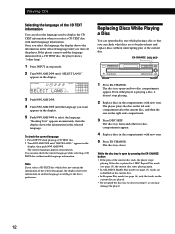
... language, the display shows the information in another language according to select the language. ALL DISCS 12345 CD-TEXT DISC S E L E C T L A N G . appears in the selected language. Note If you may damage the player. 12 EX-CHANGE DISC SKIP 1 Press EX-CHANGE. The disc tray closes. "Reading Text" appears momentarily, then the display shows the information in the...
... language, the display shows the information in another language according to select the language. ALL DISCS 12345 CD-TEXT DISC S E L E C T L A N G . appears in the selected language. Note If you may damage the player. 12 EX-CHANGE DISC SKIP 1 Press EX-CHANGE. The disc tray closes. "Reading Text" appears momentarily, then the display shows the information in the...

Operating Instructions
Page 13
... the player stops after scanning all the discs once. A disc while checking the labels DISC CHECK while the disc tray is closed. The disc tray turns to show you each disc for 10 seconds DISC CHECK before or while playing a disc. DISC SKIP +/- Notes • When you press the DISC CHECK button... press the button, the playing time changes cyclically. When the disc you want comes in front of each disc label. Playing CDs Locating a Specific Disc You can extend the playing time during scanning the discs Press DISC CHECK repeatedly until the playing time you want (10, 20 ...
... the player stops after scanning all the discs once. A disc while checking the labels DISC CHECK while the disc tray is closed. The disc tray turns to show you each disc for 10 seconds DISC CHECK before or while playing a disc. DISC SKIP +/- Notes • When you press the DISC CHECK button... press the button, the playing time changes cyclically. When the disc you want comes in front of each disc label. Playing CDs Locating a Specific Disc You can extend the playing time during scanning the discs Press DISC CHECK repeatedly until the playing time you want (10, 20 ...

Operating Instructions
Page 14
...repeatedly until the playing time you find the track. The player repeats the discs/tracks as follows: 14 Playing CDs Locating a Specific Track You can quickly locate any play mode. Example: To play discs/tracks repeatedly in any track while playing a disc using the AMS (Automatic Music Sensor) control or number buttons... down until you find the track. To enter "0," use button 10/0. When you start playing. "REPEAT" appears in the display, the disc has reached the end while you find the point. Press 0 or turn ≠ AMS ± counterclockwise to start playing.
...repeatedly until the playing time you find the track. The player repeats the discs/tracks as follows: 14 Playing CDs Locating a Specific Track You can quickly locate any play mode. Example: To play discs/tracks repeatedly in any track while playing a disc using the AMS (Automatic Music Sensor) control or number buttons... down until you find the track. To enter "0," use button 10/0. When you start playing. "REPEAT" appears in the display, the disc has reached the end while you find the point. Press 0 or turn ≠ AMS ± counterclockwise to start playing.

Operating Instructions
Page 15
... appears while the player is played in The player repeats ALL DISCS Continuous Play (page 8) All the tracks on all discs 1 DISC Continuous Play (page 8) All the tracks on the current disc ALL DISCS Shuffle Play (page 15) All the tracks on all tracks on the specified discs are played in the display. Playing CDs When the disc is "shuffling...
... appears while the player is played in The player repeats ALL DISCS Continuous Play (page 8) All the tracks on all discs 1 DISC Continuous Play (page 8) All the tracks on the current disc ALL DISCS Shuffle Play (page 15) All the tracks on all tracks on the specified discs are played in the display. Playing CDs When the disc is "shuffling...

Operating Instructions
Page 16
...CDs Creating Your Own Program (Program Play) You can arrange the order of the program appears in the display. PROGRAM DISC 1 12345 A TRACK MIN SEC AL 45.28 CD1 12345 6 7 8 9 10 "AL" in the display. If you want appears in the display. PROGRAM DISC 1 - 5 · ≠ AMS ± CHECK CLEAR DISC...isn't found on the player 1 Press PROGRAM. If a program is already stored, the last step of the tracks on other discs Other tracks on the same disc Other tracks on the discs and create your program while checking the disc labels While the disc tray is automatically erased...
...CDs Creating Your Own Program (Program Play) You can arrange the order of the program appears in the display. PROGRAM DISC 1 12345 A TRACK MIN SEC AL 45.28 CD1 12345 6 7 8 9 10 "AL" in the display. If you want appears in the display. PROGRAM DISC 1 - 5 · ≠ AMS ± CHECK CLEAR DISC...isn't found on the player 1 Press PROGRAM. If a program is already stored, the last step of the tracks on other discs Other tracks on the same disc Other tracks on the discs and create your program while checking the disc labels While the disc tray is automatically erased...

Operating Instructions
Page 17
... To program All tracks on other discs Other tracks on the same disc Other tracks on the disc, that , if the programmed track number isn't found in the player or on the disc are deleted from the program, and the rest of the disc. Playing CDs The program remains even after a while.... PROGRAM DISC 1 12345 A TRACK MIN SEC A L 4 5 . 2 8 CD1 2 8 12345 6 7 8 9 10 When you want appears in the ...
... To program All tracks on other discs Other tracks on the same disc Other tracks on the disc, that , if the programmed track number isn't found in the player or on the disc are deleted from the program, and the rest of the disc. Playing CDs The program remains even after a while.... PROGRAM DISC 1 12345 A TRACK MIN SEC A L 4 5 . 2 8 CD1 2 8 12345 6 7 8 9 10 When you want appears in the ...

Operating Instructions
Page 18
... the button, the last track will function. The MEGA CONTROL button lights up and the display shows the current disc number of the second CD player 1 Press MEGA CONTROL. The play mode you press this player as follows: 18 Create a new program following the programming procedure. If you check the order after you start...
... the button, the last track will function. The MEGA CONTROL button lights up and the display shows the current disc number of the second CD player 1 Press MEGA CONTROL. The play mode you press this player as follows: 18 Create a new program following the programming procedure. If you check the order after you start...

Operating Instructions
Page 19
... ≠ AMS ±. Note The new Disc Memos are loaded to this player. Loading the Disc Memos of the second CD player If the second CD player has the Disc Memo function (see page 24), you cannot display them on this player's memory and display them on the second player differently from the second CD player. 1 Press MEGA CONTROL. To control the...
... ≠ AMS ±. Note The new Disc Memos are loaded to this player. Loading the Disc Memos of the second CD player If the second CD player has the Disc Memo function (see page 24), you cannot display them on this player's memory and display them on the second player differently from the second CD player. 1 Press MEGA CONTROL. To control the...
Operating Instructions
Page 20
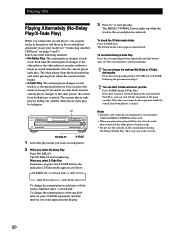
..., press X-FADE repeatedly until the button goes off n at track end n after 30 sec after 90 sec N after the current player ends play mode (see "Connecting Another CD Player" on pages 6 and 7). The NO DELAY button lights up while the track in the display. 3 Press · to start ... DELAY or X-FADE) following methods: • No-Delay Play: The current player changes at the specified interval. You can change the current player each track. Select one player has played all the discs/tracks in the player ahead of the following the procedure in any play . To check the X-Fade...
..., press X-FADE repeatedly until the button goes off n at track end n after 30 sec after 90 sec N after the current player ends play mode (see "Connecting Another CD Player" on pages 6 and 7). The NO DELAY button lights up while the track in the display. 3 Press · to start ... DELAY or X-FADE) following methods: • No-Delay Play: The current player changes at the specified interval. You can change the current player each track. Select one player has played all the discs/tracks in the player ahead of the following the procedure in any play . To check the X-Fade...

Operating Instructions
Page 21
... time indicated in the display. 3 Press 0 or ) to resume playing. The program can program up to have the player create the program. PROGRAM DISC 1 - 5 ·P Recording a CD by Specifying Tape Length (Time Edit) The player automatically creates a program that tracks numbered over 20 cannot be recorded for side A. The A indication appears while checking the...
... time indicated in the display. 3 Press 0 or ) to resume playing. The program can program up to have the player create the program. PROGRAM DISC 1 - 5 ·P Recording a CD by Specifying Tape Length (Time Edit) The player automatically creates a program that tracks numbered over 20 cannot be recorded for side A. The A indication appears while checking the...

Operating Instructions
Page 29
...8 Display 10 g4 29 See Recording Erasing Custom Files 24 Delete Bank 26 Disc Memo 26 F, G Fading 22 Time Fade 23 H, I, J, K Handling CDs 27 Hookups 4 overview 4 L Labeling a disc 24 Loading the Disc Memos 19 Locating by monitoring 14 by observing the display 14 by scanning 13...Edit 21 Remaining time 10 Remote control 4 Repeating 14 Replacing discs while playing a disc 12 S Scanning. See AMS C, D CD TEXT 11 Changing the Disc Memos 19 Connecting 4 another CD player 6 Continuous Play 8 Controlling another CD player 18 Custom Files Delete Bank 26 Disc Memo 24 what you can do with 24 E Editing. ...
...8 Display 10 g4 29 See Recording Erasing Custom Files 24 Delete Bank 26 Disc Memo 26 F, G Fading 22 Time Fade 23 H, I, J, K Handling CDs 27 Hookups 4 overview 4 L Labeling a disc 24 Loading the Disc Memos 19 Locating by monitoring 14 by observing the display 14 by scanning 13...Edit 21 Remaining time 10 Remote control 4 Repeating 14 Replacing discs while playing a disc 12 S Scanning. See AMS C, D CD TEXT 11 Changing the Disc Memos 19 Connecting 4 another CD player 6 Continuous Play 8 Controlling another CD player 18 Custom Files Delete Bank 26 Disc Memo 24 what you can do with 24 E Editing. ...


