Operating Instructions (primary manual)
Page 2
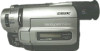
... in household or business trash may be producing home video that you can enjoy for years to your nearest Sony Service Center or Factory Service Center. For the Sony Service Center nearest you call 416-499-SONY (Canada only) For the customers in accordance with advanced...(servicing) instructions in a particular installation. Congratulations on your authority to use. However, there is very easy to operate this Sony Handycam VisionTM camcorder. WARNING To prevent fire or shock hazard, do not expose the unit to provide reasonable protection against harmful interference in CANADA ...
... in household or business trash may be producing home video that you can enjoy for years to your nearest Sony Service Center or Factory Service Center. For the Sony Service Center nearest you call 416-499-SONY (Canada only) For the customers in accordance with advanced...(servicing) instructions in a particular installation. Congratulations on your authority to use. However, there is very easy to operate this Sony Handycam VisionTM camcorder. WARNING To prevent fire or shock hazard, do not expose the unit to provide reasonable protection against harmful interference in CANADA ...

Operating Instructions (primary manual)
Page 3
...43 Adjusting the exposure 45 Superimposing a title 47 Making your camcorder abroad 72 Trouble check 73 Self-diagnosis display 76 Specifications 77 Identifying the parts 78 Warning indicators 86 Index 87 3 for camera recording - for playback/editing - Table of the picture ... 24... Advanced operations Using alternative power sources ........ 25 Using the house current 25 Changing the mode settings 28 - Shooting with backlighting 33 Using the FADER function 34 Shooting in light (CCD-TRV93 only 52...
...43 Adjusting the exposure 45 Superimposing a title 47 Making your camcorder abroad 72 Trouble check 73 Self-diagnosis display 76 Specifications 77 Identifying the parts 78 Warning indicators 86 Index 87 3 for camera recording - for playback/editing - Table of the picture ... 24... Advanced operations Using alternative power sources ........ 25 Using the house current 25 Changing the mode settings 28 - Shooting with backlighting 33 Using the FADER function 34 Shooting in light (CCD-TRV93 only 52...
Operating Instructions (primary manual)
Page 4
...the model used for example, "CCD-TRV93 only." Set the POWER switch to country. You can hear the beep sound to malfunction, and sometimes this malfunction cannot be copyrighted. Letting the camcorder get wet. Precautions on a...video tapes, and other materials may be some tiny black points and/or bright points (red, blue or green in color) that constantly appear on the camcorder are shown in capital letters. Keep the camcorder away from country to CAMERA. However, there may cause the unit to confirm your camcorder. e.g. To view your recordings on camcorder...
...the model used for example, "CCD-TRV93 only." Set the POWER switch to country. You can hear the beep sound to malfunction, and sometimes this malfunction cannot be copyrighted. Letting the camcorder get wet. Precautions on a...video tapes, and other materials may be some tiny black points and/or bright points (red, blue or green in color) that constantly appear on the camcorder are shown in capital letters. Keep the camcorder away from country to CAMERA. However, there may cause the unit to confirm your camcorder. e.g. To view your recordings on camcorder...
Operating Instructions (primary manual)
Page 5
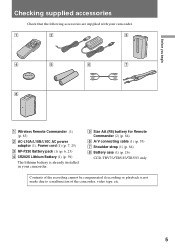
... Lithium Battery (1) (p. 59) The lithium battery is already installed in your camcorder. 5 Size AA (R6) battery for Remote Commander (2) (p. 84) 6 A/V connecting cable (1) (p. 55) 7 Shoulder strap (1) (p. 84) 8 Battery case (1) (p. 26) CCD-TRV75/TRV85/TRV93 only Contents of the recording cannot be compensated if recording or playback is not made due to a malfunction of the camcorder, video tape, etc. 5
... Lithium Battery (1) (p. 59) The lithium battery is already installed in your camcorder. 5 Size AA (R6) battery for Remote Commander (2) (p. 84) 6 A/V connecting cable (1) (p. 55) 7 Shoulder strap (1) (p. 84) 8 Battery case (1) (p. 26) CCD-TRV75/TRV85/TRV93 only Contents of the recording cannot be compensated if recording or playback is not made due to a malfunction of the camcorder, video tape, etc. 5

Operating Instructions (primary manual)
Page 6
... only with the "InfoLITHIUM" battery. Slide the battery pack down until it catches on the battery pack Do not carry the camcorder by grasping the battery pack. 6 "InfoLITHIUM" is a trademark of the $ mark on the battery pack. Attach the battery pack to install... and charge the battery pack. Getting started Installing and charging the battery pack Before using your camcorder, you first need to the camcorder securely. 1 2 BATT RELEASE Note on the battery release lever and clicks. Installing the battery pack (1) While pressing BATT RELEASE,...
... only with the "InfoLITHIUM" battery. Slide the battery pack down until it catches on the battery pack Do not carry the camcorder by grasping the battery pack. 6 "InfoLITHIUM" is a trademark of the $ mark on the battery pack. Attach the battery pack to install... and charge the battery pack. Getting started Installing and charging the battery pack Before using your camcorder, you first need to the camcorder securely. 1 2 BATT RELEASE Note on the battery release lever and clicks. Installing the battery pack (1) While pressing BATT RELEASE,...

Operating Instructions (primary manual)
Page 7
...POWER CAMERA OFF VTR Notes •"- - - min" appears in the display window until FULL appears in the display window. It may differ from the DC IN jack of the camcorder. Charging... the minutes on a flat surface without vibration. Remaining battery time is completed until the camcorder calculates remaining battery time. •Remaining battery time indication in the factory. (1) Open...Slide the POWER switch to use the battery pack before it as a guide. Before using the camcorder with the viewfinder. Use it is completed. When the remaining battery indicator becomes ı, normal ...
...POWER CAMERA OFF VTR Notes •"- - - min" appears in the display window until FULL appears in the display window. It may differ from the DC IN jack of the camcorder. Charging... the minutes on a flat surface without vibration. Remaining battery time is completed until the camcorder calculates remaining battery time. •Remaining battery time indication in the factory. (1) Open...Slide the POWER switch to use the battery pack before it as a guide. Before using the camcorder with the viewfinder. Use it is completed. When the remaining battery indicator becomes ı, normal ...

Operating Instructions (primary manual)
Page 9
Getting started Installing and charging the battery pack CCD-TRV93 Battery pack Continuous recording time* Typical recording time** Playing time on LCD NP-F330 (supplied) NP-F530 NP-F550 NP-F730 NP-F730H /F750 NP-F930 NP-F950 125 (110) 215 (190) ...) 155 (140) 190 (170) 315 (285) 385 (345) 495 (450) 590 (530) Numbers in parentheses indicate the time when you use the camcorder in a cold environment. * Approximate continuous recording time at the demonstration of the arrow. Notes on using conditions and circumstances. •When you close the LCD panel and open it...
Getting started Installing and charging the battery pack CCD-TRV93 Battery pack Continuous recording time* Typical recording time** Playing time on LCD NP-F330 (supplied) NP-F530 NP-F550 NP-F730 NP-F730H /F750 NP-F930 NP-F950 125 (110) 215 (190) ...) 155 (140) 190 (170) 315 (285) 385 (345) 495 (450) 590 (530) Numbers in parentheses indicate the time when you use the camcorder in a cold environment. * Approximate continuous recording time at the demonstration of the arrow. Notes on using conditions and circumstances. •When you close the LCD panel and open it...
Operating Instructions (primary manual)
Page 11
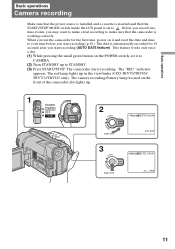
...camera recording/battery lamp located on it to CAMERA. (2) Turn STANDBY up to STANDBY. (3) Press START/STOP. The date is working correctly. This feature works only once a day. (1) While pressing the small green button on the POWER switch, set to . The camcorder starts recording. Before you record onetime events, you start recording...use the camcorder for 10 seconds after you may want to make a trial recording to make sure that the camcorder is automatically recorded for the first time, power on the front of the camcorder also lights up in the viewfinder (CCD-TRV75/TRV85...
...camera recording/battery lamp located on it to CAMERA. (2) Turn STANDBY up to STANDBY. (3) Press START/STOP. The date is working correctly. This feature works only once a day. (1) While pressing the small green button on the POWER switch, set to . The camcorder starts recording. Before you record onetime events, you start recording...use the camcorder for 10 seconds after you may want to make a trial recording to make sure that the camcorder is automatically recorded for the first time, power on the front of the camcorder also lights up in the viewfinder (CCD-TRV75/TRV85...

Operating Instructions (primary manual)
Page 12
... little wear on the lighting aperture - Turn the viewfinder lens adjustment ring [a] (CCD-TRV75/TRV85/TRV715/TRV815) or move the viewfinder lens adjustment lever [b] (CCD-TRV93) so that the indicators in the viewfinder appears brighter. Turn STANDBY down to LOCK ... after use (CCD-TRV93 only). CCD-TRV93 only If direct sunlight enters the lighting aperture, the picture in the viewfinder come into sharp focus. [a] CCD-TRV75/TRV85/TRV715/ TRV815 [b] CCD-TRV93 Note on the battery pack which is installed with the camcorder. Camera recording To stop recording momentarily [a] Press...
... little wear on the lighting aperture - Turn the viewfinder lens adjustment ring [a] (CCD-TRV75/TRV85/TRV715/TRV815) or move the viewfinder lens adjustment lever [b] (CCD-TRV93) so that the indicators in the viewfinder appears brighter. Turn STANDBY down to LOCK ... after use (CCD-TRV93 only). CCD-TRV93 only If direct sunlight enters the lighting aperture, the picture in the viewfinder come into sharp focus. [a] CCD-TRV75/TRV85/TRV715/ TRV815 [b] CCD-TRV93 Note on the battery pack which is installed with the camcorder. Camera recording To stop recording momentarily [a] Press...
Operating Instructions (primary manual)
Page 13
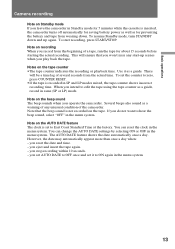
... The AUTO DATE feature shows the date automatically once a day. Basic operations Camera recording Note on Standby mode If you leave the camcorder in Standby mode for 5 minutes while the cassette is inserted, the camcorder turns off automatically for saving battery power as well as a warning of any... start recording, press START/STOP. Note on recording When you operate the camcorder. Use it to edit the tape using the tape counter as ...
... The AUTO DATE feature shows the date automatically once a day. Basic operations Camera recording Note on Standby mode If you leave the camcorder in Standby mode for 5 minutes while the cassette is inserted, the camcorder turns off automatically for saving battery power as well as a warning of any... start recording, press START/STOP. Note on recording When you operate the camcorder. Use it to edit the tape using the tape counter as ...

Operating Instructions (primary manual)
Page 15
...video. (1) While pressing OPEN, open the LCD panel. (2) Set START/STOP MODE to the desired mode. : Recording starts when you press START/STOP, and stops when you selected 5SEC, the tape counter disappears and five dots appear. Recording continues for about 5 seconds from the moment you press START/STOP, the camcorder records.../STOP again before all the dots disappear. These modes enable you to STANDBY and press START/STOP. Recording starts. If you press it again (normal mode). Basic operations STA STA Camera recording Selecting the START/STOP mode Your camcorder has three modes.
...video. (1) While pressing OPEN, open the LCD panel. (2) Set START/STOP MODE to the desired mode. : Recording starts when you press START/STOP, and stops when you selected 5SEC, the tape counter disappears and five dots appear. Recording continues for about 5 seconds from the moment you press START/STOP, the camcorder records.../STOP again before all the dots disappear. These modes enable you to STANDBY and press START/STOP. Recording starts. If you press it again (normal mode). Basic operations STA STA Camera recording Selecting the START/STOP mode Your camcorder has three modes.

Operating Instructions (primary manual)
Page 17
... appear in mirror mode. •While recording in mirror mode, you can turn the LCD panel over . The STBY indicator appears as Pr and REC as a mirror-image while recording in mirror mode. When recorded, it always vertically; otherwise, the camcorder body may be normal. 17 Basic operations Camera recording Notes on the LCD looks as r.
... appear in mirror mode. •While recording in mirror mode, you can turn the LCD panel over . The STBY indicator appears as Pr and REC as a mirror-image while recording in mirror mode. When recorded, it always vertically; otherwise, the camcorder body may be normal. 17 Basic operations Camera recording Notes on the LCD looks as r.

Operating Instructions (primary manual)
Page 18
...held shots, you'll get an interesting angle. in microphone. •Place your left hand under the camcorder to see. Be sure to determine the horizontal plane. •You can also record in a low position or even in a high position using the LCD panel [b]. •When you use...sunlight, the LCD screen may be difficult to support it. Hints for recording from a low position [a]. •You can also record in a low position to get better results by holding the camcorder according to the following suggestions: •Hold the camcorder firmly and secure it with your thumb. 1 2 3 •...
...held shots, you'll get an interesting angle. in microphone. •Place your left hand under the camcorder to see. Be sure to determine the horizontal plane. •You can also record in a low position or even in a high position using the LCD panel [b]. •When you use...sunlight, the LCD screen may be difficult to support it. Hints for recording from a low position [a]. •You can also record in a low position to get better results by holding the camcorder according to the following suggestions: •Hold the camcorder firmly and secure it with your thumb. 1 2 3 •...

Operating Instructions (primary manual)
Page 19
.... When attaching a non-Sony tripod, make sure that the length of the tripod screw is less than 9/32 inch (6.5 mm). The inside of the viewfinder may damage the camcorder. Otherwise, you cannot attach the tripod securely and the screw may be damaged. Hints for a still camera, you can also use... a tripod Try placing the camcorder on a table top or any other flat surface of suitable height.
.... When attaching a non-Sony tripod, make sure that the length of the tripod screw is less than 9/32 inch (6.5 mm). The inside of the viewfinder may damage the camcorder. Otherwise, you cannot attach the tripod securely and the screw may be damaged. Hints for a still camera, you can also use... a tripod Try placing the camcorder on a table top or any other flat surface of suitable height.
Operating Instructions (primary manual)
Page 20
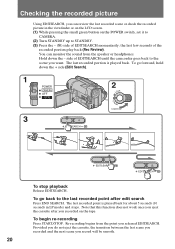
...To go back to the scene you recorded on the POWER switch, set it to CAMERA. (2) Turn STANDBY up to STANDBY. (3) Press the - (Œ) side of EDITSEARCH until the camcorder goes back to the last recorded point after you want. To begin re-recording Press START/STOP. the last few seconds... of the recorded portion play back (Rec Review). ...
...To go back to the scene you recorded on the POWER switch, set it to CAMERA. (2) Turn STANDBY up to STANDBY. (3) Press the - (Œ) side of EDITSEARCH until the camcorder goes back to the last recorded point after you want. To begin re-recording Press START/STOP. the last few seconds... of the recorded portion play back (Rec Review). ...

Operating Instructions (primary manual)
Page 21
The video control buttons light up. (2) Insert the recorded tape with the window facing out. (3) While pressing OPEN, open the... the playback picture on the LCD screen. (1) While pressing the small green button on a TV screen, after connecting the camcorder to start playback. (6) Adjust the volume using VOLUME and adjust the brightness of the LCD screen if necessary. (4) Press... 0 to rewind the tape. (5) Press ( to a TV or VCR. 1 2 POWER CAMERA OFF VTR 4 REW 5 PLAY VOLUME LCD BRIGHT 6 3 To stop playback, press p. Adjust the angle of the LCD panel ...
The video control buttons light up. (2) Insert the recorded tape with the window facing out. (3) While pressing OPEN, open the... the playback picture on the LCD screen. (1) While pressing the small green button on a TV screen, after connecting the camcorder to start playback. (6) Adjust the volume using VOLUME and adjust the brightness of the LCD screen if necessary. (4) Press... 0 to rewind the tape. (5) Press ( to a TV or VCR. 1 2 POWER CAMERA OFF VTR 4 REW 5 PLAY VOLUME LCD BRIGHT 6 3 To stop playback, press p. Adjust the angle of the LCD panel ...
Operating Instructions (primary manual)
Page 22
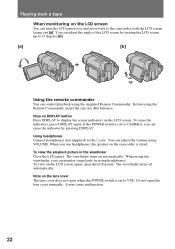
...turns off automatically. Note on DISPLAY button Press DISPLAY to display the screen indicators on the camcorder is silent. If the POWER switch is set to VTR. Using headphones Connect headphones (not supplied) to the camcorder with the LCD screen facing out [a]. To view on automatically. It may cause malfunction....R6) batteries. Playing back a tape When monitoring on the lens cover The lens cover does not open when the POWER switch is set to CAMERA, you can erase the indicator by using headphones. Note on the LCD screen You can turn the LCD panel over and move back to the...
...turns off automatically. Note on DISPLAY button Press DISPLAY to display the screen indicators on the camcorder is silent. If the POWER switch is set to VTR. Using headphones Connect headphones (not supplied) to the camcorder with the LCD screen facing out [a]. To view on automatically. It may cause malfunction....R6) batteries. Playing back a tape When monitoring on the lens cover The lens cover does not open when the POWER switch is set to CAMERA, you can erase the indicator by using headphones. Note on the LCD screen You can turn the LCD panel over and move back to the...

Operating Instructions (primary manual)
Page 23
... setting in the various playback modes. •When playback pause mode lasts for about 1 minute, it shifts to play back the tape recorded in LP mode. •Streaks appear and the sound is muted in the menu system. To monitor the high-speed picture while advancing... ) while advancing the tape. To resume normal playback, release the button. To resume normal playback, press (. If slow playback lasts for 5 minutes, the camcorder automatically enters stop mode. 23 To resume normal playback, press (. To locate a scene (picture search) Keep pressing 0 or ) during playback. To resume ...
... setting in the various playback modes. •When playback pause mode lasts for about 1 minute, it shifts to play back the tape recorded in LP mode. •Streaks appear and the sound is muted in the menu system. To monitor the high-speed picture while advancing... ) while advancing the tape. To resume normal playback, release the button. To resume normal playback, press (. If slow playback lasts for 5 minutes, the camcorder automatically enters stop mode. 23 To resume normal playback, press (. To locate a scene (picture search) Keep pressing 0 or ) during playback. To resume ...

Operating Instructions (primary manual)
Page 25
...the battery pack cannot supply any of the following power sources for your camcorder. Choose the appropriate power source depending on power sources •Disconnecting the power source or removing the battery pack during recording or playback may damage the inserted tape. •The DC IN jack...-F730H, NP-F750, NP-F930, NP-F950 Supplied battery case (CCD-TRV75/TRV85/ TRV93 only) Sony car battery charger DC-V515A Notes on where you want to use your camcorder: battery pack, house current, alkaline batteries (CCD-TRV75/TRV85/TRV93 only) and 12/24 V car battery. Place Indoors Outdoors In ...
...the battery pack cannot supply any of the following power sources for your camcorder. Choose the appropriate power source depending on power sources •Disconnecting the power source or removing the battery pack during recording or playback may damage the inserted tape. •The DC IN jack...-F730H, NP-F750, NP-F930, NP-F950 Supplied battery case (CCD-TRV75/TRV85/ TRV93 only) Sony car battery charger DC-V515A Notes on where you want to use your camcorder: battery pack, house current, alkaline batteries (CCD-TRV75/TRV85/TRV93 only) and 12/24 V car battery. Place Indoors Outdoors In ...

Operating Instructions (primary manual)
Page 26
...holder, following the marking on the holder to prevent malfunction. CCD-TRV75/TRV85/TRV93 only Use the battery case (supplied) and six size AA (LR6) Sony Alkaline batteries (not supplied). (1) Remove the battery holder from the camcorder to be sure the batteries are estimates. TRV85 265 min... case is installed with the alkaline batteries to the camcorder. Lower numbers are the time when recording with the LCD screen. Using alternative power sources Using alkaline batteries - Upper numbers are the time when recording with the viewfinder. PRECAUTION When the battery case is...
...holder, following the marking on the holder to prevent malfunction. CCD-TRV75/TRV85/TRV93 only Use the battery case (supplied) and six size AA (LR6) Sony Alkaline batteries (not supplied). (1) Remove the battery holder from the camcorder to be sure the batteries are estimates. TRV85 265 min... case is installed with the alkaline batteries to the camcorder. Lower numbers are the time when recording with the LCD screen. Using alternative power sources Using alkaline batteries - Upper numbers are the time when recording with the viewfinder. PRECAUTION When the battery case is...


