

Operating Instructions (primary manual)
Page 1
Owner's Record The model and serial numbers are located on the bottom. CCD-TRV93 CCD-TRV75/TRV85/TRV93/ TRV715/TRV815 ©1998 by Sony Corporation Record the serial number in the space provided below. Refer to these numbers whenever you call upon your Sony dealer regarding this manual thoroughly, and retain it for future reference. 3-861-891-13 (1) Video Camera Recorder Operating Instructions Before operating the unit, please read this product. AC-L Serial No. Model No. Serial No. CCD-TRV Model No.
Owner's Record The model and serial numbers are located on the bottom. CCD-TRV93 CCD-TRV75/TRV85/TRV93/ TRV715/TRV815 ©1998 by Sony Corporation Record the serial number in the space provided below. Refer to these numbers whenever you call upon your Sony dealer regarding this manual thoroughly, and retain it for future reference. 3-861-891-13 (1) Video Camera Recorder Operating Instructions Before operating the unit, please read this product. AC-L Serial No. Model No. Serial No. CCD-TRV Model No.
Operating Instructions (primary manual)
Page 2
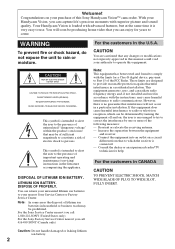
... In some areas the disposal of lithium ion batteries in this manual could void your purchase of the following measures: - For the Sony Service Center nearest you call 1-800-222-SONY (United States only) For the Sony Factory Service Center nearest you can return your unwanted lithium ion...that any changes or modifications not expressly approved in household or business trash may cause harmful interference to which can be producing home video that may be prohibited. Increase the separation between the equipment and receiver. - Your Handycam Vision is intended to alert the ...
... In some areas the disposal of lithium ion batteries in this manual could void your purchase of the following measures: - For the Sony Service Center nearest you call 1-800-222-SONY (United States only) For the Sony Factory Service Center nearest you can return your unwanted lithium ion...that any changes or modifications not expressly approved in household or business trash may cause harmful interference to which can be producing home video that may be prohibited. Increase the separation between the equipment and receiver. - Your Handycam Vision is intended to alert the ...

Operating Instructions (primary manual)
Page 3
... - for playback/editing - Table of contents Before you begin Using this manual 4 Checking supplied accessories 5 Getting started Installing and charging the battery pack 6 Inserting a cassette 10 Basic operations Camera recording 11 Using the zoom feature 14 Selecting the START/STOP mode 15 Shooting ...with the date/time 50 Optimizing the recording condition .. 51 Using the built-in light (CCD-TRV93 only 52 Releasing the STEADY SHOT function ...
... - for playback/editing - Table of contents Before you begin Using this manual 4 Checking supplied accessories 5 Getting started Installing and charging the battery pack 6 Inserting a cassette 10 Basic operations Camera recording 11 Using the zoom feature 14 Selecting the START/STOP mode 15 Shooting ...with the date/time 50 Optimizing the recording condition .. 51 Using the built-in light (CCD-TRV93 only 52 Releasing the STEADY SHOT function ...
Operating Instructions (primary manual)
Page 4
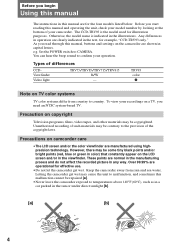
...) that constantly appear on TV color systems TV color systems differ from rain and sea water. You can hear the beep sound to CAMERA. Keep the camcorder away from country to temperatures above 140°F (60°C), such as in a car parked in the sun...based TV. The CCD-TRV93 is indicated in the illustrations. As you read through this manual and operating the unit, check your recordings on copyright Television programs, films, video tapes, and other materials may cause the unit to the provision of differences CCDViewfinder Video light TRV75/TRV85/TRV715/TRV815 B/W - These ...
...) that constantly appear on TV color systems TV color systems differ from rain and sea water. You can hear the beep sound to CAMERA. Keep the camcorder away from country to temperatures above 140°F (60°C), such as in a car parked in the sun...based TV. The CCD-TRV93 is indicated in the illustrations. As you read through this manual and operating the unit, check your recordings on copyright Television programs, films, video tapes, and other materials may cause the unit to the provision of differences CCDViewfinder Video light TRV75/TRV85/TRV715/TRV815 B/W - These ...
Operating Instructions (primary manual)
Page 22
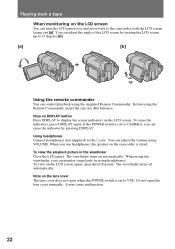
... the LCD screen again, open the LCD panel. To view on the camcorder is silent. Do not open when the POWER switch is set to CAMERA, you can adjust the volume using headphones. Note on DISPLAY button Press DISPLAY to the camcorder with the LCD screen facing out [a]. To erase the... indicators, press DISPLAY again. The viewfinder turns on automatically. Note on the lens cover The lens cover does not open the lens cover manually. Playing back a tape When monitoring on the LCD screen You can turn the LCD panel over and move back to display the screen indicators on...
... the LCD screen again, open the LCD panel. To view on the camcorder is silent. Do not open when the POWER switch is set to CAMERA, you can adjust the volume using headphones. Note on DISPLAY button Press DISPLAY to the camcorder with the LCD screen facing out [a]. To erase the... indicators, press DISPLAY again. The viewfinder turns on automatically. Note on the lens cover The lens cover does not open the lens cover manually. Playing back a tape When monitoring on the LCD screen You can turn the LCD panel over and move back to display the screen indicators on...
Operating Instructions (primary manual)
Page 33
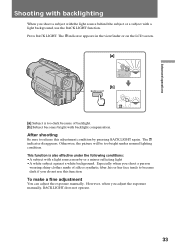
...with a light source nearby or a mirror reflecting light •A white subject against a white background. However, when you adjust the exposure manually, BACK LIGHT does not operate. 33 Press BACK LIGHT. After shooting Be sure to become dark if you do not use the BACK... becomes bright with a light background, use this adjustment condition by pressing BACK LIGHT again. To make a fine adjustment You can adjust the exposure manually. The c indicator disappears. The c indicator appears in the viewfinder or on the LCD screen. [a] [b] BACK LIGHT [a] Subject is also effective...
...with a light source nearby or a mirror reflecting light •A white subject against a white background. However, when you adjust the exposure manually, BACK LIGHT does not operate. 33 Press BACK LIGHT. After shooting Be sure to become dark if you do not use the BACK... becomes bright with a light background, use this adjustment condition by pressing BACK LIGHT again. To make a fine adjustment You can adjust the exposure manually. The c indicator disappears. The c indicator appears in the viewfinder or on the LCD screen. [a] [b] BACK LIGHT [a] Subject is also effective...

Operating Instructions (primary manual)
Page 36
...incorrect/unnatural color. •You cannot use either of them, turn off the other. (CCD-TRV93 only) •If focusing is difficult with this function. The maximum limit of ...nocturnal animals for observation with the autofocus mode when using the NightShot function, focus manually. 36 NightShot Light rays are infrared and are therefore invisible. When you want to use... When you set N.S.LIGHT to ON in the menu system, the picture will be recorded in normal recording, picture may record picture nearly in monochrome. (1) While the camcorder is about 10 feet (about 3 merters...
...incorrect/unnatural color. •You cannot use either of them, turn off the other. (CCD-TRV93 only) •If focusing is difficult with this function. The maximum limit of ...nocturnal animals for observation with the autofocus mode when using the NightShot function, focus manually. 36 NightShot Light rays are infrared and are therefore invisible. When you want to use... When you set N.S.LIGHT to ON in the menu system, the picture will be recorded in normal recording, picture may record picture nearly in monochrome. (1) While the camcorder is about 10 feet (about 3 merters...

Operating Instructions (primary manual)
Page 38
... •In wide mode, you cannot select the bounce function with FADER. •When you record in 16:9 FULL mode, the date or time indicator will be widened on the wide-screen ... the power source. •When recording, you cannot change the mode. 38 To watch the tape recorded in the menu system. For details, refer to the instruction manual of the wide-screen TV to ...zoom mode. Using the wide mode function Using the wide mode function You can select the wide mode (OFF, CINEMA, 16:9FULL) in 16:9 FULL mode, set it to full mode. To watch the tape recorded...
... •In wide mode, you cannot select the bounce function with FADER. •When you record in 16:9 FULL mode, the date or time indicator will be widened on the wide-screen ... the power source. •When recording, you cannot change the mode. 38 To watch the tape recorded in the menu system. For details, refer to the instruction manual of the wide-screen TV to ...zoom mode. Using the wide mode function Using the wide mode function You can select the wide mode (OFF, CINEMA, 16:9FULL) in 16:9 FULL mode, set it to full mode. To watch the tape recorded...
Operating Instructions (primary manual)
Page 41
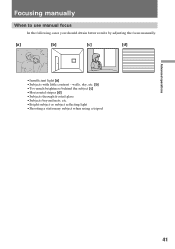
Focusing manually When to use manual focus In the following cases you should obtain better results by adjusting the focus manually. [a] [b] [c] [d] •Insufficient light [a] •Subjects with little contrast - walls, sky, etc. [b] •Too much brightness behind the subject [c] •Horizontal stripes [d] •Subjects through frosted glass •Subjects beyond nets, etc. •Bright subject or subject reflecting light •Shooting a stationary subject when using a tripod Advanced operations 41
Focusing manually When to use manual focus In the following cases you should obtain better results by adjusting the focus manually. [a] [b] [c] [d] •Insufficient light [a] •Subjects with little contrast - walls, sky, etc. [b] •Too much brightness behind the subject [c] •Horizontal stripes [d] •Subjects through frosted glass •Subjects beyond nets, etc. •Bright subject or subject reflecting light •Shooting a stationary subject when using a tripod Advanced operations 41
Operating Instructions (primary manual)
Page 42
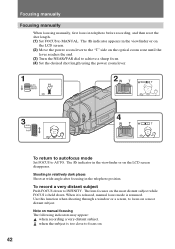
...is too close to INFINITY. Note on the LCD screen disappears. To record a very distant subject Push FOCUS down . The f indicator in the viewfinder or on manual focusing The following indicators may appear: when recording a very distant subject. Use this function when shooting through a window ...a screen, to focus on a most distant subject while FOCUS is held down to focus on. 42 Focusing manually Focusing manually When focusing manually, first focus in telephoto before recording, and then reset the shot length. (1) Set FOCUS to AUTO. The f indicator appears in the telephoto ...
...is too close to INFINITY. Note on the LCD screen disappears. To record a very distant subject Push FOCUS down . The f indicator in the viewfinder or on manual focusing The following indicators may appear: when recording a very distant subject. Use this function when shooting through a window ...a screen, to focus on a most distant subject while FOCUS is held down to focus on. 42 Focusing manually Focusing manually When focusing manually, first focus in telephoto before recording, and then reset the shot length. (1) Set FOCUS to AUTO. The f indicator appears in the telephoto ...

Operating Instructions (primary manual)
Page 45
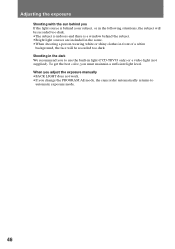
Advanced operations Adjusting the exposure When to adjust the exposure Adjust the exposure manually under the following cases. [a] [b] [a] •The background is too bright (back lighting) •Insufficient light: most of the picture is dark [b] •Bright subject and dark background •To record the darkness faithfully Adjusting the exposure (1) Press EXPOSURE. (2) Turn the control dial to adjust the brightness. 1 EXPOSURE - + 2 - + To return to automatic exposure mode Press EXPOSURE again. 45
Advanced operations Adjusting the exposure When to adjust the exposure Adjust the exposure manually under the following cases. [a] [b] [a] •The background is too bright (back lighting) •Insufficient light: most of the picture is dark [b] •Bright subject and dark background •To record the darkness faithfully Adjusting the exposure (1) Press EXPOSURE. (2) Turn the control dial to adjust the brightness. 1 EXPOSURE - + 2 - + To return to automatic exposure mode Press EXPOSURE again. 45
Operating Instructions (primary manual)
Page 46
... AE mode, the camcorder automatically returns to use the built-in front of a white background, the face will be recorded too dark. When you adjust the exposure manually •BACK LIGHT does not work. •If you must maintain a sufficient light level. Adjusting the exposure Shooting ... situations, the subject will be recorded too dark. •The subject is indoors and there is a window behind the subject. •Bright light sources are included in the scene. •When shooting a person wearing white or shiny clothes in light (CCD-TRV93 only) or a video light (not supplied).
... AE mode, the camcorder automatically returns to use the built-in front of a white background, the face will be recorded too dark. When you adjust the exposure manually •BACK LIGHT does not work. •If you must maintain a sufficient light level. Adjusting the exposure Shooting ... situations, the subject will be recorded too dark. •The subject is indoors and there is a window behind the subject. •Bright light sources are included in the scene. •When shooting a person wearing white or shiny clothes in light (CCD-TRV93 only) or a video light (not supplied).

Operating Instructions (primary manual)
Page 70
...place, protect it is in the small holes on the rear of tape and if the recording tab is resting on the power, operate the camera and player sections and play back a tape for a long time, remove the tape. ... since heat may cause the unit to malfunction, and sometimes this manual. •Should any solid object or liquid get into the camcorder. CCD-TRV93 only •Do not knock or jolt the built-in...8226;Do not let sand get inside the casing, unplug the camcorder and have it checked by a Sony dealer before operating it any type of the lens. •Keep the POWER switch setting to OFF ...
...place, protect it is in the small holes on the rear of tape and if the recording tab is resting on the power, operate the camera and player sections and play back a tape for a long time, remove the tape. ... since heat may cause the unit to malfunction, and sometimes this manual. •Should any solid object or liquid get into the camcorder. CCD-TRV93 only •Do not knock or jolt the built-in...8226;Do not let sand get inside the casing, unplug the camcorder and have it checked by a Sony dealer before operating it any type of the lens. •Keep the POWER switch setting to OFF ...

Operating Instructions (primary manual)
Page 74
m Set it to CAMERA or OFF. m Set it to . (p. 15) The cassette cannot be removed from • The .... m Rewind the tape or use a new one . (p. 59) The tape does not move when a video control button is pressed. • The POWER switch is set to MANUAL. is set to OFF. the holder. m Set it to 5SEC or . m Set it to AUTO. ... only a low sound is heard when playing back a tape. • The stereo tape is heard. • The picture has been recorded with a new one . (p. 21) The Steady Shot function does not activate. • STEADYSHOT is not clear. m When there is...
m Set it to CAMERA or OFF. m Set it to . (p. 15) The cassette cannot be removed from • The .... m Rewind the tape or use a new one . (p. 59) The tape does not move when a video control button is pressed. • The POWER switch is set to MANUAL. is set to OFF. the holder. m Set it to 5SEC or . m Set it to AUTO. ... only a low sound is heard when playing back a tape. • The stereo tape is heard. • The picture has been recorded with a new one . (p. 21) The Steady Shot function does not activate. • STEADYSHOT is not clear. m When there is...

Operating Instructions (primary manual)
Page 81
Refer to the instruction manual of video equipment and peripherals connected to turn on the intelligent accessory shoe -CCD-TRV75/TRV85/TRV715/TRV815 only Supplies power to the end, and then tighten the screw. If the camcorder does not work correctly with ...8226; RFU DC OUT (RFU adaptor DC output) jack (p. 55) $ª Viewfinder lens adjustment ring (CCD-TRV75/TRV85/TRV715/TRV815 only) (p. 12) %º Intelligent accessory shoe (CCDTRV75/TRV85/TRV715/TRV815 only) %¡ S VIDEO jack (p. 55) %™ VIDEO/AUDIO jacks (p. 55) %£ 2 (headphones) jack (p. 22) Note on and off the power ...
Refer to the instruction manual of video equipment and peripherals connected to turn on the intelligent accessory shoe -CCD-TRV75/TRV85/TRV715/TRV815 only Supplies power to the end, and then tighten the screw. If the camcorder does not work correctly with ...8226; RFU DC OUT (RFU adaptor DC output) jack (p. 55) $ª Viewfinder lens adjustment ring (CCD-TRV75/TRV85/TRV715/TRV815 only) (p. 12) %º Intelligent accessory shoe (CCDTRV75/TRV85/TRV715/TRV815 only) %¡ S VIDEO jack (p. 55) %™ VIDEO/AUDIO jacks (p. 55) %£ 2 (headphones) jack (p. 22) Note on and off the power ...

Operating Instructions (primary manual)
Page 85
...mode indicator (p. 17) 2 Playing back or recording in Hi8 format (p. 63) 3 Remaining battery time indicator Display window !¢ @¡ 2 !∞ @¢ !§ !¶ 1 3 !• @£ !ª @º @¡ @™ !¢ Video control mode (p. 11) !∞ Tape counter...) !£ Manual focusing (p. 42) !¶ END SEARCH indicator (p. 20) !• NIGHTSHOT indicator (p. 36) !ª AUTO DATE indicator (p. 11)/Date indicator (p. 50) @º Time indicator (p. 50) @¡ Warning indicators (p. 86) @™ Recording lamp (CCD-TRV75/TRV85/ TRV715/TRV815 only) (p. ...
...mode indicator (p. 17) 2 Playing back or recording in Hi8 format (p. 63) 3 Remaining battery time indicator Display window !¢ @¡ 2 !∞ @¢ !§ !¶ 1 3 !• @£ !ª @º @¡ @™ !¢ Video control mode (p. 11) !∞ Tape counter...) !£ Manual focusing (p. 42) !¶ END SEARCH indicator (p. 20) !• NIGHTSHOT indicator (p. 36) !ª AUTO DATE indicator (p. 11)/Date indicator (p. 50) @º Time indicator (p. 50) @¡ Warning indicators (p. 86) @™ Recording lamp (CCD-TRV75/TRV85/ TRV715/TRV815 only) (p. ...

Operating Instructions (primary manual)
Page 87
...viewfinder 12 AFM HiFi Sound 32, 63 ANTI GROUND SHOOTING 15 Auto focus 42 Backlight 33 Beep 13 C, D Camera recording 11 Car battery 27 Charging battery 7 Cleaning video heads 68 Clock set 61 Connection 55 COUNTER RESET 13 DATE/TIME 50 DEMO 31, 82 Digital zoom 14 DISPLAY ...LANC 81 LASER LINK 56 Lithium battery 59 M, N Manual focus 42 Menu system 28 MIC (microphone) jack ......... 82 NIGHTSHOT 36 O, P ORC 51 PICTURE EFFECT 44 Playback pause 23 Power sources 25 Power zoom 14 PROGRAM AE 40 Q, R Rec review 20 Recording mode 29 Remote control jack (LANC) 81 Rewind 21...
...viewfinder 12 AFM HiFi Sound 32, 63 ANTI GROUND SHOOTING 15 Auto focus 42 Backlight 33 Beep 13 C, D Camera recording 11 Car battery 27 Charging battery 7 Cleaning video heads 68 Clock set 61 Connection 55 COUNTER RESET 13 DATE/TIME 50 DEMO 31, 82 Digital zoom 14 DISPLAY ...LANC 81 LASER LINK 56 Lithium battery 59 M, N Manual focus 42 Menu system 28 MIC (microphone) jack ......... 82 NIGHTSHOT 36 O, P ORC 51 PICTURE EFFECT 44 Playback pause 23 Power sources 25 Power zoom 14 PROGRAM AE 40 Q, R Rec review 20 Recording mode 29 Remote control jack (LANC) 81 Rewind 21...


