Operating Instructions (primary manual)
Page 2
... that you can return your unwanted lithium ion batteries to radio communications. If this Sony Handycam VisionTM camcorder. For the customers in the literature accompanying the appliance. You will... measures: - This symbol is no guarantee that interference will soon be producing home video that to which can be determined by one or more of this equipment does cause... ion battery. 2 WARNING To prevent fire or shock hazard, do not expose the unit to Part 15 of lithium ion batteries in a particular installation. Consult the dealer or an experienced radio/TV...
... that you can return your unwanted lithium ion batteries to radio communications. If this Sony Handycam VisionTM camcorder. For the customers in the literature accompanying the appliance. You will... measures: - This symbol is no guarantee that interference will soon be producing home video that to which can be determined by one or more of this equipment does cause... ion battery. 2 WARNING To prevent fire or shock hazard, do not expose the unit to Part 15 of lithium ion batteries in a particular installation. Consult the dealer or an experienced radio/TV...

Operating Instructions (primary manual)
Page 3
...76 Specifications 77 Identifying the parts 78 Warning indicators 86 Index 87 3 Table of contents Before you begin Using this manual 4 Checking supplied accessories 5 Getting started Installing and charging the battery pack 6 Inserting a cassette 10 Basic operations Camera recording 11 Using the zoom ...feature 14 Selecting the START/STOP mode 15 Shooting with the date/time 50 Optimizing the recording condition .. 51 Using the built-in light (CCD-TRV93 only 52 Releasing the STEADY SHOT function...
...76 Specifications 77 Identifying the parts 78 Warning indicators 86 Index 87 3 Table of contents Before you begin Using this manual 4 Checking supplied accessories 5 Getting started Installing and charging the battery pack 6 Inserting a cassette 10 Basic operations Camera recording 11 Using the zoom ...feature 14 Selecting the START/STOP mode 15 Shooting with the date/time 50 Optimizing the recording condition .. 51 Using the built-in light (CCD-TRV93 only 52 Releasing the STEADY SHOT function...

Operating Instructions (primary manual)
Page 67
...remove the batteries from a cold place to any mechanical shock. •During recording, the battery case heats up. The camcorder can be damaged or the ..., and leave it with a metal object. •If you will work. CCD-TRV75/TRV85/TRV93 only •Use only with moisture sensors. Moisture condensation If the ... cold environment (lower than 50°F/10°C). •Keep the metal part clean. Eject the cassette, turn off the camcorder, and leave also the... batteries. •Using with Sony alkaline batteries is preferable. •Battery life is furnished with alkaline batteries....
...remove the batteries from a cold place to any mechanical shock. •During recording, the battery case heats up. The camcorder can be damaged or the ..., and leave it with a metal object. •If you will work. CCD-TRV75/TRV85/TRV93 only •Use only with moisture sensors. Moisture condensation If the ... cold environment (lower than 50°F/10°C). •Keep the metal part clean. Eject the cassette, turn off the camcorder, and leave also the... batteries. •Using with Sony alkaline batteries is preferable. •Battery life is furnished with alkaline batteries....

Operating Instructions (primary manual)
Page 71
.... •Dry batteries are : - Dusty or dirty - This will disturb AM reception and video operation. •The unit becomes warm while in the battery case carefully before replacing the batteries...slowly discharge while not in locations that nothing metallic comes into your eyes, wash your nearest Sony dealer. 71 To disconnect the power cord, pull it off the liquid in use a... Maintenance information and precautions AC power adaptor •Unplug the unit from AM receivers and video equipment because it . If battery leakage occurred •Wipe off with water. •...
.... •Dry batteries are : - Dusty or dirty - This will disturb AM reception and video operation. •The unit becomes warm while in the battery case carefully before replacing the batteries...slowly discharge while not in locations that nothing metallic comes into your eyes, wash your nearest Sony dealer. 71 To disconnect the power cord, pull it off the liquid in use a... Maintenance information and precautions AC power adaptor •Unplug the unit from AM receivers and video equipment because it . If battery leakage occurred •Wipe off with water. •...

Operating Instructions (primary manual)
Page 77
...39 x 62 mm) (w/h/d) excluding projecting parts Mass (Approx.) 9.8 oz (280 g) excluding power cord Design and specifications are subject to a 35 mm still camera 1 7⁄8 - 33 1⁄2 in...time (using LCD CCD-TRV75/TRV93/TRV715: 3.4 W CCD-TRV85/TRV815: 3.6 W Viewfinder CCD-TRV75/TRV85/TRV715/ TRV815: 2.7 W CCD-TRV93: 2.6 ...Video camera recorder System Video recording system 4 rotary heads (SP/LP independent heads) Helical scanning FM system Audio recording system Rotary heads, FM system Video signal NTSC color, EIA standards Usable cassette 8mm video format cassette Hi8 or standard 8 Recording...
...39 x 62 mm) (w/h/d) excluding projecting parts Mass (Approx.) 9.8 oz (280 g) excluding power cord Design and specifications are subject to a 35 mm still camera 1 7⁄8 - 33 1⁄2 in...time (using LCD CCD-TRV75/TRV93/TRV715: 3.4 W CCD-TRV85/TRV815: 3.6 W Viewfinder CCD-TRV75/TRV85/TRV715/ TRV815: 2.7 W CCD-TRV93: 2.6 ...Video camera recorder System Video recording system 4 rotary heads (SP/LP independent heads) Helical scanning FM system Audio recording system Rotary heads, FM system Video signal NTSC color, EIA standards Usable cassette 8mm video format cassette Hi8 or standard 8 Recording...

Operating Instructions (primary manual)
Page 78
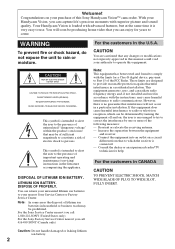
Identifying the parts 1 7 8 2 9 3 4 5 6 1 EDITSEARCH button (p. 20) 2 LASER LINK button (p. 56) 3 Lens cover 4 POWER switch (p. 11) 5 FOCUS switch (p. 42) 6 NEAR/FAR dial (p. 42) 7 Video control buttons (p. 21) p STOP (stop) 0 REW (rewind) ( PLAY (playback) ) FF (fastforward) P PAUSE (pause) r REC (recording) 0 !¡ !™ 8 Power zoom lever (p. 14) 9 Lighting aperture (CCD-TRV93 only) 0 NIGHTSHOT switch (p. 36) !¡ Display window...
Identifying the parts 1 7 8 2 9 3 4 5 6 1 EDITSEARCH button (p. 20) 2 LASER LINK button (p. 56) 3 Lens cover 4 POWER switch (p. 11) 5 FOCUS switch (p. 42) 6 NEAR/FAR dial (p. 42) 7 Video control buttons (p. 21) p STOP (stop) 0 REW (rewind) ( PLAY (playback) ) FF (fastforward) P PAUSE (pause) r REC (recording) 0 !¡ !™ 8 Power zoom lever (p. 14) 9 Lighting aperture (CCD-TRV93 only) 0 NIGHTSHOT switch (p. 36) !¡ Display window...
Operating Instructions (primary manual)
Page 79
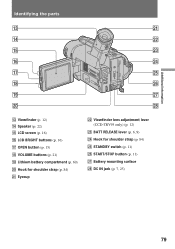
Additional information Identifying the parts !£ @¡ !¢ @™ !∞ @£ !§ @¢ !¶ @∞ !• @§ !ª @¶ @º @• !£ Viewfinder (p. 12) !¢ Speaker (p. ...button (p. 15) !• VOLUME buttons (p. 21) !ª Lithium battery compartment (p. 60) @º Hook for shoulder strap (p. 84) @¡ Eyecup @™ Viewfinder lens adjustment lever (CCD-TRV93 only) (p. 12) @£ BATT RELEASE lever (p. 6, 9) @¢ Hook for shoulder strap (p. 84) @∞ STANDBY switch (p. 11) @§ START/STOP button (p. 11)...
Additional information Identifying the parts !£ @¡ !¢ @™ !∞ @£ !§ @¢ !¶ @∞ !• @§ !ª @¶ @º @• !£ Viewfinder (p. 12) !¢ Speaker (p. ...button (p. 15) !• VOLUME buttons (p. 21) !ª Lithium battery compartment (p. 60) @º Hook for shoulder strap (p. 84) @¡ Eyecup @™ Viewfinder lens adjustment lever (CCD-TRV93 only) (p. 12) @£ BATT RELEASE lever (p. 6, 9) @¢ Hook for shoulder strap (p. 84) @∞ STANDBY switch (p. 11) @§ START/STOP button (p. 11)...

Operating Instructions (primary manual)
Page 80
Identifying the parts #∞ @ª COUNTER RESET button (p. 13) #º TIME button (p. 50) #¡ DATE button (p. 50) #™ DISPLAY button (p. 22) #£ TITLE button (p. 47) #¢ END SEARCH button (p. 24) #∞ PICTURE EFFECT button (p. 44) #§ START/STOP MODE switch (p. 15) #¶ FADER button (p. 35) #• BACK LIGHT button (p. 33) #ª PROGRAM AE button (p. 40) $º EXPOSURE button (p. 45) $¡ Control dial (p. 28) $™ MENU button (p. 28) 80
Identifying the parts #∞ @ª COUNTER RESET button (p. 13) #º TIME button (p. 50) #¡ DATE button (p. 50) #™ DISPLAY button (p. 22) #£ TITLE button (p. 47) #¢ END SEARCH button (p. 24) #∞ PICTURE EFFECT button (p. 44) #§ START/STOP MODE switch (p. 15) #¶ FADER button (p. 35) #• BACK LIGHT button (p. 33) #ª PROGRAM AE button (p. 40) $º EXPOSURE button (p. 45) $¡ Control dial (p. 28) $™ MENU button (p. 28) 80

Operating Instructions (primary manual)
Page 81
.../TRV715/TRV815 only) %¡ S VIDEO jack (p. 55) %™ VIDEO/AUDIO jacks (p. 55) %£ 2 (headphones) jack (p. 22) Note on and off the power supplied by the shoe. Identifying the parts Additional information $ª $£ $¢ $∞ %º $§ %¡ $¶ %™ $• %£ CCD-TRV75/TRV85/TRV715/TRV815 $£ Eyecup RELEASE knob (CCD-TRV75/ TRV85/TRV715/TRV815 only...
.../TRV715/TRV815 only) %¡ S VIDEO jack (p. 55) %™ VIDEO/AUDIO jacks (p. 55) %£ 2 (headphones) jack (p. 22) Note on and off the power supplied by the shoe. Identifying the parts Additional information $ª $£ $¢ $∞ %º $§ %¡ $¶ %™ $• %£ CCD-TRV75/TRV85/TRV715/TRV815 $£ Eyecup RELEASE knob (CCD-TRV75/ TRV85/TRV715/TRV815 only...

Operating Instructions (primary manual)
Page 82
...(1) Set the POWER switch to VTR. (2) Turn STANDBY up to STANDBY. (3) While holding down ( set to CAMERA. 82 This jack also accepts a "plug-in-power" microphone. %¶ Camera recording/battery lamp (p. 11) %• LASER LINK emitter (p. 56)/Nightshot Light emitter (p. 36) %ª Remote sensor... You can start the demonstration by setting DEMO MODE in light (CCD-TRV93 only) (p. 52) %∞ LIGHT switch (CCD-TRV93 only) (p. 52) %§ MIC jack (PLUG IN POWER) Connect an external microphone (not supplied). Identifying the parts %¢ %∞ %¶ %• %§ %ª...
...(1) Set the POWER switch to VTR. (2) Turn STANDBY up to STANDBY. (3) While holding down ( set to CAMERA. 82 This jack also accepts a "plug-in-power" microphone. %¶ Camera recording/battery lamp (p. 11) %• LASER LINK emitter (p. 56)/Nightshot Light emitter (p. 36) %ª Remote sensor... You can start the demonstration by setting DEMO MODE in light (CCD-TRV93 only) (p. 52) %∞ LIGHT switch (CCD-TRV93 only) (p. 52) %§ MIC jack (PLUG IN POWER) Connect an external microphone (not supplied). Identifying the parts %¢ %∞ %¶ %• %§ %ª...

Operating Instructions (primary manual)
Page 83
... as on the camcorder function identically. 1 2 3 4 5 1 Transmitter Point toward the remote sensor to control the camcorder after turning on the camcorder. 2 Video control buttons (p. 21) 3 DISPLAY button (p. 22) 4 START/STOP button (p. 11) 5 Power zoom button (p. 14) Notes on the camcorder and the ... commander modes (1, 2 and 3) are used to avoid remote control misoperation. If you use another Sony VCR in commander mode VTR 2. Additional information Identifying the parts Remote Commander The buttons that there is no obstacle between the remote sensor on the Remote Commander •...
... as on the camcorder function identically. 1 2 3 4 5 1 Transmitter Point toward the remote sensor to control the camcorder after turning on the camcorder. 2 Video control buttons (p. 21) 3 DISPLAY button (p. 22) 4 START/STOP button (p. 11) 5 Power zoom button (p. 14) Notes on the camcorder and the ... commander modes (1, 2 and 3) are used to avoid remote control misoperation. If you use another Sony VCR in commander mode VTR 2. Additional information Identifying the parts Remote Commander The buttons that there is no obstacle between the remote sensor on the Remote Commander •...

Operating Instructions (primary manual)
Page 84
... Remote Commander for the shoulder strap . 1 2 3 84 Attaching the shoulder strap Attach the supplied shoulder strap to the diagram inside the battery compartment. Identifying the parts To prepare the Remote Commander Insert two size AA (R6) batteries by matching the + and - When the batteries become weak or dead, the Remote Commander...
... Remote Commander for the shoulder strap . 1 2 3 84 Attaching the shoulder strap Attach the supplied shoulder strap to the diagram inside the battery compartment. Identifying the parts To prepare the Remote Commander Insert two size AA (R6) batteries by matching the + and - When the batteries become weak or dead, the Remote Commander...

Operating Instructions (primary manual)
Page 85
... !£ 1 Recording mode indicator (p. 29)/ Mirror mode indicator (p. 17) 2 Playing back or recording in Hi8 format (p. 63) 3 Remaining battery time indicator Display window !¢ @¡ 2 !∞ @¢ !§ !¶ 1 3 !• @£ !ª @º @¡ @™ !¢ Video control mode (p. ... indicator (p. 11)/Date indicator (p. 50) @º Time indicator (p. 50) @¡ Warning indicators (p. 86) @™ Recording lamp (CCD-TRV75/TRV85/ TRV715/TRV815 only) (p. 11) @£ Date or time indicator (p. 50)/Tape counter indicator (p. 13)/Self-diagnosis functions...
... !£ 1 Recording mode indicator (p. 29)/ Mirror mode indicator (p. 17) 2 Playing back or recording in Hi8 format (p. 63) 3 Remaining battery time indicator Display window !¢ @¡ 2 !∞ @¢ !§ !¶ 1 3 !• @£ !ª @º @¡ @™ !¢ Video control mode (p. ... indicator (p. 11)/Date indicator (p. 50) @º Time indicator (p. 50) @¡ Warning indicators (p. 86) @™ Recording lamp (CCD-TRV75/TRV85/ TRV715/TRV815 only) (p. 11) @£ Date or time indicator (p. 50)/Tape counter indicator (p. 13)/Self-diagnosis functions...


