Operating Instructions (primary manual)
Page 2
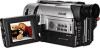
... try to your nearest Sony Service Center or Factory ...BATTERY. DISPOSE OF PROPERLY. However, there is no guarantee that to which can return your unwanted lithium ion batteries...Sony Service Center nearest you call 1-800-222-SONY (United States only) For the Sony...SONY (Canada only) For the customers in a residential installation. If this Sony... Handycam VisionTM camcorder. For the customers in the literature accompanying the appliance. Caution: Do not handle damaged or leaking lithium ion battery... the presence of lithium ion batteries in household or business trash ...
... try to your nearest Sony Service Center or Factory ...BATTERY. DISPOSE OF PROPERLY. However, there is no guarantee that to which can return your unwanted lithium ion batteries...Sony Service Center nearest you call 1-800-222-SONY (United States only) For the Sony...SONY (Canada only) For the customers in a residential installation. If this Sony... Handycam VisionTM camcorder. For the customers in the literature accompanying the appliance. Caution: Do not handle damaged or leaking lithium ion battery... the presence of lithium ion batteries in household or business trash ...

Operating Instructions (primary manual)
Page 3
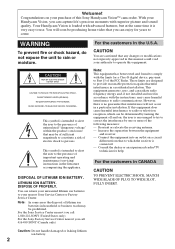
... date/time 50 Optimizing the recording condition .. 51 Using the built-in light (CCD-TRV93 only 52 Releasing the STEADY SHOT function 54 - for camera recording - Table of contents Before you begin Using this manual 4 Checking supplied accessories 5 Getting started Installing and charging the battery pack 6 Inserting a cassette 10 Basic operations Camera recording 11 Using the zoom...
... date/time 50 Optimizing the recording condition .. 51 Using the built-in light (CCD-TRV93 only 52 Releasing the STEADY SHOT function 54 - for camera recording - Table of contents Before you begin Using this manual 4 Checking supplied accessories 5 Getting started Installing and charging the battery pack 6 Inserting a cassette 10 Basic operations Camera recording 11 Using the zoom...
Operating Instructions (primary manual)
Page 5
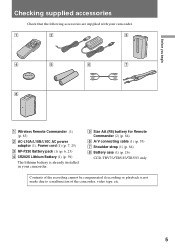
... (1) (p. 6, 25) 4 CR2025 Lithium Battery (1) (p. 59) The lithium battery is already installed in your camcorder. 5 Size AA (R6) battery for Remote Commander (2) (p. 84) 6 A/V connecting cable (1) (p. 55) 7 Shoulder strap (1) (p. 84) 8 Battery case (1) (p. 26) CCD-TRV75/TRV85/TRV93 only Contents of the recording cannot be compensated if recording or playback is not made due to a malfunction of the camcorder, video tape, etc. 5
... (1) (p. 6, 25) 4 CR2025 Lithium Battery (1) (p. 59) The lithium battery is already installed in your camcorder. 5 Size AA (R6) battery for Remote Commander (2) (p. 84) 6 A/V connecting cable (1) (p. 55) 7 Shoulder strap (1) (p. 84) 8 Battery case (1) (p. 26) CCD-TRV75/TRV85/TRV93 only Contents of the recording cannot be compensated if recording or playback is not made due to a malfunction of the camcorder, video tape, etc. 5

Operating Instructions (primary manual)
Page 6
... cover in the direction of the arrow. (2) Install the battery pack in the direction of Sony Corporation. Attach the battery pack to install and charge the battery pack. This camcorder operates only with the "InfoLITHIUM" battery. Getting started Installing and charging the battery pack Before using your camcorder, you first need to the camcorder securely. 1 2 BATT...
... cover in the direction of the arrow. (2) Install the battery pack in the direction of Sony Corporation. Attach the battery pack to install and charge the battery pack. This camcorder operates only with the "InfoLITHIUM" battery. Getting started Installing and charging the battery pack Before using your camcorder, you first need to the camcorder securely. 1 2 BATT...

Operating Instructions (primary manual)
Page 7
...CAMERA OFF VTR Notes •"- - - Before using the camcorder with the viewfinder. Use it is completely charged. The battery pack is completed until the camcorder calculates remaining battery time. •Remaining battery time indication in the display window. You can also use the battery longer than usual, leave the battery... the recording time with the battery pack, unplug the AC power adaptor from the actual recording time. 7 Remaining battery time is completed. Getting started Installing and charging the battery pack Charging the battery pack Charge the battery pack ...
...CAMERA OFF VTR Notes •"- - - Before using the camcorder with the viewfinder. Use it is completely charged. The battery pack is completed until the camcorder calculates remaining battery time. •Remaining battery time indication in the display window. You can also use the battery longer than usual, leave the battery... the recording time with the battery pack, unplug the AC power adaptor from the actual recording time. 7 Remaining battery time is completed. Getting started Installing and charging the battery pack Charging the battery pack Charge the battery pack ...

Operating Instructions (primary manual)
Page 8
... the supplied AC power adaptor. (Lower temperatures require a longer charging time.) Battery life Upper numbers are the time when recording with the viewfinder. Using both will further reduce recording time. Lower numbers are the time when recording with the LCD screen. CCD-TRV75/TRV715 Battery pack NP-F330 (supplied) NP-F530 NP-F550 NP-F730 NP-F730H...
... the supplied AC power adaptor. (Lower temperatures require a longer charging time.) Battery life Upper numbers are the time when recording with the viewfinder. Using both will further reduce recording time. Lower numbers are the time when recording with the LCD screen. CCD-TRV75/TRV715 Battery pack NP-F330 (supplied) NP-F530 NP-F550 NP-F730 NP-F730H...

Operating Instructions (primary manual)
Page 9
... will be shorter if you use a normally charged battery. To remove the battery pack While pressing BATT RELEASE, slide the battery pack in the viewfinder or on the LCD screen. Getting started Installing and charging the battery pack CCD-TRV93 Battery pack Continuous recording time* Typical recording time** Playing time on LCD NP-F330 (supplied) NP-F530 NP...
... will be shorter if you use a normally charged battery. To remove the battery pack While pressing BATT RELEASE, slide the battery pack in the viewfinder or on the LCD screen. Getting started Installing and charging the battery pack CCD-TRV93 Battery pack Continuous recording time* Typical recording time** Playing time on LCD NP-F330 (supplied) NP-F530 NP...
Operating Instructions (primary manual)
Page 11
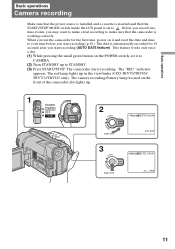
... to STANDBY. (3) Press START/STOP. The camcorder starts recording. The "REC" indicator appears. The camera recording/battery lamp located on it to CAMERA. (2) Turn STANDBY up to your time before you may want to make a trial recording to make sure that the START/STOP MODE switch inside... for 10 seconds after you start recording (p. 61). Before you record onetime events, you start recording (AUTO DATE feature). The date is automatically recorded for the first time, power on the front of the camcorder also lights up in the viewfinder (CCD-TRV75/TRV85/ TRV715/TRV815 only).
... to STANDBY. (3) Press START/STOP. The camcorder starts recording. The "REC" indicator appears. The camera recording/battery lamp located on it to CAMERA. (2) Turn STANDBY up to your time before you may want to make a trial recording to make sure that the START/STOP MODE switch inside... for 10 seconds after you start recording (p. 61). Before you record onetime events, you start recording (AUTO DATE feature). The date is automatically recorded for the first time, power on the front of the camcorder also lights up in the viewfinder (CCD-TRV75/TRV85/ TRV715/TRV815 only).

Operating Instructions (primary manual)
Page 12
... If you cannot see the indicators in the viewfinder come into sharp focus. [a] CCD-TRV75/TRV85/TRV715/ TRV815 [b] CCD-TRV93 Note on the battery pack which is installed with the camcorder. Camera recording To stop recording momentarily [a] Press START/STOP again. Turn the viewfinder lens adjustment ring [a] (CCD-TRV75/TRV85/TRV715/TRV815) or move the viewfinder lens adjustment lever...
... If you cannot see the indicators in the viewfinder come into sharp focus. [a] CCD-TRV75/TRV85/TRV715/ TRV815 [b] CCD-TRV93 Note on the battery pack which is installed with the camcorder. Camera recording To stop recording momentarily [a] Press START/STOP again. Turn the viewfinder lens adjustment ring [a] (CCD-TRV75/TRV85/TRV715/TRV815) or move the viewfinder lens adjustment lever...
Operating Instructions (primary manual)
Page 13
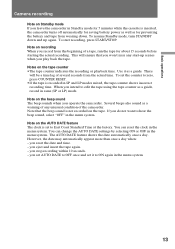
...battery and tape from wearing down and up scenes when you play back the tape. To set the counter to ON again in the menu system. 13 Note on the AUTO DATE feature The clock is recorded in SP and LP modes mixed, the tape counter shows incorrect recording time. Basic operations Camera recording... Note on Standby mode If you leave the camcorder in Standby mode for 5 minutes while the cassette is not recorded on the tape. There will...
...battery and tape from wearing down and up scenes when you play back the tape. To set the counter to ON again in the menu system. 13 Note on the AUTO DATE feature The clock is recorded in SP and LP modes mixed, the tape counter shows incorrect recording time. Basic operations Camera recording... Note on Standby mode If you leave the camcorder in Standby mode for 5 minutes while the cassette is not recorded on the tape. There will...

Operating Instructions (primary manual)
Page 16
... as a power source. 16 The LCD panel moves about 90 degrees to this side and about 210 degrees to dim the LCD screen The battery life is longer when the LCD panel is insufficiently illuminated even after adjusting LCD BRIGHT, select LCD B. Use the viewfinder instead of the LCD ...screen, press LCD BRIGHT. + side: to brighten the LCD screen - You can also record the picture while looking at the LCD screen. To adjust the brightness of the LCD screen to BRIGHT. L. Camera recording Shooting with the LCD screen You can select LCD B. side: to the other side. You cannot...
... as a power source. 16 The LCD panel moves about 90 degrees to this side and about 210 degrees to dim the LCD screen The battery life is longer when the LCD panel is insufficiently illuminated even after adjusting LCD BRIGHT, select LCD B. Use the viewfinder instead of the LCD ...screen, press LCD BRIGHT. + side: to brighten the LCD screen - You can also record the picture while looking at the LCD screen. To adjust the brightness of the LCD screen to BRIGHT. L. Camera recording Shooting with the LCD screen You can select LCD B. side: to the other side. You cannot...
Operating Instructions (primary manual)
Page 22
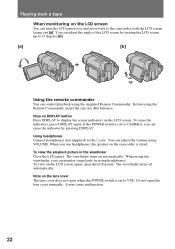
... the angle of the LCD screen by using the Remote Commander, insert the size AA (R6) batteries. When you use headphones, the speaker on the LCD screen again, open when the POWER switch is set to CAMERA, you can monitor sound only by turning the LCD screen up to the 2 jack. The...
... the angle of the LCD screen by using the Remote Commander, insert the size AA (R6) batteries. When you use headphones, the speaker on the LCD screen again, open when the POWER switch is set to CAMERA, you can monitor sound only by turning the LCD screen up to the 2 jack. The...

Operating Instructions (primary manual)
Page 25
...for your camcorder. Choose the appropriate power source depending on where you want to use your camcorder: battery pack, house current, alkaline batteries (CCD-TRV75/TRV85/TRV93 only) and 12/24 V car battery. Using the house current (1) Open the DC IN jack cover, and connect the AC power ...battery case (CCD-TRV75/TRV85/ TRV93 only) Sony car battery charger DC-V515A Notes on the camcorder. (2) Connect the power cord to the AC power adaptor. (3) Connect the power cord to the DC IN jack on power sources •Disconnecting the power source or removing the battery pack during recording ...
...for your camcorder. Choose the appropriate power source depending on where you want to use your camcorder: battery pack, house current, alkaline batteries (CCD-TRV75/TRV85/TRV93 only) and 12/24 V car battery. Using the house current (1) Open the DC IN jack cover, and connect the AC power ...battery case (CCD-TRV75/TRV85/ TRV93 only) Sony car battery charger DC-V515A Notes on the camcorder. (2) Connect the power cord to the AC power adaptor. (3) Connect the power cord to the DC IN jack on power sources •Disconnecting the power source or removing the battery pack during recording ...

Operating Instructions (primary manual)
Page 26
... as the battery pack. 1 2 3 Battery life Using alkaline batteries at 77°F (25°C). CCD-TRV75/TRV85/TRV93 only Use the battery case (supplied) and six size AA (LR6) Sony Alkaline batteries (not supplied). (1) Remove the battery holder from the camcorder to be sure to remove the battery case from the battery case. (2) Insert six new alkaline batteries into the battery holder, following...
... as the battery pack. 1 2 3 Battery life Using alkaline batteries at 77°F (25°C). CCD-TRV75/TRV85/TRV93 only Use the battery case (supplied) and six size AA (LR6) Sony Alkaline batteries (not supplied). (1) Remove the battery holder from the camcorder to be sure to remove the battery case from the battery case. (2) Insert six new alkaline batteries into the battery holder, following...

Operating Instructions (primary manual)
Page 27
... is removed in the same way as the battery pack. Connect the car battery cord to the operating instructions of a car (12 V or 24 V). To remove the car battery charger The car battery charger is a genuine accessory for Sony video products. When purchasing Sony video products, Sony recommends that this "GENUINE VIDEO ACCESSORIES" mark. 27 Refer to the cigarette lighter...
... is removed in the same way as the battery pack. Connect the car battery cord to the operating instructions of a car (12 V or 24 V). To remove the car battery charger The car battery charger is a genuine accessory for Sony video products. When purchasing Sony video products, Sony recommends that this "GENUINE VIDEO ACCESSORIES" mark. 27 Refer to the cigarette lighter...
Operating Instructions (primary manual)
Page 29
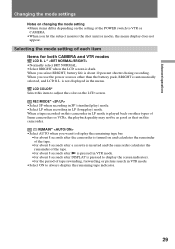
...or VCRs, the playback quality may not be as good as that on this camcorder in LP mode is played back on other than the battery pack, BRIGHT is pressed to display the screen indicators. •for about 8 seconds after DISPLAY is automatically selected, and LCD B.L. REC ...MODE* •Select SP when recording in SP (standard play) mode. •Select LP when recording in VTR mode. •for both CAMERA and VTR modes LCD B. Selecting the mode setting of each item Items for about 8 seconds after (...
...or VCRs, the playback quality may not be as good as that on this camcorder in LP mode is played back on other than the battery pack, BRIGHT is pressed to display the screen indicators. •for about 8 seconds after DISPLAY is automatically selected, and LCD B.L. REC ...MODE* •Select SP when recording in SP (standard play) mode. •Select LP when recording in VTR mode. •for both CAMERA and VTR modes LCD B. Selecting the mode setting of each item Items for about 8 seconds after (...

Operating Instructions (primary manual)
Page 32
...a tape on TBC setting Set TBC to minimize picture deterioration when editing. • Normally select OFF. Note on which you do not want the camera recording/battery lamp at the front of the unit to reduce picture noise. • Select OFF if the picture has a lot of a TV game or ... removed, as long as the lithium battery is in place. 32 DNR* • Normally select ON to light up. • Normally select ON. REC LAMP* • Select OFF when you recorded the signal of movement, causing a conspicuous afterimage. Changing the mode settings WORLD TIME* Select this item to play back...
...a tape on TBC setting Set TBC to minimize picture deterioration when editing. • Normally select OFF. Note on which you do not want the camera recording/battery lamp at the front of the unit to reduce picture noise. • Select OFF if the picture has a lot of a TV game or ... removed, as long as the lithium battery is in place. 32 DNR* • Normally select ON to light up. • Normally select ON. REC LAMP* • Select OFF when you recorded the signal of movement, causing a conspicuous afterimage. Changing the mode settings WORLD TIME* Select this item to play back...

Operating Instructions (primary manual)
Page 52
... on the built-in use. • When you do not use the camcorder, slide LIGHT to OFF and remove the battery pack to avoid turning on /off . Notes • The battery pack is quickly discharging while the built-in light turns on and off by children. LIGHT OFF AUTO ON Using the... built-in light Slide LIGHT to OFF. CCD-TRV93 only You can use . 52 The built-in light to suit your shooting...
... on the built-in use. • When you do not use the camcorder, slide LIGHT to OFF and remove the battery pack to avoid turning on /off . Notes • The battery pack is quickly discharging while the built-in light turns on and off by children. LIGHT OFF AUTO ON Using the... built-in light Slide LIGHT to OFF. CCD-TRV93 only You can use . 52 The built-in light to suit your shooting...
Operating Instructions (primary manual)
Page 59
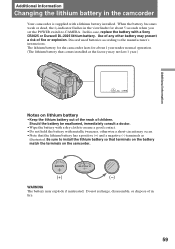
... present a risk of in fire. 59 Additional information Additional information Changing the lithium battery in the camcorder Your camcorder is supplied with a Sony CR2025 or Duracell DL-2025 lithium battery. When the battery becomes weak or dead, the I indicator flashes in the viewfinder for about 5 ...seconds when you set the POWER switch to assure a good contact. •Do not hold the battery with a dry cloth to CAMERA. In ...
... present a risk of in fire. 59 Additional information Additional information Changing the lithium battery in the camcorder Your camcorder is supplied with a Sony CR2025 or Duracell DL-2025 lithium battery. When the battery becomes weak or dead, the I indicator flashes in the viewfinder for about 5 ...seconds when you set the POWER switch to assure a good contact. •Do not hold the battery with a dry cloth to CAMERA. In ...

Operating Instructions (primary manual)
Page 60
Otherwise, you will need to reset the date, time and other items in the camcorder Changing the lithium battery When replacing the lithium battery, keep the battery pack or other power source attached. Close the lid. 1 1 2 5 3 1 2 5 CR 202 CR 202 60 Changing the lithium battery in the menu system retained by the lithium battery. (1) Open the LCD panel and open the lid of the lithium battery compartment. (2) Push the lithium battery down once and pull it out from the holder. (3) Install the lithium battery with the positive (+) side facing out.
Otherwise, you will need to reset the date, time and other items in the camcorder Changing the lithium battery When replacing the lithium battery, keep the battery pack or other power source attached. Close the lid. 1 1 2 5 3 1 2 5 CR 202 CR 202 60 Changing the lithium battery in the menu system retained by the lithium battery. (1) Open the LCD panel and open the lid of the lithium battery compartment. (2) Push the lithium battery down once and pull it out from the holder. (3) Install the lithium battery with the positive (+) side facing out.


