Operating Instructions
Page 4
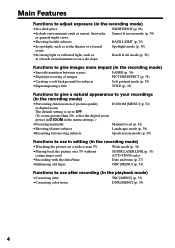
...;Preventing deterioration of picture quality in digital zoom The default setting is set to OFF. (To zoom greater than 20×, select the digital zoom power in D ZOOM in the menu settings. ) D ZOOM [MENU] (p. 52) •Focusing manually Manual focus (p. 42) •Shooting distant subjects Landscape... picture on a wide-screen TV Wide mode (p. 34) •Playing back the picture on a TV without connecting a cord •Recording with the date/time SUPER LASER LINK (p. 33) (CCD-TRV98 only) Date and time (p. 27) •Enhancing old tapes ORC [MENU] (p. 54) Functions to use after ...
...;Preventing deterioration of picture quality in digital zoom The default setting is set to OFF. (To zoom greater than 20×, select the digital zoom power in D ZOOM in the menu settings. ) D ZOOM [MENU] (p. 52) •Focusing manually Manual focus (p. 42) •Shooting distant subjects Landscape... picture on a wide-screen TV Wide mode (p. 34) •Playing back the picture on a TV without connecting a cord •Recording with the date/time SUPER LASER LINK (p. 33) (CCD-TRV98 only) Date and time (p. 27) •Enhancing old tapes ORC [MENU] (p. 54) Functions to use after ...

Operating Instructions
Page 6
... a cassette into the cassette compartment with its window facing out and the write-protect tab on the cassette up . Connecting the power cord (p. 16) Use the battery pack when using your camcorder. AC power adaptor (supplied) Inserting a cassette (p. 19) 1 Open the lid of the cassette compartment. Connect the plug with its v mark facing up...
... a cassette into the cassette compartment with its window facing out and the write-protect tab on the cassette up . Connecting the power cord (p. 16) Use the battery pack when using your camcorder. AC power adaptor (supplied) Inserting a cassette (p. 19) 1 Open the lid of the cassette compartment. Connect the plug with its v mark facing up...

Operating Instructions
Page 10
Checking supplied accessories Make sure that the following accessories are supplied with your camcorder. 1 2 3 4 5 6 7 1 Wireless Remote Commander (1) (p. 78) CCD-TRV49/TRV78/TRV98 only 4 Size AA (R6) battery for Remote Commander (2) (p. 78) CCD-TRV49/TRV78/TRV98 only 2 AC-L10A/L10B/L10C AC power adaptor (1), Power cord (1) (p. 12) 3 NP-F330 battery pack (1) (p. 11, 12) 5 A/V connecting cable (1) (p. 32) 6 Shoulder strap...
Checking supplied accessories Make sure that the following accessories are supplied with your camcorder. 1 2 3 4 5 6 7 1 Wireless Remote Commander (1) (p. 78) CCD-TRV49/TRV78/TRV98 only 4 Size AA (R6) battery for Remote Commander (2) (p. 78) CCD-TRV49/TRV78/TRV98 only 2 AC-L10A/L10B/L10C AC power adaptor (1), Power cord (1) (p. 12) 3 NP-F330 battery pack (1) (p. 11, 12) 5 A/V connecting cable (1) (p. 32) 6 Shoulder strap...
Operating Instructions
Page 12
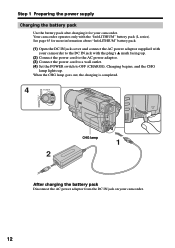
...charging the battery pack Disconnect the AC power adaptor from the DC IN jack on your camcorder. 12 Charging begins, and the CHG lamp lights up . (2) Connect the power cord to the AC power adaptor. (3) Connect the power cord to a wall outlet. (4) Set the POWER switch to OFF (CHARGE). See page ...65 for your camcorder. Step 1 Preparing the power supply Charging the battery pack Use the battery pack after charging...
...charging the battery pack Disconnect the AC power adaptor from the DC IN jack on your camcorder. 12 Charging begins, and the CHG lamp lights up . (2) Connect the power cord to the AC power adaptor. (3) Connect the power cord to a wall outlet. (4) Set the POWER switch to OFF (CHARGE). See page ...65 for your camcorder. Step 1 Preparing the power supply Charging the battery pack Use the battery pack after charging...

Operating Instructions
Page 16
...power adaptor, if any power if the power cord is connected to the DC IN jack, even when the power cord is not plugged into a wall outlet. •Place the AC power adaptor near a wall outlet. Notes •The AC power adaptor can supply power even if the battery pack is attached to your camcorder...mark facing up. (2) Connect the power cord to the AC power adaptor. (3) Connect the power cord to a wall outlet. 1 2, 3 PRECAUTION The set is not disconnected from the AC power source (wall outlet) as long as possible to cut off . Using a car battery Use Sony DC Adaptor/Charger (optional). 16 ...
...power adaptor, if any power if the power cord is connected to the DC IN jack, even when the power cord is not plugged into a wall outlet. •Place the AC power adaptor near a wall outlet. Notes •The AC power adaptor can supply power even if the battery pack is attached to your camcorder...mark facing up. (2) Connect the power cord to the AC power adaptor. (3) Connect the power cord to a wall outlet. 1 2, 3 PRECAUTION The set is not disconnected from the AC power source (wall outlet) as long as possible to cut off . Using a car battery Use Sony DC Adaptor/Charger (optional). 16 ...

Operating Instructions
Page 61
...21:ss C:22:ss C:31:ss C:32:ss E:61:ss E:62:ss Cause and/or Corrective Actions • You are using the Sony V8-25CLD cleaning cassette (optional). (p. 68) • A malfunction other than the above that is displayed, check the following code chart....the current condition of your camcorder as a 5-digit code (a combination of a letter and figures) on the state of your camcorder. • A malfunction that you are dirty. c Contact your camcorder. c Use an "InfoLITHIUM" battery pack. (p. 65) • Moisture condensation has occurred. c Disconnect the power cord of the 5-digit code....
...21:ss C:22:ss C:31:ss C:32:ss E:61:ss E:62:ss Cause and/or Corrective Actions • You are using the Sony V8-25CLD cleaning cassette (optional). (p. 68) • A malfunction other than the above that is displayed, check the following code chart....the current condition of your camcorder as a 5-digit code (a combination of a letter and figures) on the state of your camcorder. • A malfunction that you are dirty. c Contact your camcorder. c Use an "InfoLITHIUM" battery pack. (p. 65) • Moisture condensation has occurred. c Disconnect the power cord of the 5-digit code....

Operating Instructions
Page 70
...on the lens, remove them with a soft cloth. •Clean the camcorder body with a dry soft cloth, or a soft cloth lightly moistened with a damaged cord or if the unit has been dropped or damaged. •Do not bend the power cord forcibly, or place a heavy object on it. On handling tapes Do...and thickness of the tape and if the recording tab is in a dusty place, protect it from the wall outlet when you use your camcorder. Never pull the power cord itself. •Do not operate the unit with a mild detergent solution. If this malfunction cannot be damaged. •Always keep it ...
...on the lens, remove them with a soft cloth. •Clean the camcorder body with a dry soft cloth, or a soft cloth lightly moistened with a damaged cord or if the unit has been dropped or damaged. •Do not bend the power cord forcibly, or place a heavy object on it. On handling tapes Do...and thickness of the tape and if the recording tab is in a dusty place, protect it from the wall outlet when you use your camcorder. Never pull the power cord itself. •Do not operate the unit with a mild detergent solution. If this malfunction cannot be damaged. •Always keep it ...

Operating Instructions
Page 72
...approx.) 125 × 39 × 62 mm (5 × 1 9/16 × 2 1/2 in.) (w/h/d) excluding projecting parts Mass (approx.) 280 g (9.8 oz ) excluding power cord CCD-TRV58/TRV68: 123 200 (560 × 220) 20× (Optical), 460× (Digital) CCD-TRV78/TRV88/TRV98: 20× (Optical), 560× (Digital) Focal length 3.6 - 72 mm (5/32 - 2 7/8 in.) When converted to a 35... rotary heads Helical scanning FM system Audio recording system Rotary heads, FM system Video signal NTSC color, EIA standards Usable cassette 8mm video format cassette Hi8 or standard 8 Recording/playback time (using 120 min.
...approx.) 125 × 39 × 62 mm (5 × 1 9/16 × 2 1/2 in.) (w/h/d) excluding projecting parts Mass (approx.) 280 g (9.8 oz ) excluding power cord CCD-TRV58/TRV68: 123 200 (560 × 220) 20× (Optical), 460× (Digital) CCD-TRV78/TRV88/TRV98: 20× (Optical), 560× (Digital) Focal length 3.6 - 72 mm (5/32 - 2 7/8 in.) When converted to a 35... rotary heads Helical scanning FM system Audio recording system Rotary heads, FM system Video signal NTSC color, EIA standards Usable cassette 8mm video format cassette Hi8 or standard 8 Recording/playback time (using 120 min.


