
Operating Instructions
Page 2
... product's enclosure that any changes or modifications not expressly approved in this Sony Handycam VisionTM camcorder. For customers in the U.S.A. Your Handycam Vision is loaded with superior picture and sound quality. For the Sony Service Center nearest you call 416-499-SONY (Canada only) Caution: Do not handle damaged or leaking lithium ion battery...
... product's enclosure that any changes or modifications not expressly approved in this Sony Handycam VisionTM camcorder. For customers in the U.S.A. Your Handycam Vision is loaded with superior picture and sound quality. For the Sony Service Center nearest you call 416-499-SONY (Canada only) Caution: Do not handle damaged or leaking lithium ion battery...

Operating Instructions
Page 5
NightShot 26 Superimposing the date and time on TV 32 Customizing Your Camcorder Changing the menu settings 51 Troubleshooting Types of contents Main Features 4 Quick Start Guide 6 Editing Dubbing a tape 50 Getting started Using...Picture effect 38 Using the PROGRAM AE function .... 39 Adjusting the exposure manually ...... 41 Focusing manually 42 Superimposing a title 43 Making your camcorder abroad 66 Maintenance information and precautions 67 Specifications 72 Quick Reference Identifying the parts and controls ...... 73 Index Back cover Advanced Recording Operations Using...
NightShot 26 Superimposing the date and time on TV 32 Customizing Your Camcorder Changing the menu settings 51 Troubleshooting Types of contents Main Features 4 Quick Start Guide 6 Editing Dubbing a tape 50 Getting started Using...Picture effect 38 Using the PROGRAM AE function .... 39 Adjusting the exposure manually ...... 41 Focusing manually 42 Superimposing a title 43 Making your camcorder abroad 66 Maintenance information and precautions 67 Specifications 72 Quick Reference Identifying the parts and controls ...... 73 Index Back cover Advanced Recording Operations Using...

Operating Instructions
Page 6
... up . 3 Close the cassette compartment by pressing the mark on the cassette compartment. Connecting the power cord (p. 16) Use the battery pack when using your camcorder. Quick Start Guide 6 AC power adaptor (supplied) Inserting a cassette (p. 19) 1 Open the lid of the cassette compartment. See the page in parentheses "( )" for more information... jack cover. Close the lid of the cassette compartment, and press EJECT. Quick Start Guide This chapter introduces you to the basic features of your camcorder outdoors (p. 11).
... up . 3 Close the cassette compartment by pressing the mark on the cassette compartment. Connecting the power cord (p. 16) Use the battery pack when using your camcorder. Quick Start Guide 6 AC power adaptor (supplied) Inserting a cassette (p. 19) 1 Open the lid of the cassette compartment. See the page in parentheses "( )" for more information... jack cover. Close the lid of the cassette compartment, and press EJECT. Quick Start Guide This chapter introduces you to the basic features of your camcorder outdoors (p. 11).
Operating Instructions
Page 7
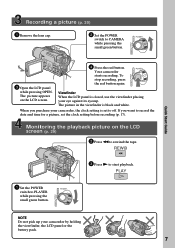
...1 Set the POWER switch to start playback. OFF (CHARGE) PLAYER POWER CAMERA Quick Start Guide 3 Open the LCD panel while pressing OPEN. Your camcorder starts recording. When you want to record the date and time for a picture, set to CAMERA while pressing the small green button. The picture... in the viewfinder is black and white. If you purchase your camcorder, the clock setting is closed, use the viewfinder placing your camcorder by holding the viewfinder, the LCD panel or the battery pack. 7 OFF (CHARGE) PLAYER POWER CAMERA ...
...1 Set the POWER switch to start playback. OFF (CHARGE) PLAYER POWER CAMERA Quick Start Guide 3 Open the LCD panel while pressing OPEN. Your camcorder starts recording. When you want to record the date and time for a picture, set to CAMERA while pressing the small green button. The picture... in the viewfinder is black and white. If you purchase your camcorder, the clock setting is closed, use the viewfinder placing your camcorder by holding the viewfinder, the LCD panel or the battery pack. 7 OFF (CHARGE) PLAYER POWER CAMERA ...

Operating Instructions
Page 8
...start reading this manual, buttons and settings on your camcorder, check the model number by looking at the bottom of differences CCDRemote sensor Digital zoom SUPER LASER LINK SteadyShot z Provided - z TRV88 - 560× - The CCD-TRV98 is the model used for the six models listed... in capital letters. TRV68 - 460× - To view your camcorder. Otherwise, the model name is being carried out. e.g. When you carry out an operation...
...start reading this manual, buttons and settings on your camcorder, check the model number by looking at the bottom of differences CCDRemote sensor Digital zoom SUPER LASER LINK SteadyShot z Provided - z TRV88 - 560× - The CCD-TRV98 is the model used for the six models listed... in capital letters. TRV68 - 460× - To view your camcorder. Otherwise, the model name is being carried out. e.g. When you carry out an operation...
Operating Instructions
Page 9
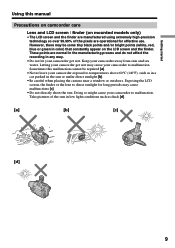
... (white, red, blue or green in any way. • Do not let your camcorder get wet may cause malfunctions [c]. • Do not directly shoot the sun. Sometimes this manual Precautions on camcorder care Lens and LCD screen / finder (on the LCD screen and the finder. Exposing ... or the lens to direct sunlight for effective use. Doing so might cause your camcorder get wet. These points are operational for long periods may cause your camcorder to malfunction. Letting your camcorder to malfunction. Take pictures of the pixels are normal in the manufacturing process and do...
... (white, red, blue or green in any way. • Do not let your camcorder get wet may cause malfunctions [c]. • Do not directly shoot the sun. Sometimes this manual Precautions on camcorder care Lens and LCD screen / finder (on the LCD screen and the finder. Exposing ... or the lens to direct sunlight for effective use. Doing so might cause your camcorder get wet. These points are operational for long periods may cause your camcorder to malfunction. Letting your camcorder to malfunction. Take pictures of the pixels are normal in the manufacturing process and do...

Operating Instructions
Page 10
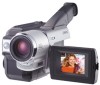
Checking supplied accessories Make sure that the following accessories are supplied with your camcorder. 1 2 3 4 5 6 7 1 Wireless Remote Commander (1) (p. 78) CCD-TRV49/TRV78/TRV98 only 4 Size AA (R6) battery for Remote Commander (2) (p. 78) CCD-TRV49/TRV78/TRV98 only 2 AC-L10A/L10B/L10C AC power adaptor (1), Power cord (1) (p. 12) 3 NP-F330 battery pack (1) (p. 11, 12) 5 A/V connecting cable...
Checking supplied accessories Make sure that the following accessories are supplied with your camcorder. 1 2 3 4 5 6 7 1 Wireless Remote Commander (1) (p. 78) CCD-TRV49/TRV78/TRV98 only 4 Size AA (R6) battery for Remote Commander (2) (p. 78) CCD-TRV49/TRV78/TRV98 only 2 AC-L10A/L10B/L10C AC power adaptor (1), Power cord (1) (p. 12) 3 NP-F330 battery pack (1) (p. 11, 12) 5 A/V connecting cable...
Operating Instructions
Page 11
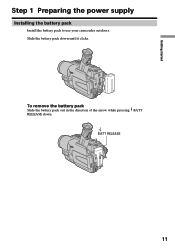
Getting started Step 1 Preparing the power supply Installing the battery pack Install the battery pack to use your camcorder outdoors. To remove the battery pack Slide the battery pack out in the direction of the arrow while pressing BATT RELEASE down until it clicks. BATT RELEASE 11 Slide the battery pack down .
Getting started Step 1 Preparing the power supply Installing the battery pack Install the battery pack to use your camcorder outdoors. To remove the battery pack Slide the battery pack out in the direction of the arrow while pressing BATT RELEASE down until it clicks. BATT RELEASE 11 Slide the battery pack down .
Operating Instructions
Page 12
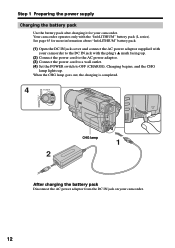
...PLAYER OFF (CHARGE) CAMERA CHG lamp 1 2 After charging the battery pack Disconnect the AC power adaptor from the DC IN jack on your camcorder. Your camcorder operates only with the plug's v mark facing up . Step 1 Preparing the power supply Charging the battery pack Use the battery pack after charging... it for more information about "InfoLITHIUM" battery pack. (1) Open the DC IN jack cover and connect the AC power adaptor supplied with your camcorder to OFF (CHARGE). Charging begins, and the CHG lamp lights up . (2) Connect the power cord to the AC power adaptor. (3) Connect...
...PLAYER OFF (CHARGE) CAMERA CHG lamp 1 2 After charging the battery pack Disconnect the AC power adaptor from the DC IN jack on your camcorder. Your camcorder operates only with the plug's v mark facing up . Step 1 Preparing the power supply Charging the battery pack Use the battery pack after charging... it for more information about "InfoLITHIUM" battery pack. (1) Open the DC IN jack cover and connect the AC power adaptor supplied with your camcorder to OFF (CHARGE). Charging begins, and the CHG lamp lights up . (2) Connect the power cord to the AC power adaptor. (3) Connect...

Operating Instructions
Page 14
Step 1 Preparing the power supply Recording time CCD-TRV49/TRV58/TRV68/TRV78 Battery pack Recording with the viewfinder Continuous* Typical** NP-F330 ...* Typical** 120 65 205 110 240 130 410 225 490 270 650 355 750 410 880 485 CCD-TRV88 Battery pack NP-F330 (supplied) NP-F530 NP-F550 NP-F730 NP-F730H/F750 NP-F930 ...Approximate continuous recording time at 25°C (77°F). The actual battery life may be shorter if you use your camcorder in a cold environment. ** Approximate number of minutes when you repeat recording start/ stop, zooming and turning the power...
Step 1 Preparing the power supply Recording time CCD-TRV49/TRV58/TRV68/TRV78 Battery pack Recording with the viewfinder Continuous* Typical** NP-F330 ...* Typical** 120 65 205 110 240 130 410 225 490 270 650 355 750 410 880 485 CCD-TRV88 Battery pack NP-F330 (supplied) NP-F530 NP-F550 NP-F730 NP-F730H/F750 NP-F930 ...Approximate continuous recording time at 25°C (77°F). The actual battery life may be shorter if you use your camcorder in a cold environment. ** Approximate number of minutes when you repeat recording start/ stop, zooming and turning the power...
Operating Instructions
Page 15
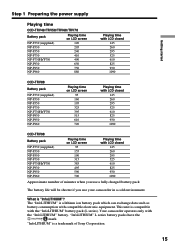
...time with the "InfoLITHIUM" battery. "InfoLITHIUM" L series battery packs have the mark. Getting started Step 1 Preparing the power supply Playing time CCD-TRV49/TRV58/TRV68/TRV78 Battery pack NP-F330 (supplied) NP-F530 NP-F550 NP-F730 NP-F730H/F750 NP-F930 NP-F950 NP-F960 Playing time on...720 Playing time with LCD closed 145 260 295 525 610 825 930 1090 Approximate number of Sony Corporation. 15 What is a trademark of minutes when you use a fully charged battery pack The battery life will be shorter if you use your camcorder in a cold environment. "InfoLITHIUM" is "InfoLITHIUM"?
...time with the "InfoLITHIUM" battery. "InfoLITHIUM" L series battery packs have the mark. Getting started Step 1 Preparing the power supply Playing time CCD-TRV49/TRV58/TRV68/TRV78 Battery pack NP-F330 (supplied) NP-F530 NP-F550 NP-F730 NP-F730H/F750 NP-F930 NP-F950 NP-F960 Playing time on...720 Playing time with LCD closed 145 260 295 525 610 825 930 1090 Approximate number of Sony Corporation. 15 What is a trademark of minutes when you use a fully charged battery pack The battery life will be shorter if you use your camcorder in a cold environment. "InfoLITHIUM" is "InfoLITHIUM"?

Operating Instructions
Page 16
... the AC power adaptor. (3) Connect the power cord to a wall outlet. 1 2, 3 PRECAUTION The set itself has been turned off the power. Using a car battery Use Sony DC Adaptor/Charger (optional). 16 Notes •The AC power adaptor can supply power even if the battery pack is connected to the wall outlet... it from a wall outlet using the AC power adaptor, if any power if the power cord is connected to the DC IN jack on your camcorder. •The DC IN jack has "source priority". While using the AC power adaptor. (1) Open the DC IN jack cover, and connect the AC power...
... the AC power adaptor. (3) Connect the power cord to a wall outlet. 1 2, 3 PRECAUTION The set itself has been turned off the power. Using a car battery Use Sony DC Adaptor/Charger (optional). 16 Notes •The AC power adaptor can supply power even if the battery pack is connected to the wall outlet... it from a wall outlet using the AC power adaptor, if any power if the power cord is connected to the DC IN jack on your camcorder. •The DC IN jack has "source priority". While using the AC power adaptor. (1) Open the DC IN jack cover, and connect the AC power...
Operating Instructions
Page 17
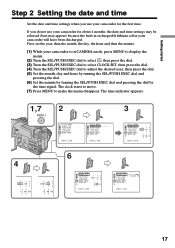
...the time signal. First, set the year, then the month, the day, the hour and then the minute. (1) While your camcorder is in your camcorder will have been discharged. If you use your camcorder for the first time. The time indicator appears. 1,7 MENU 2 SETUP MENU CLOCK SET AUTO DATE LTR S I ZE L ...PM [ MENU ] : END 17 Getting started Step 2 Setting the date and time Set the date and time settings when you do not use your camcorder for about 4 months, the date and time settings may be released (bars may appear) because the built-in rechargeable lithium cell in CAMERA mode, press...
...the time signal. First, set the year, then the month, the day, the hour and then the minute. (1) While your camcorder is in your camcorder will have been discharged. If you use your camcorder for the first time. The time indicator appears. 1,7 MENU 2 SETUP MENU CLOCK SET AUTO DATE LTR S I ZE L ...PM [ MENU ] : END 17 Getting started Step 2 Setting the date and time Set the date and time settings when you do not use your camcorder for about 4 months, the date and time settings may be released (bars may appear) because the built-in rechargeable lithium cell in CAMERA mode, press...

Operating Instructions
Page 18
... clock of your local time before you set AUTO DATE to OFF once and set it on and reset the date and time to your camcorder operates on the auto date function You can change the AUTO DATE setting by selecting ON or OFF in the menu settings. 18 you start... insert the tape again. - Press DATE and/or TIME again. The year changes as follows: 1995 T t 2001 T t 2079 Auto date function When you use your camcorder for noon. The auto date function automatically displays the date once a day.
... clock of your local time before you set AUTO DATE to OFF once and set it on and reset the date and time to your camcorder operates on the auto date function You can change the AUTO DATE setting by selecting ON or OFF in the menu settings. 18 you start... insert the tape again. - Press DATE and/or TIME again. The year changes as follows: 1995 T t 2001 T t 2079 Auto date function When you use your camcorder for noon. The auto date function automatically displays the date once a day.

Operating Instructions
Page 19
... opens automatically. (3) Insert a cassette with its window facing out and the write-protect tab on the cassette up your camcorder by pressing the mark on the cassette to record in the Hi8 system, use Hi8 video cassettes . (1) Prepare the power supply (p. 11). (2) Open the lid of the cassette compartment. 2 3 EJECT 4,5 To eject a cassette...
... opens automatically. (3) Insert a cassette with its window facing out and the write-protect tab on the cassette up your camcorder by pressing the mark on the cassette to record in the Hi8 system, use Hi8 video cassettes . (1) Prepare the power supply (p. 11). (2) Open the lid of the cassette compartment. 2 3 EJECT 4,5 To eject a cassette...
Operating Instructions
Page 20
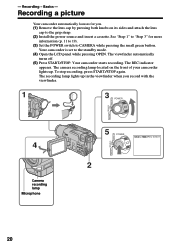
... POWER switch to the grip strap. (2) Install the power source and insert a cassette. The viewfinder automatically turns off. (5) Press START/STOP. Your camcorder starts recording. The REC indicator appears. The recording lamp lights up in the viewfinder when you . (1) Remove the lens cap by pressing both knobs ...on the front of your camcorder lights up. - Recording - The camera recording lamp located on its sides and attach the lens cap to CAMERA while pressing the small green...
... POWER switch to the grip strap. (2) Install the power source and insert a cassette. The viewfinder automatically turns off. (5) Press START/STOP. Your camcorder starts recording. The REC indicator appears. The recording lamp lights up in the viewfinder when you . (1) Remove the lens cap by pressing both knobs ...on the front of your camcorder lights up. - Recording - The camera recording lamp located on its sides and attach the lens cap to CAMERA while pressing the small green...

Operating Instructions
Page 21
...176; 90° When closing the LCD panel, set the POWER switch to 0:00:00 Press COUNTER RESET (p. 76). This is inserted Your camcorder automatically turns off your camcorder to the lens side. Basics Recording a picture Note Fasten the grip strap firmly. To enable smooth transition You can make the transition between... last scene you recorded and the next scene smooth as long as you do not eject the cassette even if you turn it into the camcorder body. 21 If you change the battery pack, set it vertically until it clicks, and swing it to OFF (CHARGE). (2) Close the LCD panel. (3) ...
...176; 90° When closing the LCD panel, set the POWER switch to 0:00:00 Press COUNTER RESET (p. 76). This is inserted Your camcorder automatically turns off your camcorder to the lens side. Basics Recording a picture Note Fasten the grip strap firmly. To enable smooth transition You can make the transition between... last scene you recorded and the next scene smooth as long as you do not eject the cassette even if you turn it into the camcorder body. 21 If you change the battery pack, set it vertically until it clicks, and swing it to OFF (CHARGE). (2) Close the LCD panel. (3) ...

Operating Instructions
Page 22
... the LCD screen outdoors in direct sunlight The LCD screen may be normal when recorded. During recording in the mirror mode The picture on your camcorder do not work. Picture in the mirror mode DATE and TIME on the LCD is working. Some of the backlight. Adjusting the brightness of the...
... the LCD screen outdoors in direct sunlight The LCD screen may be normal when recorded. During recording in the mirror mode The picture on your camcorder do not work. Picture in the mirror mode DATE and TIME on the LCD is working. Some of the backlight. Adjusting the brightness of the...
Operating Instructions
Page 26
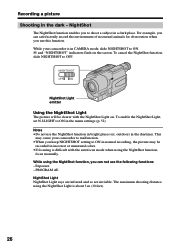
... the NightShot Light The picture will be recorded in normal recording, the picture may cause your camcorder is about 3 m (10 feet). 26 While using the NightShot function, you keep NIGHTSHOT setting to ON. While your camcorder to malfunction. •When you can satisfactorily record the environment of nocturnal animals for observation when...
... the NightShot Light The picture will be recorded in normal recording, the picture may cause your camcorder is about 3 m (10 feet). 26 While using the NightShot function, you keep NIGHTSHOT setting to ON. While your camcorder to malfunction. •When you can satisfactorily record the environment of nocturnal animals for observation when...

Operating Instructions
Page 27
.... 27 Press DATE to record the time. Press DATE (or TIME), then press TIME (or DATE) to off. Set the date and time to your camcorder, the clock setting is set to record the date and time. Carry out the following operations in the black screen as the background for about...
.... 27 Press DATE to record the time. Press DATE (or TIME), then press TIME (or DATE) to off. Set the date and time to your camcorder, the clock setting is set to record the date and time. Carry out the following operations in the black screen as the background for about...


