Operating Instructions
Page 7
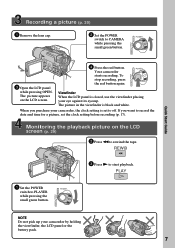
...small green button. If you purchase your camcorder by holding the viewfinder, the LCD panel or the battery pack. 7 PLAY 1 Set the POWER switch to CAMERA while pressing the small green button. Monitoring the playback picture on the LCD screen. 4 Press the red button. OFF (...CHARGE) PLAYER POWER CAMERA Viewfinder When the LCD panel is black and white. REW 3 Press N to rewind the tape. Your camcorder starts recording. The picture appears on the LCD screen (p. 29) 2 Press m to ...
...small green button. If you purchase your camcorder by holding the viewfinder, the LCD panel or the battery pack. 7 PLAY 1 Set the POWER switch to CAMERA while pressing the small green button. Monitoring the playback picture on the LCD screen. 4 Press the red button. OFF (...CHARGE) PLAYER POWER CAMERA Viewfinder When the LCD panel is black and white. REW 3 Press N to rewind the tape. Your camcorder starts recording. The picture appears on the LCD screen (p. 29) 2 Press m to ...
Operating Instructions
Page 9
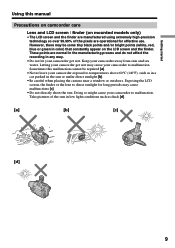
... operational for long periods may be repaired [a]. • Never leave your camcorder exposed to malfunction. Sometimes this manual Precautions on camcorder care Lens and LCD screen / finder (on the LCD screen and the finder. Exposing the LCD screen, the finder or the lens to malfunction. Keep your camcorder to temperatures above 60°C (140°F), such as duck [d]. [a] [b] [c] [d] 9 Doing...
... operational for long periods may be repaired [a]. • Never leave your camcorder exposed to malfunction. Sometimes this manual Precautions on camcorder care Lens and LCD screen / finder (on the LCD screen and the finder. Exposing the LCD screen, the finder or the lens to malfunction. Keep your camcorder to temperatures above 60°C (140°F), such as duck [d]. [a] [b] [c] [d] 9 Doing...

Operating Instructions
Page 14
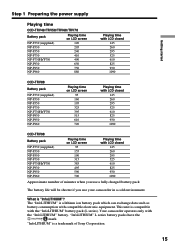
...CCD-TRV49/TRV58/TRV68/TRV78 Battery pack Recording with the viewfinder Continuous* Typical** NP-F330 (supplied) 140 75 NP-F530 245 135 NP-F550 280 155 NP-F730 500 275 NP-F730H/F750 580 320 NP-F930 780 430 NP-F950 900 495 NP-F960 1035 570 Recording with the LCD screen... 580 320 780 430 900 495 1035 570 Recording with the LCD screen Continuous* Typical** 95 50 155 85 190 105 315 175 385 210 495 270 590 325 700 385 Approximate number of minutes when you use your camcorder in a cold environment. ** Approximate number of minutes when recording...
...CCD-TRV49/TRV58/TRV68/TRV78 Battery pack Recording with the viewfinder Continuous* Typical** NP-F330 (supplied) 140 75 NP-F530 245 135 NP-F550 280 155 NP-F730 500 275 NP-F730H/F750 580 320 NP-F930 780 430 NP-F950 900 495 NP-F960 1035 570 Recording with the LCD screen... 580 320 780 430 900 495 1035 570 Recording with the LCD screen Continuous* Typical** 95 50 155 85 190 105 315 175 385 210 495 270 590 325 700 385 Approximate number of minutes when you use your camcorder in a cold environment. ** Approximate number of minutes when recording...
Operating Instructions
Page 15
...the power supply Playing time CCD-TRV49/TRV58/TRV68/TRV78 Battery pack NP-F330 (supplied) NP-F530 NP-F550 NP-F730 NP-F730H/F750 NP-F930 NP-F950 NP-F960 Playing time on LCD screen 120 205 240 410 490 650 750 880 Playing time with LCD closed 145 260 295 ... LCD closed 145 260 295 525 610 825 930 1090 Approximate number of Sony Corporation. 15 This unit is a lithium ion battery pack which can exchange data such as battery consumption with compatible electronic equipment. The "InfoLITHIUM" is compatible with the "InfoLITHIUM" battery. "InfoLITHIUM" is "InfoLITHIUM"? Your camcorder...
...the power supply Playing time CCD-TRV49/TRV58/TRV68/TRV78 Battery pack NP-F330 (supplied) NP-F530 NP-F550 NP-F730 NP-F730H/F750 NP-F930 NP-F950 NP-F960 Playing time on LCD screen 120 205 240 410 490 650 750 880 Playing time with LCD closed 145 260 295 ... LCD closed 145 260 295 525 610 825 930 1090 Approximate number of Sony Corporation. 15 This unit is a lithium ion battery pack which can exchange data such as battery consumption with compatible electronic equipment. The "InfoLITHIUM" is compatible with the "InfoLITHIUM" battery. "InfoLITHIUM" is "InfoLITHIUM"? Your camcorder...

Operating Instructions
Page 21
..., then turn off . Adjusting the LCD screen The LCD panel moves about 90 degrees to the viewfinder side and about 180 degrees to OFF (CHARGE). (2) Close the LCD panel. (3) Eject the cassette. (4) Attach the lens cap. When you leave your camcorder in microphone during recording. This is... inserted Your camcorder automatically turns off your camcorder to avoid turning on the screen (Mirror mode). 180° 90°...
..., then turn off . Adjusting the LCD screen The LCD panel moves about 90 degrees to the viewfinder side and about 180 degrees to OFF (CHARGE). (2) Close the LCD panel. (3) Eject the cassette. (4) Attach the lens cap. When you leave your camcorder in microphone during recording. This is... inserted Your camcorder automatically turns off your camcorder to avoid turning on the screen (Mirror mode). 180° 90°...

Operating Instructions
Page 22
...;The date appears mirror-reversed when the auto date function is a mirror-image. LCD SET LCD BR I GHT MENU [ MENU ] : END LCD screen backlight You can adjust the brightness of the LCD screen with LCD BRIGHT in in the mirror mode The picture on your camcorder do not work. If this happens, we recommend that you use the...
...;The date appears mirror-reversed when the auto date function is a mirror-image. LCD SET LCD BR I GHT MENU [ MENU ] : END LCD screen backlight You can adjust the brightness of the LCD screen with LCD BRIGHT in in the mirror mode The picture on your camcorder do not work. If this happens, we recommend that you use the...
Operating Instructions
Page 25
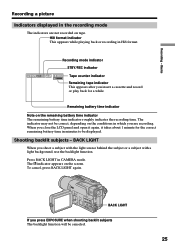
.... indicator appears on the remaining battery time indicator The remaining battery time indicator roughly indicates the recording time. Hi8 format indicator This appears while playing back or recording in the recording mode The indicators are recording. The indicator may not be correct,...battery time in minutes to be canceled. 25 To cancel, press BACK LIGHT again. Remaining battery time indicator Note on the screen. Press BACK LIGHT in which you close the LCD panel and open it again, it takes about 1 minute for a while. Recording - When you are not recorded on the...
.... indicator appears on the remaining battery time indicator The remaining battery time indicator roughly indicates the recording time. Hi8 format indicator This appears while playing back or recording in the recording mode The indicators are recording. The indicator may not be correct,...battery time in minutes to be canceled. 25 To cancel, press BACK LIGHT again. Remaining battery time indicator Note on the screen. Press BACK LIGHT in which you close the LCD panel and open it again, it takes about 1 minute for a while. Recording - When you are not recorded on the...

Operating Instructions
Page 29
Basics - You can monitor the playback picture on the screen. The speaker on VOLUME. Playback - Playing back a tape You can control playback using the Remote Commander supplied with your camcorder (CCD-TRV49/TRV78/TRV98 only). (1) Install the power source and insert the recorded tape. (2) Set...Press m to rewind the tape. (5) Press N to start playback. (6) To adjust the volume, press either of the two buttons on your camcorder is silent when the LCD panel is closed. 4 REW 5 PLAY 2 POWER PLAYER OFF (CHARGE) CAMERA 3 To stop playback Press x. 6 VOLUME 29 Basics - Playback ...
Basics - You can monitor the playback picture on the screen. The speaker on VOLUME. Playback - Playing back a tape You can control playback using the Remote Commander supplied with your camcorder (CCD-TRV49/TRV78/TRV98 only). (1) Install the power source and insert the recorded tape. (2) Set...Press m to rewind the tape. (5) Press N to start playback. (6) To adjust the volume, press either of the two buttons on your camcorder is silent when the LCD panel is closed. 4 REW 5 PLAY 2 POWER PLAYER OFF (CHARGE) CAMERA 3 To stop playback Press x. 6 VOLUME 29 Basics - Playback ...

Operating Instructions
Page 30
Playing back a tape When monitoring on the LCD screen You can adjust the angle of the LCD panel by lifting the LCD panel up by 23 degrees [b]. [a] [b] 23° To control the display of the screen indicators Press DISPLAY on the LCD screen. DISPLAY 30 The indicators appear on your camcorder. To make the indicators disappear, press DISPLAY again. You can turn the LCD panel over and move it back to the camcorder body with your camcorder or the Remote Commander (CCD-TRV49/TRV78/ TRV98 only) supplied with the LCD screen facing out [a].
Playing back a tape When monitoring on the LCD screen You can adjust the angle of the LCD panel by lifting the LCD panel up by 23 degrees [b]. [a] [b] 23° To control the display of the screen indicators Press DISPLAY on the LCD screen. DISPLAY 30 The indicators appear on your camcorder. To make the indicators disappear, press DISPLAY again. You can turn the LCD panel over and move it back to the camcorder body with your camcorder or the Remote Commander (CCD-TRV49/TRV78/ TRV98 only) supplied with the LCD screen facing out [a].

Operating Instructions
Page 32
... playback control buttons in the same way as when you monitor playback pictures on both your camcorder and the TV. 32 If your TV. Connect the S video cable (optional) to the S video jacks on the LCD screen. Refer to the operating instructions of the A/V connecting cable. Set the input selector on the VCR...
... playback control buttons in the same way as when you monitor playback pictures on both your camcorder and the TV. 32 If your TV. Connect the S video cable (optional) to the S video jacks on the LCD screen. Refer to the operating instructions of the A/V connecting cable. Set the input selector on the VCR...

Operating Instructions
Page 53
...BRIGHT" is removed. If you set the brightness on which you cancel the SteadyShot function (CCD-TRV68/TRV78/TRV88/TRV98 only) The SteadyShot off indicator appears. Note on the LCD screen with the SEL/PUSH EXEC dial. L. If you have dubbed over and recorded the signal ... power sources other menu items are returned to OFF when playing back a tape on the LCD screen normal BRIGHT To brighten the LCD screen -- To adjust the brightness on LCD B.L. Your camcorder prevents excessive compensation for camera-shake. The other than 5 minutes after removing the power source...
...BRIGHT" is removed. If you set the brightness on which you cancel the SteadyShot function (CCD-TRV68/TRV78/TRV88/TRV98 only) The SteadyShot off indicator appears. Note on the LCD screen with the SEL/PUSH EXEC dial. L. If you have dubbed over and recorded the signal ... power sources other menu items are returned to OFF when playing back a tape on the LCD screen normal BRIGHT To brighten the LCD screen -- To adjust the brightness on LCD B.L. Your camcorder prevents excessive compensation for camera-shake. The other than 5 minutes after removing the power source...
Operating Instructions
Page 56
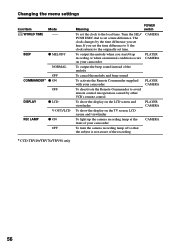
...camera recording lamp at the front of the recording * CCD-TRV49/TRV78/TRV98 only 56 The clock changes by other VCR's remote control To show the display on the LCD screen and viewfinder PLAYER CAMERA To show the display on your camcorder To output the beep sound instead of the melody ...To cancel the melody and beep sound To activate the Remote Commander supplied with your camcorder CAMERA To turn the camera recording lamp...
...camera recording lamp at the front of the recording * CCD-TRV49/TRV78/TRV98 only 56 The clock changes by other VCR's remote control To show the display on the LCD screen and viewfinder PLAYER CAMERA To show the display on your camcorder To output the beep sound instead of the melody ...To cancel the melody and beep sound To activate the Remote Commander supplied with your camcorder CAMERA To turn the camera recording lamp...

Operating Instructions
Page 61
..., check the following code chart. After reconnecting the power source, operate your Sony dealer or local authorized Sony service facility. Viewfinder or LCD screen C:21:00 Self-diagnosis display •C:ss:ss You can service has occurred. Troubleshooting Self-diagnosis display Your camcorder has a self-diagnosis display function. c Remove the cassette and insert it again...
..., check the following code chart. After reconnecting the power source, operate your Sony dealer or local authorized Sony service facility. Viewfinder or LCD screen C:21:00 Self-diagnosis display •C:ss:ss You can service has occurred. Troubleshooting Self-diagnosis display Your camcorder has a self-diagnosis display function. c Remove the cassette and insert it again...

Operating Instructions
Page 65
... battery. • The battery life varies according to 10 minutes. If you charge the battery outside of your camcorder. We recommend using the LCD screen or frequently operating playback, fast forward or rewind wears out the battery faster. This is little remaining battery time ...sometimes blinks depending on your camcorder, and displays the remaining battery time in low-temperature surroundings. Battery capacity drops little...
... battery. • The battery life varies according to 10 minutes. If you charge the battery outside of your camcorder. We recommend using the LCD screen or frequently operating playback, fast forward or rewind wears out the battery faster. This is little remaining battery time ...sometimes blinks depending on your camcorder, and displays the remaining battery time in low-temperature surroundings. Battery capacity drops little...

Operating Instructions
Page 68
... your camcorder in the following instances: - About care and storage of the lens • Wipe the surface of the lens clean with the Sony V8-25CLD cleaning cassette (optional). [a] [b] [a] Slightly dirty [b] Very dirty Note on the lens surface - In hot or humid locations - Cleaning the LCD screen If fingerprints or dust make the LCD screen dirty...
... your camcorder in the following instances: - About care and storage of the lens • Wipe the surface of the lens clean with the Sony V8-25CLD cleaning cassette (optional). [a] [b] [a] Slightly dirty [b] Very dirty Note on the lens surface - In hot or humid locations - Cleaning the LCD screen If fingerprints or dust make the LCD screen dirty...

Operating Instructions
Page 69
... switch set to build up , 3 turn the eyecup in a clockwise direction, then replace the screw. Precautions Camcorder operation •Operate your camcorder on the LCD screen. Caution Do not remove any other screws. The rechargeable lithium cell is not charged, it any further. •...inside. •Keep your camcorder away from inside the casing, unplug your camcorder to remove the eyecup. Charging the rechargeable lithium cell: •Connect your camcorder and have it checked by a Sony dealer before operating it will not affect the camcorder operation. Be particularly careful of...
... switch set to build up , 3 turn the eyecup in a clockwise direction, then replace the screw. Precautions Camcorder operation •Operate your camcorder on the LCD screen. Caution Do not remove any other screws. The rechargeable lithium cell is not charged, it any further. •...inside. •Keep your camcorder away from inside the casing, unplug your camcorder to remove the eyecup. Charging the rechargeable lithium cell: •Connect your camcorder and have it checked by a Sony dealer before operating it will not affect the camcorder operation. Be particularly careful of...

Operating Instructions
Page 72
... 72 10 °C to 30 °C (50 °F to 86 °F) Viewfinder LCD screen Power requirements Electric viewfinder (monochrome) Picture 100 - 240 V AC, 50/60 Hz Image device CCD-TRV49/TRV58/TRV68/ Power consumption CCD-TRV49/TRV58: TRV78: 23 W 3.0 mm (1/6 type) CCD 6.2 cm (2.5 type) Output voltage Approx. 270 000 pixels (Effective: Approx. 250 000 pixels... heads Helical scanning FM system Audio recording system Rotary heads, FM system Video signal NTSC color, EIA standards Usable cassette 8mm video format cassette Hi8 or standard 8 Recording/playback time (using 120 min.
... 72 10 °C to 30 °C (50 °F to 86 °F) Viewfinder LCD screen Power requirements Electric viewfinder (monochrome) Picture 100 - 240 V AC, 50/60 Hz Image device CCD-TRV49/TRV58/TRV68/ Power consumption CCD-TRV49/TRV58: TRV78: 23 W 3.0 mm (1/6 type) CCD 6.2 cm (2.5 type) Output voltage Approx. 270 000 pixels (Effective: Approx. 250 000 pixels... heads Helical scanning FM system Audio recording system Rotary heads, FM system Video signal NTSC color, EIA standards Usable cassette 8mm video format cassette Hi8 or standard 8 Recording/playback time (using 120 min.

Operating Instructions
Page 75
Quick Reference 75 Identifying the parts and controls ws wd wf wg ws Speaker wd LCD screen (p. 21) wf MENU button (p. 51) wg RESET button (p. 60) wh wj wk wl wh EXPOSURE button (p. 41) wj FADER button (p. 37) wk BACK LIGHT button (p. 25) wl FOCUS button (p. 42) Attaching the shoulder strap Attach the shoulder strap supplied with your camcorder to the hooks for the shoulder strap.
Quick Reference 75 Identifying the parts and controls ws wd wf wg ws Speaker wd LCD screen (p. 21) wf MENU button (p. 51) wg RESET button (p. 60) wh wj wk wl wh EXPOSURE button (p. 41) wj FADER button (p. 37) wk BACK LIGHT button (p. 25) wl FOCUS button (p. 42) Attaching the shoulder strap Attach the shoulder strap supplied with your camcorder to the hooks for the shoulder strap.

Operating Instructions
Page 79
TRV68/TRV78/TRV88/TRV98 only) (p. 52) qs Manual...ql 8 12:00:00 AM 9 w; 0 wa qa qs ws qd Quick Reference 1 Recording mode indicator (p. 54)/ Mirror mode indicator (p. 21) 2 Hi8 format indicator 3 Remaining battery time indicator (p. 25) 4 Exposure indicator (p. 41)/Zoom indicator (p. 23) 5 Fader indicator (p. 36) 6 Wide mode indicator... (p. 18)/Date indicator (p. 18, 27) w; Identifying the parts and controls Operation indicators LCD screen and Viewfinder Display window 1 qf 2 wd 3 qg 4 40min W T STBY 0:00:00 qh 5 M . Backlight indicator (p. ...
TRV68/TRV78/TRV88/TRV98 only) (p. 52) qs Manual...ql 8 12:00:00 AM 9 w; 0 wa qa qs ws qd Quick Reference 1 Recording mode indicator (p. 54)/ Mirror mode indicator (p. 21) 2 Hi8 format indicator 3 Remaining battery time indicator (p. 25) 4 Exposure indicator (p. 41)/Zoom indicator (p. 23) 5 Fader indicator (p. 36) 6 Wide mode indicator... (p. 18)/Date indicator (p. 18, 27) w; Identifying the parts and controls Operation indicators LCD screen and Viewfinder Display window 1 qf 2 wd 3 qg 4 40min W T STBY 0:00:00 qh 5 M . Backlight indicator (p. ...

Operating Instructions
Page 80
... 50 E Earphone jack 73 EDIT 53 END SEARCH 28, 31 Exposure 41 F, G, H Fade in/out 37 FADER 36 FOCUS 42 Grip strap 77 Heads 68 Hi8 system 64 M, N Manual focus 42 Menu settings 51 Mirror mode 21 Moisture condensation .......... 67 MONOTONE 36 Mosaic fader 36 NIGHTSHOT 26 NTSC system 66 O, P, Q Operation... indicators 62 Wide-angle 23 Wide mode 34 WORLD TIME 56 Write-protect tab 19 Zoom 23 I, J, K, L "InfoLITHIUM" battery ........ 65 Infrared rays emitter ........ 26, 33 LCD screen 21 LP mode 54 Sony Corporation Printed in Japan 306564811
... 50 E Earphone jack 73 EDIT 53 END SEARCH 28, 31 Exposure 41 F, G, H Fade in/out 37 FADER 36 FOCUS 42 Grip strap 77 Heads 68 Hi8 system 64 M, N Manual focus 42 Menu settings 51 Mirror mode 21 Moisture condensation .......... 67 MONOTONE 36 Mosaic fader 36 NIGHTSHOT 26 NTSC system 66 O, P, Q Operation... indicators 62 Wide-angle 23 Wide mode 34 WORLD TIME 56 Write-protect tab 19 Zoom 23 I, J, K, L "InfoLITHIUM" battery ........ 65 Infrared rays emitter ........ 26, 33 LCD screen 21 LP mode 54 Sony Corporation Printed in Japan 306564811


