
Operating Instructions (primary manual)
Page 2
... unwanted lithium ion batteries to come. For the Sony Service Center nearest you call 416-499-SONY (Canada only) Caution: Do not handle damaged or leaking lithium ion battery. CAUTION You are cautioned that you call 1-800-222-SONY (United States only) For the Sony Factory Service Center...'s enclosure that may be producing home video that any changes or modifications not expressly approved in the United States and Canada DISPOSAL OF LITHIUM ION BATTERY. You can enjoy for years to your purchase of lithium ion batteries in the literature accompanying the appliance. This...
... unwanted lithium ion batteries to come. For the Sony Service Center nearest you call 416-499-SONY (Canada only) Caution: Do not handle damaged or leaking lithium ion battery. CAUTION You are cautioned that you call 1-800-222-SONY (United States only) For the Sony Factory Service Center...'s enclosure that may be producing home video that any changes or modifications not expressly approved in the United States and Canada DISPOSAL OF LITHIUM ION BATTERY. You can enjoy for years to your purchase of lithium ion batteries in the literature accompanying the appliance. This...
Operating Instructions (primary manual)
Page 5
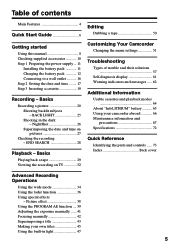
...accessories 10 Step 1 Preparing the power supply ... 11 Installing the battery pack 11 Charging the battery pack 12 Connecting to a wall outlet 16 Step 2 Setting the date and time ........ 17 Step 3 Inserting a cassette 19 Recording - Table of trouble and their solutions 57 Self-diagnosis display ... Information Usable cassettes and playback modes 64 About "InfoLITHIUM" battery 65 Using your own titles 45 Using the built-in the dark - Basics Playing back a tape 29 Viewing the recording on pictures 27 Checking the recording - Picture effect 38 Using the PROGRAM AE function .... ...
...accessories 10 Step 1 Preparing the power supply ... 11 Installing the battery pack 11 Charging the battery pack 12 Connecting to a wall outlet 16 Step 2 Setting the date and time ........ 17 Step 3 Inserting a cassette 19 Recording - Table of trouble and their solutions 57 Self-diagnosis display ... Information Usable cassettes and playback modes 64 About "InfoLITHIUM" battery 65 Using your own titles 45 Using the built-in the dark - Basics Playing back a tape 29 Viewing the recording on pictures 27 Checking the recording - Picture effect 38 Using the PROGRAM AE function .... ...
Operating Instructions (primary manual)
Page 6
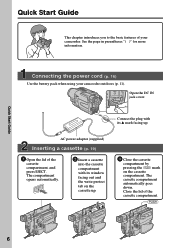
... into the cassette compartment with its window facing out and the write-protect tab on the cassette compartment. Connecting the power cord (p. 16) Use the battery pack when using your camcorder. Quick Start Guide 6 The cassette compartment automatically goes down. Open the DC IN jack cover. The compartment opens automatically. See...
... into the cassette compartment with its window facing out and the write-protect tab on the cassette compartment. Connecting the power cord (p. 16) Use the battery pack when using your camcorder. Quick Start Guide 6 The cassette compartment automatically goes down. Open the DC IN jack cover. The compartment opens automatically. See...
Operating Instructions (primary manual)
Page 7
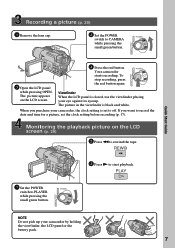
...recording (p. 17). Monitoring the playback picture on the LCD screen. 4 Press the red button. REW 3 Press N to CAMERA while pressing the small green button. Recording... a picture (p. 20) 1 Remove the lens cap. 2 Set the POWER switch to start playback. OFF (CHARGE) PLAYER POWER CAMERA...To stop recording, press the red button again. PLAY 1 Set the POWER switch to off. When you want to record the ...date and time for a picture, set to PLAYER while pressing the small green button. OFF (CHARGE) PLAYER POWER CAMERA...
...recording (p. 17). Monitoring the playback picture on the LCD screen. 4 Press the red button. REW 3 Press N to CAMERA while pressing the small green button. Recording... a picture (p. 20) 1 Remove the lens cap. 2 Set the POWER switch to start playback. OFF (CHARGE) PLAYER POWER CAMERA...To stop recording, press the red button again. PLAY 1 Set the POWER switch to off. When you want to record the ...date and time for a picture, set to PLAYER while pressing the small green button. OFF (CHARGE) PLAYER POWER CAMERA...
Operating Instructions (primary manual)
Page 10
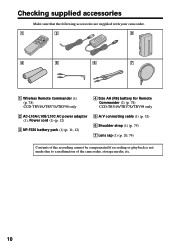
.../TRV98 only 4 Size AA (R6) battery for Remote Commander (2) (p. 78) CCD-TRV49/TRV78/TRV98 only 2 AC-L10A/L10B/L10C AC power adaptor (1), Power cord (1) (p. 12) 3 NP-F330 battery pack (1) (p. 11, 12) 5 A/V connecting cable (1) (p. 32) 6 Shoulder strap (1) (p. 75) 7 Lens cap (1) (p. 20, 74) Contents of the recording cannot be compensated if recording or playback is not made...
.../TRV98 only 4 Size AA (R6) battery for Remote Commander (2) (p. 78) CCD-TRV49/TRV78/TRV98 only 2 AC-L10A/L10B/L10C AC power adaptor (1), Power cord (1) (p. 12) 3 NP-F330 battery pack (1) (p. 11, 12) 5 A/V connecting cable (1) (p. 32) 6 Shoulder strap (1) (p. 75) 7 Lens cap (1) (p. 20, 74) Contents of the recording cannot be compensated if recording or playback is not made...
Operating Instructions (primary manual)
Page 11
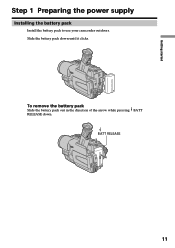
BATT RELEASE 11 Slide the battery pack down . Getting started Step 1 Preparing the power supply Installing the battery pack Install the battery pack to use your camcorder outdoors. To remove the battery pack Slide the battery pack out in the direction of the arrow while pressing BATT RELEASE down until it clicks.
BATT RELEASE 11 Slide the battery pack down . Getting started Step 1 Preparing the power supply Installing the battery pack Install the battery pack to use your camcorder outdoors. To remove the battery pack Slide the battery pack out in the direction of the arrow while pressing BATT RELEASE down until it clicks.
Operating Instructions (primary manual)
Page 12
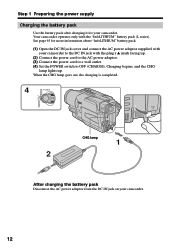
... switch to the DC IN jack with the plug's v mark facing up . Step 1 Preparing the power supply Charging the battery pack Use the battery pack after charging it for more information about "InfoLITHIUM" battery pack. (1) Open the DC IN jack cover and connect the AC power adaptor supplied with the "InfoLITHIUM...camcorder. See page 65 for your camcorder to OFF (CHARGE). When the CHG lamp goes out, the charging is completed. 4 POWER PLAYER OFF (CHARGE) CAMERA CHG lamp 1 2 After charging the battery pack Disconnect the AC power adaptor from the DC IN jack on your camcorder. 12
... switch to the DC IN jack with the plug's v mark facing up . Step 1 Preparing the power supply Charging the battery pack Use the battery pack after charging it for more information about "InfoLITHIUM" battery pack. (1) Open the DC IN jack cover and connect the AC power adaptor supplied with the "InfoLITHIUM...camcorder. See page 65 for your camcorder to OFF (CHARGE). When the CHG lamp goes out, the charging is completed. 4 POWER PLAYER OFF (CHARGE) CAMERA CHG lamp 1 2 After charging the battery pack Disconnect the AC power adaptor from the DC IN jack on your camcorder. 12

Operating Instructions (primary manual)
Page 13
... •Prevent metallic objects from coming into contact with the battery pack. This may go off although the battery remaining indicator indicates that the battery pack has enough power to operate Charge the battery pack fully again so that the indication on the battery remaining indicator is wrong with the metal parts of the DC... plug of minutes to be used for a long time, charge the battery pack fully, and then use it until it fully discharges again. Do this once a year. If the power may cause a short-circuit, damaging the AC ...
... •Prevent metallic objects from coming into contact with the battery pack. This may go off although the battery remaining indicator indicates that the battery pack has enough power to operate Charge the battery pack fully again so that the indication on the battery remaining indicator is wrong with the metal parts of the DC... plug of minutes to be used for a long time, charge the battery pack fully, and then use it until it fully discharges again. Do this once a year. If the power may cause a short-circuit, damaging the AC ...

Operating Instructions (primary manual)
Page 14
... may be shorter if you use a fully charged battery pack * Approximate continuous recording time at 25°C (77°F). The battery life will be shorter. 14 Step 1 Preparing the power supply Recording time CCD-TRV49/TRV58/TRV68/TRV78 Battery pack Recording with the viewfinder Continuous* Typical** NP-F330 (supplied) 140 75 NP-F530 245 135 NP-F550 280...
... may be shorter if you use a fully charged battery pack * Approximate continuous recording time at 25°C (77°F). The battery life will be shorter. 14 Step 1 Preparing the power supply Recording time CCD-TRV49/TRV58/TRV68/TRV78 Battery pack Recording with the viewfinder Continuous* Typical** NP-F330 (supplied) 140 75 NP-F530 245 135 NP-F550 280...
Operating Instructions (primary manual)
Page 15
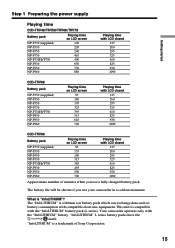
... be shorter if you use your camcorder in a cold environment. The "InfoLITHIUM" is "InfoLITHIUM"? Getting started Step 1 Preparing the power supply Playing time CCD-TRV49/TRV58/TRV68/TRV78 Battery pack NP-F330 (supplied) NP-F530 NP-F550 NP-F730 NP-F730H/F750 NP-F930 NP-F950 NP-F960 Playing time on LCD screen... 1090 CCD-TRV98 Battery pack NP-F330 (supplied) NP-F530 NP-F550 NP-F730 NP-F730H/F750 NP-F930 NP-F950 NP-F960 Playing time on LCD screen 95 160 195 325 395 515 610 720 Playing time with LCD closed 145 260 295 525 610 825 930 1090 Approximate number of Sony...
... be shorter if you use your camcorder in a cold environment. The "InfoLITHIUM" is "InfoLITHIUM"? Getting started Step 1 Preparing the power supply Playing time CCD-TRV49/TRV58/TRV68/TRV78 Battery pack NP-F330 (supplied) NP-F530 NP-F550 NP-F730 NP-F730H/F750 NP-F930 NP-F950 NP-F960 Playing time on LCD screen... 1090 CCD-TRV98 Battery pack NP-F330 (supplied) NP-F530 NP-F550 NP-F730 NP-F730H/F750 NP-F930 NP-F950 NP-F960 Playing time on LCD screen 95 160 195 325 395 515 610 720 Playing time with LCD closed 145 260 295 525 610 825 930 1090 Approximate number of Sony...

Operating Instructions (primary manual)
Page 16
...camcorder with this unit, disconnect the plug from the AC power source (wall outlet) as long as possible to cut off . Using a car battery Use Sony DC Adaptor/Charger (optional). 16 This means that you power it is connected to the wall outlet, even if the set is not disconnected from...near a wall outlet. Step 1 Preparing the power supply Connecting to a wall outlet When you use your camcorder for a long time, we recommend that the battery pack cannot supply any trouble occurs with the plug's v mark facing up. (2) Connect the power cord to the AC power adaptor. (3) Connect the power ...
...camcorder with this unit, disconnect the plug from the AC power source (wall outlet) as long as possible to cut off . Using a car battery Use Sony DC Adaptor/Charger (optional). 16 This means that you power it is connected to the wall outlet, even if the set is not disconnected from...near a wall outlet. Step 1 Preparing the power supply Connecting to a wall outlet When you use your camcorder for a long time, we recommend that the battery pack cannot supply any trouble occurs with the plug's v mark facing up. (2) Connect the power cord to the AC power adaptor. (3) Connect the power ...
Operating Instructions (primary manual)
Page 21
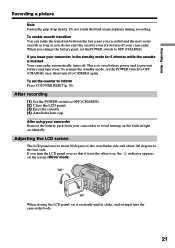
...transition You can make the transition between the last scene you recorded and the next scene smooth as long as you do not eject the cassette even if you change the battery pack, set the counter to CAMERA again. This is inserted Your camcorder automatically turns off your ...camcorder in the standby mode for 5 minutes while the cassette is to save battery power and to OFF (CHARGE). Recording - When you turn off . After recording (1) Set the POWER...
...transition You can make the transition between the last scene you recorded and the next scene smooth as long as you do not eject the cassette even if you change the battery pack, set the counter to CAMERA again. This is inserted Your camcorder automatically turns off your ...camcorder in the standby mode for 5 minutes while the cassette is to save battery power and to OFF (CHARGE). Recording - When you turn off . After recording (1) Set the POWER...
Operating Instructions (primary manual)
Page 25
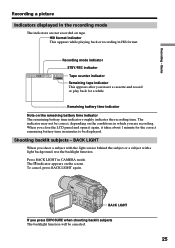
...remaining battery time indicator The remaining battery time indicator roughly indicates the recording time. Recording - The . Hi8 format indicator This appears while playing back or recording in the recording mode The indicators are recording. Basics Recording a... picture Indicators displayed in Hi8 format. Press BACK LIGHT in which you press EXPOSURE when shooting backlit subjects The backlight function will be canceled. 25 BACK LIGHT If you are not recorded on the conditions in CAMERA...
...remaining battery time indicator The remaining battery time indicator roughly indicates the recording time. Recording - The . Hi8 format indicator This appears while playing back or recording in the recording mode The indicators are recording. Basics Recording a... picture Indicators displayed in Hi8 format. Press BACK LIGHT in which you press EXPOSURE when shooting backlit subjects The backlight function will be canceled. 25 BACK LIGHT If you are not recorded on the conditions in CAMERA...
Operating Instructions (primary manual)
Page 48
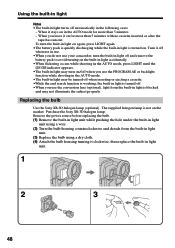
... using a dry cloth. (4) Attach the bulb housing turning it clockwise, then replace the built-in light unit. 1 2 3 48 To turn on . Purchase the Sony XB-3D halogen lamp. Remove the power source before replacing the bulb. (1) Remove the built-in light unit while pushing the hole under the built...following cases: - The supplied halogen lamp is turned on /off when you use your camcorder, turn the built-in light off and remove the battery pack to avoid turning on the built-in light accidentally. •When flickering occurs while shooting in the AUTO mode, press LIGHT until the indicator...
... using a dry cloth. (4) Attach the bulb housing turning it clockwise, then replace the built-in light unit. 1 2 3 48 To turn on . Purchase the Sony XB-3D halogen lamp. Remove the power source before replacing the bulb. (1) Remove the built-in light unit while pushing the hole under the built...following cases: - The supplied halogen lamp is turned on /off when you use your camcorder, turn the built-in light off and remove the battery pack to avoid turning on the built-in light accidentally. •When flickering occurs while shooting in the AUTO mode, press LIGHT until the indicator...

Operating Instructions (primary manual)
Page 53
...STEADYSHOT to ON in the menu settings, the indicator flashes. PLAYER CAMERA LCD B. If you have dubbed over and recorded the signal of a TV game or similar machine. Note on the SteadyShot function (CCD-TRV68/TRV78/TRV88/TRV98 only) • The SteadyShot function will not...; SteadyShot does not operate in memory even when the battery is automatically selected. 53 L. Your camcorder prevents excessive compensation for camera-shake. The other than 5 minutes after removing the power source The "EDIT" and "COMMANDER" (CCD-TRV49/TRV78/TRV98 only) items are held in the ...
...STEADYSHOT to ON in the menu settings, the indicator flashes. PLAYER CAMERA LCD B. If you have dubbed over and recorded the signal of a TV game or similar machine. Note on the SteadyShot function (CCD-TRV68/TRV78/TRV88/TRV98 only) • The SteadyShot function will not...; SteadyShot does not operate in memory even when the battery is automatically selected. 53 L. Your camcorder prevents excessive compensation for camera-shake. The other than 5 minutes after removing the power source The "EDIT" and "COMMANDER" (CCD-TRV49/TRV78/TRV98 only) items are held in the ...

Operating Instructions (primary manual)
Page 57
...Sony dealer or local authorized Sony service facility. c Set the POWER switch to OFF (CHARGE) and then to focus manually. (p. 42) The x indicator flashes in the menu settings. c Set FOCUS to MANUAL to CAMERA again. (p. 20) • The battery... pack is open. Troubleshooting - If "C:ss:ss" appears on the viewfinder screen • The viewfinder lens is not adjusted. In the recording ...the viewfinder. • The video heads may be dirty. c Set it to ON. (p. 52) • The SteadyShot function does not work . (CCD-TRV68/TRV78/TRV88/ TRV98 ...
...Sony dealer or local authorized Sony service facility. c Set the POWER switch to OFF (CHARGE) and then to focus manually. (p. 42) The x indicator flashes in the menu settings. c Set FOCUS to MANUAL to CAMERA again. (p. 20) • The battery... pack is open. Troubleshooting - If "C:ss:ss" appears on the viewfinder screen • The viewfinder lens is not adjusted. In the recording ...the viewfinder. • The video heads may be dirty. c Set it to ON. (p. 52) • The SteadyShot function does not work . (CCD-TRV68/TRV78/TRV88/ TRV98 ...
Operating Instructions (primary manual)
Page 59
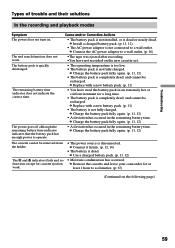
...hour to a wall outlet. (p. 16) •The tape was ejected after recording. •You have used the battery pack in an extremely hot or cold environment for cassette ejection work . The remaining battery time indicator does not indicate the correct time. Cause and/or Corrective Actions •...) (Continued on . The % and Z indicators flash and no functions except for a long time. • The battery pack is not fully charged. c Replace with a new battery pack. (p. 11) • You have not recorded on the new cassette yet. • The operating temperature is too low. • The...
...hour to a wall outlet. (p. 16) •The tape was ejected after recording. •You have used the battery pack in an extremely hot or cold environment for cassette ejection work . The remaining battery time indicator does not indicate the correct time. Cause and/or Corrective Actions •...) (Continued on . The % and Z indicators flash and no functions except for a long time. • The battery pack is not fully charged. c Replace with a new battery pack. (p. 11) • You have not recorded on the new cassette yet. • The operating temperature is too low. • The...

Operating Instructions (primary manual)
Page 60
...12, 16). c Remove the obstacle. • The batteries inserted in the battery holder with the battery pack. c Remove the cassette and leave your camcorder for 5 seconds. • Moisture condensation has occurred. If the functions still do not work . (CCD-TRV49/TRV78/TRV98 only) • COMMANDER is wrong with... the date and time return to OFF (CHARGE) 60 The melody or beep sounds for at least 1 hour to your Sony dealer or local authorized Sony service facility. c Contact your comcorder. • The POWER switch is blocking the infrared rays. c Insert new ones. ...
...12, 16). c Remove the obstacle. • The batteries inserted in the battery holder with the battery pack. c Remove the cassette and leave your camcorder for 5 seconds. • Moisture condensation has occurred. If the functions still do not work . (CCD-TRV49/TRV78/TRV98 only) • COMMANDER is wrong with... the date and time return to OFF (CHARGE) 60 The melody or beep sounds for at least 1 hour to your Sony dealer or local authorized Sony service facility. c Contact your comcorder. • The POWER switch is blocking the infrared rays. c Insert new ones. ...
Operating Instructions (primary manual)
Page 61
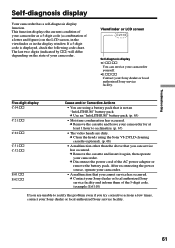
...c Use an "InfoLITHIUM" battery pack. (p. 65) • Moisture condensation has occurred. c Contact your Sony dealer or local authorized Sony service facility and inform them of your Sony dealer or local authorized Sony service facility. Troubleshooting Self-...diagnosis display Your camcorder has a self-diagnosis display function. c Remove the cassette and leave your camcorder. c Remove the cassette and insert it again, then operate your camcorder for at least 1 hour to acclimatize. (p. 67) • The video...
...c Use an "InfoLITHIUM" battery pack. (p. 65) • Moisture condensation has occurred. c Contact your Sony dealer or local authorized Sony service facility and inform them of your Sony dealer or local authorized Sony service facility. Troubleshooting Self-...diagnosis display Your camcorder has a self-diagnosis display function. c Remove the cassette and leave your camcorder. c Remove the cassette and insert it again, then operate your camcorder for at least 1 hour to acclimatize. (p. 67) • The video...

Operating Instructions (primary manual)
Page 62
... (p. 61).* * You hear the melodh or beep sound Warning indicator as to clean the heads using the Sony V8-25CLD cleaning cassette (optional) (p. 68). Fast flashing: •The battery is dead •The tape has run out.* Self-diagnosis display (p. 61) C:21:00 Moisture condensation has... following: See the page in parentheses "( )" for about 1 hour with the cassette compartment open (p. 67). Warning indicators The video heads are 5 to tape or battery Slow flashing: •The battery is nearly dead. •The tape is near the end. •No tape is near the end.
... (p. 61).* * You hear the melodh or beep sound Warning indicator as to clean the heads using the Sony V8-25CLD cleaning cassette (optional) (p. 68). Fast flashing: •The battery is dead •The tape has run out.* Self-diagnosis display (p. 61) C:21:00 Moisture condensation has... following: See the page in parentheses "( )" for about 1 hour with the cassette compartment open (p. 67). Warning indicators The video heads are 5 to tape or battery Slow flashing: •The battery is nearly dead. •The tape is near the end. •No tape is near the end.


