Operating Instructions
Page 5
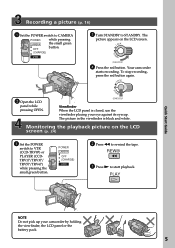
LOCK NDBY START/STOP 4 Press the red button. To stop recording, press the red button again. The picture in the viewfinder is closed, use the viewfinder placing your camcorder by holding the viewfinder, the LCD panel or the battery pack. 5 Recording a picture (p. 16) 1 Set the POWER ... (CCD-TRV87) or PLAYER (CCDTRV17/TRV37/ TRV57/TRV67) while pressing the small green button. PLAY Quick Start Guide NOTE Do not pick up your eye against its eyecup. The picture appears on the LCD screen (p. 24) 1 Set the POWER switch to rewind the tape. Your camcorder starts recording.
LOCK NDBY START/STOP 4 Press the red button. To stop recording, press the red button again. The picture in the viewfinder is closed, use the viewfinder placing your camcorder by holding the viewfinder, the LCD panel or the battery pack. 5 Recording a picture (p. 16) 1 Set the POWER ... (CCD-TRV87) or PLAYER (CCDTRV17/TRV37/ TRV57/TRV67) while pressing the small green button. PLAY Quick Start Guide NOTE Do not pick up your eye against its eyecup. The picture appears on the LCD screen (p. 24) 1 Set the POWER switch to rewind the tape. Your camcorder starts recording.
Operating Instructions
Page 12
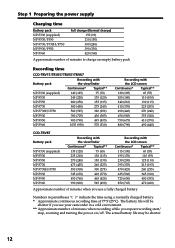
The actual battery life may be shorter if you repeat recording start/ stop, zooming and turning the power on/off. The battery...) 390 (330) 420 (360) Approximate number of minutes to charge an empty battery pack Recording time CCD-TRV17/TRV37/TRV57/TRV67 Battery pack Recording with the viewfinder Continuous* Typical** NP-F330 (supplied) NP-F530 NP-F550 NP-F730 NP... charged battery Numbers in a cold environment. ** Approximate number of minutes when recording while you use your camcorder in parentheses "( )" indicate the time using a normally charged battery. * Approximate continuous...
The actual battery life may be shorter if you repeat recording start/ stop, zooming and turning the power on/off. The battery...) 390 (330) 420 (360) Approximate number of minutes to charge an empty battery pack Recording time CCD-TRV17/TRV37/TRV57/TRV67 Battery pack Recording with the viewfinder Continuous* Typical** NP-F330 (supplied) NP-F530 NP-F550 NP-F730 NP... charged battery Numbers in a cold environment. ** Approximate number of minutes when recording while you use your camcorder in parentheses "( )" indicate the time using a normally charged battery. * Approximate continuous...
Operating Instructions
Page 16
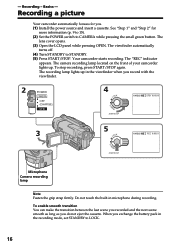
...15). (2) Set the POWER switch to CAMERA while pressing the small green button. Your camcorder starts recording. The recording lamp lights up . Do not touch the built-in the recording mode, set STANDBY to STANDBY. (5) Press START/STOP. When you do not eject the cassette. See "Step 1" and "Step 2" for...40min H SP REC 0:00:01 STA NDBY START/STOP Microphone Camera recording lamp Note Fasten the grip strap firmly. The lens cover opens. (3) Open the LCD panel while pressing OPEN. The camera recording lamp located on the front of your camcorder lights up in the viewfinder when you . (1) ...
...15). (2) Set the POWER switch to CAMERA while pressing the small green button. Your camcorder starts recording. The recording lamp lights up . Do not touch the built-in the recording mode, set STANDBY to STANDBY. (5) Press START/STOP. When you do not eject the cassette. See "Step 1" and "Step 2" for...40min H SP REC 0:00:01 STA NDBY START/STOP Microphone Camera recording lamp Note Fasten the grip strap firmly. The lens cover opens. (3) Open the LCD panel while pressing OPEN. The camera recording lamp located on the front of your camcorder lights up in the viewfinder when you . (1) ...

Operating Instructions
Page 17
... down to LOCK. (2) Close the LCD panel. (3) Eject the cassette. (4) Set the POWER switch to OFF (CHARGE). (5) Remove the battery pack. To start recording, press START/STOP. If you leave your camcorder do not work. When you use the LCD screen outdoors in the mirror mode DATE and TIME on your... camcorder in the viewfinder and on the LCD screen (Mirror mode). During recording in direct sunlight The LCD screen may be difficult to 0:00:00 Press...
... down to LOCK. (2) Close the LCD panel. (3) Eject the cassette. (4) Set the POWER switch to OFF (CHARGE). (5) Remove the battery pack. To start recording, press START/STOP. If you leave your camcorder do not work. When you use the LCD screen outdoors in the mirror mode DATE and TIME on your... camcorder in the viewfinder and on the LCD screen (Mirror mode). During recording in direct sunlight The LCD screen may be difficult to 0:00:00 Press...
Operating Instructions
Page 23
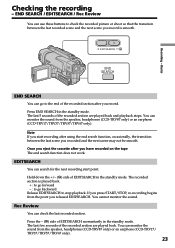
... are played back and playback stops. EDITSEARCH You can check the last recorded section. The last few seconds of the recorded section are played back. Note If you press START/STOP, re-recording begins from the speaker, headphones (CCD-TRV87 only) or an earphone (CCD-TRV17/ TRV37/TRV57/TRV67 only). 23 The recorded section is smooth. If you start...
... are played back and playback stops. EDITSEARCH You can check the last recorded section. The last few seconds of the recorded section are played back. Note If you press START/STOP, re-recording begins from the speaker, headphones (CCD-TRV87 only) or an earphone (CCD-TRV17/ TRV37/TRV57/TRV67 only). 23 The recorded section is smooth. If you start...
Operating Instructions
Page 26
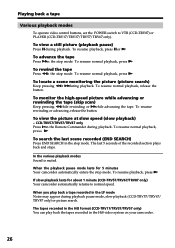
... for about 1 minute (CCD-TRV57/TRV67/TRV87 only) Your camcorder automatically returns to VTR (CCD-TRV87) or PLAYER (CCD-TRV17/TRV37/TRV57/TRV67 only). To advance the tape Press Min the stop mode. To resume normal playback, press N. If slow playback lasts for 5 minutes Your camcorder automatically enters the stop mode. The last 5 seconds of the recorded section plays back...
... for about 1 minute (CCD-TRV57/TRV67/TRV87 only) Your camcorder automatically returns to VTR (CCD-TRV87) or PLAYER (CCD-TRV17/TRV37/TRV57/TRV67 only). To advance the tape Press Min the stop mode. To resume normal playback, press N. If slow playback lasts for 5 minutes Your camcorder automatically enters the stop mode. The last 5 seconds of the recorded section plays back...
Operating Instructions
Page 35
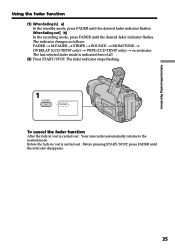
...CCD-TRV87 only) t WIPE (CCD-TRV87 only) t no indicator The last selected fader mode is carried out : Before pressing START/STOP, press FADER until the indicator disappears. 35 Before the fade in /out is carried out : Your camcorder automatically returns to the normal mode. Whenfadingout[ b] In the recording... mode, press FADER until the desired fader indicator flashes. The fader indicator stops flashing. 1 FADER FADER To cancel the fader function After...
...CCD-TRV87 only) t WIPE (CCD-TRV87 only) t no indicator The last selected fader mode is carried out : Before pressing START/STOP, press FADER until the indicator disappears. 35 Before the fade in /out is carried out : Your camcorder automatically returns to the normal mode. Whenfadingout[ b] In the recording... mode, press FADER until the desired fader indicator flashes. The fader indicator stops flashing. 1 FADER FADER To cancel the fader function After...
Operating Instructions
Page 45
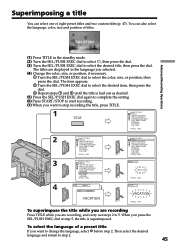
... displayed in the standby mode. (2) Turn the SEL/PUSH EXEC dial to select , then press the dial. (3) Turn the SEL/PUSH EXEC dial to stop recording the title, press TITLE. 1 TITLE PRESET TITLE HELLO! To select the language of a preset title If you selected. (4) Change the color, size, or... Repeat steps 1 and 2 until the title is laid out as desired. (5) Press the SEL/PUSH EXEC dial again to complete the setting. (6) Press START/STOP to start recording. (7) When you press the SEL/PUSH EXEC dial at step 5, the title is superimposed. OUR SWEET BABY WEDDING VACATION THE END [TITLE] : END 2 3...
... displayed in the standby mode. (2) Turn the SEL/PUSH EXEC dial to select , then press the dial. (3) Turn the SEL/PUSH EXEC dial to stop recording the title, press TITLE. 1 TITLE PRESET TITLE HELLO! To select the language of a preset title If you selected. (4) Change the color, size, or... Repeat steps 1 and 2 until the title is laid out as desired. (5) Press the SEL/PUSH EXEC dial again to complete the setting. (6) Press START/STOP to start recording. (7) When you press the SEL/PUSH EXEC dial at step 5, the title is superimposed. OUR SWEET BABY WEDDING VACATION THE END [TITLE] : END 2 3...
Operating Instructions
Page 51
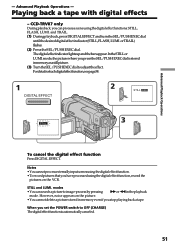
... page 38. 1 DIGITAL EFFECT 2 STILL 3 STILL Advanced Playback Operations To cancel the digital effect function Press DIGITAL EFFECT. CCD-TRV87 only During playback, you stop playing back a tape. mode, the picture where you press the SEL/PUSH EXEC dial is automatically canceled. 51 and TRAIL...to OFF (CHARGE) The digital effect function is stored in memory even if you can process a scene using the digital effect function, record the pictures on the picture. •You cannot delete a picture stored in memory as a still picture. (3) TurntheSEL/PUSHEXECdialtoadjusttheeffect. When...
... page 38. 1 DIGITAL EFFECT 2 STILL 3 STILL Advanced Playback Operations To cancel the digital effect function Press DIGITAL EFFECT. CCD-TRV87 only During playback, you stop playing back a tape. mode, the picture where you press the SEL/PUSH EXEC dial is automatically canceled. 51 and TRAIL...to OFF (CHARGE) The digital effect function is stored in memory even if you can process a scene using the digital effect function, record the pictures on the picture. •You cannot delete a picture stored in memory as a still picture. (3) TurntheSEL/PUSHEXECdialtoadjusttheeffect. When...
Operating Instructions
Page 58
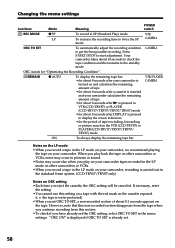
... picture search in the VTR (CCD-TRV87) or PLAYER (CCD-TRV17/TRV37/TRV57/ TRV67) mode VTR/PLAYER CAMERA ON To always display the remaining tape bar Notes on the LP mode • When you record a tape in the LP mode on your camcorder, we recommend playing the tape ...camcorder is inserted and your camcorder. Changing the menu settings Icon/item Mode Meaning POWER switch REC MODE z SP LP To record in SP (Standard Play) mode To increase the recording time to twice the SP mode VTR CAMERA ORC TO SET To automatically adjust the recording condition to start adjustment. Press START/STOP...
... picture search in the VTR (CCD-TRV87) or PLAYER (CCD-TRV17/TRV37/TRV57/ TRV67) mode VTR/PLAYER CAMERA ON To always display the remaining tape bar Notes on the LP mode • When you record a tape in the LP mode on your camcorder, we recommend playing the tape ...camcorder is inserted and your camcorder. Changing the menu settings Icon/item Mode Meaning POWER switch REC MODE z SP LP To record in SP (Standard Play) mode To increase the recording time to twice the SP mode VTR CAMERA ORC TO SET To automatically adjust the recording condition to start adjustment. Press START/STOP...
Operating Instructions
Page 60
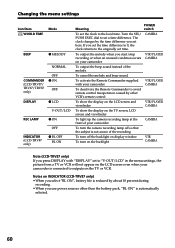
...the local time. If you start/stop VTR/PLAYER recording or when an unusual condition occurs CAMERA on your camcorder To output the beep sound instead of the recording To turn off the backlight on display window To turn on the backlight VTR CAMERA Note (CCD-TRV87 only) If you set here...a time difference. Changing the menu settings Icon/item Mode WORLD TIME BEEP z MELODY NORMAL COMMANDER (CCD-TRV57/ TRV67/TRV87 only) OFF z ON OFF DISPLAY z LCD V-OUT/LCD REC LAMP z ON OFF INDICATOR (CCD-TRV87 only) z BL OFF BL ON Meaning POWER switch To set the clock to outputs on ...
...the local time. If you start/stop VTR/PLAYER recording or when an unusual condition occurs CAMERA on your camcorder To output the beep sound instead of the recording To turn off the backlight on display window To turn on the backlight VTR CAMERA Note (CCD-TRV87 only) If you set here...a time difference. Changing the menu settings Icon/item Mode WORLD TIME BEEP z MELODY NORMAL COMMANDER (CCD-TRV57/ TRV67/TRV87 only) OFF z ON OFF DISPLAY z LCD V-OUT/LCD REC LAMP z ON OFF INDICATOR (CCD-TRV87 only) z BL OFF BL ON Meaning POWER switch To set the clock to outputs on ...
Operating Instructions
Page 62
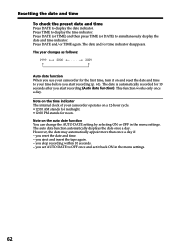
Note on the auto date function You can change the AUTO DATE setting by selecting ON or OFF in the menu settings. 62 you stop recording within 10 seconds. - you reset the date and time. - Resetting the date and time To check the preset date and time Press DATE to display ... TIME (or DATE) to OFF once and set it on and reset the date and time to your camcorder operates on the time indicator The internal clock of your time before you start recording (p. 61). The date and/or time indicator disappears. This function works only once a day. The auto date function...
Note on the auto date function You can change the AUTO DATE setting by selecting ON or OFF in the menu settings. 62 you stop recording within 10 seconds. - you reset the date and time. - Resetting the date and time To check the preset date and time Press DATE to display ... TIME (or DATE) to OFF once and set it on and reset the date and time to your camcorder operates on the time indicator The internal clock of your time before you start recording (p. 61). The date and/or time indicator disappears. This function works only once a day. The auto date function...
Operating Instructions
Page 67
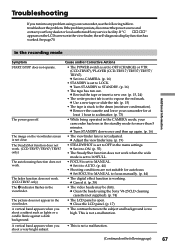
.... In the recording mode Additional Information Symptom START/STOP does not operate. The SteadyShot function does not work. (CCD-TRV57/TRV67/TRV87 only) The autofocusing function does not work . (CCD-TRV87 only) ...not adjusted. The power goes off. c Remove the cassette and leave your Sony dealer or local authorized Sony service facility. c Turn STANDBY down once and then up again. (p. 16.... c Set it to acclimatize. (p. 73) • While being operated in the CAMERA mode, your camcorder has been in the viewfinder. c Set it . (p. 38) • The video heads may be dirty...
.... In the recording mode Additional Information Symptom START/STOP does not operate. The SteadyShot function does not work. (CCD-TRV57/TRV67/TRV87 only) The autofocusing function does not work . (CCD-TRV87 only) ...not adjusted. The power goes off. c Remove the cassette and leave your Sony dealer or local authorized Sony service facility. c Turn STANDBY down once and then up again. (p. 16.... c Set it to acclimatize. (p. 73) • While being operated in the CAMERA mode, your camcorder has been in the viewfinder. c Set it . (p. 38) • The video heads may be dirty...
Operating Instructions
Page 68
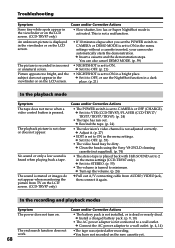
.... 68 •The tape was ejected after recording. •You have not recorded on the LCD screen. • If 10... not clear or does not appear. c Clean the heads using the Sony V8-25CLD cleaning cassette (not supplied). (p. 74) • The ...stops. c Adjust it to OFF. (p. 21) Picture appears too bright, and the • NIGHTSHOT is set to ON in the menu settings without a cassette inserted, your camcorder automatically starts the demonstration. c Install a charged battery pack. (p. 9, 10) • The AC power adaptor is not connected to VTR (CCD-TRV87)/PLAYER (CCD-TRV17/ TRV37/TRV57...
.... 68 •The tape was ejected after recording. •You have not recorded on the LCD screen. • If 10... not clear or does not appear. c Clean the heads using the Sony V8-25CLD cleaning cassette (not supplied). (p. 74) • The ...stops. c Adjust it to OFF. (p. 21) Picture appears too bright, and the • NIGHTSHOT is set to ON in the menu settings without a cassette inserted, your camcorder automatically starts the demonstration. c Install a charged battery pack. (p. 9, 10) • The AC power adaptor is not connected to VTR (CCD-TRV87)/PLAYER (CCD-TRV17/ TRV37/TRV57...
Operating Instructions
Page 71
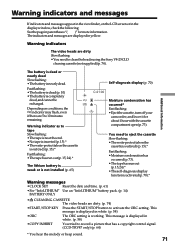
...CLEANING CASSETTE The video heads are 5 to clean the heads using the Sony V8-25CLD cleaning cassette (not supplied) (p. 74). You need to 10...STOP button to eject the cassette Slow flashing: • The write-protect tab on the LCD screen or in the display window, check the following: Seethepageinparentheses"( )"formoreinformation. This message is working. Warning indicators The video heads are displayed in yellow. Warning indicator as to record a picture that has a copyright control signal. (CCD...camcorder, and leave it for about 1 hour with the cassette compartment open (p. 73...
...CLEANING CASSETTE The video heads are 5 to clean the heads using the Sony V8-25CLD cleaning cassette (not supplied) (p. 74). You need to 10...STOP button to eject the cassette Slow flashing: • The write-protect tab on the LCD screen or in the display window, check the following: Seethepageinparentheses"( )"formoreinformation. This message is working. Warning indicators The video heads are displayed in yellow. Warning indicator as to record a picture that has a copyright control signal. (CCD...camcorder, and leave it for about 1 hour with the cassette compartment open (p. 73...
Operating Instructions
Page 80
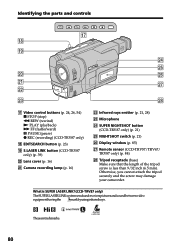
...wg NIGHTSHOT switch (p. 21) wh Display window (p. 85) wj Remote sensor (CCD-TRV57/TRV67/ TRV87 only) (p. 84) wk Tripod receptacle (base) Make sure that the length of the tripod screw is SUPER LASER LINK? (CCD-TRV87 only) The SUPER LASER LINK system sends and receives pictures and sound ... tripod securely and the screw may damage your camcorder. What is less than 9/32 inch (6.5 mm). wh wa wj ws wd wk qj Video control buttons (p. 24, 26, 54) x STOP (stop) m REW (rewind) N PLAY (playback) M FF (fastforward) X PAUSE (pause) z REC (recording) (CCD-TRV87 only) qk EDITSEARCH button (p. 23) ql...
...wg NIGHTSHOT switch (p. 21) wh Display window (p. 85) wj Remote sensor (CCD-TRV57/TRV67/ TRV87 only) (p. 84) wk Tripod receptacle (base) Make sure that the length of the tripod screw is SUPER LASER LINK? (CCD-TRV87 only) The SUPER LASER LINK system sends and receives pictures and sound ... tripod securely and the screw may damage your camcorder. What is less than 9/32 inch (6.5 mm). wh wa wj ws wd wk qj Video control buttons (p. 24, 26, 54) x STOP (stop) m REW (rewind) N PLAY (playback) M FF (fastforward) X PAUSE (pause) z REC (recording) (CCD-TRV87 only) qk EDITSEARCH button (p. 23) ql...


