
Camera Operations Guide
Page 3
..., films, video tapes, and other device such as at the sun. CCD-TRV128: TRV128 CCD-TRV228: TRV228 CCD-TRV328: TRV328 CCD-TRV428: TRV428 DCR-TRV260: TRV260 DCR-TRV265: TRV265 Instructions with an USB or i.LINK cable, be provided, even if recording or playback is encouraged to try to Subpart B of Part 15 of the following measures: - Consult a Sony dealer...
..., films, video tapes, and other device such as at the sun. CCD-TRV128: TRV128 CCD-TRV228: TRV228 CCD-TRV328: TRV328 CCD-TRV428: TRV428 DCR-TRV260: TRV260 DCR-TRV265: TRV265 Instructions with an USB or i.LINK cable, be provided, even if recording or playback is encouraged to try to Subpart B of Part 15 of the following measures: - Consult a Sony dealer...

Camera Operations Guide
Page 4
Notes on using the camcorder • Hold your camcorder correctly. • To ensure a good grip, fasten the grip belt as shown in the following illustration. • You can change the language to decide. 4 Viewfinder LCD panel Battery pack • Turn the SEL/PUSH EXEC dial to select desired item, then press the dial to be used for screen display on your camcorder (p. 19). • Do not hold the camcorder by the following parts.
Notes on using the camcorder • Hold your camcorder correctly. • To ensure a good grip, fasten the grip belt as shown in the following illustration. • You can change the language to decide. 4 Viewfinder LCD panel Battery pack • Turn the SEL/PUSH EXEC dial to select desired item, then press the dial to be used for screen display on your camcorder (p. 19). • Do not hold the camcorder by the following parts.
Camera Operations Guide
Page 7
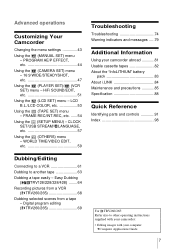
...the (TAPE SET) menu - Easy Dubbing ( TRV128/228/328/428) ........64 Recording pictures from a VCR ( TRV260/265 68 Dubbing selected scenes from a tape -...MENU) - CLOCK SET/USB STREAM/ LANGUAGE, etc 57 Using the (OTHERS) menu - WORLD TIME/VIDEO EDIT, etc 59 Troubleshooting Troubleshooting 74 Warning indicators and messages .....79 Additional Information Using your computer cComputer ... EFFECT, etc 44 Using the (CAMERA SET) menu - 16:9 WIDE/STEADYSHOT, etc 47 Using the (PLAYER SET)/ (VCR SET) menu - Advanced operations Customizing Your Camcorder Changing the menu settings 43 Using the...
...the (TAPE SET) menu - Easy Dubbing ( TRV128/228/328/428) ........64 Recording pictures from a VCR ( TRV260/265 68 Dubbing selected scenes from a tape -...MENU) - CLOCK SET/USB STREAM/ LANGUAGE, etc 57 Using the (OTHERS) menu - WORLD TIME/VIDEO EDIT, etc 59 Troubleshooting Troubleshooting 74 Warning indicators and messages .....79 Additional Information Using your computer cComputer ... EFFECT, etc 44 Using the (CAMERA SET) menu - 16:9 WIDE/STEADYSHOT, etc 47 Using the (PLAYER SET)/ (VCR SET) menu - Advanced operations Customizing Your Camcorder Changing the menu settings 43 Using the...

Camera Operations Guide
Page 8
... EJECT lever in the its window-side facing Close the cassette lid after direction of the arrow until it clicks. 2 Insert a cassette into the camcorder. The cassette compartment cassette. a Slide the OPEN/ b Insert the cassette with c Press . comes out automatically. To charge the battery, see... page 12. Quick Start Guide Recording movies 1 Attach the charged battery pack to open the lid. b Slide the battery pack in by itself. OPEN/EJECT lever Window-side 8 Quick...
... EJECT lever in the its window-side facing Close the cassette lid after direction of the arrow until it clicks. 2 Insert a cassette into the camcorder. The cassette compartment cassette. a Slide the OPEN/ b Insert the cassette with c Press . comes out automatically. To charge the battery, see... page 12. Quick Start Guide Recording movies 1 Attach the charged battery pack to open the lid. b Slide the battery pack in by itself. OPEN/EJECT lever Window-side 8 Quick...
Camera Operations Guide
Page 9
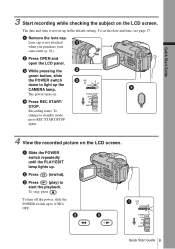
.... Lens cap is not set the date and time, see page 17. b Press (rewind). To turn off the power, slide the POWER switch up the CAMERA lamp. To stop, press . The power turns on the LCD screen. c Press (play) to standby mode, press REC START/STOP again. 4 View the... light up to (CHG) OFF. To change to start the playback. Quick Start Guide 3 Start recording while checking the subject on the LCD screen. The date and time is not attached when you purchase your camcorder (p. 91). a Slide the POWER switch repeatedly until the PLAY/EDIT lamp lights up in the default...
.... Lens cap is not set the date and time, see page 17. b Press (rewind). To turn off the power, slide the POWER switch up the CAMERA lamp. To stop, press . The power turns on the LCD screen. c Press (play) to standby mode, press REC START/STOP again. 4 View the... light up to (CHG) OFF. To change to start the playback. Quick Start Guide 3 Start recording while checking the subject on the LCD screen. The date and time is not attached when you purchase your camcorder (p. 91). a Slide the POWER switch repeatedly until the PLAY/EDIT lamp lights up in the default...
Camera Operations Guide
Page 11
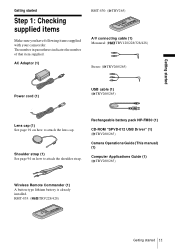
... "SPVD-012 USB Driver" (1) ( TRV260/265) Camera Operations Guide (This manual) (1) Computer Applications Guide (1) ( TRV260/265) Wireless Remote Commander (1) A button-type lithium battery is already installed. RMT-833: ( TRV228/428) Getting started Step 1: Checking supplied items Make sure you have following items supplied with your camcorder. The number in parentheses indicates the...
... "SPVD-012 USB Driver" (1) ( TRV260/265) Camera Operations Guide (This manual) (1) Computer Applications Guide (1) ( TRV260/265) Wireless Remote Commander (1) A button-type lithium battery is already installed. RMT-833: ( TRV228/428) Getting started Step 1: Checking supplied items Make sure you have following items supplied with your camcorder. The number in parentheses indicates the...

Camera Operations Guide
Page 12
... direction of the AC Adaptor or battery terminals with any malfunction occurs. 2 Attach the battery pack by attaching the "InfoLITHIUM" battery pack (M series) to your camcorder. b Notes • You cannot use batteries other than the "InfoLITHIUM" battery pack (M series) (p. 83). • Do not short-circuit the DC plug of the arrow...
... direction of the AC Adaptor or battery terminals with any malfunction occurs. 2 Attach the battery pack by attaching the "InfoLITHIUM" battery pack (M series) to your camcorder. b Notes • You cannot use batteries other than the "InfoLITHIUM" battery pack (M series) (p. 83). • Do not short-circuit the DC plug of the arrow...

Camera Operations Guide
Page 15
....) Using an outside power source You can use the AC Adaptor as shown in following conditions. - PRECAUTION Even if your camcorder is disconnected from the wall outlet. • The recording and playback time will be shorter when you do not want the battery to run out. Step 3: Turning the power on...power cord is turned off the power Slide the POWER switch up . • CAMERA mode: To record on . To turn off , AC power (house current) is still supplied to it is connected to the DC IN jack of your camcorder, even if its charge even when it while connected to the wall outlet...
....) Using an outside power source You can use the AC Adaptor as shown in following conditions. - PRECAUTION Even if your camcorder is disconnected from the wall outlet. • The recording and playback time will be shorter when you do not want the battery to run out. Step 3: Turning the power on...power cord is turned off the power Slide the POWER switch up . • CAMERA mode: To record on . To turn off , AC power (house current) is still supplied to it is connected to the DC IN jack of your camcorder, even if its charge even when it while connected to the wall outlet...

Camera Operations Guide
Page 16
...using the battery pack for power source, you can adjust the brightness by selecting [LCD B.L.] in the (LCD SET) menu (p. 53). • The recorded picture will not be affected by this setting. • You can turn off the operation confirmation beep by adjusting the angle of the LCD screen... setting [BEEP] in the (OTHERS) menu to meet various recording situations. To adjust the brightness of the LCD panel to [OFF] (p. 59). SEL/PUSH EXEC dial Open the LCD panel 90 degrees to the camcorder, then rotate it to select [LCD BRIGHT], then press the dial (p. 53). 4 Adjust the ...
...using the battery pack for power source, you can adjust the brightness by selecting [LCD B.L.] in the (LCD SET) menu (p. 53). • The recorded picture will not be affected by this setting. • You can turn off the operation confirmation beep by adjusting the angle of the LCD screen... setting [BEEP] in the (OTHERS) menu to meet various recording situations. To adjust the brightness of the LCD panel to [OFF] (p. 59). SEL/PUSH EXEC dial Open the LCD panel 90 degrees to the camcorder, then rotate it to select [LCD BRIGHT], then press the dial (p. 53). 4 Adjust the ...
Camera Operations Guide
Page 17
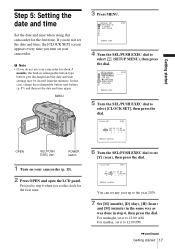
.... For midnight, set it to 12:00 PM. ,continued Getting started Step 5: Setting the date and time Set the date and time when using this camcorder for the first time. 6 Turn the SEL/PUSH EXEC dial to set it to 12:00 AM. For midday, set [Y] (year), then press the dial... started 17 In that case, charge the rechargeable button-type battery (p. 87) and then set any year up to step 6 when you turn on your camcorder for about 3 months, the built-in step 6, then press the dial. b Note • If you do not set the date and time, the [CLOCK SET...
.... For midnight, set it to 12:00 PM. ,continued Getting started Step 5: Setting the date and time Set the date and time when using this camcorder for the first time. 6 Turn the SEL/PUSH EXEC dial to set it to 12:00 AM. For midday, set [Y] (year), then press the dial... started 17 In that case, charge the rechargeable button-type battery (p. 87) and then set any year up to step 6 when you turn on your camcorder for about 3 months, the built-in step 6, then press the dial. b Note • If you do not set the date and time, the [CLOCK SET...
Camera Operations Guide
Page 18
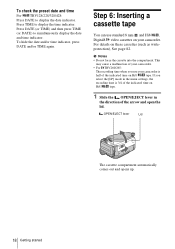
... mm and Hi8 , Digital8 video cassettes on these cassettes (such as writeprotection), See page 82. Step 6: Inserting a cassette tape You can use your camcorder is 3/4 of the indicated time on Hi8 tape. For details on your camcorder. • For TRV260/265: The recording time when you select the... [LP] mode in the menu settings, the recording time is half of the indicated time on ...
... mm and Hi8 , Digital8 video cassettes on these cassettes (such as writeprotection), See page 82. Step 6: Inserting a cassette tape You can use your camcorder is 3/4 of the indicated time on Hi8 tape. For details on your camcorder. • For TRV260/265: The recording time when you select the... [LP] mode in the menu settings, the recording time is half of the indicated time on ...
Camera Operations Guide
Page 19
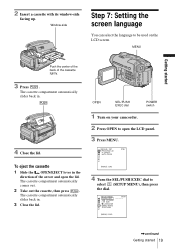
... dial POWER switch 1 Turn on the LCD screen. Window-side Step 7: Setting the screen language You can select the language to be used on your camcorder. 2 Press OPEN to select (SETUP MENU), then press the dial. SETUP MENU CLOCK SET USB STREAM LTR SIZE LANGUAGE DEMO MODE RETURN STBY --:--:-- [MENU] : END...
... dial POWER switch 1 Turn on the LCD screen. Window-side Step 7: Setting the screen language You can select the language to be used on your camcorder. 2 Press OPEN to select (SETUP MENU), then press the dial. SETUP MENU CLOCK SET USB STREAM LTR SIZE LANGUAGE DEMO MODE RETURN STBY --:--:-- [MENU] : END...

Camera Operations Guide
Page 20
SETUP MENU CLOCK SET STBY USB STREAM LTR SIZE ENGLISH LANGUAGE ENG[SIMP] DEMO MODE FRANÇAIS ESPAÑOL PORTUGUÊS [MENU] : END 6 Turn the SEL/PUSH EXEC dial to select [ LANGUAGE], then press the dial. z Tip • Your camcorder offers [ENG [SIMP]] (simplified English) for when you cannot find your native tongue among the options. 20 Getting started 5 Turn the SEL/PUSH EXEC dial to select the desired language, then press the dial. 7 Press MENU.
SETUP MENU CLOCK SET STBY USB STREAM LTR SIZE ENGLISH LANGUAGE ENG[SIMP] DEMO MODE FRANÇAIS ESPAÑOL PORTUGUÊS [MENU] : END 6 Turn the SEL/PUSH EXEC dial to select [ LANGUAGE], then press the dial. z Tip • Your camcorder offers [ENG [SIMP]] (simplified English) for when you cannot find your native tongue among the options. 20 Getting started 5 Turn the SEL/PUSH EXEC dial to select the desired language, then press the dial. 7 Press MENU.
Camera Operations Guide
Page 21
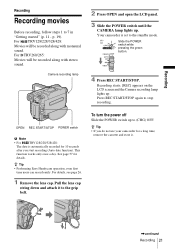
... up . See page 57 for a long time, remove the cassette and store it to (CHG) OFF. Camera recording lamp 2 Press OPEN and open the LCD panel. 3 Slide the POWER switch until the CAMERA lamp lights up . This function works only once a day. For details, see page 26. 1 Remove the... off Slide the POWER switch up to the grip belt. Pull the lens cap string down and attach it . ,continued Recording 21 z Tip • Performing Easy Handycam operation, even first time users can record easily. p. 19). Your camcorder is automatically recorded for 10 seconds after you do not use your...
... up . See page 57 for a long time, remove the cassette and store it to (CHG) OFF. Camera recording lamp 2 Press OPEN and open the LCD panel. 3 Slide the POWER switch until the CAMERA lamp lights up . This function works only once a day. For details, see page 26. 1 Remove the... off Slide the POWER switch up to the grip belt. Pull the lens cap string down and attach it . ,continued Recording 21 z Tip • Performing Easy Handycam operation, even first time users can record easily. p. 19). Your camcorder is automatically recorded for 10 seconds after you do not use your...
Camera Operations Guide
Page 22
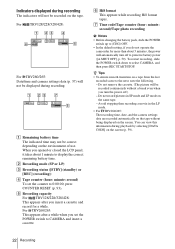
.../328/428: This appears after a while when you do not operate the camcorder for a while. F Hi8 format This appears while recording Hi8 format tapes. To restart recording, slide the POWER switch down to CAMERA and insert a cassette. You can view this information during recording. 1 23 7 60min SP REC 0:00:00 5 A Remaining battery time The indicated...
.../328/428: This appears after a while when you do not operate the camcorder for a while. F Hi8 format This appears while recording Hi8 format tapes. To restart recording, slide the POWER switch down to CAMERA and insert a cassette. You can view this information during recording. 1 23 7 60min SP REC 0:00:00 5 A Remaining battery time The indicated...
Camera Operations Guide
Page 23
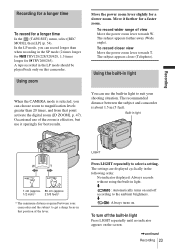
...and off according to get a sharp focus in light Recording 1 cm (approx. 80 cm (approx. 1/2 inch)* 2 5/8 feet)* * The minimum distance required between the subject and camcorder is effective, but use the built-in light to suit your camcorder and the subject to the ambient brightness. Move it sparingly...times, and from that position of view Move the power zoom lever towards T. To record closer view Move the power zoom lever towards W. The settings are displayed cyclically in light When the CAMERA mode is selected, you can choose zoom to select a setting. Built-in that point...
...and off according to get a sharp focus in light Recording 1 cm (approx. 80 cm (approx. 1/2 inch)* 2 5/8 feet)* * The minimum distance required between the subject and camcorder is effective, but use the built-in light to suit your camcorder and the subject to the ambient brightness. Move it sparingly...times, and from that position of view Move the power zoom lever towards T. To record closer view Move the power zoom lever towards W. The settings are displayed cyclically in light When the CAMERA mode is selected, you can choose zoom to select a setting. Built-in that point...
Camera Operations Guide
Page 24
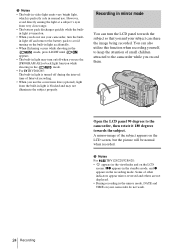
...interval time of the subject appears on your camcorder, turn the built- in light off and remove the battery pack to the camcorder while you do not use . You can share the image being recorded. b Notes • The built-in video light emits very bright light, which is ...perfectly safe in mirror mode You can turn the LCD panel towards the subject. Recording in normal use your camcorder do not work. 24 Recording in the viewfinder and on . &#...
...interval time of the subject appears on your camcorder, turn the built- in light off and remove the battery pack to the camcorder while you do not use . You can share the image being recorded. b Notes • The built-in video light emits very bright light, which is ...perfectly safe in mirror mode You can turn the LCD panel towards the subject. Recording in normal use your camcorder do not work. 24 Recording in the viewfinder and on . &#...

Camera Operations Guide
Page 25
...grip belt. To hide the date and time, press DATE and/or TIME again. Before recording, follow steps 1 to your camcorder, the clock is not set up yet. Pull the lens cap string down and attach it to record the date and time. z Tip • If you purchase your local time before ...starting actual recording. 2 Press OPEN and open the LCD panel. ,continued Recording 25 OPEN PHOTO DATE CCD-TRV428 TIME Press...
...grip belt. To hide the date and time, press DATE and/or TIME again. Before recording, follow steps 1 to your camcorder, the clock is not set up yet. Pull the lens cap string down and attach it to record the date and time. z Tip • If you purchase your local time before ...starting actual recording. 2 Press OPEN and open the LCD panel. ,continued Recording 25 OPEN PHOTO DATE CCD-TRV428 TIME Press...
Camera Operations Guide
Page 26
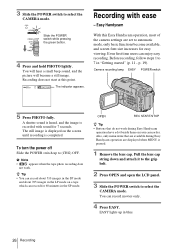
... the lens cap. The still image is displayed on your camcorder. You can enjoy easy recording. Slide the POWER switch while pressing the green button. 4 Press and hold PHOTO lightly. Recording does not start at this Easy Handycam operation, most of the camera settings are displayed when MENU is completed. Even first time users...
... the lens cap. The still image is displayed on your camcorder. You can enjoy easy recording. Slide the POWER switch while pressing the green button. 4 Press and hold PHOTO lightly. Recording does not start at this Easy Handycam operation, most of the camera settings are displayed when MENU is completed. Even first time users...
Camera Operations Guide
Page 27
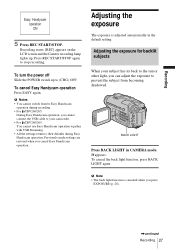
... the Camera recording lamp lights up to Easy Handycam operation during Easy Handycam operation. b Notes • You cannot switch from becoming shadowed. Previously made settings are restored when you press EXPOSURE (p. 28). ,continued Recording 27 Adjusting the exposure for backlit subjects When your camcorder. &#...the power off Slide the POWER switch up . b Note • The back light function is adjusted automatically in CAMERA mode. . appears. Recording Easy Handycam operation ON 5 Press REC START/STOP. Press REC START/STOP again to prevent the subject from /to (CHG...
... the Camera recording lamp lights up to Easy Handycam operation during Easy Handycam operation. b Notes • You cannot switch from becoming shadowed. Previously made settings are restored when you press EXPOSURE (p. 28). ,continued Recording 27 Adjusting the exposure for backlit subjects When your camcorder. &#...the power off Slide the POWER switch up . b Note • The back light function is adjusted automatically in CAMERA mode. . appears. Recording Easy Handycam operation ON 5 Press REC START/STOP. Press REC START/STOP again to prevent the subject from /to (CHG...


