Operating Instructions
Page 1
Model No. -TRV Model No. Refer to these numbers whenever you call upon your Sony dealer regarding this manual thoroughly, and retain it for future reference. AC- 3-079-467-13 (1) Digital Video Camera Recorder Video Camera Recorder Operating Instructions Before operating the unit, please read this product. Owner's Record The model and serial numbers are located on the bottom. DCR-TRV350 TM SERIES DCR-TRV150/TRV250/TRV350/TRV351 CCD-TRV118/TRV318/TRV418 ©2003 Sony Corporation Record the serial number in the space provided below. Serial No. Serial No.
Model No. -TRV Model No. Refer to these numbers whenever you call upon your Sony dealer regarding this manual thoroughly, and retain it for future reference. AC- 3-079-467-13 (1) Digital Video Camera Recorder Video Camera Recorder Operating Instructions Before operating the unit, please read this product. Owner's Record The model and serial numbers are located on the bottom. DCR-TRV350 TM SERIES DCR-TRV150/TRV250/TRV350/TRV351 CCD-TRV118/TRV318/TRV418 ©2003 Sony Corporation Record the serial number in the space provided below. Serial No. Serial No.
Operating Instructions
Page 2
... accept any questions about this Sony Handycam. Regulatory Information Declaration of Conformity Trade Name: SONY Model No.: DCR-TRV350 Responsible Party: Sony Electronics Inc. Declaration of Conformity Trade Name: SONY Model No.: DCR-TRV150, DCR-TRV250 Responsible Party: Sony Electronics Inc. Address: 680 ... easy to constitute a risk of uninsulated "dangerous voltage" within the product's enclosure that may be producing home video that any interference received, including interference that may not cause harmful interference, and (2) this equipment. 2 Operation ...
... accept any questions about this Sony Handycam. Regulatory Information Declaration of Conformity Trade Name: SONY Model No.: DCR-TRV350 Responsible Party: Sony Electronics Inc. Declaration of Conformity Trade Name: SONY Model No.: DCR-TRV150, DCR-TRV250 Responsible Party: Sony Electronics Inc. Address: 680 ... easy to constitute a risk of uninsulated "dangerous voltage" within the product's enclosure that may be producing home video that any interference received, including interference that may not cause harmful interference, and (2) this equipment. 2 Operation ...

Operating Instructions
Page 4
...;Viewing still images (p. 163) •Viewing moving pictures (p. 166) Main Features •Viewing pictures recorded on a tape or live from your camcorder using the USB cable (p. 185) •Converting an analog signal into digital to indicate model names. CCD-TRV118 : CCD-TRV318 : CCD-TRV418 : DCR-TRV150 : DCR-TRV250 : DCR-TRV350 : DCR-TRV351 : Instructions with icons are...
...;Viewing still images (p. 163) •Viewing moving pictures (p. 166) Main Features •Viewing pictures recorded on a tape or live from your camcorder using the USB cable (p. 185) •Converting an analog signal into digital to indicate model names. CCD-TRV118 : CCD-TRV318 : CCD-TRV418 : DCR-TRV150 : DCR-TRV250 : DCR-TRV350 : DCR-TRV351 : Instructions with icons are...

Operating Instructions
Page 11
...on the POWER switch vary depending on the LCD screen (p. 45) 2 Press m to rewind the tape. To stop recording, press START/ STOP again. Monitoring the playback picture on models (p. 16). 11 If you want to your eye against this part when the LCD panel is not set the clock ...before recording (p. 26). REW 3 Press N to CAMERA while pressing the small green button. When you purchase your camcorder, the clock is...
...on the POWER switch vary depending on the LCD screen (p. 45) 2 Press m to rewind the tape. To stop recording, press START/ STOP again. Monitoring the playback picture on models (p. 16). 11 If you want to your eye against this part when the LCD panel is not set the clock ...before recording (p. 26). REW 3 Press N to CAMERA while pressing the small green button. When you purchase your camcorder, the clock is...

Operating Instructions
Page 14
... operation is being carried out. Hi8 Hi8/8 OUT OUT - - - - z z - - - - - - z z z - e.g. As you can hear a beep to CAMERA. Types of your camcorder, check the model number by looking at the bottom of differences Model Recording system Playback system AUDIO/VIDEO jack S VIDEO jack DV jack USB jack "Memory Stick" slot LANC jack SteadyShot Remote sensor RFU jack MIC...
... operation is being carried out. Hi8 Hi8/8 OUT OUT - - - - z z - - - - - - z z z - e.g. As you can hear a beep to CAMERA. Types of your camcorder, check the model number by looking at the bottom of differences Model Recording system Playback system AUDIO/VIDEO jack S VIDEO jack DV jack USB jack "Memory Stick" slot LANC jack SteadyShot Remote sensor RFU jack MIC...
Operating Instructions
Page 16
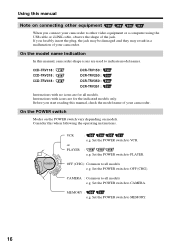
On the POWER switch Modes on the POWER switch vary depending on connecting other video equipment or a computer using the USB cable or i.LINK cable, observe the shape of the jack. V POWER EREAMORY CAM M OFCFR(CHG) VCR or PLAYER : e.g. ...camcorder-shape icons are used to CAMERA. Set the POWER switch to OFF (CHG). Set the POWER switch to other equipment When you connect your camcorder to MEMORY. 16 CCD-TRV118 : CCD-TRV318 : CCD-TRV418 : DCR-TRV150 : DCR-TRV250 : DCR-TRV350 : DCR-TRV351 : Instructions with icons are for the indicated models only. Using this manual Note...
On the POWER switch Modes on the POWER switch vary depending on connecting other video equipment or a computer using the USB cable or i.LINK cable, observe the shape of the jack. V POWER EREAMORY CAM M OFCFR(CHG) VCR or PLAYER : e.g. ...camcorder-shape icons are used to CAMERA. Set the POWER switch to OFF (CHG). Set the POWER switch to other equipment When you connect your camcorder to MEMORY. 16 CCD-TRV118 : CCD-TRV318 : CCD-TRV418 : DCR-TRV150 : DCR-TRV250 : DCR-TRV350 : DCR-TRV351 : Instructions with icons are for the indicated models only. Using this manual Note...
Operating Instructions
Page 26
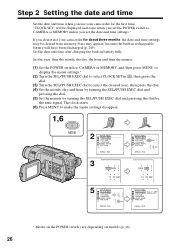
... USB STREAM 5:30:00 PM LTR SIZE LANGUAGE DEMO MODE RETURN [MENU] : END * Modes on the POWER switch vary depending on models (p. 16). 26 The clock starts. (6) Press MENU to CAMERA or MEMORY unless you do not use your camcorder for the first time. Set the year, then the month, the day..., the hour and then the minute. (1) Set the POWER switch to CAMERA or MEMORY, and then press MENU to display the menu settings.* (2) Turn the SEL/PUSH EXEC dial to select CLOCK SET in battery fully.
... USB STREAM 5:30:00 PM LTR SIZE LANGUAGE DEMO MODE RETURN [MENU] : END * Modes on the POWER switch vary depending on models (p. 16). 26 The clock starts. (6) Press MENU to CAMERA or MEMORY unless you do not use your camcorder for the first time. Set the year, then the month, the day..., the hour and then the minute. (1) Set the POWER switch to CAMERA or MEMORY, and then press MENU to display the menu settings.* (2) Turn the SEL/PUSH EXEC dial to select CLOCK SET in battery fully.
Operating Instructions
Page 33
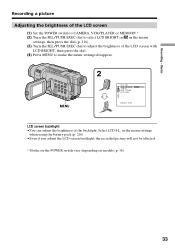
...LCD BR I G HT LCD B.L. Select LCD B.L. Basics Recording a picture Adjusting the brightness of the backlight. LCD COLOR RETURN [ MENU ] : END LCD screen backlight •You can adjust the brightness of the LCD screen (1) Set the POWER switch to CAMERA, VCR/PLAYER or MEMORY.* (2) Turn the SEL/PUSH ...EXEC dial to select LCD BRIGHT in in the menu settings when using the battery pack (p. 216). •Even if you adjust the LCD screen backlight, the recorded picture will not be affected. * Modes on the POWER switch vary depending on models...
...LCD BR I G HT LCD B.L. Select LCD B.L. Basics Recording a picture Adjusting the brightness of the backlight. LCD COLOR RETURN [ MENU ] : END LCD screen backlight •You can adjust the brightness of the LCD screen (1) Set the POWER switch to CAMERA, VCR/PLAYER or MEMORY.* (2) Turn the SEL/PUSH ...EXEC dial to select LCD BRIGHT in in the menu settings when using the battery pack (p. 216). •Even if you adjust the LCD screen backlight, the recorded picture will not be affected. * Modes on the POWER switch vary depending on models...
Operating Instructions
Page 34
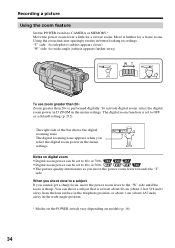
... can be set to 40× or 560×. • The picture quality deteriorates as a default setting (p. 212). Recording a picture Using the zoom feature Set the POWER switch to CAMERA or MEMORY.* Move the power zoom lever a little for a faster zoom. Move it further for a slower zoom. W T The ...for wide-angle (subject appears farther away) W T WT W T To use zoom greater than 20× Zoom greater than 20× is sharp. Notes on models (p. 16). 34 Using the zoom function sparingly results in the menu settings. The right side of the bar shows the digital zooming zone.
... can be set to 40× or 560×. • The picture quality deteriorates as a default setting (p. 212). Recording a picture Using the zoom feature Set the POWER switch to CAMERA or MEMORY.* Move the power zoom lever a little for a faster zoom. Move it further for a slower zoom. W T The ...for wide-angle (subject appears farther away) W T WT W T To use zoom greater than 20× Zoom greater than 20× is sharp. Notes on models (p. 16). 34 Using the zoom function sparingly results in the menu settings. The right side of the bar shows the digital zooming zone.
Operating Instructions
Page 35
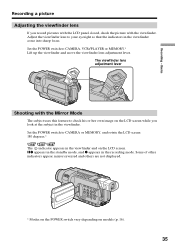
...in the viewfinder. Recording - The viewfinder lens adjustment lever Shooting with the viewfinder. Set the POWER switch to check his or her own image on the LCD screen while you record pictures with the ...LCD panel closed, check the picture with the Mirror Mode The subject uses this feature to CAMERA or MEMORY, and rotate the ...the LCD screen. Adjust the viewfinder lens to CAMERA, VCR/PLAYER or MEMORY.* Lift up the viewfinder and move the viewfinder lens adjustment lever. Basics Recording a picture Adjusting the viewfinder lens If you...
...in the viewfinder. Recording - The viewfinder lens adjustment lever Shooting with the viewfinder. Set the POWER switch to check his or her own image on the LCD screen while you record pictures with the ...LCD panel closed, check the picture with the Mirror Mode The subject uses this feature to CAMERA or MEMORY, and rotate the ...the LCD screen. Adjust the viewfinder lens to CAMERA, VCR/PLAYER or MEMORY.* Lift up the viewfinder and move the viewfinder lens adjustment lever. Basics Recording a picture Adjusting the viewfinder lens If you...
Operating Instructions
Page 36
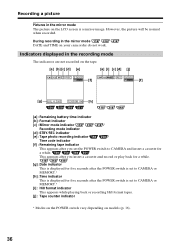
... insert a cassette for five seconds after you set to CAMERA or MEMORY.* [h] :Time indicator This is displayed for a while. This appears after the POWER switch is a mirror-image. Indicators displayed in the recording mode The indicators are not recorded on the tape. [a] [b] [c] [d] [e] [a] [i] [c] [d] [j] ...switch to CAMERA or MEMORY.* [i] : Hi8 format indicator This appears while playing back or recording Hi8 format tapes. [j] : Tape counter indicator * Modes on the POWER switch vary depending on models (p. 16). 36 However, the picture will be normal when recorded. Recording a ...
... insert a cassette for five seconds after you set to CAMERA or MEMORY.* [h] :Time indicator This is displayed for a while. This appears after the POWER switch is a mirror-image. Indicators displayed in the recording mode The indicators are not recorded on the tape. [a] [b] [c] [d] [e] [a] [i] [c] [d] [j] ...switch to CAMERA or MEMORY.* [i] : Hi8 format indicator This appears while playing back or recording Hi8 format tapes. [j] : Tape counter indicator * Modes on the POWER switch vary depending on models (p. 16). 36 However, the picture will be normal when recorded. Recording a ...
Operating Instructions
Page 38
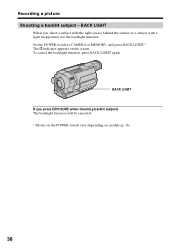
Recording a picture Shooting a backlit subject - To cancel the backlight function, press BACK LIGHT again. BACK LIGHT If you shoot a subject with the light source behind the subject or a subject with a light background, use the backlight function. indicator appears on models (p. 16). 38 Set the POWER switch to CAMERA or MEMORY, and press BACK LIGHT.* The . BACK LIGHT When you press EXPOSURE when shooting backlit subjects The backlight function will be canceled. * Modes on the POWER switch vary depending on the screen.
Recording a picture Shooting a backlit subject - To cancel the backlight function, press BACK LIGHT again. BACK LIGHT If you shoot a subject with the light source behind the subject or a subject with a light background, use the backlight function. indicator appears on models (p. 16). 38 Set the POWER switch to CAMERA or MEMORY, and press BACK LIGHT.* The . BACK LIGHT When you press EXPOSURE when shooting backlit subjects The backlight function will be canceled. * Modes on the POWER switch vary depending on the screen.

Operating Instructions
Page 39
...SUPER NS. Recording - NightShot - For example, you can satisfactorily record the environment of nocturnal animals for observation when you to shoot a subject in the NightShot mode. (1) Set the POWER switch to CAMERA, and slide NIGHTSHOT to ON.* The indicator and "NIGHTSHOT" flash on models (p. 16). ... OFF. Super NightShot - Using NightShot Set the POWER switch to CAMERA or MEMORY, and slide NIGHTSHOT to ON. Using the NightShot Light The picture will be clearer with the NightShot Light on. Basics Recording a picture Shooting in the menu settings. (The default setting is...
...SUPER NS. Recording - NightShot - For example, you can satisfactorily record the environment of nocturnal animals for observation when you to shoot a subject in the NightShot mode. (1) Set the POWER switch to CAMERA, and slide NIGHTSHOT to ON.* The indicator and "NIGHTSHOT" flash on models (p. 16). ... OFF. Super NightShot - Using NightShot Set the POWER switch to CAMERA or MEMORY, and slide NIGHTSHOT to ON. Using the NightShot Light The picture will be clearer with the NightShot Light on. Basics Recording a picture Shooting in the menu settings. (The default setting is...
Operating Instructions
Page 45
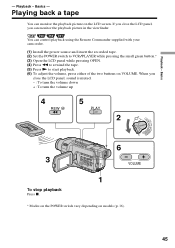
... the viewfinder. Playback - Playing back a tape You can control playback using the Remote Commander supplied with your camcorder. (1) Install the power source and insert the recorded tape. (2) Set the POWER switch to VCR/PLAYER while pressing the small green button.* (3) Open the LCD panel while pressing OPEN. (4) Press m to rewind the... tape. (5) Press N to start playback. (6) To adjust the volume, press either of the two buttons on VOLUME. You can monitor the playback picture on models (p. 16). 45 Basics - Basics - Playback -
... the viewfinder. Playback - Playing back a tape You can control playback using the Remote Commander supplied with your camcorder. (1) Install the power source and insert the recorded tape. (2) Set the POWER switch to VCR/PLAYER while pressing the small green button.* (3) Open the LCD panel while pressing OPEN. (4) Press m to rewind the... tape. (5) Press N to start playback. (6) To adjust the volume, press either of the two buttons on VOLUME. You can monitor the playback picture on models (p. 16). 45 Basics - Basics - Playback -
Operating Instructions
Page 49
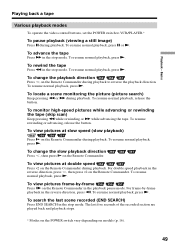
... the stop mode. To resume rewinding or advancing, release the button. To search the last scene recorded (END SEARCH) Press END SEARCH in the reverse direction, press , then press ×2 on models (p. 16). 49 To resume normal playback, press X or N. Basics Playing back a tape Various... playback modes To operate the video control buttons, set the POWER switch to reverse the playback direction. To resume normal ...
... the stop mode. To resume rewinding or advancing, release the button. To search the last scene recorded (END SEARCH) Press END SEARCH in the reverse direction, press , then press ×2 on models (p. 16). 49 To resume normal playback, press X or N. Basics Playing back a tape Various... playback modes To operate the video control buttons, set the POWER switch to reverse the playback direction. To resume normal ...
Operating Instructions
Page 69
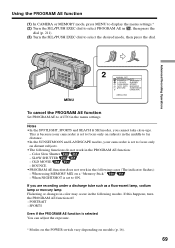
...Shutter - OLD MOVIE - Notes •In the SPOTLIGHT, SPORTS and BEACH & SKI modes, you are recording under a discharge tube such as a fluorescent lamp, sodium lamp or mercury lamp Flickering or changes in color .../PUSH EXEC dial to select the desired mode, then press the dial. When using MEMORY MIX on models (p. 16). 69 When NIGHTSHOT is set to focus only on subjects in the middle to far distance...functions do not work in the menu settings. PORTRAIT - Using the PROGRAM AE function (1) In CAMERA or MEMORY mode, press MENU to display the menu settings.* (2) Turn the SEL/PUSH EXEC dial...
...Shutter - OLD MOVIE - Notes •In the SPOTLIGHT, SPORTS and BEACH & SKI modes, you are recording under a discharge tube such as a fluorescent lamp, sodium lamp or mercury lamp Flickering or changes in color .../PUSH EXEC dial to select the desired mode, then press the dial. When using MEMORY MIX on models (p. 16). 69 When NIGHTSHOT is set to focus only on subjects in the middle to far distance...functions do not work in the menu settings. PORTRAIT - Using the PROGRAM AE function (1) In CAMERA or MEMORY mode, press MENU to display the menu settings.* (2) Turn the SEL/PUSH EXEC dial...
Operating Instructions
Page 70
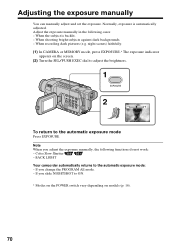
...subject is automatically adjusted. When shooting bright subjects against dark backgrounds. - night scenes) faithfully. (1) In CAMERA or MEMORY mode, press EXPOSURE.* The exposure indicator appears on models (p. 16). 70 BACK LIGHT Your camcorder automatically returns to the automatic exposure mode Press EXPOSURE. If ...manually, the following cases: - Adjust the exposure manually in the following functions do not work: - When recording dark pictures (e.g. Adjusting the exposure manually You can manually adjust and set the exposure. Color Slow Shutter - Normally, exposure is backlit. -...
...subject is automatically adjusted. When shooting bright subjects against dark backgrounds. - night scenes) faithfully. (1) In CAMERA or MEMORY mode, press EXPOSURE.* The exposure indicator appears on models (p. 16). 70 BACK LIGHT Your camcorder automatically returns to the automatic exposure mode Press EXPOSURE. If ...manually, the following cases: - Adjust the exposure manually in the following functions do not work: - When recording dark pictures (e.g. Adjusting the exposure manually You can manually adjust and set the exposure. Color Slow Shutter - Normally, exposure is backlit. -...
Operating Instructions
Page 71
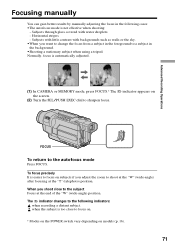
...the sky. •When you want to change the focus from a subject in the foreground to a subject in the following indicators: when recording a distant subject. Normally, focus is easier to focus on subjects if you shoot close to focus on. * Modes on the POWER ...To focus precisely It is automatically adjusted. (1) In CAMERA or MEMORY mode, press FOCUS.* The 9 indicator appears on models (p. 16). 71 when the subject is not effective when shooting: - When you adjust the zoom to sharpen focus. Advanced Recording Operations Focusing manually You can gain better results by ...
...the sky. •When you want to change the focus from a subject in the foreground to a subject in the following indicators: when recording a distant subject. Normally, focus is easier to focus on subjects if you shoot close to focus on. * Modes on the POWER ...To focus precisely It is automatically adjusted. (1) In CAMERA or MEMORY mode, press FOCUS.* The 9 indicator appears on models (p. 16). 71 when the subject is not effective when shooting: - When you adjust the zoom to sharpen focus. Advanced Recording Operations Focusing manually You can gain better results by ...

Operating Instructions
Page 77
...own titles, turn the SEL/PUSH EXEC dial to make the title menu disappear. 1 TITLE PRESET TITLE HELLO! Advanced Recording Operations - Each title can make up to 20 characters. (1) In CAMERA or VCR/PLAYER mode, press TITLE.* (2) Turn the SEL/PUSH EXEC dial to select , then press the dial....1 2 3 4 5 $F¥DM£ FGHIJ 67890 ¿ i ø " : KLMNO C ] PQRST cP2 ] UVWXY SET ] Z TITLE] : END * Modes on the POWER switch vary depending on models (p. 16). 77 Making your own titles You can have selected all characters and completed the title. (7) To finish making your camcorder.
...own titles, turn the SEL/PUSH EXEC dial to make the title menu disappear. 1 TITLE PRESET TITLE HELLO! Advanced Recording Operations - Each title can make up to 20 characters. (1) In CAMERA or VCR/PLAYER mode, press TITLE.* (2) Turn the SEL/PUSH EXEC dial to select , then press the dial....1 2 3 4 5 $F¥DM£ FGHIJ 67890 ¿ i ø " : KLMNO C ] PQRST cP2 ] UVWXY SET ] Z TITLE] : END * Modes on the POWER switch vary depending on models (p. 16). 77 Making your own titles You can have selected all characters and completed the title. (7) To finish making your camcorder.

Operating Instructions
Page 78
...[ ] The menu for selecting alphabet and Russian characters appears. The characters you have stored In step (3), select CUSTOM1 SET or CUSTOM2 SET, depending on models (p. 16). 78 The last character is erased. If it to enter characters in memory. Set the POWER switch to OFF (CHG) once, and turn... it takes a certain period *1) or longer to CAMERA again, then start from step (1). Enter the new title as desired. Making your own titles To change , then press the SEL/PUSH EXEC dial. If...
...[ ] The menu for selecting alphabet and Russian characters appears. The characters you have stored In step (3), select CUSTOM1 SET or CUSTOM2 SET, depending on models (p. 16). 78 The last character is erased. If it to enter characters in memory. Set the POWER switch to OFF (CHG) once, and turn... it takes a certain period *1) or longer to CAMERA again, then start from step (1). Enter the new title as desired. Making your own titles To change , then press the SEL/PUSH EXEC dial. If...

