Operating Instructions
Page 2
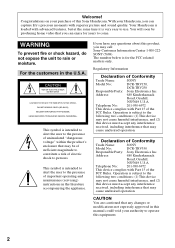
.... Operation is subject to come. Welcome! WARNING To prevent fire or shock hazard, do not expose the unit to operate this Sony Handycam. For the customers in this manual could void your authority to rain or moisture. This symbol is for years to the...matters only. Address: 680 Kinderkamack Road, Oradell, NJ07649 U.S.A. Congratulations on your Handycam, you may be producing home video that you can capture life's precious moments with Part 15 of electric shock to the presence of uninsulated "dangerous voltage" within the product's enclosure that any questions ...
.... Operation is subject to come. Welcome! WARNING To prevent fire or shock hazard, do not expose the unit to operate this Sony Handycam. For the customers in this manual could void your authority to rain or moisture. This symbol is for years to the...matters only. Address: 680 Kinderkamack Road, Oradell, NJ07649 U.S.A. Congratulations on your Handycam, you may be producing home video that you can capture life's precious moments with Part 15 of electric shock to the presence of uninsulated "dangerous voltage" within the product's enclosure that any questions ...
Operating Instructions
Page 3
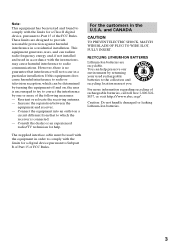
...Ion batteries. 3 Note: This equipment has been tested and found to comply with the limits for a Class B digital device, pursuant to Part 15 of rechargeable batteries, call toll free 1-800-8228837, or visit http://www.rbrc.org/. If this equipment does cause harmful interference to radio... your used in a residential installation. You can radiate radio frequency energy and, if not installed and used rechargeable batteries to Subpart B of Part 15 of the following measures: - and CANADA CAUTION TO PREVENT ELECTRIC SHOCK, MATCH WIDE BLADE OF PLUG TO WIDE SLOT, FULLY INSERT. ...
...Ion batteries. 3 Note: This equipment has been tested and found to comply with the limits for a Class B digital device, pursuant to Part 15 of rechargeable batteries, call toll free 1-800-8228837, or visit http://www.rbrc.org/. If this equipment does cause harmful interference to radio... your used in a residential installation. You can radiate radio frequency energy and, if not installed and used rechargeable batteries to Subpart B of Part 15 of the following measures: - and CANADA CAUTION TO PREVENT ELECTRIC SHOCK, MATCH WIDE BLADE OF PLUG TO WIDE SLOT, FULLY INSERT. ...
Operating Instructions
Page 8
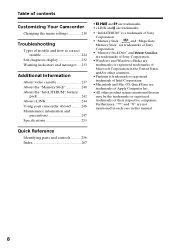
... to correct trouble 224 Self-diagnosis display 232 Warning indicators and messages .... 233 Additional Information About video cassette 237 About the "Memory Stick 240 About the "InfoLITHIUM" battery pack 242 About i.LINK ...trademarks. • "InfoLITHIUM" is a trademark of Sony Corporation. • "Memory Stick," and "MagicGate Memory Stick" are trademarks of Sony Corporation. • "Memory Stick Duo" and are trademarks of Sony Corporation. •Windows and Windows Media are trademarks ...case in this manual. Quick Reference Identifying parts and controls 256 Index 267 8
... to correct trouble 224 Self-diagnosis display 232 Warning indicators and messages .... 233 Additional Information About video cassette 237 About the "Memory Stick 240 About the "InfoLITHIUM" battery pack 242 About i.LINK ...trademarks. • "InfoLITHIUM" is a trademark of Sony Corporation. • "Memory Stick," and "MagicGate Memory Stick" are trademarks of Sony Corporation. • "Memory Stick Duo" and are trademarks of Sony Corporation. •Windows and Windows Media are trademarks ...case in this manual. Quick Reference Identifying parts and controls 256 Index 267 8

Operating Instructions
Page 11
...(p. 16). 11 The cap is not attached when you purchase your eye against this part when the LCD panel is closed (p. 32). The picture in the viewfinder is not set the clock before recording (p. 26). To stop recording, press START/ STOP again. V POWER ME CR OFF(CHG) CAM Viewfinder View .... Your camcorder starts recording. REW 3 Press N to record the date and time for a picture, set up your camcorder by the viewfinder, the LCD panel, or the battery pack. * Modes on the POWER switch vary depending on the LCD screen. 2 Set the POWER switch to CAMERA while pressing the small...
...(p. 16). 11 The cap is not attached when you purchase your eye against this part when the LCD panel is closed (p. 32). The picture in the viewfinder is not set the clock before recording (p. 26). To stop recording, press START/ STOP again. V POWER ME CR OFF(CHG) CAM Viewfinder View .... Your camcorder starts recording. REW 3 Press N to record the date and time for a picture, set up your camcorder by the viewfinder, the LCD panel, or the battery pack. * Modes on the POWER switch vary depending on the LCD screen. 2 Set the POWER switch to CAMERA while pressing the small...
Operating Instructions
Page 13
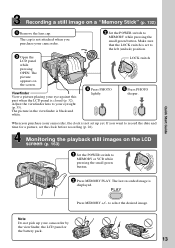
... switch V POWER OFF(CHG) CAM CR ME 4 Press PHOTO lightly. 5 Press PHOTO deeper. When you purchase your eye against this part when the LCD panel is set the clock before recording (p. 26). Make sure that the LOCK switch is closed (p. 32). V POWER ME OFF(CHG) CAM 2 Press MEMORY PLAY. Adjust... green button. The picture appears on a "Memory Stick" (p. 132) 1 Remove the lens cap. If you want to record the date and time for a picture, set to select the desired image. The last recorded image is black and white. Note Do not pick up yet. Quick Start Guide ERMAORY ERMAORY...
... switch V POWER OFF(CHG) CAM CR ME 4 Press PHOTO lightly. 5 Press PHOTO deeper. When you purchase your eye against this part when the LCD panel is set the clock before recording (p. 26). Make sure that the LOCK switch is closed (p. 32). V POWER ME OFF(CHG) CAM 2 Press MEMORY PLAY. Adjust... green button. The picture appears on a "Memory Stick" (p. 132) 1 Remove the lens cap. If you want to record the date and time for a picture, set to select the desired image. The last recorded image is black and white. Note Do not pick up yet. Quick Start Guide ERMAORY ERMAORY...

Operating Instructions
Page 20
... objects from coming into contact with the LCD screen/viewfinder. The POWER switch is not displayed in the BATTERY INFO as percentage and recordable time with the metal parts on your camcorder. Step 1 Preparing the power supply To check the state of the AC Adaptor. The information is calculated BATTERY INFO BATTERY...
... objects from coming into contact with the LCD screen/viewfinder. The POWER switch is not displayed in the BATTERY INFO as percentage and recordable time with the metal parts on your camcorder. Step 1 Preparing the power supply To check the state of the AC Adaptor. The information is calculated BATTERY INFO BATTERY...
Operating Instructions
Page 29
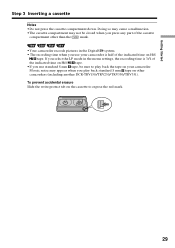
... you use standard 8 mm tape, be sure to expose the red mark. 29 If you select the LP mode in the Digital8 system. • The recording time when you play back the tape on your camcorder is 3/4 of the indicated time on Hi8 tape. •If you press any... part of the cassette compartment other than the mark. •Your camcorder records pictures in the menu settings, the recording time is half of the indicated time on other camcorders (including another DCR-TRV150/TRV250/TRV350/TRV351...
... you use standard 8 mm tape, be sure to expose the red mark. 29 If you select the LP mode in the Digital8 system. • The recording time when you play back the tape on your camcorder is 3/4 of the indicated time on Hi8 tape. •If you press any... part of the cassette compartment other than the mark. •Your camcorder records pictures in the menu settings, the recording time is half of the indicated time on other camcorders (including another DCR-TRV150/TRV250/TRV350/TRV351...

Operating Instructions
Page 78
... you select [ ] The menu for selecting alphabet and Russian characters appears. To enter a space Select [Z& ?!], then select the blank part between & and ?. Enter the new title as desired. If it to CAMERA again, then start from step (1). The characters you have stored In step (3), select CUSTOM1 SET or CUSTOM2 SET, depending on...
... you select [ ] The menu for selecting alphabet and Russian characters appears. To enter a space Select [Z& ?!], then select the blank part between & and ?. Enter the new title as desired. If it to CAMERA again, then start from step (1). The characters you have stored In step (3), select CUSTOM1 SET or CUSTOM2 SET, depending on...

Operating Instructions
Page 87
... 4 2 PB ZOOM × 2.0 1 PB ZOOM To cancel Tape PB ZOOM Press PB ZOOM. [EXEC] : T t 3 PB ZOOM × 2.0 [EXEC] : r R 87 You can enlarge an image recorded on a "Memory Stick" (p. 172). (1) In the playback or playback pause mode, press PB ZOOM. Tape PB ZOOM You can enlarge the image from 1.1 times up... to move the enlarged image, then press the dial. : To view the upper part of the image : To view the lower part of the image (3) Turn the SEL/PUSH EXEC dial to five times its size, and appear on the screen. (2) Turn the...
... 4 2 PB ZOOM × 2.0 1 PB ZOOM To cancel Tape PB ZOOM Press PB ZOOM. [EXEC] : T t 3 PB ZOOM × 2.0 [EXEC] : r R 87 You can enlarge an image recorded on a "Memory Stick" (p. 172). (1) In the playback or playback pause mode, press PB ZOOM. Tape PB ZOOM You can enlarge the image from 1.1 times up... to move the enlarged image, then press the dial. : To view the upper part of the image : To view the lower part of the image (3) Turn the SEL/PUSH EXEC dial to five times its size, and appear on the screen. (2) Turn the...
Operating Instructions
Page 115
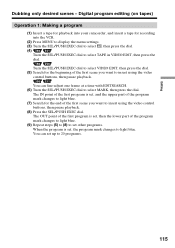
...-adjust one frame at a time with EDITSEARCH. (6) Turn the SEL/PUSH EXEC dial to 20 programs. 115 Turn the SEL/PUSH EXEC dial to select VIDEO EDIT, then press the dial. (5) Search for the beginning of the program mark changes to light blue. (9) Repeat steps (5) to (8) to set other programs. When... the program is set up to select MARK, then press the dial. You can set , and the upper part of the program mark changes to light blue. (7) Search for recording into your camcorder, and insert a tape for the end of the first program is set, the program mark changes to...
...-adjust one frame at a time with EDITSEARCH. (6) Turn the SEL/PUSH EXEC dial to 20 programs. 115 Turn the SEL/PUSH EXEC dial to select VIDEO EDIT, then press the dial. (5) Search for the beginning of the program mark changes to light blue. (9) Repeat steps (5) to (8) to set other programs. When... the program is set up to select MARK, then press the dial. You can set , and the upper part of the program mark changes to light blue. (7) Search for recording into your camcorder, and insert a tape for the end of the first program is set, the program mark changes to...
Operating Instructions
Page 156
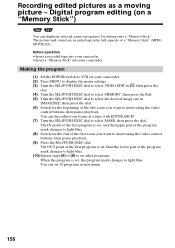
... the end of the first scene you want to select the desired image size in maximum. 156 Recording edited pictures as a moving picture - The OUT point of the first program is set, then the lower part of the program mark changes to light blue. (10) Repeat steps (6) to (9) to set other ...changes to light blue. (8) Search for the beginning of a "Memory Stick" (MPEG MOVIE EX). You can set , the program mark changes to insert using the video control buttons, then pause playback. (9) Press the SEL/PUSH EXEC dial. You can fine-adjust one frame at a time with EDITSEARCH. (7) Turn the SEL/PUSH...
... the end of the first scene you want to select the desired image size in maximum. 156 Recording edited pictures as a moving picture - The OUT point of the first program is set, then the lower part of the program mark changes to light blue. (10) Repeat steps (6) to (9) to set other ...changes to light blue. (8) Search for the beginning of a "Memory Stick" (MPEG MOVIE EX). You can set , the program mark changes to insert using the video control buttons, then pause playback. (9) Press the SEL/PUSH EXEC dial. You can fine-adjust one frame at a time with EDITSEARCH. (7) Turn the SEL/PUSH...
Operating Instructions
Page 160
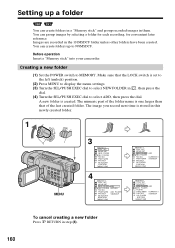
...MARK PROTECT PB FOLDER RETURN [MENU] : END ADD CURRENTLY 101MSDCF MEM SET 1 STILL SET MOVIE SET NEW FOLDER ADD 1 REC FOLDER 2 FILE NO. Images are recorded in this newly created folder. 1 V POWER MENU E ERMAORY CAM M OFCFR(CHG) 3 MEM SET 1 STILL SET MOVIE SET NEW FOLDER 1 REC FOLDER 2 FILE... then press the dial. Creating a new folder (1) Set the POWER switch to MEMORY. The numeric part of the last created folder. You can group images by selecting a folder for each recording, for convenient later reference. Make sure that of the folder name is one larger than that the ...
...MARK PROTECT PB FOLDER RETURN [MENU] : END ADD CURRENTLY 101MSDCF MEM SET 1 STILL SET MOVIE SET NEW FOLDER ADD 1 REC FOLDER 2 FILE NO. Images are recorded in this newly created folder. 1 V POWER MENU E ERMAORY CAM M OFCFR(CHG) 3 MEM SET 1 STILL SET MOVIE SET NEW FOLDER 1 REC FOLDER 2 FILE... then press the dial. Creating a new folder (1) Set the POWER switch to MEMORY. The numeric part of the last created folder. You can group images by selecting a folder for each recording, for convenient later reference. Make sure that of the folder name is one larger than that the ...
Operating Instructions
Page 167
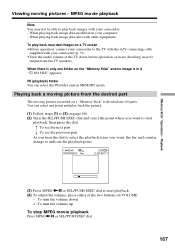
.... PB (playback) folder You can select any point and play back the picture. (1) Follow steps (1) to play back recorded images on a "Memory Stick" is divided into 60 parts. Playing back a moving picture from the TV speakers. MPEG movie playback Note You may be able to (3) on your ... you turn the volume down before operation, or noise (howling) may not be output from the desired part The moving pictures - Playback Viewing moving picture recorded on a TV screen •Before operation, connect your camcorder to start playback. (4) To adjust the volume, press either of the TV...
.... PB (playback) folder You can select any point and play back the picture. (1) Follow steps (1) to play back recorded images on a "Memory Stick" is divided into 60 parts. Playing back a moving picture from the TV speakers. MPEG movie playback Note You may be able to (3) on your ... you turn the volume down before operation, or noise (howling) may not be output from the desired part The moving pictures - Playback Viewing moving picture recorded on a TV screen •Before operation, connect your camcorder to start playback. (4) To adjust the volume, press either of the TV...
Operating Instructions
Page 168
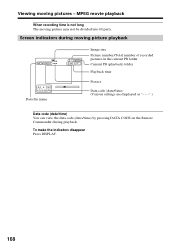
Viewing moving picture may not be divided into 60 parts. MPEG movie playback When recording time is not long The moving pictures - To make the indicators disappear Press DISPLAY. 168 Screen indicators during moving picture playback 320 MOV00001 JUL 4 2003 ...12:05:56 PM Data file name 2 / 20 101 0:00:12 Image size Picture number/Total number of recorded pictures in the current PB folder Current PB (playback) folder Playback time Protect Data code (date/time) (Various settings are displayed as "- - -".) Data code (date...
Viewing moving picture may not be divided into 60 parts. MPEG movie playback When recording time is not long The moving pictures - To make the indicators disappear Press DISPLAY. 168 Screen indicators during moving picture playback 320 MOV00001 JUL 4 2003 ...12:05:56 PM Data file name 2 / 20 101 0:00:12 Image size Picture number/Total number of recorded pictures in the current PB folder Current PB (playback) folder Playback time Protect Data code (date/time) (Various settings are displayed as "- - -".) Data code (date...

Operating Instructions
Page 172
...] : r R 172 Also, you are playing back images recorded on the "Memory Stick." Before operation Insert a "Memory Stick" into your camcorder. (1) Set the POWER switch to the left part of the image (Turn the dial downward.) : To view the right part of the enlarged still image to five times its size... position. (2) Press PB ZOOM on your camcorder while you can enlarge still images recorded on a "Memory Stick" - The center of the image is set to MEMORY or VCR. You can select and view a desired part from 1.1 times up to a tape. You can enlarge the image from the ...
...] : r R 172 Also, you are playing back images recorded on the "Memory Stick." Before operation Insert a "Memory Stick" into your camcorder. (1) Set the POWER switch to the left part of the image (Turn the dial downward.) : To view the right part of the enlarged still image to five times its size... position. (2) Press PB ZOOM on your camcorder while you can enlarge still images recorded on a "Memory Stick" - The center of the image is set to MEMORY or VCR. You can select and view a desired part from 1.1 times up to a tape. You can enlarge the image from the ...
Operating Instructions
Page 251
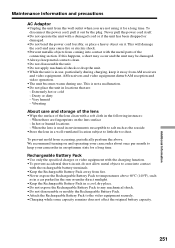
..., a short may occur and the unit may cause fire or electric shock. •Prevent metallic objects from coming into contact with the metal parts of the lens clean with a damaged cord or if the unit has been dropped or damaged. •Do not bend the power cord forcibly... in a car parked in the sun or under direct sunlight. •Keep the Rechargeable Battery Pack in a well-ventilated location subject to the video equipment securely. •Charging while some capacity remains does not affect the original battery capacity. 251 Additional Information Dusty or dirty - To prevent mold...
..., a short may occur and the unit may cause fire or electric shock. •Prevent metallic objects from coming into contact with the metal parts of the lens clean with a damaged cord or if the unit has been dropped or damaged. •Do not bend the power cord forcibly... in a car parked in the sun or under direct sunlight. •Keep the Rechargeable Battery Pack in a well-ventilated location subject to the video equipment securely. •Charging while some capacity remains does not affect the original battery capacity. 251 Additional Information Dusty or dirty - To prevent mold...
Operating Instructions
Page 255
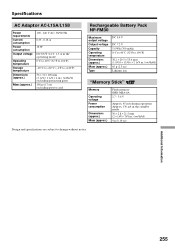
...;C (32°F to 104°F) -20°C to +60°C (-4°F to +140°F) 56 × 31 × 100 mm (2 1/4 × 1 1/4 × 4 in.) (w/h/d) excluding projecting parts 190 g (6.7 oz) excluding power cord Rechargeable Battery Pack NP-FM30 Maximum output voltage Output voltage Capacity Operating temperature Dimensions (approx.) Mass (approx.) Type DC 8.4 V DC...
...;C (32°F to 104°F) -20°C to +60°C (-4°F to +140°F) 56 × 31 × 100 mm (2 1/4 × 1 1/4 × 4 in.) (w/h/d) excluding projecting parts 190 g (6.7 oz) excluding power cord Rechargeable Battery Pack NP-FM30 Maximum output voltage Output voltage Capacity Operating temperature Dimensions (approx.) Mass (approx.) Type DC 8.4 V DC...

Operating Instructions
Page 256
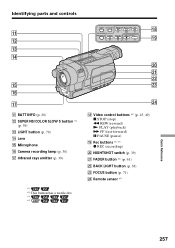
- Identifying parts and controls Camcorder 5 1 6 7 2 8 3 9 4 0 1 Lens cap (p. 30) 2 LCD screen (p. 30) 3 OPEN button (p. 30) 4 VOLUME -/+ * button (p. 45) 5 Rechargeable Battery Pack (p. 18) 6 BATT (battery) release lever (p. 18) 7 POWER switch (p. 30) 8 START/STOP button (p. 30) 9 Hooks for the shoulder strap. 256 Attaching the shoulder strap Attach the shoulder strap supplied with your camcorder to the hooks for shoulder strap 0 DC IN jack (p. 19) * This button has a tactile dot. Quick Reference -
- Identifying parts and controls Camcorder 5 1 6 7 2 8 3 9 4 0 1 Lens cap (p. 30) 2 LCD screen (p. 30) 3 OPEN button (p. 30) 4 VOLUME -/+ * button (p. 45) 5 Rechargeable Battery Pack (p. 18) 6 BATT (battery) release lever (p. 18) 7 POWER switch (p. 30) 8 START/STOP button (p. 30) 9 Hooks for the shoulder strap. 256 Attaching the shoulder strap Attach the shoulder strap supplied with your camcorder to the hooks for shoulder strap 0 DC IN jack (p. 19) * This button has a tactile dot. Quick Reference -
Operating Instructions
Page 257
Identifying parts and controls qa qs qd qf qg qh qj qa BATT INFO (p. 20) qs SUPER NS/COLOR SLOW S button *1) (p. 39) qd LIGHT button (p. 79) qf Lens qg Microphone qh Camera recording lamp (p. 30) qj Infrared rays emitter (p. 39) *1) *2) This button has a tactile dot. *3) *4) LIGHT BATT INFO REW PLAY FF ... FADER button *2) (p. 61) ws BACK LIGHT button (p. 38) wd FOCUS button (p. 71) wf Remote sensor *4) Quick Reference 257 wa ws wd wf qk Video control buttons *2) (p. 45, 49) x STOP (stop) m REW (rewind) N PLAY (playback) M FF (fast-forward) X PAUSE (pause) ql Rec buttons *2) *3) z REC...
Identifying parts and controls qa qs qd qf qg qh qj qa BATT INFO (p. 20) qs SUPER NS/COLOR SLOW S button *1) (p. 39) qd LIGHT button (p. 79) qf Lens qg Microphone qh Camera recording lamp (p. 30) qj Infrared rays emitter (p. 39) *1) *2) This button has a tactile dot. *3) *4) LIGHT BATT INFO REW PLAY FF ... FADER button *2) (p. 61) ws BACK LIGHT button (p. 38) wd FOCUS button (p. 71) wf Remote sensor *4) Quick Reference 257 wa ws wd wf qk Video control buttons *2) (p. 45, 49) x STOP (stop) m REW (rewind) N PLAY (playback) M FF (fast-forward) X PAUSE (pause) ql Rec buttons *2) *3) z REC...
Operating Instructions
Page 258
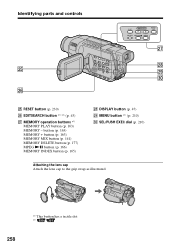
button (p. 163) MEMORY + button (p. 163) MEMORY MIX button (p. 141) MEMORY DELETE button (p. 177) MPEG NX button (p. 166) MEMORY INDEX button (p. 165) wk DISPLAY button (p. 47) wl MENU button *1) (p. 210) e; SEL/PUSH EXEC dial (p. 210) Attaching the lens cap Attach the lens cap to the grip strap as illustrated. 258 *1) This button has a tactile dot. *2) Identifying parts and controls wg wh PLAY MEMORY MEMORY MIX DELETE MPEG INDEX wj wk wl e; wg RESET button (p. 230) wh EDITSEARCH button *1) *2) (p. 43) wj MEMORY operation buttons *2) MEMORY PLAY button (p. 163) MEMORY -
button (p. 163) MEMORY + button (p. 163) MEMORY MIX button (p. 141) MEMORY DELETE button (p. 177) MPEG NX button (p. 166) MEMORY INDEX button (p. 165) wk DISPLAY button (p. 47) wl MENU button *1) (p. 210) e; SEL/PUSH EXEC dial (p. 210) Attaching the lens cap Attach the lens cap to the grip strap as illustrated. 258 *1) This button has a tactile dot. *2) Identifying parts and controls wg wh PLAY MEMORY MEMORY MIX DELETE MPEG INDEX wj wk wl e; wg RESET button (p. 230) wh EDITSEARCH button *1) *2) (p. 43) wj MEMORY operation buttons *2) MEMORY PLAY button (p. 163) MEMORY -


