Operating Instructions
Page 6
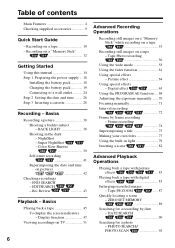
...digital effects 85 Enlarging recorded images - Rec ...recording 72 Frame by date - NightShot - Frame recording...recording 41 Superimposing the date and time on a tape 10 - Tape Photo recording...Recording a picture 30 Shooting a backlit subject - DATE SEARCH 90 Searching for a recording by frame recording - Recording on a tape - Display function 47 Viewing recordings on TV 51 Advanced Recording Operations Recording still images on a "Memory Stick" while recording on a tape 53 Recording... 3 Inserting a cassette 28 Recording - PHOTO SEARCH/ PHOTO SCAN...
...digital effects 85 Enlarging recorded images - Rec ...recording 72 Frame by date - NightShot - Frame recording...recording 41 Superimposing the date and time on a tape 10 - Tape Photo recording...Recording a picture 30 Shooting a backlit subject - DATE SEARCH 90 Searching for a recording by frame recording - Recording on a tape - Display function 47 Viewing recordings on TV 51 Advanced Recording Operations Recording still images on a "Memory Stick" while recording on a tape 53 Recording... 3 Inserting a cassette 28 Recording - PHOTO SEARCH/ PHOTO SCAN...

Operating Instructions
Page 11
... is closed (p. 32). The picture appears on the LCD screen. 2 Set the POWER switch to start playback. Your camcorder starts recording. If you purchase your eyesight (p. 35). The picture in the viewfinder is not set the clock before recording (p. 26). REW 3 Press N to CAMERA while pressing the small green button. Adjust the viewfinder lens...
... is closed (p. 32). The picture appears on the LCD screen. 2 Set the POWER switch to start playback. Your camcorder starts recording. If you purchase your eyesight (p. 35). The picture in the viewfinder is not set the clock before recording (p. 26). REW 3 Press N to CAMERA while pressing the small green button. Adjust the viewfinder lens...
Operating Instructions
Page 13
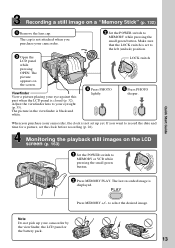
... purchase your camcorder, the clock is not set the clock before recording (p. 26). Monitoring the playback still images on the screen. to MEMORY while pressing the small green button. The picture appears on the LCD screen (p. 163) CR 1 Set the POWER switch to record the date and time for a picture, set up your camcorder...
... purchase your camcorder, the clock is not set the clock before recording (p. 26). Monitoring the playback still images on the screen. to MEMORY while pressing the small green button. The picture appears on the LCD screen (p. 163) CR 1 Set the POWER switch to record the date and time for a picture, set up your camcorder...
Operating Instructions
Page 17
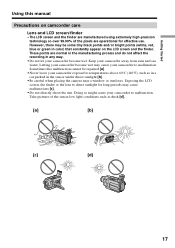
... LCD screen, the finder or the lens to temperatures above 60°C (140°F), such as dusk [d]. [a] [b] [c] [d] 17 Take pictures of the pixels are normal in the manufacturing process and do not affect the recording in the sun or under direct sunlight [b]. •Be careful when placing the camera near ... and/or bright points (white, red, blue or green in color) that constantly appear on camcorder care Lens and LCD screen/finder • The LCD screen and the finder are manufactured using extremely high-precision technology so over 99.99% of the sun in low light conditions such...
... LCD screen, the finder or the lens to temperatures above 60°C (140°F), such as dusk [d]. [a] [b] [c] [d] 17 Take pictures of the pixels are normal in the manufacturing process and do not affect the recording in the sun or under direct sunlight [b]. •Be careful when placing the camera near ... and/or bright points (white, red, blue or green in color) that constantly appear on camcorder care Lens and LCD screen/finder • The LCD screen and the finder are manufactured using extremely high-precision technology so over 99.99% of the sun in low light conditions such...

Operating Instructions
Page 20
...BATTERY INFO BATTERY CHARGE LEVEL 0% 50% 100% The battery charge level indicator moves flashing and "CALCULATING BATTERY INFO..." REC TIME AVAILABLE LCD SCREEN: 80 min VIEWFINDER: 105 min Full charge After charging the battery pack Disconnect the AC Adaptor from the DC IN jack on the DC...outlet as soon as possible to the value displayed in 10% increments. The information is displayed in the BATTERY INFO as percentage and recordable time with the metal parts on your camcorder. If any trouble occurs with this unit, disconnect the plug from coming into contact with...
...BATTERY INFO BATTERY CHARGE LEVEL 0% 50% 100% The battery charge level indicator moves flashing and "CALCULATING BATTERY INFO..." REC TIME AVAILABLE LCD SCREEN: 80 min VIEWFINDER: 105 min Full charge After charging the battery pack Disconnect the AC Adaptor from the DC IN jack on the DC...outlet as soon as possible to the value displayed in 10% increments. The information is displayed in the BATTERY INFO as percentage and recordable time with the metal parts on your camcorder. If any trouble occurs with this unit, disconnect the plug from coming into contact with...
Operating Instructions
Page 22
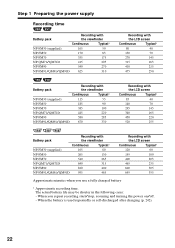
... 190 NP-QM71/QM71D 445 220 NP-FM90 580 285 NP-FM91/QM91/QM91D 670 330 Recording with the LCD screen Continuous Typical* 85 40 140 70 295 145 340 165 450 220 520 255 Battery pack Recording with the viewfinder Continuous Typical* NP-FM30 (supplied) 165 80 NP-FM50 265 130 NP...-FM70 540 265 NP-QM71/QM71D 640 315 NP-FM90 820 400 NP-FM91/QM91/QM91D 955 465 Recording with the LCD screen Continuous Typical* 120 60 195 100 400 205 465 235 600 305 695 355 Approximate minutes when you repeat...
... 190 NP-QM71/QM71D 445 220 NP-FM90 580 285 NP-FM91/QM91/QM91D 670 330 Recording with the LCD screen Continuous Typical* 85 40 140 70 295 145 340 165 450 220 520 255 Battery pack Recording with the viewfinder Continuous Typical* NP-FM30 (supplied) 165 80 NP-FM50 265 130 NP...-FM70 540 265 NP-QM71/QM71D 640 315 NP-FM90 820 400 NP-FM91/QM91/QM91D 955 465 Recording with the LCD screen Continuous Typical* 120 60 195 100 400 205 465 235 600 305 695 355 Approximate minutes when you repeat...
Operating Instructions
Page 23
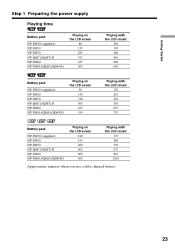
...NP-FM30 (supplied) NP-FM50 NP-FM70 NP-QM71/QM71D NP-FM90 NP-FM91/QM91/QM91D Playing on the LCD screen 80 135 285 335 435 505 Playing with the LCD closed 120 195 400 465 600 695 Battery pack NP-...FM30 (supplied) NP-FM50 NP-FM70 NP-QM71/QM71D NP-FM90 NP-FM91/QM91/QM91D Playing on the LCD screen 90 150 310 365 475 550 Playing with the LCD closed 130 210 430 505 655 755 Battery pack NP-...FM30 (supplied) NP-FM50 NP-FM70 NP-QM71/QM71D NP-FM90 NP-FM91/QM91/QM91D Playing on the LCD screen 120 195 400 465 600 695 Playing with the LCD closed 175 280 570 675 865 1010 Approximate minutes when ...
...NP-FM30 (supplied) NP-FM50 NP-FM70 NP-QM71/QM71D NP-FM90 NP-FM91/QM91/QM91D Playing on the LCD screen 80 135 285 335 435 505 Playing with the LCD closed 120 195 400 465 600 695 Battery pack NP-...FM30 (supplied) NP-FM50 NP-FM70 NP-QM71/QM71D NP-FM90 NP-FM91/QM91/QM91D Playing on the LCD screen 90 150 310 365 475 550 Playing with the LCD closed 130 210 430 505 655 755 Battery pack NP-...FM30 (supplied) NP-FM50 NP-FM70 NP-QM71/QM71D NP-FM90 NP-FM91/QM91/QM91D Playing on the LCD screen 120 195 400 465 600 695 Playing with the LCD closed 175 280 570 675 865 1010 Approximate minutes when ...

Operating Instructions
Page 30
... viewfinder. 1 3 V POWER CR OFF(CHG) CAM ME ERMAORY 5 50min SP REC 0:00:01 4 2 Camera recording lamp Microphone Notes •The data code (date/time when recorded) are recorded automatically onto the tape. This sets your camcorder lights up in microphone during recording. The camera recording lamp located on the screen. The recording lamp lights up . Basics - Your camcorder starts...
... viewfinder. 1 3 V POWER CR OFF(CHG) CAM ME ERMAORY 5 50min SP REC 0:00:01 4 2 Camera recording lamp Microphone Notes •The data code (date/time when recorded) are recorded automatically onto the tape. This sets your camcorder lights up in microphone during recording. The camera recording lamp located on the screen. The recording lamp lights up . Basics - Your camcorder starts...
Operating Instructions
Page 32
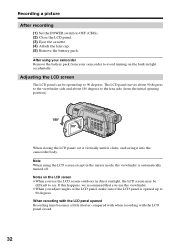
..., we recommend that you use the viewfinder. •When you use the LCD screen outdoors in direct sunlight, the LCD screen may be opened Recording time becomes a little shorter compared with when recording with the LCD panel closed. 32 Adjusting the LCD screen The LCD panel can be difficult to OFF (CHG). (2) Close the LCD...
..., we recommend that you use the viewfinder. •When you use the LCD screen outdoors in direct sunlight, the LCD screen may be opened Recording time becomes a little shorter compared with when recording with the LCD panel closed. 32 Adjusting the LCD screen The LCD panel can be difficult to OFF (CHG). (2) Close the LCD...
Operating Instructions
Page 33
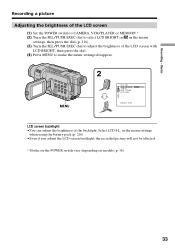
...then press the dial (p. 216). (3) Turn the SEL/PUSH EXEC dial to make the menu settings disappear. Basics Recording a picture Adjusting the brightness of the LCD screen (1) Set the POWER switch to CAMERA, VCR/PLAYER or MEMORY.* (2) Turn the SEL/PUSH EXEC dial to select LCD BRIGHT in in the menu settings... when using the battery pack (p. 216). •Even if you adjust the LCD screen backlight, the recorded picture will not be ...
...then press the dial (p. 216). (3) Turn the SEL/PUSH EXEC dial to make the menu settings disappear. Basics Recording a picture Adjusting the brightness of the LCD screen (1) Set the POWER switch to CAMERA, VCR/PLAYER or MEMORY.* (2) Turn the SEL/PUSH EXEC dial to select LCD BRIGHT in in the menu settings... when using the battery pack (p. 216). •Even if you adjust the LCD screen backlight, the recorded picture will not be ...
Operating Instructions
Page 35
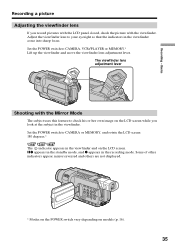
... Adjusting the viewfinder lens If you look at the subject in the recording mode. Set the POWER switch to CAMERA or MEMORY, and rotate the LCD screen 180 degrees.* The indicator appears in the viewfinder come into sharp focus. Recording - Xz appears in the standby mode, and z appears in the viewfinder.... you record pictures with the LCD panel closed, check the picture with the Mirror Mode The subject uses this feature to your eyesight so that the indicators in the viewfinder and on the LCD screen. Set the POWER switch to CAMERA, VCR/PLAYER or MEMORY.* Lift up the viewfinder ...
... Adjusting the viewfinder lens If you look at the subject in the recording mode. Set the POWER switch to CAMERA or MEMORY, and rotate the LCD screen 180 degrees.* The indicator appears in the viewfinder come into sharp focus. Recording - Xz appears in the standby mode, and z appears in the viewfinder.... you record pictures with the LCD panel closed, check the picture with the Mirror Mode The subject uses this feature to your eyesight so that the indicators in the viewfinder and on the LCD screen. Set the POWER switch to CAMERA, VCR/PLAYER or MEMORY.* Lift up the viewfinder ...
Operating Instructions
Page 36
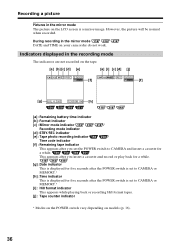
... displayed for five seconds after you set to CAMERA and insert a cassette for a while. Indicators displayed in the recording mode The indicators are not recorded on the LCD screen is set the POWER switch to CAMERA or MEMORY.* [i] : Hi8 format indicator This appears while playing back or recording Hi8 format tapes. [j] : Tape counter indicator * Modes on...
... displayed for five seconds after you set to CAMERA and insert a cassette for a while. Indicators displayed in the recording mode The indicators are not recorded on the LCD screen is set the POWER switch to CAMERA or MEMORY.* [i] : Hi8 format indicator This appears while playing back or recording Hi8 format tapes. [j] : Tape counter indicator * Modes on...
Operating Instructions
Page 37
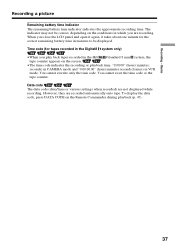
...cannot rewrite only the time code. To display the data code, press DATA CODE on the screen. •The time code indicates the recording or playback time, "0:00:00" (hours:minutes: seconds) in CAMERA mode and "0:00:00:00" (hours:minutes:seconds:frames) in the Digital8 system only) ...•When you are not displayed while recording. The indicator may not be displayed. Basics Recording a picture Remaining battery...
...cannot rewrite only the time code. To display the data code, press DATA CODE on the screen. •The time code indicates the recording or playback time, "0:00:00" (hours:minutes: seconds) in CAMERA mode and "0:00:00:00" (hours:minutes:seconds:frames) in the Digital8 system only) ...•When you are not displayed while recording. The indicator may not be displayed. Basics Recording a picture Remaining battery...
Operating Instructions
Page 38
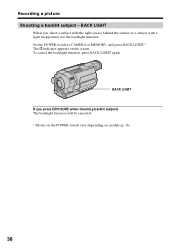
indicator appears on models (p. 16). 38 Recording a picture Shooting a backlit subject - BACK LIGHT If you shoot a subject with the light source behind the subject or a subject with a light background, use the backlight function. BACK LIGHT When you press EXPOSURE when shooting backlit subjects The backlight function will be canceled. * Modes on the POWER switch vary depending on the screen. Set the POWER switch to CAMERA or MEMORY, and press BACK LIGHT.* The . To cancel the backlight function, press BACK LIGHT again.
indicator appears on models (p. 16). 38 Recording a picture Shooting a backlit subject - BACK LIGHT If you shoot a subject with the light source behind the subject or a subject with a light background, use the backlight function. BACK LIGHT When you press EXPOSURE when shooting backlit subjects The backlight function will be canceled. * Modes on the POWER switch vary depending on the screen. Set the POWER switch to CAMERA or MEMORY, and press BACK LIGHT.* The . To cancel the backlight function, press BACK LIGHT again.

Operating Instructions
Page 39
...NIGHTSHOT OFF ON Using the Super NightShot The Super NightShot function makes subjects up to 16 times brighter than those recorded in the NightShot mode. (1) Set the POWER switch to CAMERA, and slide NIGHTSHOT to ON in the menu settings. (The default setting is ON.) (p. 213) * Modes...returns to ON.* The indicator and "NIGHTSHOT" flash on the screen. (2) Press SUPER NS. Recording - Using the NightShot Light The picture will be clearer with the NightShot Light on the screen. Using NightShot Set the POWER switch to CAMERA or MEMORY, and slide NIGHTSHOT to the NightShot mode. The ...
...NIGHTSHOT OFF ON Using the Super NightShot The Super NightShot function makes subjects up to 16 times brighter than those recorded in the NightShot mode. (1) Set the POWER switch to CAMERA, and slide NIGHTSHOT to ON in the menu settings. (The default setting is ON.) (p. 213) * Modes...returns to ON.* The indicator and "NIGHTSHOT" flash on the screen. (2) Press SUPER NS. Recording - Using the NightShot Light The picture will be clearer with the NightShot Light on the screen. Using NightShot Set the POWER switch to CAMERA or MEMORY, and slide NIGHTSHOT to the NightShot mode. The ...
Operating Instructions
Page 40
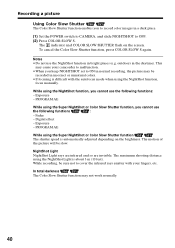
...or Color Slow Shutter function, you to record color images in a dark place. (1) Set the POWER switch to CAMERA, and slide NIGHTSHOT to OFF. (2) Press COLOR SLOW S. Digital effect - Exposure - The motion of the picture will be recorded in normal recording, the picture may be slow. NightShot...your camcorder to cover the infrared rays emitter with the autofocus mode when using the NightShot Light is automatically adjusted depending on the screen. Exposure - Notes •Do not use the NightShot function in the daytime). The indicator and COLOR SLOW SHUTTER flash on...
...or Color Slow Shutter function, you to record color images in a dark place. (1) Set the POWER switch to CAMERA, and slide NIGHTSHOT to OFF. (2) Press COLOR SLOW S. Digital effect - Exposure - The motion of the picture will be recorded in normal recording, the picture may be slow. NightShot...your camcorder to cover the infrared rays emitter with the autofocus mode when using the NightShot Light is automatically adjusted depending on the screen. Exposure - Notes •Do not use the NightShot function in the daytime). The indicator and COLOR SLOW SHUTTER flash on...

Operating Instructions
Page 41
... In the last two seconds of the countdown, the beep gets faster, then recording starts automatically. Self-timer recording is automatically canceled when: - You can also record still images on the screen. (5) Press START/STOP. Self-timer starts counting down from 10 with the ...Turn the SEL/PUSH EXEC dial to select SELFTIMER in 10 seconds automatically. Basics Recording a picture Self-timer recording Recording with a beep. Note The self-timer is finished. - Recording - START/STOP START/STOP MENU 3 CAMERA SET SELFTIMER D ZOOM 16:9WIDE STEADYSHOT N.S.LIGHT RETURN OFF ON [MENU] ...
... In the last two seconds of the countdown, the beep gets faster, then recording starts automatically. Self-timer recording is automatically canceled when: - You can also record still images on the screen. (5) Press START/STOP. Self-timer starts counting down from 10 with the ...Turn the SEL/PUSH EXEC dial to select SELFTIMER in 10 seconds automatically. Basics Recording a picture Self-timer recording Recording with a beep. Note The self-timer is finished. - Recording - START/STOP START/STOP MENU 3 CAMERA SET SELFTIMER D ZOOM 16:9WIDE STEADYSHOT N.S.LIGHT RETURN OFF ON [MENU] ...
Operating Instructions
Page 42
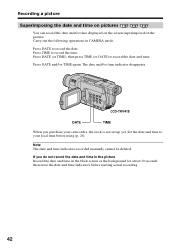
Press DATE and/or TIME again. CCD-TRV418 DATE TIME When you do not record the date and time in the picture Record the date and time in CAMERA mode. Carry out the following operations in the black screen as the background for about 10 seconds, then erase the date and time indicators before ...using (p. 26). Press DATE (or TIME), then press TIME (or DATE) to record the date. The...
Press DATE and/or TIME again. CCD-TRV418 DATE TIME When you do not record the date and time in the picture Record the date and time in CAMERA mode. Carry out the following operations in the black screen as the background for about 10 seconds, then erase the date and time indicators before ...using (p. 26). Press DATE (or TIME), then press TIME (or DATE) to record the date. The...
Operating Instructions
Page 45
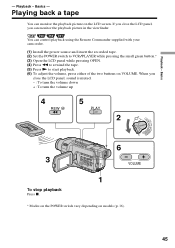
... depending on models (p. 16). 45 If you can control playback using the Remote Commander supplied with your camcorder. (1) Install the power source and insert the recorded tape. (2) Set the POWER switch to VCR/PLAYER while pressing the small green button.* (3) Open the LCD panel while pressing OPEN. (4) Press m to rewind the...
... depending on models (p. 16). 45 If you can control playback using the Remote Commander supplied with your camcorder. (1) Install the power source and insert the recorded tape. (2) Set the POWER switch to VCR/PLAYER while pressing the small green button.* (3) Open the LCD panel while pressing OPEN. (4) Press m to rewind the...
Operating Instructions
Page 46
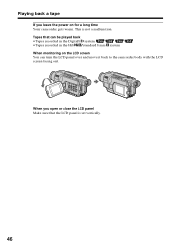
When you leave the power on the LCD screen You can be played back •Tapes recorded in the Digital8 system •Tapes recorded in the Hi8 /standard 8 mm system When monitoring on for a long time Your camcorder gets warm. This is set vertically. 46 Playing back a tape If you open or close the LCD panel Make sure that can turn the LCD panel over and move it back to the camcorder body with the LCD screen facing out. Tapes that the LCD panel is not a malfunction.
When you leave the power on the LCD screen You can be played back •Tapes recorded in the Digital8 system •Tapes recorded in the Hi8 /standard 8 mm system When monitoring on for a long time Your camcorder gets warm. This is set vertically. 46 Playing back a tape If you open or close the LCD panel Make sure that can turn the LCD panel over and move it back to the camcorder body with the LCD screen facing out. Tapes that the LCD panel is not a malfunction.


