Operating Instructions
Page 3
...TO WIDE SLOT, FULLY INSERT. These limits are recyclable. However, there is encouraged to try to Subpart B of Part 15 of rechargeable batteries, call toll free 1-800-8228837, or visit http://www.rbrc.org/. You can radiate radio frequency energy and, if not installed and used...against harmful interference in the U.S.A. Increase the separation between the equipment and receiver. - Caution: Do not handle damaged or leaking Lithium-Ion batteries. 3 Note: This equipment has been tested and found to comply with the limits for help preserve our environment by one or more information...
...TO WIDE SLOT, FULLY INSERT. These limits are recyclable. However, there is encouraged to try to Subpart B of Part 15 of rechargeable batteries, call toll free 1-800-8228837, or visit http://www.rbrc.org/. You can radiate radio frequency energy and, if not installed and used...against harmful interference in the U.S.A. Increase the separation between the equipment and receiver. - Caution: Do not handle damaged or leaking Lithium-Ion batteries. 3 Note: This equipment has been tested and found to comply with the limits for help preserve our environment by one or more information...
Operating Instructions
Page 6
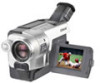
... subject - NightShot - Display function 47 Viewing recordings on TV 51 Advanced Recording Operations Recording still images on a "Memory Stick" while recording on a tape 53 Recording still images on a "Memory Stick" 12 Getting Started Using this manual 14 Step 1 Preparing the power supply ... 18 Installing the battery pack 18 Charging the battery pack 19 Connecting to a wall outlet...
... subject - NightShot - Display function 47 Viewing recordings on TV 51 Advanced Recording Operations Recording still images on a "Memory Stick" while recording on a tape 53 Recording still images on a "Memory Stick" 12 Getting Started Using this manual 14 Step 1 Preparing the power supply ... 18 Installing the battery pack 18 Charging the battery pack 19 Connecting to a wall outlet...
Operating Instructions
Page 8
... 224 Self-diagnosis display 232 Warning indicators and messages .... 233 Additional Information About video cassette 237 About the "Memory Stick 240 About the "InfoLITHIUM" battery pack 242 About i.LINK 244 Using your camcorder abroad .......... 246 Maintenance information and... and are trademarks. • "InfoLITHIUM" is a trademark of Sony Corporation. • "Memory Stick," and "MagicGate Memory Stick" are trademarks of Sony Corporation. • "Memory Stick Duo" and are trademarks of Sony Corporation. •Windows and Windows Media are trademarks of Apple Computer...
... 224 Self-diagnosis display 232 Warning indicators and messages .... 233 Additional Information About video cassette 237 About the "Memory Stick 240 About the "InfoLITHIUM" battery pack 242 About i.LINK 244 Using your camcorder abroad .......... 246 Maintenance information and... and are trademarks. • "InfoLITHIUM" is a trademark of Sony Corporation. • "Memory Stick," and "MagicGate Memory Stick" are trademarks of Sony Corporation. • "Memory Stick Duo" and are trademarks of Sony Corporation. •Windows and Windows Media are trademarks of Apple Computer...
Operating Instructions
Page 9
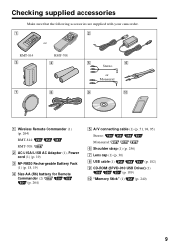
... 4 5 6 Stereo or Monaural 7 8 9 q; 1 Wireless Remote Commander (1) (p. 264) RMT-814: RMT-708: 2 AC-L15A/L15B AC Adaptor (1), Power cord (1) (p. 19) 3 NP-FM30 Rechargeable Battery Pack (1) (p. 18, 19) 4 Size AA (R6) battery for Remote Commander (2) (p. 264) 5 A/V connecting cable (1) (p. 51, 94, 95) Stereo: Monaural: 6 Shoulder strap (1) (p. 256) 7 Lens cap (1) (p. 30) 8 USB cable (1) (p. 182) 9 CD-ROM...
... 4 5 6 Stereo or Monaural 7 8 9 q; 1 Wireless Remote Commander (1) (p. 264) RMT-814: RMT-708: 2 AC-L15A/L15B AC Adaptor (1), Power cord (1) (p. 19) 3 NP-FM30 Rechargeable Battery Pack (1) (p. 18, 19) 4 Size AA (R6) battery for Remote Commander (2) (p. 264) 5 A/V connecting cable (1) (p. 51, 94, 95) Stereo: Monaural: 6 Shoulder strap (1) (p. 256) 7 Lens cap (1) (p. 30) 8 USB cable (1) (p. 182) 9 CD-ROM...

Operating Instructions
Page 10
... with its v mark facing up . 3 Close the cassette compartment by pressing on a tape of your camcorder outdoors (p. 18). Connecting the power cord (p. 24) Use the battery pack when using your camcorder. Open the DC IN jack cover. After the cassette compartment goes down completely, close the lid. Quick Start Guide...
... with its v mark facing up . 3 Close the cassette compartment by pressing on a tape of your camcorder outdoors (p. 18). Connecting the power cord (p. 24) Use the battery pack when using your camcorder. Open the DC IN jack cover. After the cassette compartment goes down completely, close the lid. Quick Start Guide...

Operating Instructions
Page 11
...When you purchase your eyesight (p. 35). The picture appears on the LCD screen (p. 45) 2 Press m to record the date and time for a picture, set up your camcorder, the clock is black and white. 4 Press START...not pick up yet. The picture in the viewfinder is not set the clock before recording (p. 26). The cap is closed (p. 32). REW 3 Press N to CAMERA while pressing the small green button. PLAY CR 1 Set the POWER switch to ... your camcorder by the viewfinder, the LCD panel, or the battery pack. * Modes on the POWER switch vary depending on models (p. 16). 11 To stop...
...When you purchase your eyesight (p. 35). The picture appears on the LCD screen (p. 45) 2 Press m to record the date and time for a picture, set up your camcorder, the clock is black and white. 4 Press START...not pick up yet. The picture in the viewfinder is not set the clock before recording (p. 26). The cap is closed (p. 32). REW 3 Press N to CAMERA while pressing the small green button. PLAY CR 1 Set the POWER switch to ... your camcorder by the viewfinder, the LCD panel, or the battery pack. * Modes on the POWER switch vary depending on models (p. 16). 11 To stop...

Operating Instructions
Page 12
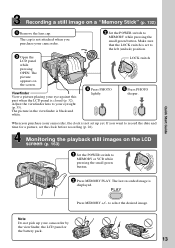
...Stick" slot b mark When ejecting the "Memory Stick," press the "Memory Stick" once lightly. 12 Recording on a "Memory Stick" Quick Start Guide This chapter introduces you to the basic features to record on a "Memory Stick" of your camcorder outdoors (p. 18). AC Adaptor (supplied) Inserting a "Memory... Stick" (p. 127) Insert a "Memory Stick" in parentheses "( )" for more information. Connecting the power cord (p. 24) Use the battery pack when using your ...
...Stick" slot b mark When ejecting the "Memory Stick," press the "Memory Stick" once lightly. 12 Recording on a "Memory Stick" Quick Start Guide This chapter introduces you to the basic features to record on a "Memory Stick" of your camcorder outdoors (p. 18). AC Adaptor (supplied) Inserting a "Memory... Stick" (p. 127) Insert a "Memory Stick" in parentheses "( )" for more information. Connecting the power cord (p. 24) Use the battery pack when using your ...
Operating Instructions
Page 13
... 1 Set the POWER switch to MEMORY while pressing the small green button. V POWER ME OFF(CHG) CAM 2 Press MEMORY PLAY. The last recorded image is black and white. The cap is not attached when you purchase your camcorder, the clock is not set up your eyesight (p. 35). ... viewfinder lens to select the desired image. The picture in the viewfinder is displayed. to your camcorder by the viewfinder, the LCD panel or the battery pack. 13 LOCK switch V POWER OFF(CHG) CAM CR ME 4 Press PHOTO lightly. 5 Press PHOTO deeper. Viewfinder View a picture placing your ...
... 1 Set the POWER switch to MEMORY while pressing the small green button. V POWER ME OFF(CHG) CAM 2 Press MEMORY PLAY. The last recorded image is black and white. The cap is not attached when you purchase your camcorder, the clock is not set up your eyesight (p. 35). ... viewfinder lens to select the desired image. The picture in the viewfinder is displayed. to your camcorder by the viewfinder, the LCD panel or the battery pack. 13 LOCK switch V POWER OFF(CHG) CAM CR ME 4 Press PHOTO lightly. 5 Press PHOTO deeper. Viewfinder View a picture placing your ...
Operating Instructions
Page 18
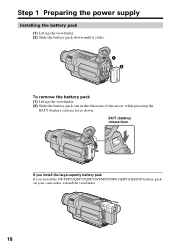
BATT (battery) release lever If you install the large-capacity battery pack If you install the NP-FM70/QM71/QM71D/FM90/FM91/QM91/QM91D battery pack on your camcorder, extend the viewfinder. 18 Step 1 Preparing the power supply Installing the battery pack (1) Lift up the viewfinder. (2) Slide the battery pack down until it clicks. 1 2 To remove the battery pack (1) Lift up the viewfinder. (2) Slide the battery pack out in the direction of the arrow while pressing the BATT (battery) release lever down.
BATT (battery) release lever If you install the large-capacity battery pack If you install the NP-FM70/QM71/QM71D/FM90/FM91/QM91/QM91D battery pack on your camcorder, extend the viewfinder. 18 Step 1 Preparing the power supply Installing the battery pack (1) Lift up the viewfinder. (2) Slide the battery pack down until it clicks. 1 2 To remove the battery pack (1) Lift up the viewfinder. (2) Slide the battery pack out in the direction of the arrow while pressing the BATT (battery) release lever down.
Operating Instructions
Page 19
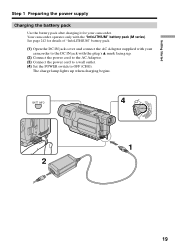
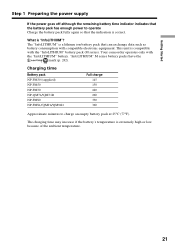
Getting Started Step 1 Preparing the power supply Charging the battery pack Use the battery pack after charging it for details of "InfoLITHIUM" battery pack. (1) Open the DC IN jack cover and connect the AC Adaptor supplied with the "InfoLITHIUM" battery pack (M series). See page 242 for your camcorder to the DC IN jack with the...
Getting Started Step 1 Preparing the power supply Charging the battery pack Use the battery pack after charging it for details of "InfoLITHIUM" battery pack. (1) Open the DC IN jack cover and connect the AC Adaptor supplied with the "InfoLITHIUM" battery pack (M series). See page 242 for your camcorder to the DC IN jack with the...

Operating Instructions
Page 20
... seven seconds. CALCULATING BATTERY INFO... To display the BATTERY INFO longer Press BATT INFO again while the BATTERY INFO is calculated BATTERY INFO BATTERY CHARGE LEVEL 0% 50% 100% The battery charge level indicator moves flashing and "CALCULATING BATTERY INFO..." Until the remaining battery charge is still displayed. The battery pack is displayed as percentage and recordable time with this unit...
... seven seconds. CALCULATING BATTERY INFO... To display the BATTERY INFO longer Press BATT INFO again while the BATTERY INFO is calculated BATTERY INFO BATTERY CHARGE LEVEL 0% 50% 100% The battery charge level indicator moves flashing and "CALCULATING BATTERY INFO..." Until the remaining battery charge is still displayed. The battery pack is displayed as percentage and recordable time with this unit...
Operating Instructions
Page 21
...temperature. 21 This unit is a lithium ion battery pack that can exchange data such as battery consumption with compatible electronic equipment. Your camcorder operates only with the "InfoLITHIUM" battery pack (M series). TM SERIES Charging time Battery pack NP-FM30 (supplied) NP-FM50 NP-FM70...145 150 240 260 330 360 Approximate minutes to operate Charge the battery pack fully again so that the indication is correct. The "InfoLITHIUM" is compatible with the "InfoLITHIUM" battery. "InfoLITHIUM" M series battery packs have the mark (p. 242). Getting Started Step 1 Preparing the...
...temperature. 21 This unit is a lithium ion battery pack that can exchange data such as battery consumption with compatible electronic equipment. Your camcorder operates only with the "InfoLITHIUM" battery pack (M series). TM SERIES Charging time Battery pack NP-FM30 (supplied) NP-FM50 NP-FM70...145 150 240 260 330 360 Approximate minutes to operate Charge the battery pack fully again so that the indication is correct. The "InfoLITHIUM" is compatible with the "InfoLITHIUM" battery. "InfoLITHIUM" M series battery packs have the mark (p. 242). Getting Started Step 1 Preparing the...
Operating Instructions
Page 22
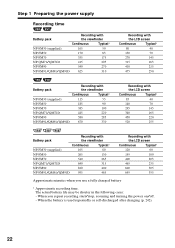
... NP-QM71/QM71D 415 205 NP-FM90 540 270 NP-FM91/QM91/QM91D 625 310 Recording with the LCD screen Continuous Typical* 80 40 130 70 270 145 315 165 410 215 475 250 Battery pack Recording with the viewfinder Continuous Typical* NP-FM30 (supplied) 115 55 NP-FM50 185 90...190 NP-QM71/QM71D 445 220 NP-FM90 580 285 NP-FM91/QM91/QM91D 670 330 Recording with the LCD screen Continuous Typical* 85 40 140 70 295 145 340 165 450 220 520 255 Battery pack Recording with the viewfinder Continuous Typical* NP-FM30 (supplied) 165 80 NP-FM50 265 130...
... NP-QM71/QM71D 415 205 NP-FM90 540 270 NP-FM91/QM91/QM91D 625 310 Recording with the LCD screen Continuous Typical* 80 40 130 70 270 145 315 165 410 215 475 250 Battery pack Recording with the viewfinder Continuous Typical* NP-FM30 (supplied) 115 55 NP-FM50 185 90...190 NP-QM71/QM71D 445 220 NP-FM90 580 285 NP-FM91/QM91/QM91D 670 330 Recording with the LCD screen Continuous Typical* 85 40 140 70 295 145 340 165 450 220 520 255 Battery pack Recording with the viewfinder Continuous Typical* NP-FM30 (supplied) 165 80 NP-FM50 265 130...
Operating Instructions
Page 23
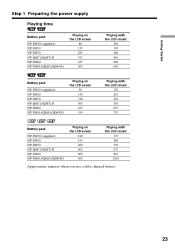
...-FM91/QM91/QM91D Playing on the LCD screen 80 135 285 335 435 505 Playing with the LCD closed 120 195 400 465 600 695 Battery pack NP-FM30 (supplied) NP-FM50 NP-FM70 NP-QM71/QM71D NP-FM90 NP-FM91/QM91/QM91D Playing on the LCD screen 90 150 310... 365 475 550 Playing with the LCD closed 130 210 430 505 655 755 Battery pack NP-FM30 (supplied) NP-FM50 NP-FM70 NP-QM71/QM71D NP-FM90 NP-FM91/QM91/QM91D Playing on the LCD screen 120 195 400...
...-FM91/QM91/QM91D Playing on the LCD screen 80 135 285 335 435 505 Playing with the LCD closed 120 195 400 465 600 695 Battery pack NP-FM30 (supplied) NP-FM50 NP-FM70 NP-QM71/QM71D NP-FM90 NP-FM91/QM91/QM91D Playing on the LCD screen 90 150 310... 365 475 550 Playing with the LCD closed 130 210 430 505 655 755 Battery pack NP-FM30 (supplied) NP-FM50 NP-FM70 NP-QM71/QM71D NP-FM90 NP-FM91/QM91/QM91D Playing on the LCD screen 120 195 400...
Operating Instructions
Page 24
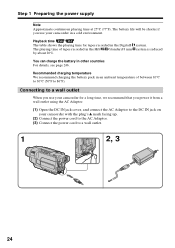
... the power cord to the AC Adaptor. (3) Connect the power cord to 86°F). system. Recommended charging temperature We recommend charging the battery pack in an ambient temperature of tapes recorded in the Digital8 The playing time of between 10°C to 30°C (50°F to a wall outlet. 1 2, 3 24... The battery life will be shorter if you power it from a wall outlet using the AC Adaptor. (1) Open the DC IN jack cover...
... the power cord to the AC Adaptor. (3) Connect the power cord to 86°F). system. Recommended charging temperature We recommend charging the battery pack in an ambient temperature of tapes recorded in the Digital8 The playing time of between 10°C to 30°C (50°F to a wall outlet. 1 2, 3 24... The battery life will be shorter if you power it from a wall outlet using the AC Adaptor. (1) Open the DC IN jack cover...

Operating Instructions
Page 25
... information. 25 Getting Started Step 1 Preparing the power supply PRECAUTION The set itself has been turned off the power. Using a car battery Use Sony Car Battery Adaptor (optional). This means that the battery pack cannot supply any trouble occurs with this unit, disconnect the plug from the AC power source (house current) as long...
... information. 25 Getting Started Step 1 Preparing the power supply PRECAUTION The set itself has been turned off the power. Using a car battery Use Sony Car Battery Adaptor (optional). This means that the battery pack cannot supply any trouble occurs with this unit, disconnect the plug from the AC power source (house current) as long...
Operating Instructions
Page 26
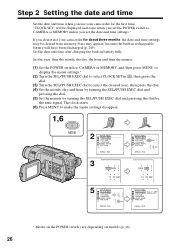
... month, the day, the hour and then the minute. (1) Set the POWER switch to CAMERA or MEMORY, and then press MENU to display the menu settings.* (2) Turn the SEL/PUSH EXEC dial to select CLOCK SET in battery fully. The clock starts. (6) Press MENU to select the desired year, then press the... use your camcorder for about three months, the date and time settings may be cleared from memory (bars may appear) because the built-in rechargeable battery will have been discharged (p. 249). Set the date and time after charging the built-in , then press the dial. (3) Turn the SEL/PUSH EXEC dial...
... month, the day, the hour and then the minute. (1) Set the POWER switch to CAMERA or MEMORY, and then press MENU to display the menu settings.* (2) Turn the SEL/PUSH EXEC dial to select CLOCK SET in battery fully. The clock starts. (6) Press MENU to select the desired year, then press the... use your camcorder for about three months, the date and time settings may be cleared from memory (bars may appear) because the built-in rechargeable battery will have been discharged (p. 249). Set the date and time after charging the built-in , then press the dial. (3) Turn the SEL/PUSH EXEC dial...

Operating Instructions
Page 31
... in the LP mode on your camcorder. Do not mix recordings in the SP mode and in the LP mode •The time code may be set the counter to prevent battery and tape wear. This is set the POWER switch to CAMERA again. To set to the left as you do not... eject the cassette even if you leave your camcorder. When you change the battery pack, set to MEMORY accidentally. Recording - However, your camcorder, we recommend that you play ) mode. To enable smooth transition...
... in the LP mode on your camcorder. Do not mix recordings in the SP mode and in the LP mode •The time code may be set the counter to prevent battery and tape wear. This is set the POWER switch to CAMERA again. To set to the left as you do not... eject the cassette even if you leave your camcorder. When you change the battery pack, set to MEMORY accidentally. Recording - However, your camcorder, we recommend that you play ) mode. To enable smooth transition...
Operating Instructions
Page 32
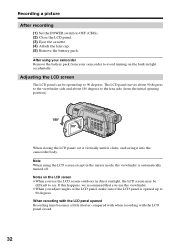
... the LCD panel, set it vertically until it clicks, and swing it into the camcorder body. Notes on the built-in light accidentally. When recording with the LCD panel opened up to 90 degrees. If this happens, we recommend that you use the viewfinder. •When you use the... side and about 180 degrees to OFF (CHG). (2) Close the LCD panel. (3) Eject the cassette. (4) Attach the lens cap. (5) Remove the battery pack. Recording a picture After recording (1) Set the POWER switch to the lens side (from your camcorder to avoid turning on the LCD screen •When you adjust angles of...
... the LCD panel, set it vertically until it clicks, and swing it into the camcorder body. Notes on the built-in light accidentally. When recording with the LCD panel opened up to 90 degrees. If this happens, we recommend that you use the viewfinder. •When you use the... side and about 180 degrees to OFF (CHG). (2) Close the LCD panel. (3) Eject the cassette. (4) Attach the lens cap. (5) Remove the battery pack. Recording a picture After recording (1) Set the POWER switch to the lens side (from your camcorder to avoid turning on the LCD screen •When you adjust angles of...
Operating Instructions
Page 33
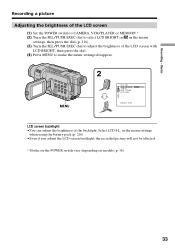
... press the dial (p. 216). (3) Turn the SEL/PUSH EXEC dial to make the menu settings disappear. Basics Recording a picture Adjusting the brightness of the LCD screen (1) Set the POWER switch to CAMERA, VCR/PLAYER or MEMORY.* (2) Turn the SEL/PUSH EXEC dial to select LCD BRIGHT in in the menu settings... when using the battery pack (p. 216). •Even if you adjust the LCD screen backlight, the recorded picture will not be affected. * Modes on ...
... press the dial (p. 216). (3) Turn the SEL/PUSH EXEC dial to make the menu settings disappear. Basics Recording a picture Adjusting the brightness of the LCD screen (1) Set the POWER switch to CAMERA, VCR/PLAYER or MEMORY.* (2) Turn the SEL/PUSH EXEC dial to select LCD BRIGHT in in the menu settings... when using the battery pack (p. 216). •Even if you adjust the LCD screen backlight, the recorded picture will not be affected. * Modes on ...


