
Primary User Manual
Page 2
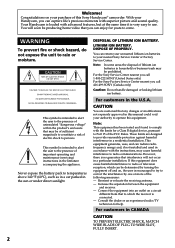
... come. This equipment generates, uses, and can be producing home video that may be prohibited. Consult the dealer or an experienced radio/TV technician for years to operate this Sony Handycam® camcorder. This symbol is intended to alert the user to provide reasonable... of the FCC Rules. Increase the separation between the equipment and receiver. - Welcome! DISPOSE OF PROPERLY. Congratulations on your nearest Sony Service Center or Factory Service Center. You will not occur in a residential installation. Never expose the battery pack to temperatures above 140...
... come. This equipment generates, uses, and can be producing home video that may be prohibited. Consult the dealer or an experienced radio/TV technician for years to operate this Sony Handycam® camcorder. This symbol is intended to alert the user to provide reasonable... of the FCC Rules. Increase the separation between the equipment and receiver. - Welcome! DISPOSE OF PROPERLY. Congratulations on your nearest Sony Service Center or Factory Service Center. You will not occur in a residential installation. Never expose the battery pack to temperatures above 140...
Primary User Manual
Page 3
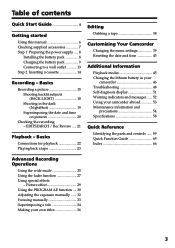
...33 Superimposing a title 34 Making your camcorder abroad 53 Maintenance information and precautions 54 Specifications 58 Quick Reference Identifying the parts and controls ...... 59 Quick Function Guide 65 Index 66 Advanced Recording Operations Using the wide mode 25 ...Charging the battery pack 9 Connecting to a wall outlet 13 Step 2 Inserting a cassette 14 Recording - Basics Recording a picture 15 Shooting backlit subjects (BACK LIGHT 18 Shooting in your camcorder 46 Troubleshooting 48 Self-diagnosis display 51 Warning indicators and messages ...... 52 Using your own titles ...
...33 Superimposing a title 34 Making your camcorder abroad 53 Maintenance information and precautions 54 Specifications 58 Quick Reference Identifying the parts and controls ...... 59 Quick Function Guide 65 Index 66 Advanced Recording Operations Using the wide mode 25 ...Charging the battery pack 9 Connecting to a wall outlet 13 Step 2 Inserting a cassette 14 Recording - Basics Recording a picture 15 Shooting backlit subjects (BACK LIGHT 18 Shooting in your camcorder 46 Troubleshooting 48 Self-diagnosis display 51 Warning indicators and messages ...... 52 Using your own titles ...

Primary User Manual
Page 4
... (p. 8). Quick Start Guide 4 Connect the plug with its v mark facing up. Connecting the power cord (p. 13) Use the battery pack when using your camcorder. EJECT AC power adaptor (supplied) Inserting a cassette (p. 14) 1 Slide EJECT in parentheses "( )" for more information. Quick Start Guide This chapter introduces you to the basic ...
... (p. 8). Quick Start Guide 4 Connect the plug with its v mark facing up. Connecting the power cord (p. 13) Use the battery pack when using your camcorder. EJECT AC power adaptor (supplied) Inserting a cassette (p. 14) 1 Slide EJECT in parentheses "( )" for more information. Quick Start Guide This chapter introduces you to the basic ...
Primary User Manual
Page 5
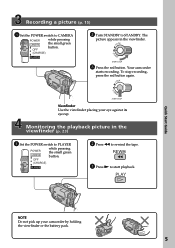
... your camcorder by holding the viewfinder or the battery pack. 5 PLAY Quick Start Guide NOTE Do not pick up your eye against its eyecup. OFF (CHARGE) PLAYER 2 Press m to PLAYER POWER CAMERA while pressing the small green button. REW 3 Press N to STANDBY. Recording a picture... (p. 15) 1 Set the POWER switch to CAMERA POWER CAMERA OFF while pressing the small green button. (CHARGE) PLAYER STA 2 Turn ...
... your camcorder by holding the viewfinder or the battery pack. 5 PLAY Quick Start Guide NOTE Do not pick up your eye against its eyecup. OFF (CHARGE) PLAYER 2 Press m to PLAYER POWER CAMERA while pressing the small green button. REW 3 Press N to STANDBY. Recording a picture... (p. 15) 1 Set the POWER switch to CAMERA POWER CAMERA OFF while pressing the small green button. (CHARGE) PLAYER STA 2 Turn ...
Primary User Manual
Page 6
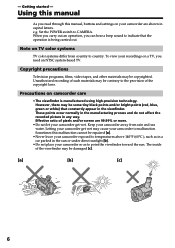
... from country to point the viewfinder toward the sun. To view your camcorder to indicate that constantly appear in any way. Copyright precautions Television programs, films, video tapes, and other materials may be contrary to CAMERA. However, there may cause your recordings on camcorder care •The viewfinder is being carried out. These points occur...
... from country to point the viewfinder toward the sun. To view your camcorder to indicate that constantly appear in any way. Copyright precautions Television programs, films, video tapes, and other materials may be contrary to CAMERA. However, there may cause your recordings on camcorder care •The viewfinder is being carried out. These points occur...
Primary User Manual
Page 7
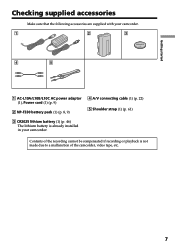
Contents of the camcorder, video tape, etc. 7 Getting started Checking supplied accessories Make sure that the following accessories are supplied with your camcorder. 1 2 3 4 5 1 AC-L10A/L10B/L10C AC power adaptor (1), Power cord (1) (p. 9) 2 NP-F330 battery pack (1) (p. 8, 9) 4 A/V connecting cable (1) (p. 22) 5 Shoulder strap (1) (p. 61) 3 CR2025 lithium battery (1) (p. 46) The lithium battery is not made due to a malfunction of the recording cannot be compensated if recording or playback is already installed in your camcorder.
Contents of the camcorder, video tape, etc. 7 Getting started Checking supplied accessories Make sure that the following accessories are supplied with your camcorder. 1 2 3 4 5 1 AC-L10A/L10B/L10C AC power adaptor (1), Power cord (1) (p. 9) 2 NP-F330 battery pack (1) (p. 8, 9) 4 A/V connecting cable (1) (p. 22) 5 Shoulder strap (1) (p. 61) 3 CR2025 lithium battery (1) (p. 46) The lithium battery is not made due to a malfunction of the recording cannot be compensated if recording or playback is already installed in your camcorder.
Primary User Manual
Page 8
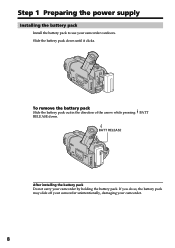
BATT RELEASE After installing the battery pack Do not carry your camcorder outdoors. Step 1 Preparing the power supply Installing the battery pack Install the battery pack to use your camcorder by holding the battery pack. Slide the battery pack down . To remove the battery pack Slide the battery pack out in the direction of the arrow while pressing BATT RELEASE down until it clicks. If you do so, the battery pack may slide off your camcorder unintentionally, damaging your camcorder. 8
BATT RELEASE After installing the battery pack Do not carry your camcorder outdoors. Step 1 Preparing the power supply Installing the battery pack Install the battery pack to use your camcorder by holding the battery pack. Slide the battery pack down . To remove the battery pack Slide the battery pack out in the direction of the arrow while pressing BATT RELEASE down until it clicks. If you do so, the battery pack may slide off your camcorder unintentionally, damaging your camcorder. 8
Primary User Manual
Page 9
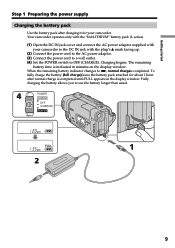
...charging the battery allows you to u, normal chargeis completed. To fully charge the battery (full charge), leave the battery pack attached for your camcorder to the DC IN jack with the plug's v mark facing up. (2) Connect the power cord to the AC power adaptor. (3) Connect...When the remaining battery indicator changes to use the battery longer than usual. 4 POWER CAMERA OFF (CHARGE) PLAYER 1 2 9 The remaining battery time is completed until FULL appears in minutes on the display window. Your camcorder operates only with the "InfoLITHIUM" battery pack (L series). (1) Open the DC IN...
...charging the battery allows you to u, normal chargeis completed. To fully charge the battery (full charge), leave the battery pack attached for your camcorder to the DC IN jack with the plug's v mark facing up. (2) Connect the power cord to the AC power adaptor. (3) Connect...When the remaining battery indicator changes to use the battery longer than usual. 4 POWER CAMERA OFF (CHARGE) PLAYER 1 2 9 The remaining battery time is completed until FULL appears in minutes on the display window. Your camcorder operates only with the "InfoLITHIUM" battery pack (L series). (1) Open the DC IN...
Primary User Manual
Page 10
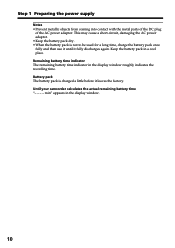
... discharges again. min" appears in a cool place. Remaining battery time indicator The remaining battery time indicator in the display window roughly indicates the recording time. Battery pack The battery pack is not to be used for a long time, charge the battery pack once fully and then use it... until it leaves the factory. Until your camcorder calculates the actual remaining battery time "- - - - Step 1 Preparing the power supply Notes •Prevent metallic objects from coming into contact with the ...
... discharges again. min" appears in a cool place. Remaining battery time indicator The remaining battery time indicator in the display window roughly indicates the recording time. Battery pack The battery pack is not to be used for a long time, charge the battery pack once fully and then use it... until it leaves the factory. Until your camcorder calculates the actual remaining battery time "- - - - Step 1 Preparing the power supply Notes •Prevent metallic objects from coming into contact with the ...
Primary User Manual
Page 11
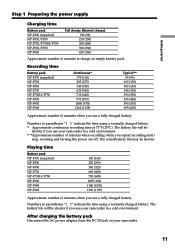
...) 325 (295) 360 (325) 665 (600) 750 (680) 1035 (930) 1140 (1030) 1330 (1195) Approximate number of minutes when recording while you repeat recording start/ stop, zooming and turning the power on your camcorder in a cold environment. After charging the battery pack Disconnect the AC power adaptor from the DC IN jack on...
...) 325 (295) 360 (325) 665 (600) 750 (680) 1035 (930) 1140 (1030) 1330 (1195) Approximate number of minutes when recording while you repeat recording start/ stop, zooming and turning the power on your camcorder in a cold environment. After charging the battery pack Disconnect the AC power adaptor from the DC IN jack on...

Primary User Manual
Page 12
...recording The indicator may not be correct, depending on the conditions in which can exchange data such as battery consumption with the "InfoLITHIUM" battery pack (L series). "InfoLITHIUM" is "InfoLITHIUM"? The "InfoLITHIUM" is compatible with compatible electronic equipment. "InfoLITHIUM" L series battery packs have the mark. Your camcorder... operates only with the "InfoLITHIUM" battery. What is a trademark of Sony Corporation. 12
...recording The indicator may not be correct, depending on the conditions in which can exchange data such as battery consumption with the "InfoLITHIUM" battery pack (L series). "InfoLITHIUM" is "InfoLITHIUM"? The "InfoLITHIUM" is compatible with compatible electronic equipment. "InfoLITHIUM" L series battery packs have the mark. Your camcorder... operates only with the "InfoLITHIUM" battery. What is a trademark of Sony Corporation. 12
Primary User Manual
Page 13
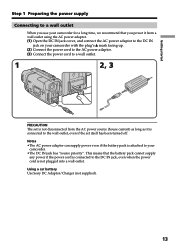
... long as it is not plugged into a wall outlet. Using a car battery Use Sony DC Adaptor/Charger (not supplied). 13 Getting started Step 1 Preparing the power supply Connecting to a wall outlet When you use your camcorder for a long time, we recommend that the battery pack cannot supply any power if ...;The DC IN jack has "source priority". Notes •The AC power adaptor can supply power even if the battery pack is attached to your camcorder with the plug's v mark facing up. (2) Connect the power cord to the AC power adaptor. (3) Connect the power cord to a wall outlet. 1 2, 3 ...
... long as it is not plugged into a wall outlet. Using a car battery Use Sony DC Adaptor/Charger (not supplied). 13 Getting started Step 1 Preparing the power supply Connecting to a wall outlet When you use your camcorder for a long time, we recommend that the battery pack cannot supply any power if ...;The DC IN jack has "source priority". Notes •The AC power adaptor can supply power even if the battery pack is attached to your camcorder with the plug's v mark facing up. (2) Connect the power cord to the AC power adaptor. (3) Connect the power cord to a wall outlet. 1 2, 3 ...

Primary User Manual
Page 15
...0:00:00 Press COUNTER RESET (p. 62). 15 Recording - The lens cover opens. (3) Turn STANDBY to prevent battery and tape wear. The camera recording lamp located on the front of your camcorder in the standby mode for more information (p. 8 ...camcorder automatically turns off. Recording - Basics - When you leave your camcorder lights up again. To start recording, press START/STOP. Your camcorder starts recording. To stop recording, press START/STOP again. 2 POWER CAMERA OFF (CHARGE) PLAYER STA 3 LOCK NDBY START/STOP 40min SP STBY 0:00:00 Microphone Camera recording...
...0:00:00 Press COUNTER RESET (p. 62). 15 Recording - The lens cover opens. (3) Turn STANDBY to prevent battery and tape wear. The camera recording lamp located on the front of your camcorder in the standby mode for more information (p. 8 ...camcorder automatically turns off. Recording - Basics - When you leave your camcorder lights up again. To start recording, press START/STOP. Your camcorder starts recording. To stop recording, press START/STOP again. 2 POWER CAMERA OFF (CHARGE) PLAYER STA 3 LOCK NDBY START/STOP 40min SP STBY 0:00:00 Microphone Camera recording...
Primary User Manual
Page 19
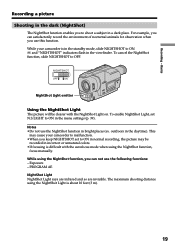
Exposure - PROGRAM AE NightShot Light NightShot Light rays are infrared and so are invisible. Recording - To enable NightShot Light, set to ON in normal recording, the picture may cause your camcorder is in the standby mode, slide NIGHTSHOT to ON in the menu settings (p. 39). outdoors ...the NightShot Light is difficult with the NightShot Light on. While your camcorder to malfunction. •When you to OFF. NIGHTSHOT OFF ON NightShot Light emitter Using the NightShot Light The picture will be recorded in the dark (NightShot) The NightShot function enables you keep NIGHTSHOT ...
Exposure - PROGRAM AE NightShot Light NightShot Light rays are infrared and so are invisible. Recording - To enable NightShot Light, set to ON in normal recording, the picture may cause your camcorder is in the standby mode, slide NIGHTSHOT to ON in the menu settings (p. 39). outdoors ...the NightShot Light is difficult with the NightShot Light on. While your camcorder to malfunction. •When you to OFF. NIGHTSHOT OFF ON NightShot Light emitter Using the NightShot Light The picture will be recorded in the dark (NightShot) The NightShot function enables you keep NIGHTSHOT ...

Primary User Manual
Page 22
... on the VCR to the TV using the A/V connecting cable supplied with your camcorder from a wall outlet using the AC power adaptor (p. 13). Open the jack cover. Connect your camcorder to LINE. VIDEO OUT AUDIO OUT IN VIDEO AUDIO : Signal flow If your TV is already connected to a VCR Connect... your camcorder to the LINE IN input on the TV screen, we recommend that you power your camcorder to a TV or VCR without Video/Audio input jacks Use an NTSC system RFU adaptor (not supplied). - Basics - When ...
... on the VCR to the TV using the A/V connecting cable supplied with your camcorder from a wall outlet using the AC power adaptor (p. 13). Open the jack cover. Connect your camcorder to LINE. VIDEO OUT AUDIO OUT IN VIDEO AUDIO : Signal flow If your TV is already connected to a VCR Connect... your camcorder to the LINE IN input on the TV screen, we recommend that you power your camcorder to a TV or VCR without Video/Audio input jacks Use an NTSC system RFU adaptor (not supplied). - Basics - When ...
Primary User Manual
Page 23
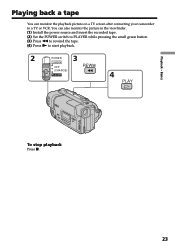
You can monitor the playback picture on a TV screen after connecting your camcorder to start playback. 2 POWER 3 CAMERA OFF REW (CHARGE) PLAYER 4 PLAY To stop playback Press x. 23 Basics Playing back a tape You can also monitor the picture in the viewfinder. (1) Install the power source and insert the recorded tape. (2) Set the POWER switch to PLAYER while pressing the small green button. (3) Press m to rewind the tape. (4) Press N to a TV or VCR. Playback -
You can monitor the playback picture on a TV screen after connecting your camcorder to start playback. 2 POWER 3 CAMERA OFF REW (CHARGE) PLAYER 4 PLAY To stop playback Press x. 23 Basics Playing back a tape You can also monitor the picture in the viewfinder. (1) Install the power source and insert the recorded tape. (2) Set the POWER switch to PLAYER while pressing the small green button. (3) Press m to rewind the tape. (4) Press N to a TV or VCR. Playback -

Primary User Manual
Page 24
... or picture search. To resume normal playback, press N. To resume playback, press X or N. To resume playback, press N. When you play back the tapes recorded in the stop mode. To locate a scene monitoring the picture (picture search) Keep pressing m or M during playback. When the playback pause mode lasts for... the tape (skip scan) Keep pressing m while rewinding or M while advancing the tape. To advance the tape Press M in the Hi8 video system on your camcorder. 24 Playing back a tape Various playback modes To operate video control buttons, set the POWER switch to PLAYER.
... or picture search. To resume normal playback, press N. To resume playback, press X or N. To resume playback, press N. When you play back the tapes recorded in the stop mode. To locate a scene monitoring the picture (picture search) Keep pressing m or M during playback. When the playback pause mode lasts for... the tape (skip scan) Keep pressing m while rewinding or M while advancing the tape. To advance the tape Press M in the Hi8 video system on your camcorder. 24 Playing back a tape Various playback modes To operate video control buttons, set the POWER switch to PLAYER.

Primary User Manual
Page 26
During recording You cannot change or cancel the wide mode. When you record in the menu settings. Date or time indicator When you cancel the wide mode, set your camcorder to the standby mode and then set 16:9WIDE to CINEMA or 16:9FULL in the menu settings (p. 39). MENU To cancel the wide mode Set 16:9WIDE to OFF in the 16:9FULL mode, the date or time indicator will be widened on wide-screen TVs. In the wide mode You cannot select the bounce function with FADER. Using the wide mode In the standby mode, set 16:9WIDE to OFF. 26
During recording You cannot change or cancel the wide mode. When you record in the menu settings. Date or time indicator When you cancel the wide mode, set your camcorder to the standby mode and then set 16:9WIDE to CINEMA or 16:9FULL in the menu settings (p. 39). MENU To cancel the wide mode Set 16:9WIDE to OFF in the 16:9FULL mode, the date or time indicator will be widened on wide-screen TVs. In the wide mode You cannot select the bounce function with FADER. Using the wide mode In the standby mode, set 16:9WIDE to OFF. 26

Primary User Manual
Page 28
...cannot use the following mode or functions: - The date, time indicator and title do not fade in /out is carried out : Your camcorder automatically returns to the mode other than OFF in the following functions: - Picture effect Note on the bounce function The BOUNCE indicator does not...FADER until the indicator disappears. D ZOOM is indicated first of all. (2) Press START/STOP. Picture effect - When fading out [b] In the recording mode, press FADER until the desired fader indicator flashes. Before the fade in or fade out Erase them before operating the fader function if they...
...cannot use the following mode or functions: - The date, time indicator and title do not fade in /out is carried out : Your camcorder automatically returns to the mode other than OFF in the following functions: - Picture effect Note on the bounce function The BOUNCE indicator does not...FADER until the indicator disappears. D ZOOM is indicated first of all. (2) Press START/STOP. Picture effect - When fading out [b] In the recording mode, press FADER until the desired fader indicator flashes. Before the fade in or fade out Erase them before operating the fader function if they...

Primary User Manual
Page 29
... 2 MOSAIC To turn the power off Press PICTURE EFFECT. ART [b] : Thecolorandbrightnessofthepictureisreversed. SEPIA : The picture is monochrome (black-and-white). SOLARIZE [c] : Thelightintensityisclearer,andthepicturelookslikeanillustration. STRETCH [f] : Thepictureexpandshorizontally. [a] [b] [c] [d] [e] [f] Advanced Recording Operations (1) PressPICTUREEFFECTinthestandbyorrecordingmode. Picture effect You can digitally process images to the normal mode. 29 Using special effects - When you turn the picture effect function off...
... 2 MOSAIC To turn the power off Press PICTURE EFFECT. ART [b] : Thecolorandbrightnessofthepictureisreversed. SEPIA : The picture is monochrome (black-and-white). SOLARIZE [c] : Thelightintensityisclearer,andthepicturelookslikeanillustration. STRETCH [f] : Thepictureexpandshorizontally. [a] [b] [c] [d] [e] [f] Advanced Recording Operations (1) PressPICTUREEFFECTinthestandbyorrecordingmode. Picture effect You can digitally process images to the normal mode. 29 Using special effects - When you turn the picture effect function off...


