Operating Instructions
Page 4
... • The default setting is a trademark of Sony Computer Entertainment Inc. • "x.v.Color" and "x.v.Color" logo are trademarks of Sony Corporation. • "PhotoTV HD" and the "PhotoTV HD" logo are trademarks of Sony Corporation. • Other system and product names are generally trademarks or registered trademarks ...AVCHD" and the "AVCHD" logo are trademarks of disc can also use the controls on the unit if they have the same or similar names as those on the remote. • Icons, such as a general reference for the BDs, DVDs, or CDs unless otherwise specified by the text ...
... • The default setting is a trademark of Sony Computer Entertainment Inc. • "x.v.Color" and "x.v.Color" logo are trademarks of Sony Corporation. • "PhotoTV HD" and the "PhotoTV HD" logo are trademarks of Sony Corporation. • Other system and product names are generally trademarks or registered trademarks ...AVCHD" and the "AVCHD" logo are trademarks of disc can also use the controls on the unit if they have the same or similar names as those on the remote. • Icons, such as a general reference for the BDs, DVDs, or CDs unless otherwise specified by the text ...
Operating Instructions
Page 6
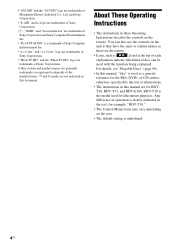
... Appropriate Settings Automatically 66 Setting the Speakers 67 Controlling Your TV with the Supplied Remote 69 Using the Sleep Timer 71 Changing the Brightness of the Front Panel Display ...Update 75 [Video Settings 76 [Audio Settings 78 [BD/DVD Viewing Settings 80 [Photo Settings 82 [HDMI Settings 82 [System Settings 83 [Network Settings 84 [Easy Setup 85 [Resetting ...86 Additional Information Precautions 87 Notes about the Discs 88 Troubleshooting 89 Self-diagnosis Function 95 Playable Discs 96 ...
... Appropriate Settings Automatically 66 Setting the Speakers 67 Controlling Your TV with the Supplied Remote 69 Using the Sleep Timer 71 Changing the Brightness of the Front Panel Display ...Update 75 [Video Settings 76 [Audio Settings 78 [BD/DVD Viewing Settings 80 [Photo Settings 82 [HDMI Settings 82 [System Settings 83 [Network Settings 84 [Easy Setup 85 [Resetting ...86 Additional Information Precautions 87 Notes about the Discs 88 Troubleshooting 89 Self-diagnosis Function 95 Playable Discs 96 ...
Operating Instructions
Page 7
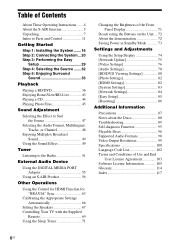
...; Speaker cords (5, white/red/ blue/gray/green) • Operating Instructions • Speaker and TV Connections guide • Setup Disc (DVD) • DIGITAL MEDIA PORT adapter (TDM-iP20) (1) • Video cord (1) • Subwoofer (1) • Remote commander (remote) (1) • Operating Instructions for the DIGITAL MEDIA PORT adapter (TDM-iP20) • R6 (size AA) batteries (2) • AM...
...; Speaker cords (5, white/red/ blue/gray/green) • Operating Instructions • Speaker and TV Connections guide • Setup Disc (DVD) • DIGITAL MEDIA PORT adapter (TDM-iP20) (1) • Video cord (1) • Subwoofer (1) • Remote commander (remote) (1) • Operating Instructions for the DIGITAL MEDIA PORT adapter (TDM-iP20) • R6 (size AA) batteries (2) • AM...
Operating Instructions
Page 8
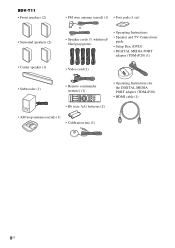
...; Speaker cords (5, white/red/ blue/gray/green) • Operating Instructions • Speaker and TV Connections guide • Setup Disc (DVD) • DIGITAL MEDIA PORT adapter (TDM-iP20) (1) • Video cord (1) • Subwoofer (1) • Remote commander (remote) (1) • R6 (size AA) batteries (2) • Operating Instructions for the DIGITAL MEDIA PORT adapter (TDM-iP20) • HDMI...
...; Speaker cords (5, white/red/ blue/gray/green) • Operating Instructions • Speaker and TV Connections guide • Setup Disc (DVD) • DIGITAL MEDIA PORT adapter (TDM-iP20) (1) • Video cord (1) • Subwoofer (1) • Remote commander (remote) (1) • R6 (size AA) batteries (2) • Operating Instructions for the DIGITAL MEDIA PORT adapter (TDM-iP20) • HDMI...
Operating Instructions
Page 9
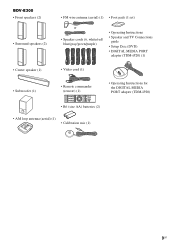
...; Speaker cords (6, white/red/ blue/gray/green/purple) • Operating Instructions • Speaker and TV Connections guide • Setup Disc (DVD) • DIGITAL MEDIA PORT adapter (TDM-iP20) (1) • Video cord (1) • Remote commander (remote) (1) • Operating Instructions for the DIGITAL MEDIA PORT adapter (TDM-iP20) • R6 (size AA) batteries (2) • AM loop...
...; Speaker cords (6, white/red/ blue/gray/green/purple) • Operating Instructions • Speaker and TV Connections guide • Setup Disc (DVD) • DIGITAL MEDIA PORT adapter (TDM-iP20) (1) • Video cord (1) • Remote commander (remote) (1) • Operating Instructions for the DIGITAL MEDIA PORT adapter (TDM-iP20) • R6 (size AA) batteries (2) • AM loop...

Operating Instructions
Page 10
...pads (supplied) to the bottom of time, remove the batteries to avoid possible damage from the protective cover. 10US Note • Do not leave the remote in an extremely hot or humid place. • Do not use a new battery with an old one. • Do not drop any foreign object... 3 and # ends on the batteries to the markings inside the compartment. Using the remote Inserting batteries into the remote casing, particularly when replacing the batteries. • If you do not intend to use the remote for an extended period of the subwoofer to stabilize the subwoofer and prevent it from slipping...
...pads (supplied) to the bottom of time, remove the batteries to avoid possible damage from the protective cover. 10US Note • Do not leave the remote in an extremely hot or humid place. • Do not use a new battery with an old one. • Do not drop any foreign object... 3 and # ends on the batteries to the markings inside the compartment. Using the remote Inserting batteries into the remote casing, particularly when replacing the batteries. • If you do not intend to use the remote for an extended period of the subwoofer to stabilize the subwoofer and prevent it from slipping...
Operating Instructions
Page 11
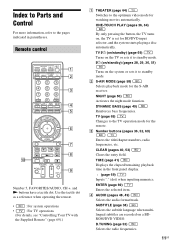
...tactile dot as a reference when operating the remote. • : For system operations • : For TV operations (For details, see "Controlling Your TV with the Supplied Remote" (page 69).) A THEATER (page 64) Switches to the optimum video mode for the remote. TV (page 69) Changes to standby ... PLAY (pages 36, 64) By only pressing the button, the TV turns on the system or sets it to the TV operation mode for watching movies automatically. B S-AIR MODE (page 58) Selects playback mode for BD/DVD input selector, and the system starts playing a disc automatically.
...tactile dot as a reference when operating the remote. • : For system operations • : For TV operations (For details, see "Controlling Your TV with the Supplied Remote" (page 69).) A THEATER (page 64) Switches to the optimum video mode for the remote. TV (page 69) Changes to standby ... PLAY (pages 36, 64) By only pressing the button, the TV turns on the system or sets it to the TV operation mode for watching movies automatically. B S-AIR MODE (page 58) Selects playback mode for BD/DVD input selector, and the system starts playing a disc automatically.
Operating Instructions
Page 13
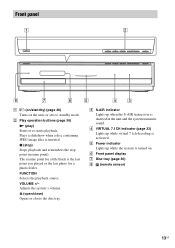
... or the last photo for a photo folder. VOLUME +/- F Front panel display G Disc tray (page 36) H (remote sensor) 13US The resume point for a title/track is activated. Plays a slideshow when a disc containing JPEG image files is inserted in the unit and the system transmits sound. E Power indicator Lights up when the S-AIR transceiver is inserted...
... or the last photo for a photo folder. VOLUME +/- F Front panel display G Disc tray (page 36) H (remote sensor) 13US The resume point for a title/track is activated. Plays a slideshow when a disc containing JPEG image files is inserted in the unit and the system transmits sound. E Power indicator Lights up when the S-AIR transceiver is inserted...
Operating Instructions
Page 28
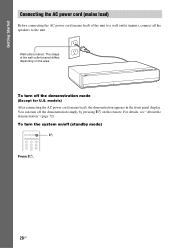
To turn the system on the remote. For details, see "About the demonstration" (page 72). To turn off the demonstration simply by pressing "/1 on /off the demonstration mode (Except for U.S. You can ...
To turn the system on the remote. For details, see "About the demonstration" (page 72). To turn off the demonstration simply by pressing "/1 on /off the demonstration mode (Except for U.S. You can ...
Operating Instructions
Page 52
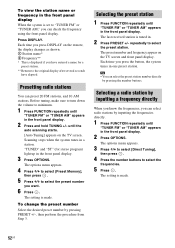
...the preset station number directly by inputting the frequencies directly. 1 Press FUNCTION repeatedly until the auto scanning starts. [Auto Tuning] appears on the remote, the display changes as shown. 1 Station name* 2 Frequency** * This is displayed if you can preset 20 FM stations, and 10 ...AM stations. Scanning stops when the system tunes in . 2 Press PRESET +/- To change the preset number Select the desired preset number by pressing PRESET +/-, then perform the procedure from Step...
...the preset station number directly by inputting the frequencies directly. 1 Press FUNCTION repeatedly until the auto scanning starts. [Auto Tuning] appears on the remote, the display changes as shown. 1 Station name* 2 Frequency** * This is displayed if you can preset 20 FM stations, and 10 ...AM stations. Scanning stops when the system tunes in . 2 Press PRESET +/- To change the preset number Select the desired preset number by pressing PRESET +/-, then perform the procedure from Step...
Operating Instructions
Page 55
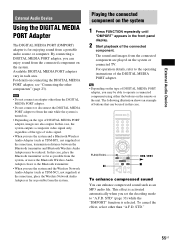
... MEDIA PORT adapter, you may be reduced. Note • Do not connect an adapter other components" (page 23). For details on the remote or the unit. Tip • Depending on the type of buttons that can enhance compressed sound such as possible from the connected component on... the type of DIGITAL MEDIA PORT adapter, images are played on the system 1 Press FUNCTION repeatedly until "DMPORT" appears in the front panel display. 2 Start playback of the connected component. The following illustration ...
... MEDIA PORT adapter, you may be reduced. Note • Do not connect an adapter other components" (page 23). For details on the remote or the unit. Tip • Depending on the type of buttons that can enhance compressed sound such as possible from the connected component on... the type of DIGITAL MEDIA PORT adapter, images are played on the system 1 Press FUNCTION repeatedly until "DMPORT" appears in the front panel display. 2 Start playback of the connected component. The following illustration ...
Operating Instructions
Page 59
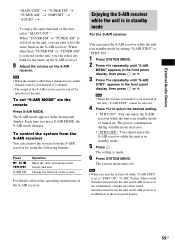
... Adjust the volume on the remote and unit. For details, refer to the operating instructions of the system. The setting is in standby mode or turned on the unit, you turn the system off . Note •...is in standby mode by operation of the S-AIR receiver may be selected. 4 Press X/x to "STBY ON." 1 Press SYSTEM MENU. 2 Press X/x repeatedly until "S-AIR MENU" appears in the front panel display, then press or c. 3 Press X/x...AIR receiver while the unit is set "S-AIR MODE" via the remote Press S-AIR MODE. The system menu turns off while "S-AIR STBY" is in the front panel display.
... Adjust the volume on the remote and unit. For details, refer to the operating instructions of the system. The setting is in standby mode or turned on the unit, you turn the system off . Note •...is in standby mode by operation of the S-AIR receiver may be selected. 4 Press X/x to "STBY ON." 1 Press SYSTEM MENU. 2 Press X/x repeatedly until "S-AIR MENU" appears in the front panel display, then press or c. 3 Press X/x...AIR receiver while the unit is set "S-AIR MODE" via the remote Press S-AIR MODE. The system menu turns off while "S-AIR STBY" is in the front panel display.
Operating Instructions
Page 63
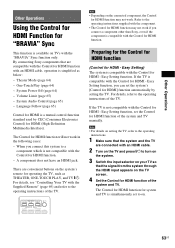
... not work. A component does not have an HDMI jack. Theater Mode (page 64) - Easy Setting function. Easy Setting function, you connect a component other than Sony, even if the component is available on the system's remote for operating the TV, such as below: - Easy Setting ...function, set the system's [Control for HDMI] function automatically by CEC (Consumer Electronics Control) for...
... not work. A component does not have an HDMI jack. Theater Mode (page 64) - Easy Setting function. Easy Setting function, you connect a component other than Sony, even if the component is available on the system's remote for operating the TV, such as below: - Easy Setting ...function, set the system's [Control for HDMI] function automatically by CEC (Consumer Electronics Control) for...
Operating Instructions
Page 64
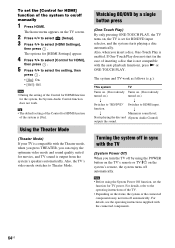
...(in sync with the Theater mode, when you press THEATER, you insert a disc, One-Touch Play is not compatible with the connected components. 64US Note • Before using the POWER button on the TV's remote or TV "/1 on the system's remote, the system turns off by a... TV sound is [On]. For details, refer to the operating instructions of the system is output from the system's speakers automatically. Turning the system off manually 1 Press HOME. function. r r Minimizes sound level. The home menu appears on .) r r Switches to "BD/DVD" Switches to Theater Mode.
...(in sync with the Theater mode, when you press THEATER, you insert a disc, One-Touch Play is not compatible with the connected components. 64US Note • Before using the POWER button on the TV's remote or TV "/1 on the system's remote, the system turns off by a... TV sound is [On]. For details, refer to the operating instructions of the system is output from the system's speakers automatically. Turning the system off manually 1 Press HOME. function. r r Minimizes sound level. The home menu appears on .) r r Switches to "BD/DVD" Switches to Theater Mode.

Operating Instructions
Page 65
... easy operation. For details, see the operating instructions of the TV. • When the system is in this by means of the system using the TV remote. To use the System Audio Control function as follows: • You can adjust the volume and turn off and on , TV sound will not work. Changing ...the volume. Setting the Maximum Volume Level of the System (Volume Limit) If you change the output method of the TV to the system speaker on the TV menu or by pressing THEATER, loud sound may be output from the speakers of the system by limiting the maximum level of the TV returns ...
... easy operation. For details, see the operating instructions of the TV. • When the system is in this by means of the system using the TV remote. To use the System Audio Control function as follows: • You can adjust the volume and turn off and on , TV sound will not work. Changing ...the volume. Setting the Maximum Volume Level of the System (Volume Limit) If you change the output method of the TV to the system speaker on the TV menu or by pressing THEATER, loud sound may be output from the speakers of the system by limiting the maximum level of the TV returns ...
Operating Instructions
Page 69
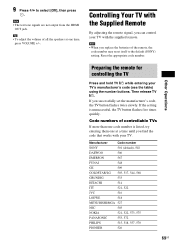
... set the manufacturer's code, the TV button flashes twice slowly. Then release TV [/1. 9 Press X/x to the default (SONY) setting. Tip • To adjust the volume of the remote, the code number may reset itself to select [Off], then press . Note • The test tone signals are not... output from the HDMI OUT jack. Controlling Your TV with the supplied remote. Manufacturer Code number SONY 501 (default), 502 DAEWOO 506 EMERSON 567 FUNAI 548 GE 509 GOLDSTAR/LG 503, 517, 544, 568 GRUNDIG 533 HITACHI 514 ITT...
... set the manufacturer's code, the TV button flashes twice slowly. Then release TV [/1. 9 Press X/x to the default (SONY) setting. Tip • To adjust the volume of the remote, the code number may reset itself to select [Off], then press . Note • The test tone signals are not... output from the HDMI OUT jack. Controlling Your TV with the supplied remote. Manufacturer Code number SONY 501 (default), 502 DAEWOO 506 EMERSON 567 FUNAI 548 GE 509 GOLDSTAR/LG 503, 517, 544, 568 GRUNDIG 533 HITACHI 514 ITT...

Operating Instructions
Page 70
... the TV on the menu. WIDE Change the aspect ratio of the SONY TV. To use some buttons may not be able to use these...all of the TV. By pressing TV "/1 THEATER TV INPUT VOLUME +/- Switch the TV's input source between the TV and other than THEATER, TV [/1, TV INPUT), set the remote to the TV mode by pressing TV, ...HOME Display the menu of the TV. Note • While in the TV mode, if you press any of the following buttons while the remote is in the TV mode, TV flashes four times and the remote exits the TV mode automatically, and the system is operated as the remote...
... the TV on the menu. WIDE Change the aspect ratio of the SONY TV. To use some buttons may not be able to use these...all of the TV. By pressing TV "/1 THEATER TV INPUT VOLUME +/- Switch the TV's input source between the TV and other than THEATER, TV [/1, TV INPUT), set the remote to the TV mode by pressing TV, ...HOME Display the menu of the TV. Note • While in the TV mode, if you press any of the following buttons while the remote is in the TV mode, TV flashes four times and the remote exits the TV mode automatically, and the system is operated as the remote...
Operating Instructions
Page 72
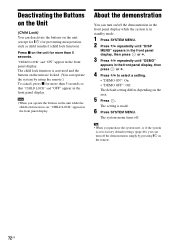
... front panel display while the system is on, "CHILD LOCK" appears in the front panel display, then press or c. 4 Press X/x to select a setting. • "DEMO ON": On. • "DEMO OFF": Off. Note • When you can turn off the demonstration simply by using the remote.) To cancel, press x ...for more than 5 seconds so that "CHILD LOCK" and "OFF" appear in the front panel display. Tip • When you purchase the system new, or if the system is at its factory default settings (page 86), you...
... front panel display while the system is on, "CHILD LOCK" appears in the front panel display, then press or c. 4 Press X/x to select a setting. • "DEMO ON": On. • "DEMO OFF": Off. Note • When you can turn off the demonstration simply by using the remote.) To cancel, press x ...for more than 5 seconds so that "CHILD LOCK" and "OFF" appear in the front panel display. Tip • When you purchase the system new, or if the system is at its factory default settings (page 86), you...
Operating Instructions
Page 90
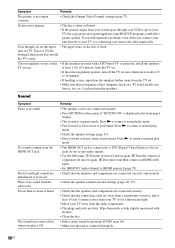
... component off the TV set the aspect • The aspect ratio on the remote if "MUTING ON" is displayed in the front panel display. • The system is dirty or flawed. • If the picture output from your system goes through your VCR to get to your TV, the copy-protection signal applied...play a CD. No sound is no magnetic object (magnetic latch on after 15 to some BD/DVD programs could affect picture quality. Press N to return to the other input jacks. Picture noise appears. • The disc is in [TV Type] of [Video Settings], the picture does not fill the TV screen. Color...
... component off the TV set the aspect • The aspect ratio on the remote if "MUTING ON" is displayed in the front panel display. • The system is dirty or flawed. • If the picture output from your system goes through your VCR to get to your TV, the copy-protection signal applied...play a CD. No sound is no magnetic object (magnetic latch on after 15 to some BD/DVD programs could affect picture quality. Press N to return to the other input jacks. Picture noise appears. • The disc is in [TV Type] of [Video Settings], the picture does not fill the TV screen. Color...
Operating Instructions
Page 91
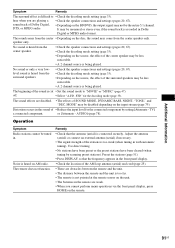
... • Check the decoding mode setting (page 33). • Depending on the BD/DVD, the output signal may be less noticeable. • A 2 channel source is being...8226; Check the decoding mode setting (page 33). • Depending on the disc, the sound may come from the center • Depending on the source, ...remote are playing a • Check the speaker connections and settings (pages 20, 67). speaker only. off. • Select "A.F.D. TV] a connected component. hear when you are weak. • When you cannot perform menu operations via the front panel display, press HOME...
... • Check the decoding mode setting (page 33). • Depending on the BD/DVD, the output signal may be less noticeable. • A 2 channel source is being...8226; Check the decoding mode setting (page 33). • Depending on the disc, the sound may come from the center • Depending on the source, ...remote are playing a • Check the speaker connections and settings (pages 20, 67). speaker only. off. • Select "A.F.D. TV] a connected component. hear when you are weak. • When you cannot perform menu operations via the front panel display, press HOME...


