
Operating Instructions
Page 2
...eyes, do not attempt to correct the interference by one or more of the apparatus with this manual could void your Sony dealer regarding this model manufactured for help. Record these numbers in this equipment does cause harmful interference to radio or television ... No. BDV-N890W Serial No The following indications are located on the bottom exterior. Other versions may cause harmful interference to the presence of the unit. NOTE: This equipment has been tested and found to provide reasonable protection against harmful interference in a particular installation. These ...
...eyes, do not attempt to correct the interference by one or more of the apparatus with this manual could void your Sony dealer regarding this model manufactured for help. Record these numbers in this equipment does cause harmful interference to radio or television ... No. BDV-N890W Serial No The following indications are located on the bottom exterior. Other versions may cause harmful interference to the presence of the unit. NOTE: This equipment has been tested and found to provide reasonable protection against harmful interference in a particular installation. These ...
Operating Instructions
Page 3
...provided for long periods of the polarized or grounding-type plug. This equipment complies with this product and (ii) our website (http:// esupport.sony.com/) for the latest information. Important Safety Instructions 1) Read these instructions. 2) Keep these instructions. 3) Heed all warnings. 4) Follow all...bottom exterior. For the customers in the U.S.A. Should you notice an abnormality in conjunction with the manufacturer's instructions. 8) Do not install near water. 6) Clean only with one wider than the other device used , use caution when moving the cart/ apparatus combination...
...provided for long periods of the polarized or grounding-type plug. This equipment complies with this product and (ii) our website (http:// esupport.sony.com/) for the latest information. Important Safety Instructions 1) Read these instructions. 2) Keep these instructions. 3) Heed all warnings. 4) Follow all...bottom exterior. For the customers in the U.S.A. Should you notice an abnormality in conjunction with the manufacturer's instructions. 8) Do not install near water. 6) Clean only with one wider than the other device used , use caution when moving the cart/ apparatus combination...

Operating Instructions
Page 4
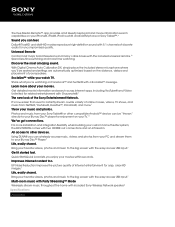
...Cinavia technology is subject to OET65. For the wireless transceiver (EZWRT50) This device complies with Canadian ICES-003. This equipment should be installed and operated keeping the radiator at least 20cm or more away from person's body (excluding extremities: hands, wrists, feet and ankles...registered trademarks of the IC radio frequency (RF) Exposure rules. For the customers in Canada Blu-ray Disc/DVD receiver (HBDN990W/HBD-N890W) Operation is provided at the Cinavia Online Consumer Information Center at http:// www.cinavia.com. These systems, called AACS (Advanced Access ...
...Cinavia technology is subject to OET65. For the wireless transceiver (EZWRT50) This device complies with Canadian ICES-003. This equipment should be installed and operated keeping the radiator at least 20cm or more away from person's body (excluding extremities: hands, wrists, feet and ankles...registered trademarks of the IC radio frequency (RF) Exposure rules. For the customers in Canada Blu-ray Disc/DVD receiver (HBDN990W/HBD-N890W) Operation is provided at the Cinavia Online Consumer Information Center at http:// www.cinavia.com. These systems, called AACS (Advanced Access ...

Operating Instructions
Page 8
Table of Contents About These Operating Instructions ....... 7 Unpacking 9 Index to Parts and Controls 11 Getting Started Step 1: Installing the System .......16 Step 2: Connecting the System ...17 Connecting the speakers ......... 17 Connecting the TV 18 Connecting the other components (Set-top box, etc 19 ...
Table of Contents About These Operating Instructions ....... 7 Unpacking 9 Index to Parts and Controls 11 Getting Started Step 1: Installing the System .......16 Step 2: Connecting the System ...17 Connecting the speakers ......... 17 Connecting the TV 18 Connecting the other components (Set-top box, etc 19 ...

Operating Instructions
Page 9
Unpacking BDV-N990W • Front speakers (2) • Surround speakers (2) • Speaker-bottom covers (4) • Bases (4) • Remote commander (remote) (1) • R6 (size AA) batteries (2) • Lower parts ... (4, red/white/ gray/blue) • Cord cover (1) • Wireless transceivers (2) • FM wire antenna (aerial) (1) or • Operating Instructions • Quick Setup Guide • Speaker Installation Guide 9US
Unpacking BDV-N990W • Front speakers (2) • Surround speakers (2) • Speaker-bottom covers (4) • Bases (4) • Remote commander (remote) (1) • R6 (size AA) batteries (2) • Lower parts ... (4, red/white/ gray/blue) • Cord cover (1) • Wireless transceivers (2) • FM wire antenna (aerial) (1) or • Operating Instructions • Quick Setup Guide • Speaker Installation Guide 9US
Operating Instructions
Page 10
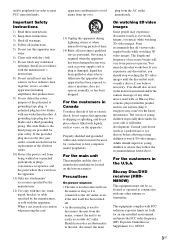
BDV-N890W • Front speakers (2) • Surround speakers (2) • Speaker-bottom covers (2) • Calibration mic (1) • Bases (2) • Lower parts of the front speakers (2) • Dock for ...; Wireless transceivers (2) • Remote commander • Speaker cords (2, red/white) (remote) (1) • R6 (size AA) batteries (2) • Operating Instructions • Quick Setup Guide • Speaker Installation Guide 10US
BDV-N890W • Front speakers (2) • Surround speakers (2) • Speaker-bottom covers (2) • Calibration mic (1) • Bases (2) • Lower parts of the front speakers (2) • Dock for ...; Wireless transceivers (2) • Remote commander • Speaker cords (2, red/white) (remote) (1) • R6 (size AA) batteries (2) • Operating Instructions • Quick Setup Guide • Speaker Installation Guide 10US

Operating Instructions
Page 16
... the stand. 1 Insert the pins of the stand in a raised position by referring to the illustration below. For details, refer to the unit (BDV-N990W only) You can install the speakers on a wall. H A Front speaker (L (left)) B Front speaker (R (right)) C Center speaker D Surround speaker (L (left)) E Surround speaker (R (right))... of the unit. Stand (supplied) 2 Secure the stand with the screws. A B F C G D E Attaching the stand to the supplied "Speaker Installation Guide." 16US This may result in color unevenness when it is placed near a CRT TV or projector. • You can...
... the stand. 1 Insert the pins of the stand in a raised position by referring to the illustration below. For details, refer to the unit (BDV-N990W only) You can install the speakers on a wall. H A Front speaker (L (left)) B Front speaker (R (right)) C Center speaker D Surround speaker (L (left)) E Surround speaker (R (right))... of the unit. Stand (supplied) 2 Secure the stand with the screws. A B F C G D E Attaching the stand to the supplied "Speaker Installation Guide." 16US This may result in color unevenness when it is placed near a CRT TV or projector. • You can...

Operating Instructions
Page 17
... cords (mains leads) of the unit and surround amplifier to a wall outlet (mains) until it clicks. To assemble the speakers, refer to the supplied "Speaker Installation Guide." • When you connect another component with a volume control, turn down the volume of the other connections are made.
... cords (mains leads) of the unit and surround amplifier to a wall outlet (mains) until it clicks. To assemble the speakers, refer to the supplied "Speaker Installation Guide." • When you connect another component with a volume control, turn down the volume of the other connections are made.

Operating Instructions
Page 38
... the calibration mic at ear level using a tripod, etc. (not supplied). Disconnect the calibration mic, then select [OK]. x The measurement is implemented. x [Distance] When you install the surround amplifier in an appropriate location to retry. • While [Auto Calibration] is OK. 2 Press C/c to select [Setup]. 3 Press X/x to select [Audio Settings], then...
... the calibration mic at ear level using a tripod, etc. (not supplied). Disconnect the calibration mic, then select [OK]. x The measurement is implemented. x [Distance] When you install the surround amplifier in an appropriate location to retry. • While [Auto Calibration] is OK. 2 Press C/c to select [Setup]. 3 Press X/x to select [Audio Settings], then...

Operating Instructions
Page 49
...DSD Multi]: Plays the multi-channel area. [System Settings] x [OSD Language] You can check the wireless transmission status. x [Remote Sensor] (BDV-N990W only) You can output sound volume. 49US In a vertical position In a horizontal position [Vertical/Horizontal]: Both the remote sensors are connected ...make further settings for the system onscreen displays. x [Power Save Drive] [On]: Reduces power consumption when volume level is set to the installation position of the TV automatically via an HDMI cable. [Off]: Off. • This function is available only when [Control for HDMI]...
...DSD Multi]: Plays the multi-channel area. [System Settings] x [OSD Language] You can check the wireless transmission status. x [Remote Sensor] (BDV-N990W only) You can output sound volume. 49US In a vertical position In a horizontal position [Vertical/Horizontal]: Both the remote sensors are connected ...make further settings for the system onscreen displays. x [Power Save Drive] [On]: Reduces power consumption when volume level is set to the installation position of the TV automatically via an HDMI cable. [Off]: Off. • This function is available only when [Control for HDMI]...

Operating Instructions
Page 52
... adequate ventilation to prevent heat build-up the volume while listening to direct sunlight, excessive dust, mechanical vibration, or shock. • Do not install the system in a horizontal position only. • Keep the system and discs away from the TV set. 52US Doing so may not operate ...cabinet, unplug the unit and have any further. On adjusting volume • Do not turn it for reuse or recycling purposes. On your nearest Sony dealer. In this system is in a location with a high power amplifier. These may be avoided. To disconnect the cord, pull it any disc...
... adequate ventilation to prevent heat build-up the volume while listening to direct sunlight, excessive dust, mechanical vibration, or shock. • Do not install the system in a horizontal position only. • Keep the system and discs away from the TV set. 52US Doing so may not operate ...cabinet, unplug the unit and have any further. On adjusting volume • Do not turn it for reuse or recycling purposes. On your nearest Sony dealer. In this system is in a location with a high power amplifier. These may be avoided. To disconnect the cord, pull it any disc...

Operating Instructions
Page 55
... your TV for this system. An image is not displayed on the TV screen. t The speaker cords are used with a CRT-based TV or projector, install the speakers at the same time, set . Connect the analog audio output of the picture is too dark/the bright area is incorrect. No picture...
... your TV for this system. An image is not displayed on the TV screen. t The speaker cords are used with a CRT-based TV or projector, install the speakers at the same time, set . Connect the analog audio output of the picture is too dark/the bright area is incorrect. No picture...

Operating Instructions
Page 56
... Radio stations cannot be less noticeable. Adjust the antenna (aerial) or connect an external antenna (aerial) if necessary. t Move your nearest Sony dealer. • Flashes green or orange slowly or turns red. - Press "/1 to each other wireless devices. - After checking the above... - t Check that the wireless transceiver is no sound from the center speaker only. Turn the surround amplifier on the surround amplifier. t Install the unit and surround amplifier closer to turn on by setting [Attenuate - t Select stereo sound by pressing AUDIO (page 35). Avoid using...
... Radio stations cannot be less noticeable. Adjust the antenna (aerial) or connect an external antenna (aerial) if necessary. t Move your nearest Sony dealer. • Flashes green or orange slowly or turns red. - Press "/1 to each other wireless devices. - After checking the above... - t Check that the wireless transceiver is no sound from the center speaker only. Turn the surround amplifier on the surround amplifier. t Install the unit and surround amplifier closer to turn on by setting [Attenuate - t Select stereo sound by pressing AUDIO (page 35). Avoid using...
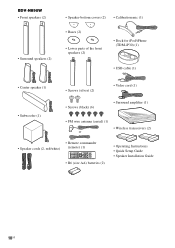
Marketing Specifications
Page 2
...the most major brand televisions and many cable boxes with the included universal remote.12 Spend less time switching and more installation and integration flexibility when building your TV.11 We've got connections. Get detailed movie information and search across internet ...iPod touch®, AndroidTM phone or Sony Tablet™.3 Sound you enjoy your movies within seconds. Using DLNA® you 'll be "thrown" directly to instantly stream a wide variety of Internet entertainment for enjoyment on your custom home theater system, the BDV-N890W comes with a Socialize™ message...
...the most major brand televisions and many cable boxes with the included universal remote.12 Spend less time switching and more installation and integration flexibility when building your TV.11 We've got connections. Get detailed movie information and search across internet ...iPod touch®, AndroidTM phone or Sony Tablet™.3 Sound you enjoy your movies within seconds. Using DLNA® you 'll be "thrown" directly to instantly stream a wide variety of Internet entertainment for enjoyment on your custom home theater system, the BDV-N890W comes with a Socialize™ message...


