Operating Instructions
Page 1
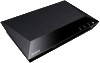
Before using this player, please read these instruction carefully. 4-442-380-11(2) Blu-ray Disc™ / DVD Player Operating Instructions Thank you for your purchase. Getting Started Playback Settings and Adjustments Additional Information BDP-S1100/BX110
Before using this player, please read these instruction carefully. 4-442-380-11(2) Blu-ray Disc™ / DVD Player Operating Instructions Thank you for your purchase. Getting Started Playback Settings and Adjustments Additional Information BDP-S1100/BX110
Operating Instructions
Page 3
...product is damaged, liquid has been spilled or objects have fallen into the apparatus, the apparatus has been exposed to comply with the limits set out in the player. • Do not place the player on a soft surface such as a rug that to them whenever you call..., bracket, or table specified by one wider than 3 metres. Increase the separation between the equipment and receiver. - Connect the equipment into your Sony dealer regarding this product is connected. - Consult the dealer or an experienced radio/ TV technician for replacement of the obsolete outlet. 10)Protect the...
...product is damaged, liquid has been spilled or objects have fallen into the apparatus, the apparatus has been exposed to comply with the limits set out in the player. • Do not place the player on a soft surface such as a rug that to them whenever you call..., bracket, or table specified by one wider than 3 metres. Increase the separation between the equipment and receiver. - Connect the equipment into your Sony dealer regarding this product is connected. - Consult the dealer or an experienced radio/ TV technician for replacement of the obsolete outlet. 10)Protect the...
Operating Instructions
Page 7
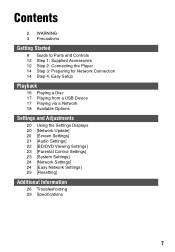
... 16 Playing a Disc 17 Playing from a USB Device 17 Playing via a Network 18 Available Options Settings and Adjustments 20 Using the Settings Displays 20 [Network Update] 20 [Screen Settings] 21 [Audio Settings] 22 [BD/DVD Viewing Settings] 23 [Parental Control Settings] 23 [System Settings] 24 [Network Settings] 24 [Easy Network Settings] 25 [Resetting] Additional Information 26 Troubleshooting 29 Specifications 7
... 16 Playing a Disc 17 Playing from a USB Device 17 Playing via a Network 18 Available Options Settings and Adjustments 20 Using the Settings Displays 20 [Network Update] 20 [Screen Settings] 21 [Audio Settings] 22 [BD/DVD Viewing Settings] 23 [Parental Control Settings] 23 [System Settings] 24 [Network Settings] 24 [Easy Network Settings] 25 [Resetting] Additional Information 26 Troubleshooting 29 Specifications 7

Operating Instructions
Page 8
Use the tactile dot as a reference when operating the player. F (USB) jack Connect a USB device to Parts and Controls Front panel z The N button has a tactile dot. Getting Started Guide to this jack. G Remote sensor To lock the disc tray (Child Lock) You can lock the disc tray to lock or unlock the tray. 8 While the player is turned on, hold down the N button on the player, or sets to standby mode. A Disc tray B Z (open/close) C N (play) D x (stop) E [/1 (on/standby) / Power indicator Turns on the player for more than 10 seconds to avoid accidental opening of the tray.
Use the tactile dot as a reference when operating the player. F (USB) jack Connect a USB device to Parts and Controls Front panel z The N button has a tactile dot. Getting Started Guide to this jack. G Remote sensor To lock the disc tray (Child Lock) You can lock the disc tray to lock or unlock the tray. 8 While the player is turned on, hold down the N button on the player, or sets to standby mode. A Disc tray B Z (open/close) C N (play) D x (stop) E [/1 (on/standby) / Power indicator Turns on the player for more than 10 seconds to avoid accidental opening of the tray.

Operating Instructions
Page 10
.... Use the tactile dot as a reference when operating the player. 10 The player automatically returns to standby mode If any button on the player, or sets to CD-DA (Music CD) only. INPUT Switches between TV and other input sources. -TV- [/1 (on/standby) Turns on the TV, or... sets to standby mode. C Color buttons (YELLOW/ BLUE/RED/GREEN) Shortcut keys for more than 30 minutes, the player automatically returns to standby mode. [/1 (on/standby) ...
.... Use the tactile dot as a reference when operating the player. 10 The player automatically returns to standby mode If any button on the player, or sets to CD-DA (Music CD) only. INPUT Switches between TV and other input sources. -TV- [/1 (on/standby) Turns on the TV, or... sets to standby mode. C Color buttons (YELLOW/ BLUE/RED/GREEN) Shortcut keys for more than 30 minutes, the player automatically returns to standby mode. [/1 (on/standby) ...
Operating Instructions
Page 11
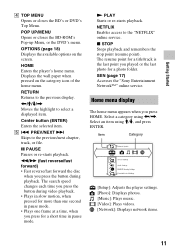
.... • Plays in slow motion, when pressed for a short time in pause mode. • Plays one second in pause mode. SEN (page 17) Accesses the "Sony Entertainment Network™" online service. Home menu display The home menu appears when you press for more than one frame at a time, when you press...
.... • Plays in slow motion, when pressed for a short time in pause mode. • Plays one second in pause mode. SEN (page 17) Accesses the "Sony Entertainment Network™" online service. Home menu display The home menu appears when you press for more than one frame at a time, when you press...
Operating Instructions
Page 13
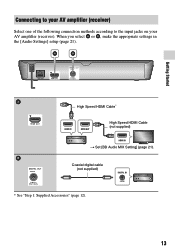
When you select A or B, make the appropriate settings in the [Audio Settings] setup (page 21). Getting Started Connecting to your AV amplifier (receiver) Select one of the following connection methods according to the input jacks on your AV amplifier (receiver). High Speed HDMI Cable* High Speed HDMI Cable (not supplied) t Set [BD Audio MIX Setting] (page 21). Coaxial digital cable (not supplied) * See "Step 1: Supplied Accessories" (page 12). 13
When you select A or B, make the appropriate settings in the [Audio Settings] setup (page 21). Getting Started Connecting to your AV amplifier (receiver) Select one of the following connection methods according to the input jacks on your AV amplifier (receiver). High Speed HDMI Cable* High Speed HDMI Cable (not supplied) t Set [BD Audio MIX Setting] (page 21). Coaxial digital cable (not supplied) * See "Step 1: Supplied Accessories" (page 12). 13
Operating Instructions
Page 14
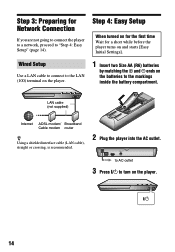
Step 3: Preparing for a short while before the player turns on and starts [Easy Initial Settings]. LAN cable (not supplied) Internet ADSL modem/ Broadband Cable modem router z Using a shielded interface cable (LAN cable), straight or crossing, is recommended. 2 Plug the player ...
Step 3: Preparing for a short while before the player turns on and starts [Easy Initial Settings]. LAN cable (not supplied) Internet ADSL modem/ Broadband Cable modem router z Using a shielded interface cable (LAN cable), straight or crossing, is recommended. 2 Plug the player ...
Operating Instructions
Page 15
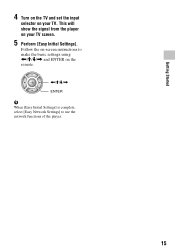
This will show the signal from the player on your TV. Getting Started 4 Turn on the TV and set the input selector on your TV screen. 5 Perform [Easy Initial Settings]. Follow the on-screen instructions to make the basic settings using
This will show the signal from the player on your TV. Getting Started 4 Turn on the TV and set the input selector on your TV screen. 5 Perform [Easy Initial Settings]. Follow the on-screen instructions to make the basic settings using
Operating Instructions
Page 16
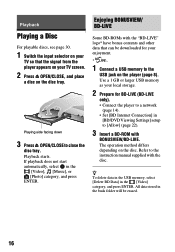
... in the buda folder will be downloaded for BD-LIVE (BD-LIVE only). • Connect the player to a network (page 14). • Set [BD Internet Connection] in [BD/DVD Viewing Settings] setup to [Allow] (page 22). 3 Insert a BD-ROM with BONUSVIEW/BD-LIVE. Playback Playing a Disc For playable discs, see page 30...
... in the buda folder will be downloaded for BD-LIVE (BD-LIVE only). • Connect the player to a network (page 14). • Set [BD Internet Connection] in [BD/DVD Viewing Settings] setup to [Allow] (page 22). 3 Insert a BD-ROM with BONUSVIEW/BD-LIVE. Playback Playing a Disc For playable discs, see page 30...
Operating Instructions
Page 17
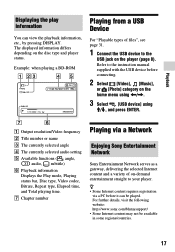
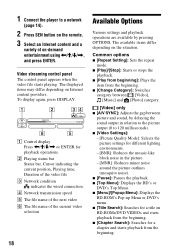
Example: when playing a BD-ROM Playing from a USB Device For "Playable types of files", see page 31. 1 Connect the USB device to the instruction manual supplied with the USB device before connecting. 2 Select [Video], [Music], or [Photo] category on the player (page 8). Refer to the USB jack on the home menu using The displayed information differs depending on the disc type and player status. Playback Displaying the play information You can view the playback information, etc., by pressing DISPLAY.
Example: when playing a BD-ROM Playing from a USB Device For "Playable types of files", see page 31. 1 Connect the USB device to the instruction manual supplied with the USB device before connecting. 2 Select [Video], [Music], or [Photo] category on the player (page 8). Refer to the USB jack on the home menu using The displayed information differs depending on the disc type and player status. Playback Displaying the play information You can view the playback information, etc., by pressing DISPLAY.
Operating Instructions
Page 18
1 Connect the player to a network (page 14). 2 Press SEN button on the remote. 3 Select an Internet content and a variety of on-demand entertainment using
1 Connect the player to a network (page 14). 2 Press SEN button on the remote. 3 Select an Internet content and a variety of on-demand entertainment using

Operating Instructions
Page 19
...-ROMs/DVD VIDEOs. x [Subtitle]: Switches the subtitle language when multilingual subtitles are recorded on BD-ROMs/DVD VIDEOs. x [Slideshow Effect]: Sets the effect for slideshows. x [Rotate Left]: Rotates the photo counterclockwise by 90 degrees. 19 x [Change Display]: Switches between [Grid View... a slideshow. x [Slideshow BGM]: - [Off]: Turns off the function. - [My Music from USB]: Sets the music files registered in [Add Slideshow BGM]. - [Play from Music CD]: Sets the tracks in the USB memory as slideshow background music (BGM). [Photo] only x [Slideshow Speed]: Changes ...
...-ROMs/DVD VIDEOs. x [Subtitle]: Switches the subtitle language when multilingual subtitles are recorded on BD-ROMs/DVD VIDEOs. x [Slideshow Effect]: Sets the effect for slideshows. x [Rotate Left]: Rotates the photo counterclockwise by 90 degrees. 19 x [Change Display]: Switches between [Grid View... a slideshow. x [Slideshow BGM]: - [Off]: Turns off the function. - [My Music from USB]: Sets the music files registered in [Add Slideshow BGM]. - [Play from Music CD]: Sets the tracks in the USB memory as slideshow background music (BGM). [Photo] only x [Slideshow Speed]: Changes ...
Operating Instructions
Page 20
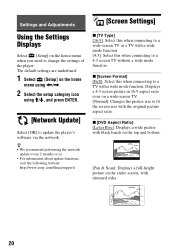
The default settings are underlined. 1 Select [Setup] on the home menu when you need to change the settings of the player. Settings and Adjustments [Screen Settings] Using the Settings Displays Select [Setup] on the home menu using
The default settings are underlined. 1 Select [Setup] on the home menu when you need to change the settings of the player. Settings and Adjustments [Screen Settings] Using the Settings Displays Select [Setup] on the home menu using
Operating Instructions
Page 21
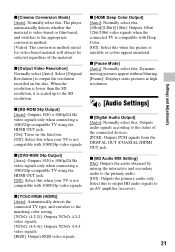
...is not compatible with 1080/24p video signals. Dynamic moving pictures appear without blurring. [Frame]: Displays static pictures at high resolution. [Audio Settings] x [Digital Audio Output] [Auto]: Normally select this . x [HDMI Deep Color Output] [Auto]: Normally select this to output HD ... only. x [YCbCr/RGB (HDMI)] [Auto]: Automatically detects the connected TV type, and switches to an AV amplifier (receiver). 21 Settings and Adjustments Outputs audio signals according to output the resolution recorded on the function. [Off]: Select this when your TV is not compatible ...
...is not compatible with 1080/24p video signals. Dynamic moving pictures appear without blurring. [Frame]: Displays static pictures at high resolution. [Audio Settings] x [Digital Audio Output] [Auto]: Normally select this . x [HDMI Deep Color Output] [Auto]: Normally select this to output HD ... only. x [YCbCr/RGB (HDMI)] [Auto]: Automatically detects the connected TV type, and switches to an AV amplifier (receiver). 21 Settings and Adjustments Outputs audio signals according to output the resolution recorded on the function. [Off]: Select this when your TV is not compatible ...
Operating Instructions
Page 22
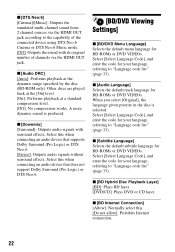
... Internet Connection] [Allow]: Normally select this when connecting an audio device that does not support Dolby Surround (Pro Logic) or DTS Neo:6. [BD/DVD Viewing Settings] x [BD/DVD Menu Language] Selects the default menu language for BD-ROMs or DVD VIDEOs. x [BD Hybrid Disc Playback Layer] [BD]: Plays BD layer. [DVD...
... Internet Connection] [Allow]: Normally select this when connecting an audio device that does not support Dolby Surround (Pro Logic) or DTS Neo:6. [BD/DVD Viewing Settings] x [BD/DVD Menu Language] Selects the default menu language for BD-ROMs or DVD VIDEOs. x [BD Hybrid Disc Playback Layer] [BD]: Plays BD layer. [DVD...
Operating Instructions
Page 23
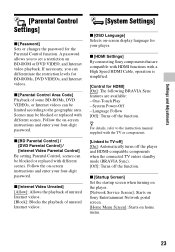
...Control] / [Internet Video Parental Control] By setting Parental Control, scenes can be limited according to set a restriction on home menu. 23 x [Startup Screen] Set the startup screen when turning on the player. [Network Service Screen]: Starts on Sony Entertainment Network portal screen. [Home Menu Screen...videos can differentiate the restriction levels for HDMI] [On]: The following BRAVIA Sync features are available: - x [HDMI Settings] By connecting Sony components that are compatible with HDMI functions with the TV or components. [Linked to the instruction manual supplied with a ...
...Control] / [Internet Video Parental Control] By setting Parental Control, scenes can be limited according to set a restriction on home menu. 23 x [Startup Screen] Set the startup screen when turning on the player. [Network Service Screen]: Starts on Sony Entertainment Network portal screen. [Home Menu Screen...videos can differentiate the restriction levels for HDMI] [On]: The following BRAVIA Sync features are available: - x [HDMI Settings] By connecting Sony components that are compatible with HDMI functions with the TV or components. [Linked to the instruction manual supplied with a ...
Operating Instructions
Page 24
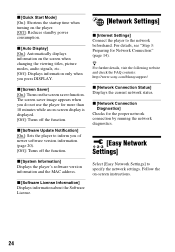
...time when turning on -screen instructions. 24 z For further details, visit the following website and check the FAQ contents: http://www.sony.com/bluraysupport/ x [Network Connection Status] Displays the current network status. x [Network Connection Diagnostics] Checks for the proper network connection ...by running the network diagnostics. [Easy Network Settings] Select [Easy Network Settings] to inform you press DISPLAY. For details, see "Step 3: Preparing for more than 10 minutes while an on-...
...time when turning on -screen instructions. 24 z For further details, visit the following website and check the FAQ contents: http://www.sony.com/bluraysupport/ x [Network Connection Status] Displays the current network status. x [Network Connection Diagnostics] Checks for the proper network connection ...by running the network diagnostics. [Easy Network Settings] Select [Easy Network Settings] to inform you press DISPLAY. For details, see "Step 3: Preparing for more than 10 minutes while an on-...
Operating Instructions
Page 25
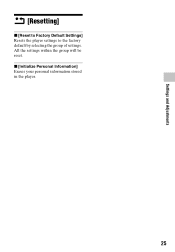
Settings and Adjustments [Resetting] x [Reset to Factory Default Settings] Resets the player settings to the factory default by selecting the group of settings. x [Initialize Personal Information] Erases your personal information stored in the player. 25 All the settings within the group will be reset.
Settings and Adjustments [Resetting] x [Reset to Factory Default Settings] Resets the player settings to the factory default by selecting the group of settings. x [Initialize Personal Information] Erases your personal information stored in the player. 25 All the settings within the group will be reset.
Operating Instructions
Page 26
...settings in the [Screen Settings] setup (page 21). , For BD-ROMs, check the [BD-ROM 24p Output] setting in the [Screen Settings] setup (page 21). , For DVD-ROMs, check the [DVD-ROM 24p Output] setting in [HDMI Settings] is set... to [On] (page 23), the display language on the screen automatically switches according to the language setting... in the [Screen Settings] setup (page 21...jack, check the audio settings (page 21). , ...you change the setting on again. 3Disconnect...
...settings in the [Screen Settings] setup (page 21). , For BD-ROMs, check the [BD-ROM 24p Output] setting in the [Screen Settings] setup (page 21). , For DVD-ROMs, check the [DVD-ROM 24p Output] setting in [HDMI Settings] is set... to [On] (page 23), the display language on the screen automatically switches according to the language setting... in the [Screen Settings] setup (page 21...jack, check the audio settings (page 21). , ...you change the setting on again. 3Disconnect...


