
Instruction Manual 2
Page 4
...NEEDLE THREADER 15 DRAWING UP THE LOWER THREAD 16 CUTTING THE THREAD 16 TWO-STEP PRESSER FOOT LIFTER 17 ADJUSTING PRESSER FOOT PRESSURE 17 STARTING SEWING 18 Start/stop button 18 Foot control 18 THREAD TENSION 19 CHANGING THE PRESSER FOOT 20 PRESSER FOOT CHART 21 MATCHING NEEDLE/ FABRIC/ THREAD 22 ...pattern selection and number buttons 30 Edit button 31 Memory button 31 Clear button 31 SEWING TIPS 32-33 Sewing corners 32 Reverse 32 Free arm 32 Installing the extension table 33 Sewing on heavy fabric 33 NEEDLE POSITION AND STITCH LENGTH 34 ZIGZAG STITCHES 34 STRETCH ...
...NEEDLE THREADER 15 DRAWING UP THE LOWER THREAD 16 CUTTING THE THREAD 16 TWO-STEP PRESSER FOOT LIFTER 17 ADJUSTING PRESSER FOOT PRESSURE 17 STARTING SEWING 18 Start/stop button 18 Foot control 18 THREAD TENSION 19 CHANGING THE PRESSER FOOT 20 PRESSER FOOT CHART 21 MATCHING NEEDLE/ FABRIC/ THREAD 22 ...pattern selection and number buttons 30 Edit button 31 Memory button 31 Clear button 31 SEWING TIPS 32-33 Sewing corners 32 Reverse 32 Free arm 32 Installing the extension table 33 Sewing on heavy fabric 33 NEEDLE POSITION AND STITCH LENGTH 34 ZIGZAG STITCHES 34 STRETCH ...
Instruction Manual 2
Page 16
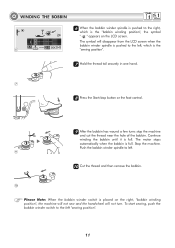
...winder switch to the left , which is full. Push the bobbin winder spindle to left. 9 10 Cut the thread and then remove the bobbin. 10 Please Note: When the bobbin winder switch is the 6 "sewing position". 7 Hold the thread tail securely in one hand. 7 8 Press the Start/stop button or... the foot control. 8 9 After the bobbin has wound a few turns stop the machine and cut the thread near the hole of the bobbin. WINDING THE BOBBIN...
...winder switch to the left , which is full. Push the bobbin winder spindle to left. 9 10 Cut the thread and then remove the bobbin. 10 Please Note: When the bobbin winder switch is the 6 "sewing position". 7 Hold the thread tail securely in one hand. 7 8 Press the Start/stop button or... the foot control. 8 9 After the bobbin has wound a few turns stop the machine and cut the thread near the hole of the bobbin. WINDING THE BOBBIN...

Instruction Manual 2
Page 46
Use a pin as shown. 77 Cut the center of the presser foot to cut too much. 41 BUTTONHOLE SEWING B-17 B-18 B-19 B-20 B-21 B-22 B-23 B-24 B-25 B-26 6 7 66 Buttonholes are sewn from the front of the buttonhole being careful not to the back, as a stopper at the bar tack so you do not cut any stitches on either side.
Use a pin as shown. 77 Cut the center of the presser foot to cut too much. 41 BUTTONHOLE SEWING B-17 B-18 B-19 B-20 B-21 B-22 B-23 B-24 B-25 B-26 6 7 66 Buttonholes are sewn from the front of the buttonhole being careful not to the back, as a stopper at the bar tack so you do not cut any stitches on either side.

Instruction Manual 2
Page 63
... slip the thread under the presser foot. If the needle is not placed OVER the first metal platform. 5. Lower the presser foot and sew. Use double-faced (basting) tape to hold the fabric pieces together for sewing, which will help feed difficult-to sew. 2. Cut a 1/2" wide by 1"deep notch... at the top edge of the foot before starting to -sew fabrics such as chiffon and silk. ...
... slip the thread under the presser foot. If the needle is not placed OVER the first metal platform. 5. Lower the presser foot and sew. Use double-faced (basting) tape to hold the fabric pieces together for sewing, which will help feed difficult-to sew. 2. Cut a 1/2" wide by 1"deep notch... at the top edge of the foot before starting to -sew fabrics such as chiffon and silk. ...


