
Singer H74 Support Question
Singer H74 Support Question
Find answers below for this question about Singer H74.Need a Singer H74 manual? We have 2 online manuals for this item!
Question posted by omaatir on February 12th, 2014
How To Thread A Singer Sewing Machine H74
The person who posted this question about this Singer product did not include a detailed explanation. Please use the "Request More Information" button to the right if more details would help you to answer this question.
Current Answers
Related Singer H74 Manual Pages
Instruction Manual 2 - Page 3

... unplug by the manufacturer as
threading needle, changing needle, threading bobbin, changing presser foot or changing the light. 10.
Close attention is being administered. 14. Use only the attachments recommended by pulling on the foot controller. 19. Do not pull or push fabric while stitching. Switch the sewing machine off ("O") when making any opening...
Instruction Manual 2 - Page 4
... POWER SOURCE 9 Connecting the machine 9 WINDING THE BOBBIN 10-11 Bobbin winding 10-11 INSERTING THE BOBBIN 12 THREADING THE UPPER THREAD 13-14 USING THE NEEDLE THREADER 15 DRAWING UP THE LOWER THREAD 16 CUTTING THE THREAD 16 TWO-STEP PRESSER FOOT LIFTER 17 ADJUSTING PRESSER FOOT PRESSURE 17 STARTING SEWING 18 Start/stop button...
Instruction Manual 2 - Page 5
...HEMMING 49 CORDING 50 Single cording 50 Triple cording 50 SATIN STITCH SEWING 51 EDGE/QUILTING GUIDE 52 GATHERING 53 SMOCKING 54 FREE MOTION SEWING 55-56 Darning 55 Embroidery 56 Monogramming 56 WALKING FOOT 57 ...72 MAINTENANCE 73-74 Cleaning the screen 73 Cleaning the sewing machine surface 73 Cleaning the hook 73-74 TROUBLE SHOOTING GUIDE 75-76 STITCH ADJUSTMENT REFERENCE CHART ...
Instruction Manual 2 - Page 6
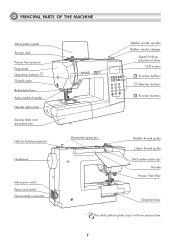
PRINCIPAL PARTS OF THE MACHINE
Stitch pattern plate Tension dial Presser foot pressure Face plate Operation buttons A Thread cutter Buttonhole lever Auto needle threader Needle plate cover
Sewing table and accessory box
Hole for Auxiliary spool pin
Handwheel
Main power switch Power cord socket Foot controller connector
Bobbin winder spindle Bobbin winder stopper
...
Instruction Manual 2 - Page 7
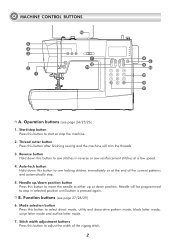
Thread cutter button Press this button to adjust the width of the current patterns and automatically stop in selected position until button is pressed again. Function buttons (see page 24/25/26)
1. MACHINE CONTROL BUTTONS
5 4 3
2 1
16
67 12 123
1
2
3
4
5
6
7
8
9
0
8 6
9 14
15
10 11
A. B. Stitch width adjustment buttons Press this button after finishing sewing and...
Instruction Manual 2 - Page 13
...(3x) Screwdriver (L & S) Pack of needles
H1D0083210(L) TA10943210(S) 006008001
006084009
006012008
006V880010
Spool pin felt
006015009
Auxiliary spool pin Sewing machine dust cover
H1D0073210
020H7A0001
Extension table
H7A0754210
SINGER style 2025 twin needle
006161008
Straight Stitch Foot
P 006916008
Darning/ Embroidery foot
006016008
Walking foot
0061850081
Cording foot
M 006813008...
Instruction Manual 2 - Page 16
... the bobbin has wound a few turns stop the machine
and cut the thread near the hole of the bobbin. Stop the machine. Continue winding the bobbin until it is the "bobbin winding position", the symbol " " appears on the right, "bobbin winding position", the machine will not sew and the handwheel will disappear from the LCD...
Instruction Manual 2 - Page 23
... to the power source. Unplug the power cord when the machine is unplugged from the machine.
Foot control
With the sewing machine turned off, insert the foot control plug into its connector on the sewing machine, and then slowly depress the foot control to stop the sewing machine. Release the foot control to start of the speed limiting...
Instruction Manual 2 - Page 29
... be disconnected to complete this button after finishing sewing and the machine will rotate slowly at the beginning of sewing. Press this operation. OPERATION BUTTONS
Needle up/down position button
Auto-lock button Reverse button Thread cutter button
Start/stop button
Start/stop button Thread cutter button
The machine will start running when start/stop button...
Instruction Manual 2 - Page 37
... and resume sewing.
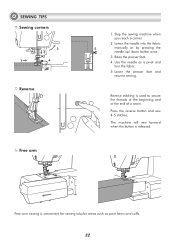
SEWING TIPS Sewing corners
3 2
1
4
Reverse
Free arm
1. Use the needle as pant hems and cuffs.
32 Free-arm sewing is released. Raise the presser foot.
4. Reverse stitching is used to secure the threads at the beginning and at the end of a seam. Press the reverse button and sew 4-5 stitches. Stop the sewing machine when you...
Instruction Manual 2 - Page 60
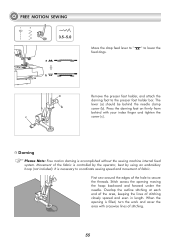
... even in length. Stitch across the opening is necessary to coordinate sewing speed and movement of the hole to secure the threads. Overlap the outline stitching at each end of the area, keeping the lines of the fabric is accomplished without the sewing machine internal feed system. The lever (a) should be behind with crosswise...
Instruction Manual 2 - Page 62
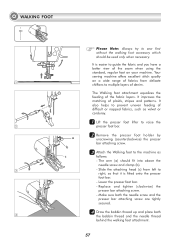
... and place both
4
the bobbin thread and the needle thread
behind the walking foot attachment.
57 It also helps to prevent uneven feeding of fabrics from left to
right, so that it is fitted onto the presser
foot bar.
- Your
sewing machine offers excellent stitch quality
1
on your machine. WALKING FOOT
1
Please Note: Always try...
Instruction Manual 2 - Page 70
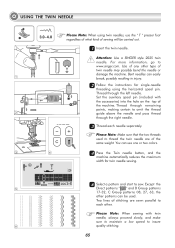
... needle button, and the
machine automatically reduces the maximum width for single-needle
threading using the horizontal spool pin. Thread through remaining
points, making certain to omit the thread
2
guide above the needle and pass thread
through the left needle.
Attention: Use a SINGER style 2025 twin
needle. Thread through the right needle.
33 Thread each other patterns can...
Instruction Manual 2 - Page 71
... the
M
cursor start flashing.
2
33 Press number of
stitches. -
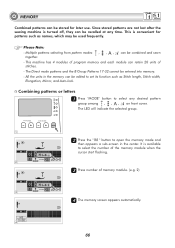
All the units in the center. Please Note: - Since stored patterns are not lost after the sewing machine is available
to set its function such as names, which may be used frequently. Multiple patterns selecting from pattern modes , , , can be combined and sewn...
Instruction Manual 2 - Page 74
...44 Press on the foot control or press the start/stop button to
start the sewing machine.
4
M
55 The screen shows the current sewing pattern.
5
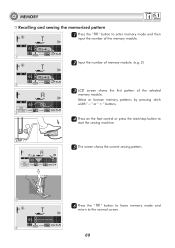
66 Press the "000" button to leave memory mode and
return... to enter memory mode and then
input the number of the selected
memory module. MEMORY
Recalling and sewing the memorized pattern 1 Press the " " button to the normal screen.
6
69
M
1
22...
Instruction Manual 2 - Page 75
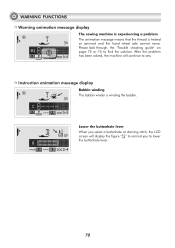
... you select a buttonhole or darning stitch, the LCD screen will continue to sew. After the problem has been solved, the machine will display the figure " " to remind you to find the solution.
WARNING FUNCTIONS Warning animation message display
The sewing machine is experiencing a problem The animation message means that the thread is winding the bobbin.
Instruction Manual 2 - Page 76
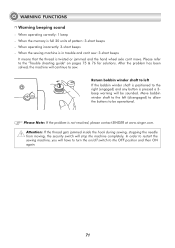
...Attention: If the thread gets jammed inside the hook during sewing, stopping the ...machine will be operational.
When the sewing machine is in trouble and can 't move. Please Note: If the problem is twisted or jammed and the hand wheel axle can 't sew: 3-short beeps
It means that the thread is not resolved, please contact SINGER at www.singer.com. In order to restart the sewing machine...
Instruction Manual 2 - Page 78
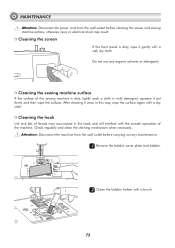
...sewing machine surface
If the surface of the sewing machine is dirty, wipe it gently with a soft, dry cloth.
Cleaning the hook
Lint and bits of thread may result. Attention: Disconnect the machine...
Attention: Disconnect the power cord from the wall outlet before cleaning the screen and sewing machine surface, otherwise injury or electrical shock may accumulate in this way, wipe the surface...
Instruction Manual 2 - Page 80
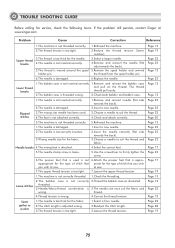
... following items. If the problem still persists, contact Singer at www.singer.com
Problem
Cause
Correction
Reference
1.The machine is not threaded correctly. 1.Rethread the machine. The thread should pull easily.
2.The bobbin case is damaged....side towards the back).
3.Wrong needle size for the fabric.
3.Choose a needle to sew. Page 23
Page 23 Page 22 Page 20 Page 13 Page 23 Page 23
Page ...
Instruction Manual 2 - Page 81
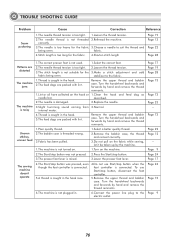
... Page 13
Page 22
Page 28
Patterns are distorted
The machine jams
The machine is noisy
Uneven stitches, uneven feed
The sewing machine doesn't operate
1.The correct presser foot is not used.
1.Select the correct foot.
2.The needle thread tension is too tight. 2.Loosen the thread tension.
3.The stitch length is connected. fabric.
4.Stitch length is...
Similar Questions

C6 Error Continues. Re-threaded The Machine Multiple Times Ensuring The Thread W
have rethreaded the machine sooooo many times following the video to ensure the thread was "under th...
have rethreaded the machine sooooo many times following the video to ensure the thread was "under th...
(Posted by Kblakey11 7 years ago)


Parts
How do I order replacements for my Singer H74 sewing machine?
How do I order replacements for my Singer H74 sewing machine?
(Posted by Anonymous-153883 8 years ago)


Will Singer H74 Sewing Machine Go Into Sewing Machine Table
(Posted by vogelgeos 10 years ago)