Singer One Support Question
Singer One Support Question
Find answers below for this question about Singer One.Need a Singer One manual? We have 19 online manuals for this item!
Question posted by Kblakey11 on August 27th, 2016
C6 Error Continues. Re-threaded The Machine Multiple Times Ensuring The Thread W
have rethreaded the machine sooooo many times following the video to ensure the thread was "under the black thing" and "flossy" to ensure it was in place. I can only take about 6-7 stitches and BAM C6! Frustrated!!
Current Answers
Answer #1: Posted by sinclair5178 on November 13th, 2020 1:06 PM
sinclair5178

Member since:
November 13th, 2020 Points: 0
Member since:
November 13th, 2020 Points: 0
The the same thing was happening to me. I threaded and rethreaded the bobbin and the spool thread to no avail. What finally worked is to very firmly swish the spool thread through the top tension sensor, back and forth a little, then thread as usual. It must not have really caught the spool thread before . This whole problem started when I changed the spool thread so hopefully this is the answer.
Related Singer One Manual Pages
Instruction Manual - Page 26

... zigzag sewing and decorative stitch functions, thread tension should be accomplished with the word "AUTO" exposed on the tension control dial on top of the machine. Helpful Hint: A slight adjustment to remove the foot. 2. BOBBIN TENSION
The bobbin tension has been correctly set at the factory, so you will be less than for straight stitch sewing. Place...
Instruction Manual - Page 58

... for the foot control. Remove foreign particle from machine and rethread.
1. It only indicates the connection or disconnection of main shaft motor. The top thread has broken. Lift presser foot lifter. The foot controller was lowered. Lower presser foot and begin sewing.
The bobbin winder shaft is in the incorrect position...
Instruction Manual 3 - Page 50
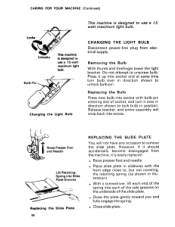
...side grooves on the underside of socket, and turn bulb over in direction shown to remove the slide plate.
Place slide plate in slideway with bulb pin entering slot of the slide plate.
. Replacing the Bulb
Press new ... THE SLIDE PLATE
You will snap back into socket and at same time turn it up into recess. CARING FOR YOUR MACHINE (Continued)
This machine is easily replaced.
.
Instruction Manual 4 - Page 17

... you .
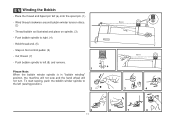
2. For removal of a seam. Do not hold thread end. To start machine. Place threads diagonally under presser foot and cut. Open slide plate and make sure bobbin is empty. Winding Steps Step 1
Step 2
2
r",
Step 3
DO NOT ALLOW THREAD TO WIND BEYOND FULL RING
Step 4
F Cutting Continuous Thread
11 Set pattern-selector release lever by turning it...
Instruction Manual 4 - Page 49
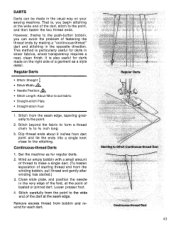
... the dart, stitch to the point, and then fasten the two thread ends. Regular Darts
Starting to make a single dart. (To hasten separation of starting thread end from the winding bobbin, pull thread end gently after winding has started.)
3.
Continuous-thread Darts
1. Lower presser foot.
4.
This method is , you can be made on your sewing machine.
That is...
Instruction Manual 4 - Page 66

... graph paper, if available.
• Place paper under presser foot with tailor's chalk. To assure centered stitching on the fabrics you have correctly guided the paper while sewing, the stitched line will demonstrate to you have sewn along the drawn line, carefully remove paper from under black vertical guideline of special purpose foot.
• Lower...
Instruction Manual 4 - Page 74

...
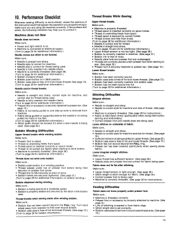
attached. If stitching is irregular, or needle thread breaks: make sure
• Needle is straight.
• Needle size and style are correct for the thread you are using.
• Machine and needle are correctly threaded.
• Bobbin contains thread. • Bobbin-case area is free of lint and
loose thread ends.
• You are correctly placed under presser...
Instruction Manual 5 - Page 13

... winder spindle to left (sewing position).
3
4
5
6
7
8
9
10 Place thread and spool holder onto spool pin (1). For smaller spools of thread place spool holder with small side next to right (5).
- Press bobbin to the left (9) and remove.
2 Please Note:
When the bobbin winder spindle is in "bobbin winding" position, the machine will not sew and the hand wheel...
Instruction Manual 5 - Page 22

... dials. How to choose your pattern
At the start of this book covers the operation of multiple models of sewing machines. In addition to stitch patterns there is also a difference in the stitch display window. As you study the chart on the stitch length dial is red and the "S1" on the right while examining your...
Instruction Manual 5 - Page 29

... pull the fabric edge towards the back.
Set the stitch pattern dial to optional hemmer foot. Begin sewing, guiding the fabric into the scroll on the foot (1). Sewing with the optional hemmer foot
* The hemmer foot is an optional accessory not supplied with your machine. Neaten the edge of the hem, turn under the...
Instruction Manual 6 - Page 29

... and to increase the elasticity of needle.
SEWING BIAS SEAMS
Machine basting is in tensions is found satisfactory for basting. Pivot on the stitch regulator, adjusted by clipping every sixth stitch and withdrawing the long, continuous thread.
These basting stitches can be easily removed by stitch regulating lever, is required. Stop machine when needle is firmer, more even and...
Instruction Manual 11 - Page 18
... is in "bobbin winding" position, the machine will not sew and the hand wheel will not turn. EN Winding the Bobbin
- Place the thread and Spool pin felt (a) onto the spool pin. (1) - Push bobbin spindle to right. (4) - Thread bobbin as illustrated and place on foot control pedal. (6) - To start sewing, push the bobbin winder spindle to the...
Instruction Manual 13 - Page 77
... and presser foot are undamaged. • Threads are correctly placed under presser foot. If the problem still exists, the following checklist may help you are correct for fabric being used . • Machine is correctly threaded. (See page 26 for additional information.)
Needle moves but stitch is being
used . Machine does not Sew
Needle does not move properly under...
Instruction Manual 14 - Page 83
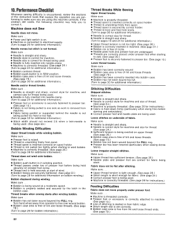
...thread tension is light enough. (See page 36.) • Stitch length is short enough for additional information.)
Stitching Difficulties
Skipped stitches. If the problem still exists, the following checklist may help you are using the machine... thread.
(See page 24.) • Machine is properly threaded. (See page 26 for fabric being used .
Thread breaks when sewing starts after stitching....
Instruction Manual 14 - Page 86
...
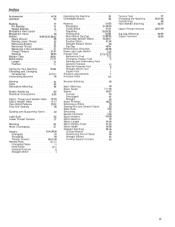
71-77
Length
72
Position
71
Caring for Your Machine Choosing and Changing
Accessories Connecting Machine
79-82
9,10,11 25
Darning
44
Darts
45
Decorative Stitching
46
Elastic Replacing
60
Electrical Connections
5,25
Fabric, Thread and Needle Table Fabric Weight Table Flexi-Stitch Patterns Free-Arm Sewing
18-23 12-17 33,52
78
Guiding...
Instruction Manual 15 - Page 7

...
5.7mm
34
Upper
•0
3.0
0.5
7.0 looper
Four-Thread Ultra-
6 Stretch Mock Safety Stitch
ire
(514)
2.5
2.0
2.5
2.0
Upper looper
35
The thread tension becomes tighter as throughout the operator's manual are turned to suit the fabric and size of no greater than half a number at a time
6 HANDY REFERENCE CHART
Stitch Type
Needle Positions
Tension Dial: Numbers shown are...
Instruction Manual 15 - Page 14

SINGE
6c' 4 0
8 7
0 O
6
0
13 • Thread the top cover thread guide by pulling the thread downward until it slips under thread guide 2 .
• While holding thread with finger, pass it between the tension discs 3 .
3 4
• Thread the looper area of the machine following the orange color coded thread guides ( 4 - 7 ).
Note: Use of tweezers provided in the accessory set to aid in...
Instruction Manual 15 - Page 16

... tweezers provided in the accessory set to aid in threading the looper.
• Grasp the thread with the tweezers 4 cm (1-1/2 inches) from thread guide 7.
• Place the thread with the point of the tweezers slightly under and to the back of the machine following the yellow color coded thread guides 4 - 7 .
• Turn the hand wheel toward you until...
Instruction Manual 18 - Page 30

... make certain it is properly located in between the tension discs 3 .
• Thread the looper area of the machine following the orange color coded thread guides ( 4 - 7 ).
• Thread the hole in threading the looper.
• Pull about 10cm (4 inches) of thread through the looper and place to the back of tweezers provided in the accessory set to aid...
Instruction Manual 18 - Page 34

... of the machine following the yellow color coded thread guides 4 - 7 . • Turn the hand wheel toward you until the lower looper is at the far right.
• Thread the looper ...provided in the accessory set to aid in threading the looper.
• Grasp the thread with the tweezers 4 cm (1-1/2 inches) from thread guide 7.
• Place the thread with the point of the tweezers slightly under ...
Similar Questions

Why Won't My Machine Sew, Checked Bobbin And Retreaded. Has Power Just Will Not
the machine has power and threade correctly and bobbin is in right. It did freeze on me when sewing....
the machine has power and threade correctly and bobbin is in right. It did freeze on me when sewing....
(Posted by alewis41 7 years ago)

I'm Getting C6 Error Message In Singer One Plus.
The manual suggests that I have a broken top thread. I have retreaded several times and it lets me s...
The manual suggests that I have a broken top thread. I have retreaded several times and it lets me s...
(Posted by chockley 8 years ago)

We Are Getting A C6 Error On A Singer One. The Thread Seems To Be Threaded Ok.
(Posted by kfoley22 8 years ago)

As Reparo The C4 Error
As Reparo The C4 Error In My Machine Singer 6160 my machine makes a loud noise, I send a C4 mistak...
As Reparo The C4 Error In My Machine Singer 6160 my machine makes a loud noise, I send a C4 mistak...
(Posted by Anonymous-142756 9 years ago)

C6 Error
I keep getting a c6 error on my singer one machine. I lost my manual and I can't keep figure it out.
I keep getting a c6 error on my singer one machine. I lost my manual and I can't keep figure it out.
(Posted by Kpunderwood 9 years ago)