

Instruction Manual
Page 5
...in embroidery hoop 64 - 65 Using fabric and stabilizer 66 - 69 Preparing the machine before installing the hoop -------- 70 - 71 Attaching and removing embroidery hoop 70 - 71 Installation of software 72 - 75 Operation switches when embroidery unit is attached ----- 76 - 77 Operation switches, Thread...Continuous patterns 50 - 51 Sewing on a button 50 - 51 Buttonholes 52 - 57 Using buttonhole foot, Procedure, Corded buttonholes Buttonholing with Futura Multi hoop 88 - 95 Helpful messages when embroidering 96 - 97 4. STARTING TO SEW Quick reference table of stitch length and width ...
...in embroidery hoop 64 - 65 Using fabric and stabilizer 66 - 69 Preparing the machine before installing the hoop -------- 70 - 71 Attaching and removing embroidery hoop 70 - 71 Installation of software 72 - 75 Operation switches when embroidery unit is attached ----- 76 - 77 Operation switches, Thread...Continuous patterns 50 - 51 Sewing on a button 50 - 51 Buttonholes 52 - 57 Using buttonhole foot, Procedure, Corded buttonholes Buttonholing with Futura Multi hoop 88 - 95 Helpful messages when embroidering 96 - 97 4. STARTING TO SEW Quick reference table of stitch length and width ...

Instruction Manual
Page 10
... is another 12 very useful foot and should be sure they are Class I5 J. 16 FOR EMBROIDERY 19. To install the FUTURA software, refer to the CD insert for needle plate 10. ACCESSORIES FOR SEWING MACHINE 1. Screwdriver for more information. 8 2 3 4 5 6 8 9 10 11 13 14 15 17 18 20 ... Foot that comes on your 7 Sewing machine is called the General Purpose Foot and will be used for the majority of the machine and the software providing powerful option and capabilities. The Satin Foot (14) is "system" of your sewing. Vinyl bag 20. Scissors 22.
... is another 12 very useful foot and should be sure they are Class I5 J. 16 FOR EMBROIDERY 19. To install the FUTURA software, refer to the CD insert for needle plate 10. ACCESSORIES FOR SEWING MACHINE 1. Screwdriver for more information. 8 2 3 4 5 6 8 9 10 11 13 14 15 17 18 20 ... Foot that comes on your 7 Sewing machine is called the General Purpose Foot and will be used for the majority of the machine and the software providing powerful option and capabilities. The Satin Foot (14) is "system" of your sewing. Vinyl bag 20. Scissors 22.
Instruction Manual
Page 74
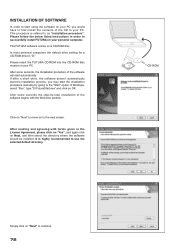
... PC you may start the installation procedure manually by -step installation of the software will start automatically. CD-ROM Simply click on a CD-ROM disc. After some seconds the step-by going to the "Start" option of the CD to your PC. This procedure is "D:" Please insert the FUTURA CD-ROM into the CD...-ROM disc receiver in order to successfully install FUTURA on your PC. The FUTURA software comes on "Next" to as...
... PC you may start the installation procedure manually by -step installation of the software will start automatically. CD-ROM Simply click on a CD-ROM disc. After some seconds the step-by going to the "Start" option of the CD to your PC. This procedure is "D:" Please insert the FUTURA CD-ROM into the CD...-ROM disc receiver in order to successfully install FUTURA on your PC. The FUTURA software comes on "Next" to as...

Instruction Manual
Page 76
... sure the needle has been moved to the highest position by clicking on your computer, but do not open the Futura software. Please wait for proper start the copy and installation of available space on "Cancel". Turn on "Next" to open up your hard disk, an error message will... get a "Transmission Pending" error message. Double click on the Futura Icon on the hard disk. If the installation utility identifies a lack of the FUTURA software files to the given directory on your machine. Next attach the embroidery unit to 100%. The...
... sure the needle has been moved to the highest position by clicking on your computer, but do not open the Futura software. Please wait for proper start the copy and installation of available space on "Cancel". Turn on "Next" to open up your hard disk, an error message will... get a "Transmission Pending" error message. Double click on the Futura Icon on the hard disk. If the installation utility identifies a lack of the FUTURA software files to the given directory on your machine. Next attach the embroidery unit to 100%. The...


