
Singer Futura XL-400 Support Question
Singer Futura XL-400 Support Question
Find answers below for this question about Singer Futura XL-400.Need a Singer Futura XL-400 manual? We have 1 online manual for this item!
Question posted by pathollis on January 27th, 2021
Where Can I Get The Installation Software
I need future xl 400 software
Current Answers
Answer #1: Posted by Odin on January 27th, 2021 6:11 PM
Odin

Member since:
April 10th, 2010 Points: 41,236,680

Member since:
April 10th, 2010 Points: 41,236,680
The latest software (from year 2013) is available from http://www.futura-support.com/products/xl-400/software.
Hope this is useful. Please don't forget to click the Accept This Answer button if you do accept it. My aim is to provide reliable helpful answers, not just a lot of them. See https://www.helpowl.com/profile/Odin.
Related Singer Futura XL-400 Manual Pages
Instruction Manual - Page 2
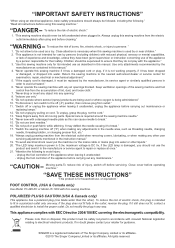
...spray) products are being administered." 10. "Keep fingers away from outlet." 11. "Switch the sewing machine off („0") position, then remove plug from all instructions before
servicing. "CAUTION--
Close
cover
...Never drop or insert any way. If it unattended: - "Do not allow to install the proper outlet. Unplug the foot controller of The Singer Company Limited or its ...
Instruction Manual - Page 5

...
3. PREPARATION FOR EMBROIDERY SEWING Before attaching embroidery unit 58 - 61
Attaching embroidery foot, Inserting the bobbin, Threading the top thread, Extension table, Attaching embroidery unit 62 - 63 Removing embroidery unit 62 - 63 Securing fabric in embroidery hoop 64 - 65 Using fabric and stabilizer 66 - 69 Preparing the machine before installing the hoop -------- 70...
Instruction Manual - Page 10

...
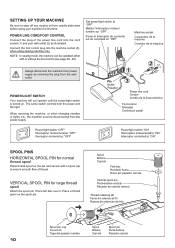
15. Thread spool net (short)
The Foot that comes on your
7
Sewing machine is called the
General Purpose Foot and will
be used for the majority of the machine and the software providing powerful option and capabilities. Embroidery presser foot 23. To install the FUTURA software, refer to the CD insert for needle plate
10. Bobbins
3. Screwdriver...
Instruction Manual - Page 12
... de la machine Conector de la máquina
2 1
Pin Butée Pasador
3
Power line cord Cordon Cordón de la linea eléctrica
Foot control Rhéostat
XL-550-P04-1....servicing the machine, or when changing needles or lights, etc., the machine must be operated either
with a spool cap to wipe off any surplus oil from needle plate area before using sewing machine only.
VERTICAL...
Instruction Manual - Page 24

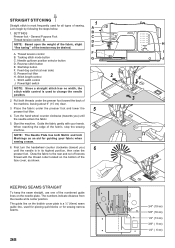
...bottom side of both top and bottom) is in the middle of layers of the machine. It is recommended for straight stitch sewing.
Helpful Hint: A slight adjustment to set at E.
The tension is irregular, you...pied Sujetador prensatelas Do this, however, only after you do not need to adjust it. Push presser foot release button to remove the foot. 2.
STRAIGHT STITCHING
The correct appearance...
Instruction Manual - Page 28

... selected pattern. Width setting for a selected pattern. Stitch length and width/needle position controls
*Auto/Default settings Your sewing machine will sound. At each of stitch length, width and needle position for twin needle sewing can be activated if it will light in green and a beep will produce most of your stitching requirements...
Instruction Manual - Page 30
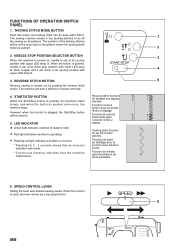
... slowly, and when the button is set at its up -stop .
4. SPEED CONTROL LEVER
Sliding the lever sets desired sewing speed. The sewing machine makes 4 tiny tacking stitches to start.
Red light indicates machine is used, the lever serves as a top speed limiter.
6
28 The position of other stitches Fonction de point de...
Instruction Manual - Page 34
...: The Needle Plate has both threads under the presser foot and lower the presser foot lifter.
5
4. The guide line on the bottom of sewing. Start/stop the sewing machine. Feed dog control (at its highest position, then raise the
6
presser foot. The numbers indicate distance from the needle at rear side) G. When reaching...
Instruction Manual - Page 56

... Marque du tissu Marca de material
mark Marque Marca
* Sewing will be completed automatically in the center of the buttonhole.... tissu Marca de material
9. Place the fabric under the foot. When sewing is finished, use a buttonhole opener to the rear.
7. While holding the top thread, start the machine. Carefully mark the position of the bartack threads.
54
Buttonhole foot alignment...
Instruction Manual - Page 60

... de aguja
Embroidery presser foot Pied presseur de broderie Prensatelas de bordado
58 PREPARATION FOR EMBROIDERY SEWING
BEFORE ATTACHING EMBROIDERY UNIT ATTACHING EMBROIDERY FOOT
Foot holder Support du pied Sujetador prensatelas
Always be sure to machine CAUTION before changing presser foot.
* Raise presser foot lifter.
Turn hand wheel toward you to move...
Instruction Manual - Page 64
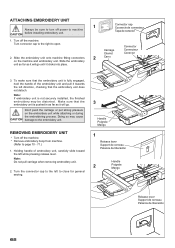
...while pressing release lever. Turn the connector cap to close for general sewing.
3
Handle Poignée Mango
1
Release lever Support de cerceau ...machine. * Remove embroidery hoop from machine.
(Refer to the embroidery unit.
Doing so may be sure to turn off power to open. ATTACHING EMBROIDERY UNIT
1
Always be distorted. Turn connector cap to the right to machine CAUTION before installing...
Instruction Manual - Page 74
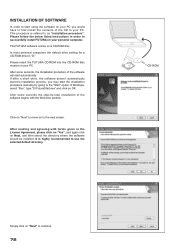
...-ROM
Simply click on "Next" to the "Start" option of Windows, select "Run", type "D:\FuturaStart.exe" and click on OK. It is refered to as "installation procedure". The FUTURA software comes on to the next screen. In most personal computers the default drive setting for a CD-ROM drive is "D:"
Please insert the...
Instruction Manual - Page 76

... start -up the Futura Software.
4. Double click on the Futura Icon on "Next" to free some hard disk space before proceeding with to use your embroidery unit.
3. A progress bar will indicate the stage at which the installation procedure is finalizing all the selections made during the installation set-up your computer and sewing machine.
1. You can always...
Instruction Manual - Page 78
... puntadas hacia atrás
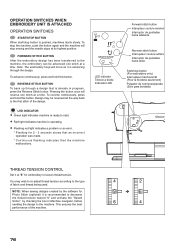
Start/stop sewing and the needle stops at a time.
REVERSE STITCH BUTTON To back up through the design.
NOTE: When sewing designs created by checking the box in.../stop the machine, push the button again and the machine will move as it is recommended to decrease
the thread tension toward "0" and activate the "Speed
limiter", by the software for embroidery ...
Instruction Manual - Page 84

Restart the embroidery machine and continue embroidering. Rethread upper thread, (see page 16 - 17 "Threading the Top Thread...hilo
2. HELPFUL INFORMATION FOR EMBROIDERING WITH FUTURA
1.
Upper thread is not broken. The hoop will move back one stitch at a time.
Computer screen says thread is broken, machine lights are missing
If the embroidery machine detects that the thread has broken, it...
Instruction Manual - Page 86
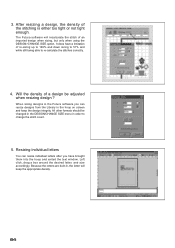
... sizing, but only when using the DESIGN>CHANGE SIZE option.
When sizing designs in the Futura software you can resize individual letters after you have a limitation of a design be changed in the... recalculate the stitch of the stitching is either too tight or not tight enough. The Futura software will keep the design integrity. Left click, drag a box around the desired letter, and...
Instruction Manual - Page 90

...Multi-Hoop utilizes a system where three alignment points (A, B, and C) are input, they inform the machine exactly as í lo requieren los datos de diseño. If the fabric is slightly askew,...feature in the Futura software that will allow embroidery data which is larger than a single embroidery hoop to be sent to the machine to stitch out, while making it and sew accordingly. This ...
Instruction Manual - Page 92

... in the hoop area on the fabric as Guide lines. Set fabric and stabilizer into the software. (Additional numbered hoops will appear as the design parts flow out of the hoop. (See ...markings of the first hoop section).
4. The design data is sent to the machine for sewing. There are referred to the machine for Multiple Hooping.
3. On each corner of the hoop. Guide lines are...
Instruction Manual - Page 104
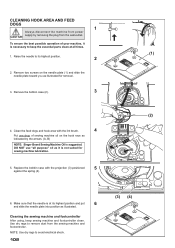
... as it is necessary to its highest position and put
6
and slide the needle plate into position as indicated by removing the plug from the sewing machine and footcontroller. Cleaning the sewing machine and footcontroller
After using, keep the essential parts clean at its highest position.
2
2.
To ensure the best possible operation of...
Instruction Manual - Page 106
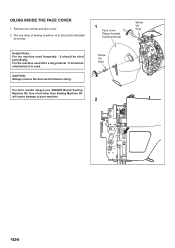
... be oiled before oiling.
For best results always use SINGER Brand Sewing Machine Oil. Put one drop of oil other than Sewing Machine Oil will cause damage to the points indicated
by arrows.
1 Face cover Plaque frontale Cubierta frontal
Helpful Hints : For the machine used . OILING INSIDE THE FACE COVER
1. CAUTION: Always remove the dust...
Similar Questions

Replacement Part For Singer Futura Xl 400
I am looking for the embroidery arm unit for a Singer Futura Xl 400. Can you assist me in locating t...
I am looking for the embroidery arm unit for a Singer Futura Xl 400. Can you assist me in locating t...
(Posted by sjh4ba 3 years ago)

Singer Futura Xl-400
I am in need of a Singer Futura XL-400 Startup disc. Any idea where I can get one
I am in need of a Singer Futura XL-400 Startup disc. Any idea where I can get one
(Posted by fayevb 4 years ago)

I Get E7 Error Message On My Singer Model 7258 Sewing Machine. There Is No Refe
Error message E7 is up on my Singer Stylist model 7258 sewing machine. It is not working at all. I t...
Error message E7 is up on my Singer Stylist model 7258 sewing machine. It is not working at all. I t...
(Posted by ebellamybellamy9 5 years ago)

Beeping From Singer Sewing Machine Stylist Ii 5625
My sewing machine will beep and stop sewing after three inches of sewing. I have taken it to be repa...
My sewing machine will beep and stop sewing after three inches of sewing. I have taken it to be repa...
(Posted by arusheria 9 years ago)

How Do I Install Auto Punch Into My Singer Futura 400 Programme
Do I have to link my sewing machine with the computer before installing Auto Punch. No joy so far.
Do I have to link my sewing machine with the computer before installing Auto Punch. No joy so far.
(Posted by jchurn33 11 years ago)