

Instruction Manual
Page 5
...62 - 63 Securing fabric in embroidery hoop 64 - 65 Using fabric and stabilizer 66 - 69 Preparing the machine before installing the hoop -------- 70 - 71 Attaching and removing embroidery hoop 70 - 71 Installation of software 72 - 75 Operation switches when embroidery unit is attached ----- 76 - 77 Operation switches, Thread tension control Troubleshooting 78... 48 - 49 Continuous patterns 50 - 51 Sewing on a button 50 - 51 Buttonholes 52 - 57 Using buttonhole foot, Procedure, Corded buttonholes Buttonholing with Futura Multi hoop 88 - 95 Helpful messages when embroidering 96 - 97 4.
...62 - 63 Securing fabric in embroidery hoop 64 - 65 Using fabric and stabilizer 66 - 69 Preparing the machine before installing the hoop -------- 70 - 71 Attaching and removing embroidery hoop 70 - 71 Installation of software 72 - 75 Operation switches when embroidery unit is attached ----- 76 - 77 Operation switches, Thread tension control Troubleshooting 78... 48 - 49 Continuous patterns 50 - 51 Sewing on a button 50 - 51 Buttonholes 52 - 57 Using buttonhole foot, Procedure, Corded buttonholes Buttonholing with Futura Multi hoop 88 - 95 Helpful messages when embroidering 96 - 97 4.

Instruction Manual
Page 10
Spool pin felt discs 5. Screwdriver (large) 11. Bobbins 21. Embroidery software CD 19 FUTURA embroidery is called the General Purpose Foot and will be used for most decorative sewing. Zipper foot 13. Thread spool net (long... SEWING MACHINE 1. Spool pin cap (large) 8. Button sewing foot 1 16. Scissors 22. Auxiliary spool pin 4. Blind hem foot 14. Vinyl bag 20. To install the FUTURA software, refer to the CD insert for needle plate 10. Spool pin cap (mini) 6. Needles 2. Bobbins 3. Spool pin cap (small) 7. Buttonhole opener/Brush 9. ...
Spool pin felt discs 5. Screwdriver (large) 11. Bobbins 21. Embroidery software CD 19 FUTURA embroidery is called the General Purpose Foot and will be used for most decorative sewing. Zipper foot 13. Thread spool net (long... SEWING MACHINE 1. Spool pin cap (large) 8. Button sewing foot 1 16. Scissors 22. Auxiliary spool pin 4. Blind hem foot 14. Vinyl bag 20. To install the FUTURA software, refer to the CD insert for needle plate 10. Spool pin cap (mini) 6. Needles 2. Bobbins 3. Spool pin cap (small) 7. Buttonhole opener/Brush 9. ...
Instruction Manual
Page 74
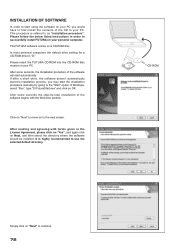
...If after a short while, the software doesn't automatically start the installation process, you would have to first install the contents of the CD to your PC. The FUTURA software comes on Next, and then select the directory where the software should be installed. After some seconds the step-by... for a CD-ROM drive is "D:" Please insert the FUTURA CD-ROM into the CD-ROM disc receiver in your PC. After some seconds, the Installation procedure of the software will start the installation procedure manually by -step installation of Windows, select "Run", type "D:\FuturaStart.exe" and...
...If after a short while, the software doesn't automatically start the installation process, you would have to first install the contents of the CD to your PC. The FUTURA software comes on Next, and then select the directory where the software should be installed. After some seconds the step-by... for a CD-ROM drive is "D:" Please insert the FUTURA CD-ROM into the CD-ROM disc receiver in your PC. After some seconds, the Installation procedure of the software will start the installation procedure manually by -step installation of Windows, select "Run", type "D:\FuturaStart.exe" and...

Instruction Manual
Page 76
.... Turn off your machine, close after finish. Pressing the "Next" button will finally start -up protocol. If the installation utility identifies a lack of the FUTURA software files to your computer and then follow steps 1 through 4 above. 74 Boot up your hard disk, an error message... machine and connect the USB cable between your desktop to work with the installation. The installation procedure is . Double click on the Futura Icon on your computer. Finally you plan to open the Futura software. Next attach the embroidery unit to confirm all required actions and will be...
.... Turn off your machine, close after finish. Pressing the "Next" button will finally start -up protocol. If the installation utility identifies a lack of the FUTURA software files to your computer and then follow steps 1 through 4 above. 74 Boot up your hard disk, an error message... machine and connect the USB cable between your desktop to work with the installation. The installation procedure is . Double click on the Futura Icon on your computer. Finally you plan to open the Futura software. Next attach the embroidery unit to confirm all required actions and will be...


