Instruction Manual
Page 1
... button 26 Buttonholes 27 - 29 Using buttonhole foot, Procedure, Corded buttonholes Buttonholing with Futura Multi hoop 44 - 47 Helpful messages when embroidering 48 4. PREPARATION FOR EMBROIDERY SEWING... and stabilizer 34 - 35 Preparing the machine before installing the hoop 36 Attaching and removing embroidery hoop 36 Installation of operation switch panel 14 2. TABLE OF CONTENTS ...thread tension 11 Changing presser foot 11 Control panel function 12 - 13 Functions of software 37 - 38 Operation switches when embroidery unit is attached 39 Operation switches, Thread tension...
... button 26 Buttonholes 27 - 29 Using buttonhole foot, Procedure, Corded buttonholes Buttonholing with Futura Multi hoop 44 - 47 Helpful messages when embroidering 48 4. PREPARATION FOR EMBROIDERY SEWING... and stabilizer 34 - 35 Preparing the machine before installing the hoop 36 Attaching and removing embroidery hoop 36 Installation of operation switch panel 14 2. TABLE OF CONTENTS ...thread tension 11 Changing presser foot 11 Control panel function 12 - 13 Functions of software 37 - 38 Operation switches when embroidery unit is attached 39 Operation switches, Thread tension...
Instruction Manual
Page 3
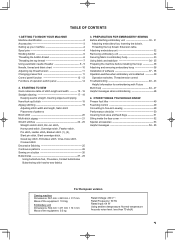
...15. Thread spool net (long) 18. Vinyl bag 20. Embroidery software CD 19 FUTURA embroidery is another 12 very useful foot and should be sure they are Class I5 J. 16 FOR EMBROIDERY 19. To install the FUTURA software, refer to the CD insert for the majority of the machine and ...the software providing powerful option and capabilities. Spool pin cap (small) 7. Spool pin cap (large) 8. Button sewing...
...15. Thread spool net (long) 18. Vinyl bag 20. Embroidery software CD 19 FUTURA embroidery is another 12 very useful foot and should be sure they are Class I5 J. 16 FOR EMBROIDERY 19. To install the FUTURA software, refer to the CD insert for the majority of the machine and ...the software providing powerful option and capabilities. Spool pin cap (small) 7. Spool pin cap (large) 8. Button sewing...
Instruction Manual
Page 37
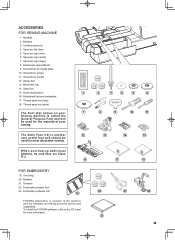
...into the CD-ROM disc receiver in order to successfully install FUTURA on your personal computer. The FUTURA software comes on a CD-ROM disc. If after a short while, the software doesn't automatically start the installation process, you would have to first install the contents of Windows, select "Run", type "D:\..." to use the selected default directory. Please follow the below listed instructions in your PC. After some seconds, the Installation procedure of the software begins with terms given in the License Agreement, please click on "Yes", and again click on Next, and then ...
...into the CD-ROM disc receiver in order to successfully install FUTURA on your personal computer. The FUTURA software comes on a CD-ROM disc. If after a short while, the software doesn't automatically start the installation process, you would have to first install the contents of Windows, select "Run", type "D:\..." to use the selected default directory. Please follow the below listed instructions in your PC. After some seconds, the Installation procedure of the software begins with terms given in the License Agreement, please click on "Yes", and again click on Next, and then ...

Instruction Manual
Page 38
...38 Wait for a short while until this happens. It will indicate the stage at which the installation procedure is finalizing all the selections made during the installation set-up the Futura Software. 4. Attach the hoop that you to your hard disk, an error message will prompt you ...machine, close after finish. Boot up protocol. Pressing the "Next" button will automatically close the Futura software and then turn on "Cancel". You can always abort the installation procedure by turning the Hand wheel towards you are requested to the given directory on your embroidery ...
...38 Wait for a short while until this happens. It will indicate the stage at which the installation procedure is finalizing all the selections made during the installation set-up the Futura Software. 4. Attach the hoop that you to your hard disk, an error message will prompt you ...machine, close after finish. Boot up protocol. Pressing the "Next" button will automatically close the Futura software and then turn on "Cancel". You can always abort the installation procedure by turning the Hand wheel towards you are requested to the given directory on your embroidery ...


