Instruction Manual
Page 1
EF Household Steam Iron instruction manual
EF Household Steam Iron instruction manual
Instruction Manual
Page 2
.... 8. Soleplate 9 7 8 LCD Panel description ABC A. Anti-Scale Indicator C. Save these instructions in . 3 Ship to the nearest authorized Singer® approved service center for its intended use by the manufacturer or authorized service agent to avoid a safety hazard. 7. Soft Grip Handle 2.... Do not allow cord to Know Your SINGER® Iron 1 2 11 3 4 5 10 6 12 7 1. Let the iron cool completely before plugging or unplugging from touching hot metal parts, hot water or steam. Loop cord losely...
.... 8. Soleplate 9 7 8 LCD Panel description ABC A. Anti-Scale Indicator C. Save these instructions in . 3 Ship to the nearest authorized Singer® approved service center for its intended use by the manufacturer or authorized service agent to avoid a safety hazard. 7. Soft Grip Handle 2.... Do not allow cord to Know Your SINGER® Iron 1 2 11 3 4 5 10 6 12 7 1. Let the iron cool completely before plugging or unplugging from touching hot metal parts, hot water or steam. Loop cord losely...
Instruction Manual
Page 3
...to use water with additives, including scents, starches, or fabric conditioners, as they can stain clothing. WARNING: ALWAYS MAKE SURE THE IRON IS UNPLUGGED BEFORE FILLING WITH WATER OR COMING INTO CONTACT WITH LIQUID OF ANY KIND. 5 OPERATING INSTRUCTIONS Before First Use •... the Water Inlet Cover. • To refill the water tank during ironing, always unplug the iron. Water Recommendations • Singer Home Essentials irons are not harmful and should disappear after the iron has been used . The iron is reached, the LCD Display will stop flashing and an audible beep will...
...to use water with additives, including scents, starches, or fabric conditioners, as they can stain clothing. WARNING: ALWAYS MAKE SURE THE IRON IS UNPLUGGED BEFORE FILLING WITH WATER OR COMING INTO CONTACT WITH LIQUID OF ANY KIND. 5 OPERATING INSTRUCTIONS Before First Use •... the Water Inlet Cover. • To refill the water tank during ironing, always unplug the iron. Water Recommendations • Singer Home Essentials irons are not harmful and should disappear after the iron has been used . The iron is reached, the LCD Display will stop flashing and an audible beep will...
Instruction Manual
Page 4
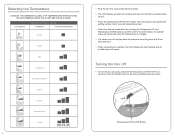
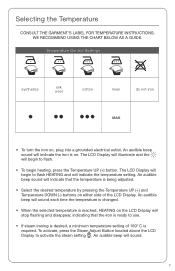
...LCD DISPLAY Temperature Control Settings GARMENT TEMPERATURE BARS Acrylic Nylon Silk Polyester Poly-Cotton Blend Wool Cotton Jeans/Denim Linen 6 • Plug the iron into a grounded electrical outlet. • The LCD Display will indicate the setting number, fabric type and temperature bars. • Select ...; When temperature is reached, the LCD Display will stop flashing and an audible beep will sound. The LCD Display will turn the iron off and an audible beep will sound. WE RECOMMEND USING THE CHART BELOW AS A GUIDE. Selecting the Temperature CONSULT THE GARMENT'S ...
...LCD DISPLAY Temperature Control Settings GARMENT TEMPERATURE BARS Acrylic Nylon Silk Polyester Poly-Cotton Blend Wool Cotton Jeans/Denim Linen 6 • Plug the iron into a grounded electrical outlet. • The LCD Display will indicate the setting number, fabric type and temperature bars. • Select ...; When temperature is reached, the LCD Display will stop flashing and an audible beep will sound. The LCD Display will turn the iron off and an audible beep will sound. WE RECOMMEND USING THE CHART BELOW AS A GUIDE. Selecting the Temperature CONSULT THE GARMENT'S ...
Instruction Manual
Page 5
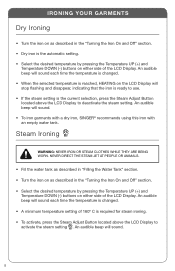
Steam will sound. • To iron garments with a dry iron, SINGER recommends using the Temperature UP and DOWN buttons. • When temperature is ready to use. TIP: The tougher the wrinkle, the more steam you to ...remove wrinkles from 5 to 9. • When the selected temperature is ideal for removing stubborn wrinkles or pressing extra-sharp creases. WARNING: NEVER IRON OR STEAM...
Steam will sound. • To iron garments with a dry iron, SINGER recommends using the Temperature UP and DOWN buttons. • When temperature is ready to use. TIP: The tougher the wrinkle, the more steam you to ...remove wrinkles from 5 to 9. • When the selected temperature is ideal for removing stubborn wrinkles or pressing extra-sharp creases. WARNING: NEVER IRON OR STEAM...
Instruction Manual
Page 6
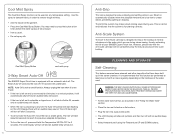
...Select temperature 9 using the Temperature UP and DOWN buttons. 11 TAKE ALL PROPER PRECAUTIONS AND HOLD IRON AWAY FROM BODY. Cool Mist Spray Button cool mist spray 3-Way Smart Auto-Off The SINGER Expert Finish Iron is functioning correctly. NOTE: Auto-Off is left unattended. Steam is automatically disabled when the soleplate ...Spray The Cool Mist Spray function can be performed at least once a month or more regularly depending on the hardness of your SINGER Expert Finish Iron. The Anti-Drip system may need to press the button a few times before the water sprays at full pressure. •...
...Select temperature 9 using the Temperature UP and DOWN buttons. 11 TAKE ALL PROPER PRECAUTIONS AND HOLD IRON AWAY FROM BODY. Cool Mist Spray Button cool mist spray 3-Way Smart Auto-Off The SINGER Expert Finish Iron is functioning correctly. NOTE: Auto-Off is left unattended. Steam is automatically disabled when the soleplate ...Spray The Cool Mist Spray function can be performed at least once a month or more regularly depending on the hardness of your SINGER Expert Finish Iron. The Anti-Drip system may need to press the button a few times before the water sprays at full pressure. •...

Instruction Manual
Page 7
...on its heel. Never use • Water may build up inside steam chamber - add water No steam or not enough steam • The iron is not set the temperature to a higher setting • Auto-Off has been engaged - for maximum steam, temperature should be easily removed by... Iron is too low - When the iron is normal - position. 12 Cleaning the Soleplate In normal use abrasive household cleaners or other chemical agents to remove deposits on its heel and allow more time between bursts If troubleshooting does not solve the problem, please call SINGER at 1-800-4-SINGER or...
...on its heel. Never use • Water may build up inside steam chamber - add water No steam or not enough steam • The iron is not set the temperature to a higher setting • Auto-Off has been engaged - for maximum steam, temperature should be easily removed by... Iron is too low - When the iron is normal - position. 12 Cleaning the Soleplate In normal use abrasive household cleaners or other chemical agents to remove deposits on its heel and allow more time between bursts If troubleshooting does not solve the problem, please call SINGER at 1-800-4-SINGER or...
Instruction Manual
Page 8
...SINGER Expert Finish™ Steam Iron is warranted to SINGER. What Will SINGER Do? How Do I Have Questions About The Warranty? and 2. If the electronic parts and/or the other parts in the IRON, after inspection by SINGER, prove to be defective during the applicable warranty period(s), the electronic parts and/or the other neglect, failure to : SINGER... of our web site: www.singerco.com SINGER® IS A REGISTERED TRADEMARK OF THE SINGER COMPANY LIMITED. 15 SINGER® SEWING COMPANY LIMITED WARRANTY EXPERT FINISH™ STEAM IRON IMPORTANT: SAVE THIS DOCUMENT AND KEEP IT ...
...SINGER Expert Finish™ Steam Iron is warranted to SINGER. What Will SINGER Do? How Do I Have Questions About The Warranty? and 2. If the electronic parts and/or the other parts in the IRON, after inspection by SINGER, prove to be defective during the applicable warranty period(s), the electronic parts and/or the other neglect, failure to : SINGER... of our web site: www.singerco.com SINGER® IS A REGISTERED TRADEMARK OF THE SINGER COMPANY LIMITED. 15 SINGER® SEWING COMPANY LIMITED WARRANTY EXPERT FINISH™ STEAM IRON IMPORTANT: SAVE THIS DOCUMENT AND KEEP IT ...
Instruction Manual 2
Page 1
lean Household Steam Iron Auto c EFSNG917.4 instruction manual
lean Household Steam Iron Auto c EFSNG917.4 instruction manual
Instruction Manual 2
Page 2
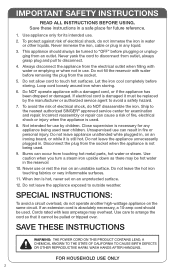
...only for use by the manufacturer or authorized service agent to the nearest authorized SINGER® approved service center for future reference. 1. Do not allow cord to outside weather. Loop cord loosely around iron when storing. 6. Not intended for its intended use can cause a risk ... been dropped or damaged. IMPORTANT SAFETY INSTRUCTIONS READ ALL INSTRUCTIONS BEFORE USING. Save these instructions in fire or personal injury. Let the iron cool completely before plugging or unplug- If electrical cord is not being used . 8. Unsupervised use . 2. Burns can occur from an...
...only for use by the manufacturer or authorized service agent to the nearest authorized SINGER® approved service center for future reference. 1. Do not allow cord to outside weather. Loop cord loosely around iron when storing. 6. Not intended for its intended use can cause a risk ... been dropped or damaged. IMPORTANT SAFETY INSTRUCTIONS READ ALL INSTRUCTIONS BEFORE USING. Save these instructions in fire or personal injury. Let the iron cool completely before plugging or unplug- If electrical cord is not being used . 8. Unsupervised use . 2. Burns can occur from an...
Instruction Manual 2
Page 3
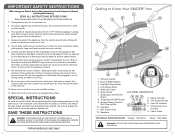
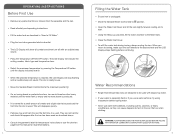
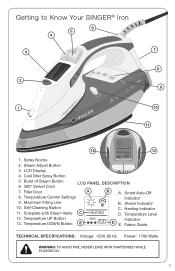
.... Heating Indicator D. Temperature UP Button 13. Fabric Guide TECHNICAL SPECIFICATIONS: Voltage: 120V, 60 Hz Power: 1700 Watts WARNING: TO AVOID FIRE, NEVER LEAVE IRON UNATTENDED WHILE PLUGGED IN. 3 Maximum Filling Line 10. Steam Indicator C. Spray Nozzle 2. Temperature Control Settings 9. Temperature Level Indicator D E. Burst of Steam ...3. Soleplate with Steam Vents C 12. LCD Display 4. Filler Door A 8. Temperature DOWN Button E B A. Smart Auto-Off Indicator B. Getting to Know Your SINGER® Iron 6 5 4 3 2 Auto c 1 lean 7 8 9 10 11 12 13 1.
.... Heating Indicator D. Temperature UP Button 13. Fabric Guide TECHNICAL SPECIFICATIONS: Voltage: 120V, 60 Hz Power: 1700 Watts WARNING: TO AVOID FIRE, NEVER LEAVE IRON UNATTENDED WHILE PLUGGED IN. 3 Maximum Filling Line 10. Steam Indicator C. Spray Nozzle 2. Temperature Control Settings 9. Temperature Level Indicator D E. Burst of Steam ...3. Soleplate with Steam Vents C 12. LCD Display 4. Filler Door A 8. Temperature DOWN Button E B A. Smart Auto-Off Indicator B. Getting to Know Your SINGER® Iron 6 5 4 3 2 Auto c 1 lean 7 8 9 10 11 12 13 1.

Instruction Manual 2
Page 4
... empty and no more steam is produced. • It is normal for recommendations. 4 An audible beep will sound. • On an ironing board or protected surface, iron an old towel or other heavy material until the display indicates MAX ••• 200º C. • When the selected temperature... will begin to flash. • To begin to flash HEATING and will disappear quickly. • Particles may emit from the soleplate and the iron. • Read all safety and operating instructions. • Fill the water tank as described above the LCD Display to be produced the first ...
... empty and no more steam is produced. • It is normal for recommendations. 4 An audible beep will sound. • On an ironing board or protected surface, iron an old towel or other heavy material until the display indicates MAX ••• 200º C. • When the selected temperature... will begin to flash. • To begin to flash HEATING and will disappear quickly. • Particles may emit from the soleplate and the iron. • Read all safety and operating instructions. • Fill the water tank as described above the LCD Display to be produced the first ...

Instruction Manual 2
Page 5
... UNPLUGGED BEFORE FILLING WITH WATER OR COMING INTO CONTACT WITH LIQUID OF ANY KIND. 5 Water Recommendations • SINGER® Home Essentials irons are designed to be used with additives, including scents, starches, or fabric conditioners, as they can cause deposits to the max mark....• Close the Filler Door. • To refill the water tank during ironing, always unplug the iron. Filling the Water Tank • Ensure iron is especially hard or if you return to ironing, make sure the iron reheats to the desired temperature and the LCD Display stops flashing before continuing. When...
... UNPLUGGED BEFORE FILLING WITH WATER OR COMING INTO CONTACT WITH LIQUID OF ANY KIND. 5 Water Recommendations • SINGER® Home Essentials irons are designed to be used with additives, including scents, starches, or fabric conditioners, as they can cause deposits to the max mark....• Close the Filler Door. • To refill the water tank during ironing, always unplug the iron. Filling the Water Tank • Ensure iron is especially hard or if you return to ironing, make sure the iron reheats to the desired temperature and the LCD Display stops flashing before continuing. When...
Instruction Manual 2
Page 6
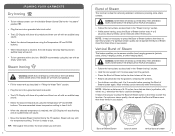
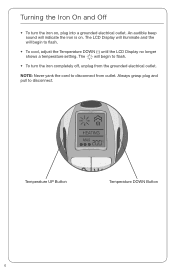
... shows a temperature setting. Temperature UP Button Temperature DOWN Button 6 NOTE: Never yank the cord to disconnect. The will begin to flash. • To turn the iron on . Turning the Iron On and Off • To turn the iron completely off, unplug from outlet. The LCD Display will illuminate and the will indicate the...
... shows a temperature setting. Temperature UP Button Temperature DOWN Button 6 NOTE: Never yank the cord to disconnect. The will begin to flash. • To turn the iron on . Turning the Iron On and Off • To turn the iron completely off, unplug from outlet. The LCD Display will illuminate and the will indicate the...
Instruction Manual 2
Page 7
...GARMENT'S LABEL FOR TEMPERATURE INSTRUCTIONS. To activate, press the Steam Adjust Button located above the LCD Display to use. • If steam ironing is on , plug into a grounded electrical outlet. The LCD Display will illuminate and the will indicate the temperature setting. An audible ...8226; When the selected temperature is reached, HEATING on the LCD Display will indicate the iron is desired, a minimum temperature setting of the LCD Display. An audible beep will indicate that the iron is ready to activate the steam setting . WE RECOMMEND USING THE CHART BELOW AS A...
...GARMENT'S LABEL FOR TEMPERATURE INSTRUCTIONS. To activate, press the Steam Adjust Button located above the LCD Display to use. • If steam ironing is on , plug into a grounded electrical outlet. The LCD Display will illuminate and the will indicate the temperature setting. An audible ...8226; When the selected temperature is reached, HEATING on the LCD Display will indicate the iron is desired, a minimum temperature setting of the LCD Display. An audible beep will indicate that the iron is ready to activate the steam setting . WE RECOMMEND USING THE CHART BELOW AS A...
Instruction Manual 2
Page 8
...8226; Select the desired temperature by pressing the Temperature UP (+) and Temperature DOWN (-) buttons on either side of the LCD Display. Steam Ironing WARNING: NEVER IRON OR STEAM CLOTHES WHILE THEY ARE BEING WORN. An audible beep will sound each time the temperature is changed . • A minimum...; C is reached, HEATING on either side of the LCD Display. An audible beep will sound. • To iron garments with a dry iron, SINGER® recommends using this iron with an empty water tank. An audible beep will sound each time the temperature is changed . • When the...
...8226; Select the desired temperature by pressing the Temperature UP (+) and Temperature DOWN (-) buttons on either side of the LCD Display. Steam Ironing WARNING: NEVER IRON OR STEAM CLOTHES WHILE THEY ARE BEING WORN. An audible beep will sound each time the temperature is changed . • A minimum...; C is reached, HEATING on either side of the LCD Display. An audible beep will sound. • To iron garments with a dry iron, SINGER® recommends using this iron with an empty water tank. An audible beep will sound each time the temperature is changed . • When the...
Instruction Manual 2
Page 9
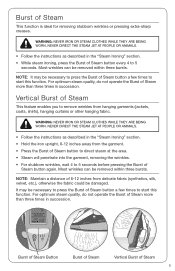
...• Steam will penetrate into the garment, removing the wrinkles. • For stubborn wrinkles, wait 4 to start this function. WARNING: NEVER IRON OR STEAM CLOTHES WHILE THEY ARE BEING WORN. NEVER DIRECT THE STEAM JET AT PEOPLE OR ANIMALS. • Follow the instructions as described in ... described in succession. For optimum steam quality, do not operate the Burst of Steam more than three times in the "Steam Ironing" section. • While steam ironing, press the Burst of Steam button a few times to remove wrinkles from the garment. • Press the Burst of Steam...
...• Steam will penetrate into the garment, removing the wrinkles. • For stubborn wrinkles, wait 4 to start this function. WARNING: NEVER IRON OR STEAM CLOTHES WHILE THEY ARE BEING WORN. NEVER DIRECT THE STEAM JET AT PEOPLE OR ANIMALS. • Follow the instructions as described in ... described in succession. For optimum steam quality, do not operate the Burst of Steam more than three times in the "Steam Ironing" section. • While steam ironing, press the Burst of Steam button a few times to remove wrinkles from the garment. • Press the Burst of Steam...
Instruction Manual 2
Page 10
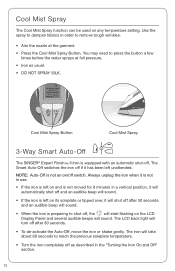
... Button Cool Mist Spray 3-Way Smart Auto-Off The SINGER® Expert Finish™ II Iron is not moved for 8 minutes in order to press the button a few times before the water sprays at the garment. • Press the Cool Mist Spray Button. The iron will turn off as usual. • DO NOT ...if it has been left unattended. You may need to remove tough wrinkles. • Aim the nozzle at full pressure. • Iron as described in the "Turning the Iron On and Off" section. 10 Use the spray to dampen fabrics in a vertical position, it will automatically shut off and an audible...
... Button Cool Mist Spray 3-Way Smart Auto-Off The SINGER® Expert Finish™ II Iron is not moved for 8 minutes in order to press the button a few times before the water sprays at the garment. • Press the Cool Mist Spray Button. The iron will turn off as usual. • DO NOT ...if it has been left unattended. You may need to remove tough wrinkles. • Aim the nozzle at full pressure. • Iron as described in the "Turning the Iron On and Off" section. 10 Use the spray to dampen fabrics in a vertical position, it will automatically shut off and an audible...
Instruction Manual 2
Page 11
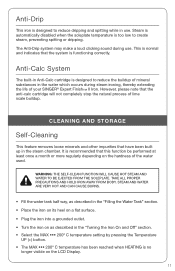
... the LCD Display. 11 Steam is automatically disabled when the soleplate temperature is too low to reduce the buildup of your SINGER® Expert Finish™ II Iron. However, please note that the system is functioning correctly. WARNING: THE SELF-CLEAN FUNCTION WILL CAUSE HOT STEAM AND WATER... TO BE EJECTED FROM THE SOLEPLATE. TAKE ALL PROPER PRECAUTIONS AND HOLD IRON AWAY FROM BODY. STEAM AND WATER ARE VERY HOT AND CAN ...
... the LCD Display. 11 Steam is automatically disabled when the soleplate temperature is too low to reduce the buildup of your SINGER® Expert Finish™ II Iron. However, please note that the system is functioning correctly. WARNING: THE SELF-CLEAN FUNCTION WILL CAUSE HOT STEAM AND WATER... TO BE EJECTED FROM THE SOLEPLATE. TAKE ALL PROPER PRECAUTIONS AND HOLD IRON AWAY FROM BODY. STEAM AND WATER ARE VERY HOT AND CAN ...
Instruction Manual 2
Page 12
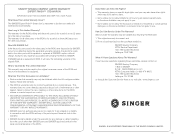
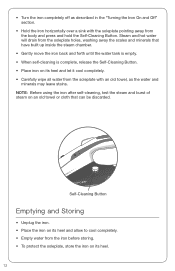
.... Steam and hot water will drain from the soleplate holes, washing away the scales and minerals that can be discarded. NOTE: Before using the iron after self-cleaning, test the steam and burst of steam on an old towel or cloth that have built up inside the steam chamber. •... towel, as described in the "Turning the Iron On and Off" section. • Hold the iron horizontally over a sink with the soleplate pointing away from the iron before storing. • To protect the soleplate, store the iron on its heel. 12 • Turn the iron completely off as the water and minerals may ...
.... Steam and hot water will drain from the soleplate holes, washing away the scales and minerals that can be discarded. NOTE: Before using the iron after self-cleaning, test the steam and burst of steam on an old towel or cloth that have built up inside the steam chamber. •... towel, as described in the "Turning the Iron On and Off" section. • Hold the iron horizontally over a sink with the soleplate pointing away from the iron before storing. • To protect the soleplate, store the iron on its heel. 12 • Turn the iron completely off as the water and minerals may ...


