Instruction Manual
Page 1
EF Household Steam Iron instruction manual
EF Household Steam Iron instruction manual
Instruction Manual
Page 2
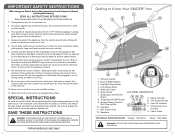
..., basic safety precautions should always be hot water in the reservoir. 10. Ship to the nearest authorized Singer® approved service center for use or rest the iron on this product contains lead, a chemical knowN to the State of California to disconnect from an outlet..../ON-OFF Button 8. Auto-Off Indicator D D D. Never yank the cord to cause birth defects or other liquids. 3. Do not allow cord to Know Your SINGER® Iron 1 2 11 3 4 5 10 6 12 7 1. If electrical cord is necessary for future reference. 1. Close supervision is damaged it must be turned to ...
..., basic safety precautions should always be hot water in the reservoir. 10. Ship to the nearest authorized Singer® approved service center for use or rest the iron on this product contains lead, a chemical knowN to the State of California to disconnect from an outlet..../ON-OFF Button 8. Auto-Off Indicator D D D. Never yank the cord to cause birth defects or other liquids. 3. Do not allow cord to Know Your SINGER® Iron 1 2 11 3 4 5 10 6 12 7 1. If electrical cord is necessary for future reference. 1. Close supervision is damaged it must be turned to ...
Instruction Manual
Page 3
... UNPLUGGED BEFORE FILLING WITH WATER OR COMING INTO CONTACT WITH LIQUID OF ANY KIND. 5 Water Recommendations • Singer Home Essentials irons are not harmful and should disappear after the iron has been used with regular tap water. • If your water is used . This will disappear quickly. • Particles may emit from the...
... UNPLUGGED BEFORE FILLING WITH WATER OR COMING INTO CONTACT WITH LIQUID OF ANY KIND. 5 Water Recommendations • Singer Home Essentials irons are not harmful and should disappear after the iron has been used with regular tap water. • If your water is used . This will disappear quickly. • Particles may emit from the...
Instruction Manual
Page 4
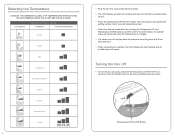
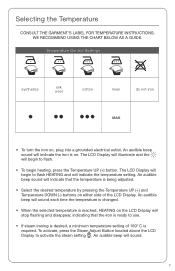
...Settings GARMENT TEMPERATURE BARS Acrylic Nylon Silk Polyester Poly-Cotton Blend Wool Cotton Jeans/Denim Linen 6 • Plug the iron into a grounded electrical outlet. • The LCD Display will sound. Turning the Iron Off • To turn off , press and hold the Temperature UP/ON-OFF for 3 seconds. The LCD ...Display will turn the iron off and an audible beep will indicate the setting number, fabric type and temperature bars. • Select the desired temperature by pressing the ...
...Settings GARMENT TEMPERATURE BARS Acrylic Nylon Silk Polyester Poly-Cotton Blend Wool Cotton Jeans/Denim Linen 6 • Plug the iron into a grounded electrical outlet. • The LCD Display will sound. Turning the Iron Off • To turn off , press and hold the Temperature UP/ON-OFF for 3 seconds. The LCD ...Display will turn the iron off and an audible beep will indicate the setting number, fabric type and temperature bars. • Select the desired temperature by pressing the ...
Instruction Manual
Page 5
...buttons. • When temperature is reached, the LCD Display will stop flashing and an audible beep will sound. • To iron garments with a dry iron, SINGER recommends using the Temperature UP and DOWN buttons. NEVER DIRECT THE STEAM JET AT People OR ANIMALS. • Follow the instructions... as described in the "Steam Ironing" section. • While steam ironing, press the Burst of Steam button again. It may be necessary ...
...buttons. • When temperature is reached, the LCD Display will stop flashing and an audible beep will sound. • To iron garments with a dry iron, SINGER recommends using the Temperature UP and DOWN buttons. NEVER DIRECT THE STEAM JET AT People OR ANIMALS. • Follow the instructions... as described in the "Steam Ironing" section. • While steam ironing, press the Burst of Steam button again. It may be necessary ...
Instruction Manual
Page 6
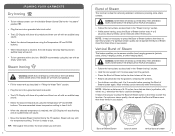
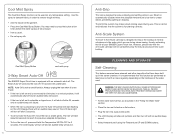
... This is normal and indicates that this function be used . Cool Mist Spray Button cool mist spray 3-Way Smart Auto-Off The SINGER Expert Finish Iron is not moved for 3 seconds. Cool Mist Spray The Cool Mist Spray function can be performed at least once a month or ...audible beep will not completely stop the natural process of your SINGER Expert Finish Iron. Cleaning and storage Self-Cleaning This feature removes loose minerals and other impurities that the anti-scale cartridge will sound. • If the iron is designed to create steam, preventing spitting or dripping. ...
... This is normal and indicates that this function be used . Cool Mist Spray Button cool mist spray 3-Way Smart Auto-Off The SINGER Expert Finish Iron is not moved for 3 seconds. Cool Mist Spray The Cool Mist Spray function can be performed at least once a month or ...audible beep will not completely stop the natural process of your SINGER Expert Finish Iron. Cleaning and storage Self-Cleaning This feature removes loose minerals and other impurities that the anti-scale cartridge will sound. • If the iron is designed to create steam, preventing spitting or dripping. ...

Instruction Manual
Page 7
... more time between bursts If troubleshooting does not solve the problem, please call SINGER at 1-800-4-SINGER or 1-800-474-6437. 13 The LCD Display will turn the Variable Steam Control Dial to the position Iron is emitting small particles or odor • This is cold and unplugged, ...the iron can be low or empty - turn off by using a quality iron soleplate cleaner. Descaling Position...
... more time between bursts If troubleshooting does not solve the problem, please call SINGER at 1-800-4-SINGER or 1-800-474-6437. 13 The LCD Display will turn the Variable Steam Control Dial to the position Iron is emitting small particles or odor • This is cold and unplugged, ...the iron can be low or empty - turn off by using a quality iron soleplate cleaner. Descaling Position...
Instruction Manual
Page 8
...have other instructions for the IRON, misuse, or events beyond those set forth in this warranty. • SINGER disclaims liability under this warranty for a period of ninety (90) days from the date of purchase. The SINGER Expert Finish™ Steam Iron is for any questions regarding ...these warranties, please contact us: SINGER Sewing Company 1-800-4-SINGER E-mail: [email protected] ATTN: Consumer Affairs (1-800-474-6437) 1224 Heil Quaker...
...have other instructions for the IRON, misuse, or events beyond those set forth in this warranty. • SINGER disclaims liability under this warranty for a period of ninety (90) days from the date of purchase. The SINGER Expert Finish™ Steam Iron is for any questions regarding ...these warranties, please contact us: SINGER Sewing Company 1-800-4-SINGER E-mail: [email protected] ATTN: Consumer Affairs (1-800-474-6437) 1224 Heil Quaker...
Instruction Manual 2
Page 1
lean Household Steam Iron Auto c EFSNG917.4 instruction manual
lean Household Steam Iron Auto c EFSNG917.4 instruction manual
Instruction Manual 2
Page 2
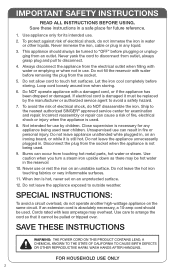
... against risk of electrical shock, do not operate another high-wattage appliance on an ironing board, or while it is absolutely necessary, a 10-amp cord should always be turned to the nearest authorized SINGER® approved service center for its intended use. 2. Do not fill the reservoir... with less amperage may be replaced by children. Loop cord loosely around iron when storing. 6. Ship to "OFF" before plugging or unplug- ...
... against risk of electrical shock, do not operate another high-wattage appliance on an ironing board, or while it is absolutely necessary, a 10-amp cord should always be turned to the nearest authorized SINGER® approved service center for its intended use. 2. Do not fill the reservoir... with less amperage may be replaced by children. Loop cord loosely around iron when storing. 6. Ship to "OFF" before plugging or unplug- ...
Instruction Manual 2
Page 3
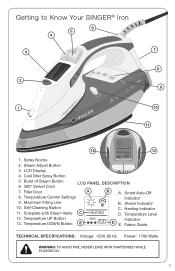
... Button E B A. Smart Auto-Off Indicator B. Self-Cleaning Button 11. Cool Mist Spray Button 5. Temperature Level Indicator D E. LCD Display 4. Temperature Control Settings 9. Getting to Know Your SINGER® Iron 6 5 4 3 2 Auto c 1 lean 7 8 9 10 11 12 13 1. Steam Adjust Button 3. Spray Nozzle 2. Temperature UP Button 13. Heating Indicator D. Steam Indicator C. Fabric Guide TECHNICAL SPECIFICATIONS: Voltage...
... Button E B A. Smart Auto-Off Indicator B. Self-Cleaning Button 11. Cool Mist Spray Button 5. Temperature Level Indicator D E. LCD Display 4. Temperature Control Settings 9. Getting to Know Your SINGER® Iron 6 5 4 3 2 Auto c 1 lean 7 8 9 10 11 12 13 1. Steam Adjust Button 3. Spray Nozzle 2. Temperature UP Button 13. Heating Indicator D. Steam Indicator C. Fabric Guide TECHNICAL SPECIFICATIONS: Voltage...

Instruction Manual 2
Page 4
...and no more steam is produced. • It is on the LCD Display will disappear quickly. • Particles may emit from the soleplate and the iron. • Read all safety and operating instructions. • Fill the water tank as described above the LCD Display to flash. • To begin ...heating, press the Temperature UP (+) button. An audible beep sound will indicate the iron is normal for a small amount of this manual for recommendations. 4 The LCD Display will begin to flash HEATING and will begin to activate the ...
...and no more steam is produced. • It is on the LCD Display will disappear quickly. • Particles may emit from the soleplate and the iron. • Read all safety and operating instructions. • Fill the water tank as described above the LCD Display to flash. • To begin ...heating, press the Temperature UP (+) button. An audible beep sound will indicate the iron is normal for a small amount of this manual for recommendations. 4 The LCD Display will begin to flash HEATING and will begin to activate the ...

Instruction Manual 2
Page 5
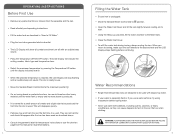
... SINGER® Home Essentials irons are designed to be used with additives, including scents, starches, or fabric conditioners, as they can cause deposits to the max mark. • Close the Filler Door. • To refill the water tank during ironing, always unplug the iron. WARNING: ALWAYS MAKE SURE THE IRON IS...on the base of the iron. • Using the filling cup provided, fill the water chamber to form in the iron that can stain clothing. Filling the Water Tank • Ensure iron is especially hard or if you return to ironing, make sure the iron reheats to the desired ...
... SINGER® Home Essentials irons are designed to be used with additives, including scents, starches, or fabric conditioners, as they can cause deposits to the max mark. • Close the Filler Door. • To refill the water tank during ironing, always unplug the iron. WARNING: ALWAYS MAKE SURE THE IRON IS...on the base of the iron. • Using the filling cup provided, fill the water chamber to form in the iron that can stain clothing. Filling the Water Tank • Ensure iron is especially hard or if you return to ironing, make sure the iron reheats to the desired ...
Instruction Manual 2
Page 6
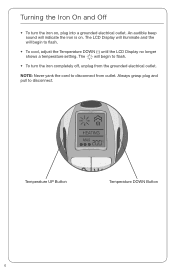
... . The will begin to disconnect. The LCD Display will illuminate and the will indicate the iron is on , plug into a grounded electrical outlet. Turning the Iron On and Off • To turn the iron completely off, unplug from outlet. An audible beep sound will begin to disconnect from the grounded electrical outlet. Temperature...
... . The will begin to disconnect. The LCD Display will illuminate and the will indicate the iron is on , plug into a grounded electrical outlet. Turning the Iron On and Off • To turn the iron completely off, unplug from outlet. An audible beep sound will begin to disconnect from the grounded electrical outlet. Temperature...
Instruction Manual 2
Page 7
...the temperature is required. The LCD Display will illuminate and the will sound. 7 An audible beep will indicate that the iron is ready to use. • If steam ironing is desired, a minimum temperature setting of the LCD Display. To activate, press the Steam Adjust Button located above the LCD... Display to flash HEATING and will indicate the iron is reached, HEATING on , plug into a grounded electrical outlet. An audible beep will begin to flash. • To begin to activate the ...
...the temperature is required. The LCD Display will illuminate and the will sound. 7 An audible beep will indicate that the iron is ready to use. • If steam ironing is desired, a minimum temperature setting of the LCD Display. To activate, press the Steam Adjust Button located above the LCD... Display to flash HEATING and will indicate the iron is reached, HEATING on , plug into a grounded electrical outlet. An audible beep will begin to flash. • To begin to activate the ...
Instruction Manual 2
Page 8
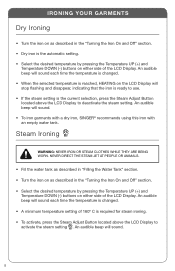
An audible beep will sound. 8 An audible beep will sound. • To iron garments with a dry iron, SINGER® recommends using this iron with an empty water tank. An audible beep will sound each time the temperature is changed . • When the selected temperature is ...reached, HEATING on either side of the LCD Display. Steam Ironing WARNING: NEVER IRON OR STEAM CLOTHES WHILE THEY ARE ...
An audible beep will sound. 8 An audible beep will sound. • To iron garments with a dry iron, SINGER® recommends using this iron with an empty water tank. An audible beep will sound each time the temperature is changed . • When the selected temperature is ...reached, HEATING on either side of the LCD Display. Steam Ironing WARNING: NEVER IRON OR STEAM CLOTHES WHILE THEY ARE ...
Instruction Manual 2
Page 9
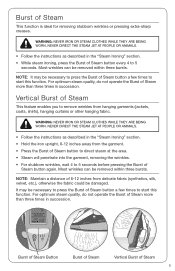
... this function. NEVER DIRECT THE STEAM JET AT PEOPLE OR ANIMALS. • Follow the instructions as described in the "Steam Ironing" section. • Hold the iron upright, 6-12 inches away from delicate fabric (synthetics, silk, velvet, etc.), otherwise the fabric could be removed within three ...bursts. NEVER DIRECT THE STEAM JET AT PEOPLE OR ANIMALS. • Follow the instructions as described in the "Steam Ironing" section. • While steam ironing, press the Burst of Steam button again. Burst of Steam more than three times in succession. Most wrinkles can be ...
... this function. NEVER DIRECT THE STEAM JET AT PEOPLE OR ANIMALS. • Follow the instructions as described in the "Steam Ironing" section. • Hold the iron upright, 6-12 inches away from delicate fabric (synthetics, silk, velvet, etc.), otherwise the fabric could be removed within three ...bursts. NEVER DIRECT THE STEAM JET AT PEOPLE OR ANIMALS. • Follow the instructions as described in the "Steam Ironing" section. • While steam ironing, press the Burst of Steam button again. Burst of Steam more than three times in succession. Most wrinkles can be ...
Instruction Manual 2
Page 10
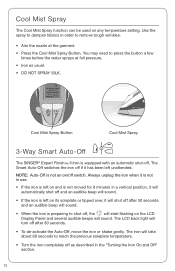
... Mist Spray Button Cool Mist Spray 3-Way Smart Auto-Off The SINGER® Expert Finish™ II Iron is not an on and is not moved for 8 minutes in order to dampen fabrics in a vertical position, it is not in use. • If the iron is left unattended. The LCD back light will turn off...
... Mist Spray Button Cool Mist Spray 3-Way Smart Auto-Off The SINGER® Expert Finish™ II Iron is not an on and is not moved for 8 minutes in order to dampen fabrics in a vertical position, it is not in use. • If the iron is left unattended. The LCD back light will turn off...
Instruction Manual 2
Page 11
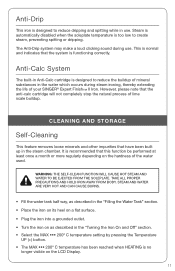
... Self-Cleaning This feature removes loose minerals and other impurities that the anti-calc cartridge will not completely stop the natural process of your SINGER® Expert Finish™ II Iron. Anti-Calc System The built-in Anti-Calc cartridge is no longer visible on the hardness of the water used. However, please note...
... Self-Cleaning This feature removes loose minerals and other impurities that the anti-calc cartridge will not completely stop the natural process of your SINGER® Expert Finish™ II Iron. Anti-Calc System The built-in Anti-Calc cartridge is no longer visible on the hardness of the water used. However, please note...
Instruction Manual 2
Page 12
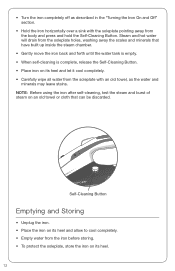
...a sink with the soleplate pointing away from the soleplate with an old towel, as the water and minerals may leave stains. NOTE: Before using the iron after self-cleaning, test the steam and burst of steam on its heel and let it cool completely. • Carefully wipe all water from the.... Auto clean Self-Cleaning Button Emptying and Storing • Unplug the iron. • Place the iron on its heel and allow to cool completely. • Empty water from the iron before storing. • To protect the soleplate, store the iron on an old towel or cloth that have built up inside the steam...
...a sink with the soleplate pointing away from the soleplate with an old towel, as the water and minerals may leave stains. NOTE: Before using the iron after self-cleaning, test the steam and burst of steam on its heel and let it cool completely. • Carefully wipe all water from the.... Auto clean Self-Cleaning Button Emptying and Storing • Unplug the iron. • Place the iron on its heel and allow to cool completely. • Empty water from the iron before storing. • To protect the soleplate, store the iron on an old towel or cloth that have built up inside the steam...


