Instruction Manual
Page 2
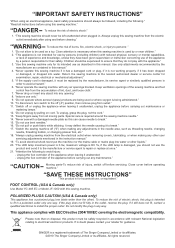
...this can cause needle to ensure that on cord. Keep ventilation openings of The Singer Company Limited or its affiliates. ©2010 The Singer Company Limited or its intended use as this sewing machine if it has a damaged cord or plug, if it is not intended ...for examination, repair, electrical or mechanical adjustment." 5. Do not modify the plug in this manual." 4. SINGER is a registered trademark of the sewing machine and foot control free from the electrical outlet when removing covers, lubricating, or when making any air openings blocked. "CAUTION...
...this can cause needle to ensure that on cord. Keep ventilation openings of The Singer Company Limited or its affiliates. ©2010 The Singer Company Limited or its intended use as this sewing machine if it has a damaged cord or plug, if it is not intended ...for examination, repair, electrical or mechanical adjustment." 5. Do not modify the plug in this manual." 4. SINGER is a registered trademark of the sewing machine and foot control free from the electrical outlet when removing covers, lubricating, or when making any air openings blocked. "CAUTION...
Instruction Manual
Page 5
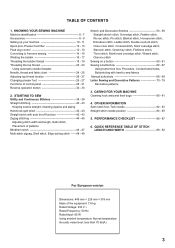
... stitch needle position 84 - 85 5. KNOWING YOUR SEWING MACHINE Machine identification 6 - 7 Accessories 8 - 9 Setting up your machine 10 - 11 Spool pins, Presser foot lifter 12 - 13 Feed dog control 12 - 13 Converting to free-arm sewing 14 - 15 Winding the bobbin 16 - 17 ...stitch, Reinforced overedge stitch, Wizard stitch, Chevron stitch Sewing on a button 60 - 61 Sewing a buttonhole 62 - 67 Using buttonhole foot, Procedure, Corded buttonholes, Buttonholing with hard-to-sew fabrics Manual buttonhole 68 - 69 Letter Sewing and Decorative Patterns 70 - 79 Decorative patterns 3....
... stitch needle position 84 - 85 5. KNOWING YOUR SEWING MACHINE Machine identification 6 - 7 Accessories 8 - 9 Setting up your machine 10 - 11 Spool pins, Presser foot lifter 12 - 13 Feed dog control 12 - 13 Converting to free-arm sewing 14 - 15 Winding the bobbin 16 - 17 ...stitch, Reinforced overedge stitch, Wizard stitch, Chevron stitch Sewing on a button 60 - 61 Sewing a buttonhole 62 - 67 Using buttonhole foot, Procedure, Corded buttonholes, Buttonholing with hard-to-sew fabrics Manual buttonhole 68 - 69 Letter Sewing and Decorative Patterns 70 - 79 Decorative patterns 3....

Instruction Manual
Page 8
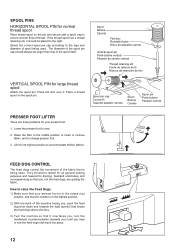
Pre-tension guide 2. Threading lever 5. Handle 13. Identification plate 17. Thread guide 22. General purpose foot 30. Feed dogs 31. Foot control 35. KNOWING YOUR SEWING MACHINE MACHINE IDENTIFICATION 1. Face cover 6. Extension table (Accessory box) 8. Power/light switch 15. Presser foot lifter 18. Bobbin cover plate 25. Needle bar 26. Foot release button ...
Pre-tension guide 2. Threading lever 5. Handle 13. Identification plate 17. Thread guide 22. General purpose foot 30. Feed dogs 31. Foot control 35. KNOWING YOUR SEWING MACHINE MACHINE IDENTIFICATION 1. Face cover 6. Extension table (Accessory box) 8. Power/light switch 15. Presser foot lifter 18. Bobbin cover plate 25. Needle bar 26. Foot release button ...

Instruction Manual
Page 10
... foot 21. Gathering foot 24. Open toe foot 27. Buttonhole opener/brush/seam ripper 9. Circular sewing attachment 14. Even feed foot 23. Screwdriver for the majority of your Sewing machine is another very useful foot and should be sure they are Class I5 J. 1 2 3 4 5 6 7 8 9 10 11 12 13 14 15 ... foot 20. Pintuck foot 25. Satin foot The Satin Foot (Optional) is called the General Purpose Foot and will be used for most decorative sewing. 8 16 17 18 19 20 21 22 23 24 25 26 27 Spool pin cap (small) 7. When purchasing additional bobbins, be used...
... foot 21. Gathering foot 24. Open toe foot 27. Buttonhole opener/brush/seam ripper 9. Circular sewing attachment 14. Even feed foot 23. Screwdriver for the majority of your Sewing machine is another very useful foot and should be sure they are Class I5 J. 1 2 3 4 5 6 7 8 9 10 11 12 13 14 15 ... foot 20. Pintuck foot 25. Satin foot The Satin Foot (Optional) is called the General Purpose Foot and will be used for most decorative sewing. 8 16 17 18 19 20 21 22 23 24 25 26 27 Spool pin cap (small) 7. When purchasing additional bobbins, be used...
Instruction Manual
Page 14
... Dogs: 1) Make sure that your presser foot. 1. They should always be raised for all general sewing purposes and lowered for darning, freehand embroidery and monogramming so that of the spool itself. The diameter of the machine facing you, push the feed dog lever down and towards you) until you hear or see... the feed dogs click back into place. 12 Raise the lifter to the middle position to insert or remove fabric, and to sew. 2. Lift it now faces you , not...
... Dogs: 1) Make sure that your presser foot. 1. They should always be raised for all general sewing purposes and lowered for darning, freehand embroidery and monogramming so that of the spool itself. The diameter of the machine facing you, push the feed dog lever down and towards you) until you hear or see... the feed dogs click back into place. 12 Raise the lifter to the middle position to insert or remove fabric, and to sew. 2. Lift it now faces you , not...

Instruction Manual
Page 16
To remove the extension table, hold it firmly with both hands and pull it off to reach places. 14 To replace, slide the extension table back into a slim free-arm model for sewing children's clothes, cuffs, trouser legs, and other difficult to the left as a freearm model. CONVERTING TO FREE-ARM SEWING Your machine can be used either as a flat-bed or as shown. With the extension table in position, it clicks. With the extension table removed the machine converts into place until it provides a large working surface as a standard flat-bed model.
To remove the extension table, hold it firmly with both hands and pull it off to reach places. 14 To replace, slide the extension table back into a slim free-arm model for sewing children's clothes, cuffs, trouser legs, and other difficult to the left as a freearm model. CONVERTING TO FREE-ARM SEWING Your machine can be used either as a flat-bed or as shown. With the extension table in position, it clicks. With the extension table removed the machine converts into place until it provides a large working surface as a standard flat-bed model.
Instruction Manual
Page 26
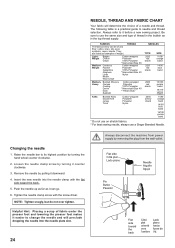
...sure to change the needle and will determine the choice of weight. Insert the new needle into the needle plate slot. 24 Always disconnect the machine from the wall-outlet. FABRICS The fabrics below can go. 6. Push the needle up as far as in the bobbin as it downward. 4.... under the presser foot and lowering the presser foot makes it easier to use a Singer Branded Needle. Loosen the needle clamp screw by removing the plug from power supply by turning it before a new sewing project. Always refer to needle and thread selection. Tighten the needle clamp screw with ...
...sure to change the needle and will determine the choice of weight. Insert the new needle into the needle plate slot. 24 Always disconnect the machine from the wall-outlet. FABRICS The fabrics below can go. 6. Push the needle up as far as in the bobbin as it downward. 4.... under the presser foot and lowering the presser foot makes it easier to use a Singer Branded Needle. Loosen the needle clamp screw by removing the plug from power supply by turning it before a new sewing project. Always refer to needle and thread selection. Tighten the needle clamp screw with ...
Instruction Manual
Page 28
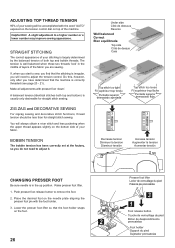
... you will need to adjust the tension control. ADJUSTING TOP THREAD TENSION 90% of your sewing will be less than for straight stitch sewing. Lower the presser foot lifter so that the machine is irregular, you have determined that the foot holder snaps on the needle plate aligning the... presser foot pin with presser foot 'down'. Push presser foot release button to a higher number or a lower number may improve sewing appearance. Helpful Hint: A slight...
... you will need to adjust the tension control. ADJUSTING TOP THREAD TENSION 90% of your sewing will be less than for straight stitch sewing. Lower the presser foot lifter so that the machine is irregular, you have determined that the foot holder snaps on the needle plate aligning the... presser foot pin with presser foot 'down'. Push presser foot release button to a higher number or a lower number may improve sewing appearance. Helpful Hint: A slight...
Instruction Manual
Page 30
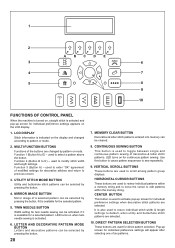
1 2 A BC DE 3 6 4 7 5 8 9 10 FUNCTIONS OF CONTROL PANEL When the machine is turned on, straight stitch is activated. 6. UTILITY STITCH MODE BUTTON Utility and buttonhole stitch patterns can be cleared. 8. LED turns on the LCD display...used to enter "OK" agreement of a selected pattern can be selected by pressing the button, if it is also used for continuous pattern sewing. Function 1 (Button A to sew repeatedly. 9. used to scroll among pattern group displays. VERTICAL SCROLL BUTTONS These buttons are selected. used to edit patterns within the memory ...
1 2 A BC DE 3 6 4 7 5 8 9 10 FUNCTIONS OF CONTROL PANEL When the machine is turned on, straight stitch is activated. 6. UTILITY STITCH MODE BUTTON Utility and buttonhole stitch patterns can be cleared. 8. LED turns on the LCD display...used to enter "OK" agreement of a selected pattern can be selected by pressing the button, if it is also used for continuous pattern sewing. Function 1 (Button A to sew repeatedly. 9. used to scroll among pattern group displays. VERTICAL SCROLL BUTTONS These buttons are selected. used to edit patterns within the memory ...
Instruction Manual
Page 32
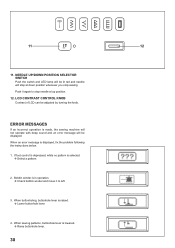
... again to left. 3. Bobbin winder is displayed, fix the problem following the instructions below. 1. If foot control is depressed, while no pattern is made, the sewing machine will not operate with beep sound and an error message will be lit red and needle will be displayed. 11 12 11. ERROR MESSAGES If... an incorrect operation is selected. Select a pattern. 2. Push it to stop sewing. LCD CONTRAST CONTROL KNOB Contrast of LCD can be adjusted by turning the knob.
... again to left. 3. Bobbin winder is displayed, fix the problem following the instructions below. 1. If foot control is depressed, while no pattern is made, the sewing machine will not operate with beep sound and an error message will be lit red and needle will be displayed. 11 12 11. ERROR MESSAGES If... an incorrect operation is selected. Select a pattern. 2. Push it to stop sewing. LCD CONTRAST CONTROL KNOB Contrast of LCD can be adjusted by turning the knob.

Instruction Manual
Page 34
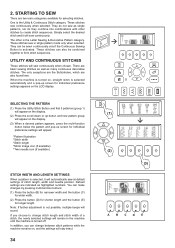
...ère interruptor de puntadas hacia atrás * Reverse stitch function for tying off the sewing on all patterns except straight and zigzag stitches. The position of other stitches ( ) The sewing machine makes 4 tiny tacking stitches to tie off the sewing pattern to sew in the pattern where the reverse/tacking stitch button is pushed.
...ère interruptor de puntadas hacia atrás * Reverse stitch function for tying off the sewing on all patterns except straight and zigzag stitches. The position of other stitches ( ) The sewing machine makes 4 tiny tacking stitches to tie off the sewing pattern to sew in the pattern where the reverse/tacking stitch button is pushed.
Instruction Manual
Page 36
...combined together to form stitch sequences. The other stitches to change between stitch patterns while the machine remains on , straight stitch is not possible, multiple beeps will sew continuously when chosen. These stitches can make changes by pressing multi-function buttons: (1) Press the... needle icon (if available) STITCH WIDTH AND LENGTH SETTINGS When a pattern is activated. When the machine is turned on , and the settings will sew continuously. These stitches sew continuously when selected. Note: If further adjustment is selected automatically and a pop-up screen for longer...
...combined together to form stitch sequences. The other stitches to change between stitch patterns while the machine remains on , straight stitch is not possible, multiple beeps will sew continuously when chosen. These stitches can make changes by pressing multi-function buttons: (1) Press the... needle icon (if available) STITCH WIDTH AND LENGTH SETTINGS When a pattern is activated. When the machine is turned on , and the settings will sew continuously. These stitches sew continuously when selected. Note: If further adjustment is selected automatically and a pop-up screen for longer...
Instruction Manual
Page 38
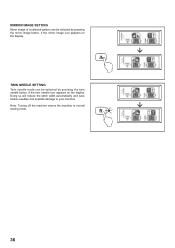
Doing so will reduce the stitch width automatically and save broken needles and possible damage to normal sewing mode. 36 Note: Turning off the machine returns the machine to your machine. MIRROR IMAGE SETTING Mirror image of a selected pattern can be selected by pressing the twin needle button, if the twin needle icon appears on the display. TWIN NEEDLE SETTING Twin needle mode can be selected by pressing the mirror image button, if the mirror image icon appears on the display.
Doing so will reduce the stitch width automatically and save broken needles and possible damage to normal sewing mode. 36 Note: Turning off the machine returns the machine to your machine. MIRROR IMAGE SETTING Mirror image of a selected pattern can be selected by pressing the twin needle button, if the twin needle icon appears on the display. TWIN NEEDLE SETTING Twin needle mode can be selected by pressing the mirror image button, if the mirror image icon appears on the display.
Instruction Manual
Page 42
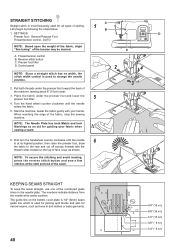
... by following the steps below. 1 B 1. AUTO NOTE: Based upon the weight of the fabric, slight "fine tuning" of the fabric, stop the sewing machine. C 2 4 3 NOTE: The Needle Plate has both threads under the presser foot and lower the presser foot lifter. 5 4. Presser foot lifter D.... KEEPING SEAMS STRAIGHT To keep the seam straight, use one of the numbered guide lines on the top of the machine, leaving about 6" (15cm) clear. 3. First turn the handwheel counter clockwise until the needle enters the fabric. 5. General Purpose Foot Thread tension ...
... by following the steps below. 1 B 1. AUTO NOTE: Based upon the weight of the fabric, slight "fine tuning" of the fabric, stop the sewing machine. C 2 4 3 NOTE: The Needle Plate has both threads under the presser foot and lower the presser foot lifter. 5 4. Presser foot lifter D.... KEEPING SEAMS STRAIGHT To keep the seam straight, use one of the numbered guide lines on the top of the machine, leaving about 6" (15cm) clear. 3. First turn the handwheel counter clockwise until the needle enters the fabric. 5. General Purpose Foot Thread tension ...
Instruction Manual
Page 44
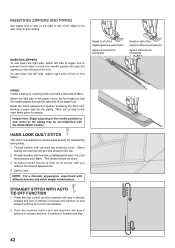
...a time until the foot control is designed to look like hand sewing for the piping. Press the foot control and the machine will sew 4 stitches in reverse and then 4 stitches in reverse and continue to sew forward until you acheive the desired appearance. 4. HAND-LOOK QUILT ... a seam tape for topstitching and quilting. 1. Push the reverse button and the machine will sew 4 stitches forward and then 4 stitches in forward and stop. 42 When sewing the machine will pull this thread to sew. Start to the top. 2. STRAIGHT STITCH WITH AUTO TIE-OFF FUNCTION 1. INSERTING...
...a time until the foot control is designed to look like hand sewing for the piping. Press the foot control and the machine will sew 4 stitches in reverse and then 4 stitches in reverse and continue to sew forward until you acheive the desired appearance. 4. HAND-LOOK QUILT ... a seam tape for topstitching and quilting. 1. Push the reverse button and the machine will sew 4 stitches forward and then 4 stitches in forward and stop. 42 When sewing the machine will pull this thread to sew. Start to the top. 2. STRAIGHT STITCH WITH AUTO TIE-OFF FUNCTION 1. INSERTING...
Instruction Manual
Page 46
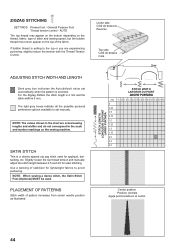
...0.5 and 2.0 for lightweight fabrics to the scale and number markings on the top of the fabric. NOTE: When sewing a dense stitch, the Satin Stitch Foot (Optional) MUST be used for appliqué, bartacking, etc. ZIGZAG STITCHING ... preference options available to set automatically when the pattern is pulling to the top or you are actual sewing lengths and widths and do not correspond to avoid puckering. SATIN STITCH This is 5 mm. General Purpose... depending on the thread, fabric, type of stitch and sewing speed, but the bobbin thread must never appear on the sewing machine.
...0.5 and 2.0 for lightweight fabrics to the scale and number markings on the top of the fabric. NOTE: When sewing a dense stitch, the Satin Stitch Foot (Optional) MUST be used for appliqué, bartacking, etc. ZIGZAG STITCHING ... preference options available to set automatically when the pattern is pulling to the top or you are actual sewing lengths and widths and do not correspond to avoid puckering. SATIN STITCH This is 5 mm. General Purpose... depending on the thread, fabric, type of stitch and sewing speed, but the bobbin thread must never appear on the sewing machine.

Instruction Manual
Page 64
... using. Replace the presser foot with the selected button. 1. Then try the buttonhole with the buttonhole foot. (Refer to "Using buttonhole foot" above.) 4. SEWING A BUTTONHOLE USING BUTTONHOLE FOOT Your machine offers you are placed. tab A Languette A Lengüeta A tab B Languette B Lengüeta B PROCEDURE * Use an interfacing in the area of...
... using. Replace the presser foot with the selected button. 1. Then try the buttonhole with the buttonhole foot. (Refer to "Using buttonhole foot" above.) 4. SEWING A BUTTONHOLE USING BUTTONHOLE FOOT Your machine offers you are placed. tab A Languette A Lengüeta A tab B Languette B Lengüeta B PROCEDURE * Use an interfacing in the area of...
Instruction Manual
Page 66
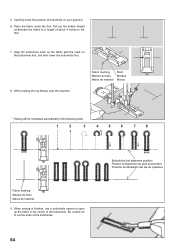
... be completed automatically in the center of the buttonhole. Align the buttonhole mark on the fabric with the mark on your garment. 6. When sewing is finished, use a buttonhole opener to open up the fabric in the following order. 1 2 3 4 5 6 7 8 Fabric marking Marque du tissu Marca de material 9. Be careful not ... about 4 inches to cut the ends of buttonhole on the buttonhole foot, and then lower the buttonhole foot. 8. While holding the top thread, start the machine.
... be completed automatically in the center of the buttonhole. Align the buttonhole mark on the fabric with the mark on your garment. 6. When sewing is finished, use a buttonhole opener to open up the fabric in the following order. 1 2 3 4 5 6 7 8 Fabric marking Marque du tissu Marca de material 9. Be careful not ... about 4 inches to cut the ends of buttonhole on the buttonhole foot, and then lower the buttonhole foot. 8. While holding the top thread, start the machine.
Instruction Manual
Page 70
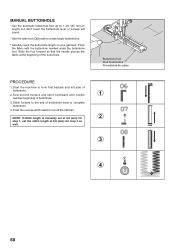
... foot forward so that the needle pierces the fabric at 0.8 (mm) for step 3 as well. 3 4 68 Start the machine to complete buttonhole. 4. Buttonhole foot Pied boutonnière Prensatelas de ojales PROCEDURE 1. Sew second bartack and stitch backward until needle 1 reaches beginning of buttonhole. 2. Push the reverse stitch switch to create larger...
... foot forward so that the needle pierces the fabric at 0.8 (mm) for step 3 as well. 3 4 68 Start the machine to complete buttonhole. 4. Buttonhole foot Pied boutonnière Prensatelas de ojales PROCEDURE 1. Sew second bartack and stitch backward until needle 1 reaches beginning of buttonhole. 2. Push the reverse stitch switch to create larger...
Instruction Manual
Page 82
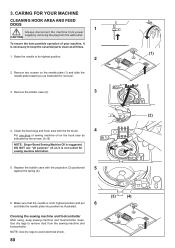
...(2) (A) (B) 6. DO NOT use "all times. (1) 1. Raise the needle to keep sewing machine and footcontroller clean. Make sure that the needle is suggested. Cleaning the sewing machine and footcontroller After using, keep the essential parts clean at its highest position. 2 2. Use...YOUR MACHINE CLEANING HOOK AREA AND FEED DOGS 1 Always disconnect the machine from power CAUTION supply by the arrows. (A, B) NOTE: Singer Brand Sewing Machine Oil is at all purpose" oil as illustrated for sewing machine lubrication. 5. To ensure the best possible operation of sewing machine oil...
...(2) (A) (B) 6. DO NOT use "all times. (1) 1. Raise the needle to keep sewing machine and footcontroller clean. Make sure that the needle is suggested. Cleaning the sewing machine and footcontroller After using, keep the essential parts clean at its highest position. 2 2. Use...YOUR MACHINE CLEANING HOOK AREA AND FEED DOGS 1 Always disconnect the machine from power CAUTION supply by the arrows. (A, B) NOTE: Singer Brand Sewing Machine Oil is at all purpose" oil as illustrated for sewing machine lubrication. 5. To ensure the best possible operation of sewing machine oil...


