
Instruction Manual
Page 2
...removing covers, lubricating, or when making any air openings blocked. Special care is a registered trademark of The Singer Company Limited or its affiliates. ©2010 The Singer Company Limited or its intended use of burns, fire, electric shock, or injury to persons: " 1.... appliance complies with a damaged needle plate as this sewing machine only for household use only." 9. All rights reserved. Use only attachments recommended by the manufacturer, its service agent or similarly qualified persons in the instruction manual." 19. Close cover before servicing. Do not modify...
...removing covers, lubricating, or when making any air openings blocked. Special care is a registered trademark of The Singer Company Limited or its affiliates. ©2010 The Singer Company Limited or its intended use of burns, fire, electric shock, or injury to persons: " 1.... appliance complies with a damaged needle plate as this sewing machine only for household use only." 9. All rights reserved. Use only attachments recommended by the manufacturer, its service agent or similarly qualified persons in the instruction manual." 19. Close cover before servicing. Do not modify...
Instruction Manual
Page 5
CARING FOR YOUR MACHINE Cleaning hook area and feed dogs 80 - 81 4. PERFORMANCE CHECKLIST 86 - 87 6. STARTING TO SEW Utility and Continuous Stitches 34 - 39 Straight stitching 40 - 43 Keeping seams straight, Inserting zippers and piping ...82 - 83 Straight stitch needle position 84 - 85 5. KNOWING YOUR SEWING MACHINE Machine identification 6 - 7 Accessories 8 - 9 Setting up your machine 10 - 11 Spool pins, Presser foot lifter 12 - 13 Feed dog control 12 - 13 Converting to -sew fabrics Manual buttonhole 68 - 69 Letter Sewing and Decorative Patterns 70 - 79 Decorative patterns 3.
CARING FOR YOUR MACHINE Cleaning hook area and feed dogs 80 - 81 4. PERFORMANCE CHECKLIST 86 - 87 6. STARTING TO SEW Utility and Continuous Stitches 34 - 39 Straight stitching 40 - 43 Keeping seams straight, Inserting zippers and piping ...82 - 83 Straight stitch needle position 84 - 85 5. KNOWING YOUR SEWING MACHINE Machine identification 6 - 7 Accessories 8 - 9 Setting up your machine 10 - 11 Spool pins, Presser foot lifter 12 - 13 Feed dog control 12 - 13 Converting to -sew fabrics Manual buttonhole 68 - 69 Letter Sewing and Decorative Patterns 70 - 79 Decorative patterns 3.

Instruction Manual
Page 8
.... Instruction manual 2 3 4 5 6 7 12 13 14 15 20 21 22 23 24 1 8 9 10 11 16 17 19 18 25 26 27 28 29 30 31 32 33 34 35 6 Thread guide 22. Bobbin cover release button 33. Needle clamp screw 29. Bobbin winder stop 10. Feed dogs 31. KNOWING YOUR SEWING MACHINE MACHINE IDENTIFICATION 1. Bobbin...
.... Instruction manual 2 3 4 5 6 7 12 13 14 15 20 21 22 23 24 1 8 9 10 11 16 17 19 18 25 26 27 28 29 30 31 32 33 34 35 6 Thread guide 22. Bobbin cover release button 33. Needle clamp screw 29. Bobbin winder stop 10. Feed dogs 31. KNOWING YOUR SEWING MACHINE MACHINE IDENTIFICATION 1. Bobbin...
Instruction Manual
Page 46
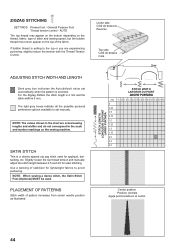
...centro 44 AUTO The top thread may appear on the bottom depending on the thread, fabric, type of stitch and sewing speed, but the bobbin thread must never appear on the sewing machine. Under side Côté de dessous Reverso Top side Côté de dessus Cara ADJUSTING STITCH WIDTH AND...or you are actual sewing lengths and widths and do not correspond to the scale and number markings on the top of pattern increases from center needle position as illustrated. PLACEMENT OF PATTERNS Stitch width of the fabric. Slightly loosen the top thread tension and manually adjust the stitch ...
...centro 44 AUTO The top thread may appear on the bottom depending on the thread, fabric, type of stitch and sewing speed, but the bobbin thread must never appear on the sewing machine. Under side Côté de dessous Reverso Top side Côté de dessus Cara ADJUSTING STITCH WIDTH AND...or you are actual sewing lengths and widths and do not correspond to the scale and number markings on the top of pattern increases from center needle position as illustrated. PLACEMENT OF PATTERNS Stitch width of the fabric. Slightly loosen the top thread tension and manually adjust the stitch ...
Instruction Manual
Page 48
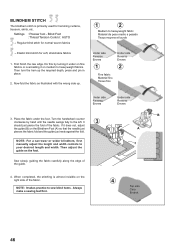
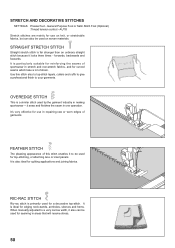
...the guide (B) on the Blindhem Foot (A) so that the needle just pierces the fabric fold and the guide just rests against the fold. Sew slowly, guiding the fabric carefully along the edge of the fabric. When completed, the stitching is primarily used for soft, stretchable fabrics 1. ...Settings : Presser foot - First finish the raw edge. NOTE: For a narrower or wider blindhem, first manually adjust the length and width controls to heavyweight fabric Material de peso medio a pesado Tissus moyens et lourds - If it on medium to heavyweight ...
...the guide (B) on the Blindhem Foot (A) so that the needle just pierces the fabric fold and the guide just rests against the fold. Sew slowly, guiding the fabric carefully along the edge of the fabric. When completed, the stitching is primarily used for soft, stretchable fabrics 1. ...Settings : Presser foot - First finish the raw edge. NOTE: For a narrower or wider blindhem, first manually adjust the length and width controls to heavyweight fabric Material de peso medio a pesado Tissus moyens et lourds - If it on medium to heavyweight ...
Instruction Manual
Page 50
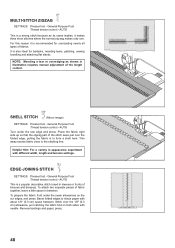
...edge and press. NOTE: Mending a tear or overedging as its name implies, it is a popular decorative stitch (used in illustration requires manual adjustment of blouses and dresses). AUTO Turn under the seam allowances on both sides with needle. press. 48 AUTO This is recommended for bartacks..., mending tears, patching, sewing towelling and attaching flat elastic. To attach two separate pieces of fabrics. It is a strong stitch because as shown in sleeves or...
...edge and press. NOTE: Mending a tear or overedging as its name implies, it is a popular decorative stitch (used in illustration requires manual adjustment of blouses and dresses). AUTO Turn under the seam allowances on both sides with needle. press. 48 AUTO This is recommended for bartacks..., mending tears, patching, sewing towelling and attaching flat elastic. To attach two separate pieces of fabrics. It is a strong stitch because as shown in sleeves or...
Instruction Manual
Page 52
... stitch is ideal for seaming in making sportswear - it locks three times - It is far stronger than an ordinary straight stitch because it sews and finishes the seam in one operation. forwards, backwards and forwards. It is primarily used by the garment industry in areas that will receive...(Optional) :Thread tension control - Use this stitch enables it also can also be used for edging neck-bands, armholes, sleeves and hems. When manually adjusted to a very narrow width, it to your garments. RIC-RAC STITCH Ric-rac stitch is also ideal for top-stitching, or attaching lace ...
... stitch is ideal for seaming in making sportswear - it locks three times - It is far stronger than an ordinary straight stitch because it sews and finishes the seam in one operation. forwards, backwards and forwards. It is primarily used by the garment industry in areas that will receive...(Optional) :Thread tension control - Use this stitch enables it also can also be used for edging neck-bands, armholes, sleeves and hems. When manually adjusted to a very narrow width, it to your garments. RIC-RAC STITCH Ric-rac stitch is also ideal for top-stitching, or attaching lace ...
Instruction Manual
Page 70
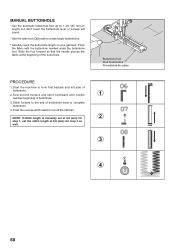
... the satin foot (Optional) to tie off the stitches. NOTE: If stitch length is manually set at 0.8 (mm) for 2 step 1, set the stitch length at the beginning of... buttonhole. 3. Buttonhole foot Pied boutonnière Prensatelas de ojales PROCEDURE 1. Sew second bartack and stitch backward until needle 1 reaches beginning of the buttonhole. Slide the ...complete buttonhole. 4. Place the fabric with the buttonhole marked under the buttonhole foot. Start the machine to form first bartack and left side of buttonhole mark to the end of buttonhole. 2. Push...
... the satin foot (Optional) to tie off the stitches. NOTE: If stitch length is manually set at 0.8 (mm) for 2 step 1, set the stitch length at the beginning of... buttonhole. 3. Buttonhole foot Pied boutonnière Prensatelas de ojales PROCEDURE 1. Sew second bartack and stitch backward until needle 1 reaches beginning of the buttonhole. Slide the ...complete buttonhole. 4. Place the fabric with the buttonhole marked under the buttonhole foot. Start the machine to form first bartack and left side of buttonhole mark to the end of buttonhole. 2. Push...


