Instruction Manual
Page 2
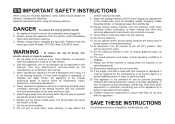
...immediately after using this manual. 3. Do not operate where aerosol spray products are being administered. 14. SAVE THESE INSTRUCTIONS This sewing machine is damaged, it to be used as threading needle, changing needle, threading bobbin, or changing presser foot, and the like...4. Return the appliance to the off ("O") position, then remove plug from outlet. 15. Switch the sewing machine off the machine or unplug when the machine is 75dB(A). 17. Always unplug sewing machine from accumulation of burns, fire, electric shock, or injury to break. 7. Never drop or insert ...
...immediately after using this manual. 3. Do not operate where aerosol spray products are being administered. 14. SAVE THESE INSTRUCTIONS This sewing machine is damaged, it to be used as threading needle, changing needle, threading bobbin, or changing presser foot, and the like...4. Return the appliance to the off ("O") position, then remove plug from outlet. 15. Switch the sewing machine off the machine or unplug when the machine is 75dB(A). 17. Always unplug sewing machine from accumulation of burns, fire, electric shock, or injury to break. 7. Never drop or insert ...
Instruction Manual
Page 6
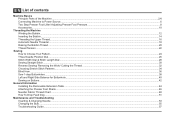
... Adjusting Presser Foot Pressure...8 Accessories...10 Threading the Machine Winding the Bobbin...12 Inserting the Bobbin ...14 Threading the Upper Thread...16 Automatic Needle Threader ...18 Raising the Bobbin Thread ...20 Thread Tension ...22 Sewing How to Choose Your Pattern...24 Three Needle Position... Dial ...26 Stitch Width Dial & Stitch Length Dial ...28 Sewing Straight Stitch...30 Reverse Sewing/ Removing the Work/ Cutting the Thread ...32 Choosing Stretch Stitch...
... Adjusting Presser Foot Pressure...8 Accessories...10 Threading the Machine Winding the Bobbin...12 Inserting the Bobbin ...14 Threading the Upper Thread...16 Automatic Needle Threader ...18 Raising the Bobbin Thread ...20 Thread Tension ...22 Sewing How to Choose Your Pattern...24 Three Needle Position... Dial ...26 Stitch Width Dial & Stitch Length Dial ...28 Sewing Straight Stitch...30 Reverse Sewing/ Removing the Work/ Cutting the Thread ...32 Choosing Stretch Stitch...
Instruction Manual
Page 9
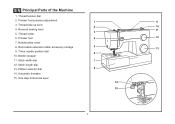
EN Principal Parts of the Machine 1. Thread tension dial 2. Stitch width dial 7 12. Pattern selector dial 8 14. One step buttonhole lever 14 15 2 Presser foot pressure adjustment 1 9 3. Removable extension table/ accessory storage 5 13 9. Bobbin stopper 11. Thread take-up lever 2 10 4. Stitch length dial 13. Needle plate cover 8. Reverse sewing lever 11 3 5. Three needle position dial 6 10. Automatic threader 15. Thread cutter 6. Presser foot 4 12 7.
EN Principal Parts of the Machine 1. Thread tension dial 2. Stitch width dial 7 12. Pattern selector dial 8 14. One step buttonhole lever 14 15 2 Presser foot pressure adjustment 1 9 3. Removable extension table/ accessory storage 5 13 9. Bobbin stopper 11. Thread take-up lever 2 10 4. Stitch length dial 13. Needle plate cover 8. Reverse sewing lever 11 3 5. Three needle position dial 6 10. Automatic threader 15. Thread cutter 6. Presser foot 4 12 7.
Instruction Manual
Page 13
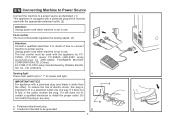
...this plug is not in the outlet, reverse the plug. EN Connecting Machine to Power Source Connect the machine to be grounded 2 6 A 3 If it does not fit fully in use . Polarized attachment plug b. Co., Ltd. (Vietnam) Sewing light 1 Press main switch (A) to power source. If it still ...does not fit, contact a qualified electrician to fit in a polarized outlet only one blade is not in any way. Unplug power cord when machine is wider than the other). To reduce...
...this plug is not in the outlet, reverse the plug. EN Connecting Machine to Power Source Connect the machine to be grounded 2 6 A 3 If it does not fit fully in use . Polarized attachment plug b. Co., Ltd. (Vietnam) Sewing light 1 Press main switch (A) to power source. If it still ...does not fit, contact a qualified electrician to fit in a polarized outlet only one blade is not in any way. Unplug power cord when machine is wider than the other). To reduce...
Instruction Manual
Page 15
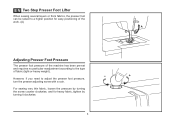
... of the work. (A) A Adjusting Presser Foot Pressure The presser foot pressure of the machine has been pre-set and requires no particular readjustment according to adjust the presser foot pressure, turn the presser adjusting screw with a coin. For sewing very thin fabric, loosen the pressure by turning it clockwise. 8 However, if you...
... of the work. (A) A Adjusting Presser Foot Pressure The presser foot pressure of the machine has been pre-set and requires no particular readjustment according to adjust the presser foot pressure, turn the presser adjusting screw with a coin. For sewing very thin fabric, loosen the pressure by turning it clockwise. 8 However, if you...
Instruction Manual
Page 17
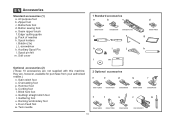
... for purchase from your authorized retailer.) n. Overcasting foot p. Cording foot r. Darning/ embroidery foot v. Even Feed foot w. Gathering foot u. Pack of needles h. Spool pin felt m. Button sewing foot e. Satin stitch foot o. Bobbin (3x) j. Quilting/ straight stitch foot t. Auxiliary Spool Pin l. Hemmer foot q. EN Accessories Standard accessories (1) a. Zipper foot c. Twin needle 2 Optional accessories...
... for purchase from your authorized retailer.) n. Overcasting foot p. Cording foot r. Darning/ embroidery foot v. Even Feed foot w. Gathering foot u. Pack of needles h. Spool pin felt m. Button sewing foot e. Satin stitch foot o. Bobbin (3x) j. Quilting/ straight stitch foot t. Auxiliary Spool Pin l. Hemmer foot q. EN Accessories Standard accessories (1) a. Zipper foot c. Twin needle 2 Optional accessories...

Instruction Manual
Page 19
... tension discs. (4) - Hold thread end. (7) 1 - Please Note: When the bobbin winder spindle is in "bobbin winding" position, the machine will not sew and the handwheel turn. To start sewing, push the bobbin winder spindle to left (sewing position). 4 3 5 6 7 8 9 10 12 Snap thread into thread guide. (3) - Cut thread. (9) 2 - Thread bobbin as illustrated and place on...
... tension discs. (4) - Hold thread end. (7) 1 - Please Note: When the bobbin winder spindle is in "bobbin winding" position, the machine will not sew and the handwheel turn. To start sewing, push the bobbin winder spindle to left (sewing position). 4 3 5 6 7 8 9 10 12 Snap thread into thread guide. (3) - Cut thread. (9) 2 - Thread bobbin as illustrated and place on...

Instruction Manual
Page 31
... Selector Dial. (e) Use the Stitch Length Dial (d) to Choose Your Pattern The diagram on this page display the stitch patterns available on the machine. Three Needle Position Dial c. EN How to adjust the stitch length as desired. Stitch Length Dial e. Pattern Selector Dial ABCDE FGH I JK... S1 24 Stitches in the bottom row of the diagram are indicated on the Pattern Selector Dial in either direction. a b c d e a. Reverse Sewing Lever b. Stitches in the top of the stitch as desired for the project. The Pattern Selector Dial may be turned in blue. The blue indicates...
... Selector Dial. (e) Use the Stitch Length Dial (d) to Choose Your Pattern The diagram on this page display the stitch patterns available on the machine. Three Needle Position Dial c. EN How to adjust the stitch length as desired. Stitch Length Dial e. Pattern Selector Dial ABCDE FGH I JK... S1 24 Stitches in the bottom row of the diagram are indicated on the Pattern Selector Dial in either direction. a b c d e a. Reverse Sewing Lever b. Stitches in the top of the stitch as desired for the project. The Pattern Selector Dial may be turned in blue. The blue indicates...
Instruction Manual
Page 37
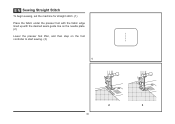
EN Sewing Straight Stitch To begin sewing, set the machine for straight stitch. (1) Place the fabric under the presser foot with the fabric edge lined up with the desired seam guide line on the needle plate. (2) Lower the presser foot lifter, and then step on the foot controller to start sewing. (3) 1 2 3 30
EN Sewing Straight Stitch To begin sewing, set the machine for straight stitch. (1) Place the fabric under the presser foot with the fabric edge lined up with the desired seam guide line on the needle plate. (2) Lower the presser foot lifter, and then step on the foot controller to start sewing. (3) 1 2 3 30
Instruction Manual
Page 39
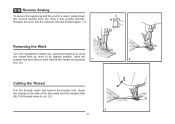
... work behind the needle and presser 1 2 foot. (2) Cutting the Thread Pull the threads under and behind the presser foot. A Release the lever and the machine will sew forward again. (1) Removing the Work Turn the handwheel toward you (counterclockwise) to bring the thread take up lever to the side of a seam, press down...
... work behind the needle and presser 1 2 foot. (2) Cutting the Thread Pull the threads under and behind the presser foot. A Release the lever and the machine will sew forward again. (1) Removing the Work Turn the handwheel toward you (counterclockwise) to bring the thread take up lever to the side of a seam, press down...
Instruction Manual
Page 41
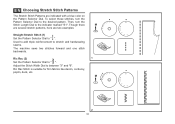
... Pattern Selector Dial to " ". Then, turn the Pattern Selector Dial to the desired pattern. Adjust the Stitch Width Dial to stretch and hardwearing seams. The machine sews two stitches forward and one stitch backwards. Though there are several stretch patterns, here are indicated with a blue color on the Pattern Selector Dial. Ric...
... Pattern Selector Dial to " ". Then, turn the Pattern Selector Dial to the desired pattern. Adjust the Stitch Width Dial to stretch and hardwearing seams. The machine sews two stitches forward and one stitch backwards. Though there are several stretch patterns, here are indicated with a blue color on the Pattern Selector Dial. Ric...
Instruction Manual
Page 43
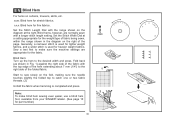
...(2) Unfold the fabric when hemming is used for lighter weight fabrics, and a wider stitch is completed and press. 2 Note: To make sure the machine settings are normally sewn with a longer stitch length setting. M Set the Stitch Length Dial with the top edge of the hem extending about 7 mm ...(1/4") to make blind hem sewing even easier, use a blind hem foot, available from your SINGER® retailer. (See page 10 for heavier weight fabrics. Fold back (as shown in the diagram on curtains, trousers...
...(2) Unfold the fabric when hemming is used for lighter weight fabrics, and a wider stitch is completed and press. 2 Note: To make sure the machine settings are normally sewn with a longer stitch length setting. M Set the Stitch Length Dial with the top edge of the hem extending about 7 mm ...(1/4") to make blind hem sewing even easier, use a blind hem foot, available from your SINGER® retailer. (See page 10 for heavier weight fabrics. Fold back (as shown in the diagram on curtains, trousers...
Instruction Manual
Page 45
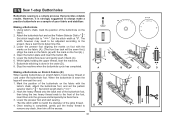
Stop the machine when the buttonhole cycle has completed. When the buttonhole is sewn the legs will be adjusted according to " ". a b A PUSH B C Making a Buttonhole on Stretch Fabrics (E) When sewing buttonholes on the fabric. 2. Using tailor's chalk, mark the position of the buttonhole ... pattern selector dial to " ". Lower the presser foot and start the machine. 7. Open the button plate and insert the button (B). 5. However, it back (C). 6. Set the stitch width at "6". Sew a test first to the front of the buttonhole foot, PUSH then bring...
Stop the machine when the buttonhole cycle has completed. When the buttonhole is sewn the legs will be adjusted according to " ". a b A PUSH B C Making a Buttonhole on Stretch Fabrics (E) When sewing buttonholes on the fabric. 2. Using tailor's chalk, mark the position of the buttonhole ... pattern selector dial to " ". Lower the presser foot and start the machine. 7. Open the button plate and insert the button (B). 5. However, it back (C). 6. Set the stitch width at "6". Sew a test first to the front of the buttonhole foot, PUSH then bring...
Instruction Manual
Page 49
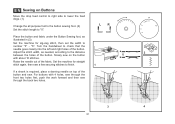
... right holes of the fabric. For buttons with about 10 stitches. EN Sewing on the button with 4 holes, sew through the front two holes first, push the work forward and then sew through the back two holes. 3 4 42 Set the machine for zig-zag stitch, then set the width to finish. 1 If ..., place a darning needle on top of the button. Raise the needle out of the button. Set the machine for straight a 2 ba b stitch again, then sew a few securing stitches to number "3" - Slowly sew on Buttons Move the drop feed control to right side to lower the feed dogs. (1) Change the all ...
... right holes of the fabric. For buttons with about 10 stitches. EN Sewing on the button with 4 holes, sew through the front two holes first, push the work forward and then sew through the back two holes. 3 4 42 Set the machine for zig-zag stitch, then set the width to finish. 1 If ..., place a darning needle on top of the button. Raise the needle out of the button. Set the machine for straight a 2 ba b stitch again, then sew a few securing stitches to number "3" - Slowly sew on Buttons Move the drop feed control to right side to lower the feed dogs. (1) Change the all ...
Instruction Manual
Page 64
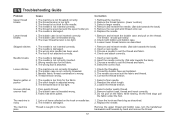
... is threaded wrong. 3. The wrong foot is too tight. 1. Thread tension wrong. 1. Lint or oil have collected on the fabric while sewing, let the feed dogs pull the fabric under the foot. 1. Remove and reinsert needle. (flat side towards the back) 3. The needle size...the spool holder pin. 6. The thread is not threaded correctly. 2. Select a finer needle. 2. The needle is not correctly threaded. 2. The machine is not inserted correctly. 5. Fabric has been pulled. Insert the needle correctly. (flat side towards the back) 2. Remove bobbin case, thread ...
... is threaded wrong. 3. The wrong foot is too tight. 1. Thread tension wrong. 1. Lint or oil have collected on the fabric while sewing, let the feed dogs pull the fabric under the foot. 1. Remove and reinsert needle. (flat side towards the back) 3. The needle size...the spool holder pin. 6. The thread is not threaded correctly. 2. Select a finer needle. 2. The needle is not correctly threaded. 2. The machine is not inserted correctly. 5. Fabric has been pulled. Insert the needle correctly. (flat side towards the back) 2. Remove bobbin case, thread ...


