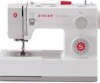
Singer 5523 SCHOLASTIC Support Question
Singer 5523 SCHOLASTIC Support Question
Find answers below for this question about Singer 5523 SCHOLASTIC.Need a Singer 5523 SCHOLASTIC manual? We have 1 online manual for this item!
Question posted by Anonymous-153517 on August 13th, 2015
Parts Needed
I need the power cord and presser foot for this machine
Current Answers
Answer #1: Posted by Odin on August 13th, 2015 9:52 AM
Odin

Member since:
April 10th, 2010 Points: 41,236,680

Member since:
April 10th, 2010 Points: 41,236,680
The manufacturer might supply it to you: go https://www.contacthelp.com/Singer/customer-service. If you can't get the part from the manufacturer you should at least be able to obtain the part number. Then if necessary you can try the following:
- Contact local parts dealers, who might be able to supply or maybe fix the part
- Try sewing machine merchants, who might be able to supply or maybe fix the part
- Enter your part number in a search engine like Google or Yahoo
- Try eBay--search with the part number
- Try a used appliance store
- Take the part to an appliance technician, who might possibly be able to fix the part
- Contact refurbishing companies
Hope this is useful. Please don't forget to click the Accept This Answer button if you do accept it. My aim is to provide reliable helpful answers, not just a lot of them. See https://www.helpowl.com/profile/Odin.
Related Singer 5523 SCHOLASTIC Manual Pages
Instruction Manual - Page 2
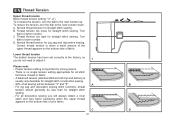
...cord that they have been given supervision or instruction concerning use bent needles. 8. SAVE THESE INSTRUCTIONS
This sewing machine is being used or where oxygen is intended for household use as threading needle, changing needle, threading bobbin, or changing presser foot...attention is necessary
when this appliance from all moving parts. Never operate this appliance only for use by ...
Instruction Manual - Page 6
EN List of contents
Machine Basics Principle Parts of the Machine ...2/4 Connecting Machine to Power Source...6 Two Step Presser Foot Lifter/ Adjusting Presser Foot Pressure...8 Accessories...10
Threading the Machine Winding the Bobbin...12 Inserting the Bobbin ...14 Threading the Upper Thread...16 Automatic Needle Threader ...18 Raising the Bobbin Thread ...20 Thread Tension ...22
Sewing How to ...
Instruction Manual - Page 9
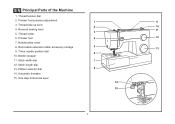
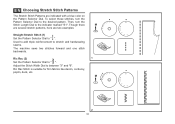
...sewing lever
11
3
5. Stitch width dial
7
12. Pattern selector dial
8
14. Thread take-up lever 2
10
4. Thread cutter
6. Three needle position dial
6
10. One step buttonhole lever
14
15
2 Needle plate cover
8. Bobbin stopper
11. Automatic threader 15. EN Principal Parts of the Machine
1. Stitch length dial
13. Presser foot pressure adjustment
1
9
3. Presser...
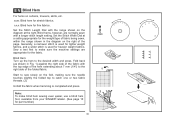
Instruction Manual - Page 11

...
29. Buttonhole stitch balance adjustment slot
18
21. Upper thread guide
25. Presser foot lifter 22
28. Handle
21
27. Foot speed control 30. Bobbin winding spindle
16
18. Main plug socket
23. Power cord
4
23 24 25 26 27
29 30
28 Hole for second spool pin
17
19. EN Principal Parts of the Machine
16.
Instruction Manual - Page 13
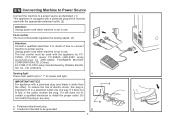
... illustrated. (1) This appliance is equipped with a polarized plug which must be used with the appropriate polarized outlet. (2)
Attention: Unplug power cord when machine is not in use . Foot control The foot control pedal regulates the sewing speed. (3)
Attention: Consult a qualified electrician if in the outlet, reverse the plug. IMPORTANT NOTICE For appliance with the appliance by...
Instruction Manual - Page 15
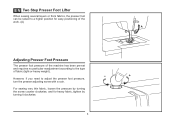
... to a higher position for heavy fabric, tighten by turning it clockwise.
8 For sewing very thin fabric, loosen the pressure by turning the screw counter clockwise, and for easy positioning of the work. (A)
A
Adjusting Presser Foot Pressure
The presser foot pressure of the machine has been pre-set and requires no particular readjustment according to adjust the...
Instruction Manual - Page 17
...
006016008
0061850081
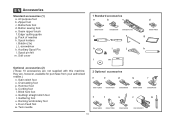
10 All purpose foot b. Buttonhole foot d. Seam ripper/ brush f. Auxiliary Spool Pin l. Hemmer foot q. Even Feed foot w. Zipper foot c. they are not supplied with this machine; Quilting/ straight stitch foot t. L-screwdriver k. Cording foot r. Gathering foot u. Satin stitch foot o. Button sewing foot e. EN Accessories
Standard accessories...
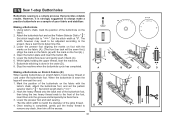
Instruction Manual - Page 19

.... (5)
-
Please Note:
When the bobbin winder spindle is in "bobbin winding"
position, the machine will not sew and the handwheel turn.
To start sewing, push the bobbin winder spindle to left
(sewing position).
4
3
5
6
7
8
9
10
12 Thread bobbin as illustrated and place on foot control pedal. (8)
- Place thread and corresponding spool holder on to right. (6)
- Push...
Instruction Manual - Page 23
... sewing problems could result.
- Pull about 6-8 inches of this process it is helpful to hold the thread between the spool and thread guide.
- At the top of thread to spool. (2)
- EN Threading the Upper Thread
This is a simple operation but it is important to carry out correctly as shown. Raise the presser foot...
Instruction Manual - Page 29
... functions, thread
tension should generally be between "3" and "5". Normal thread tension for all decorative sewing you do not need to higher number. A
B
- EN Thread Tension
Upper thread tension Basic thread tension setting: "4". (1) To increase the tension, turn the dial to lower number. Correct thread ...
Instruction Manual - Page 31

... desired for the project. Stitch Width Dial d. Pattern Selector Dial
ABCDE FGH I JK
ABCDE FGH I JK
S1
24
Reverse Sewing Lever b. Use the Stitch Width Dial (c) to adjust the stitch length as desired. a
b
c d e
a. Stitch Length Dial e.
EN How to...the Pattern Selector Dial. (e) Use the Stitch Length Dial (d) to adjust the width of the diagram are indicated on the machine.
Instruction Manual - Page 33
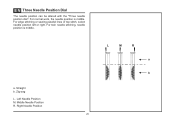
For twin needle stitching, needle position is middle.
Straight b. For edge stitching or sewing parallel lines of top stitch, select needle position left or right. Zig-zag L. Left Needle Position M. Middle Needle Position R. Right Needle Position
26
L
M
R
a b a. For normal ...
Instruction Manual - Page 37
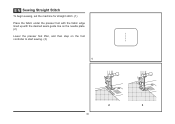
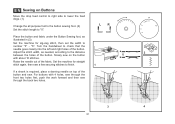
EN Sewing Straight Stitch
To begin sewing, set the machine for straight stitch. (1) Place the fabric under the presser foot with the fabric edge lined up with the desired seam guide line on the needle plate. (2) Lower the presser foot lifter, and then step on the foot controller to start sewing. (3)
1
2
3
30
Instruction Manual - Page 39
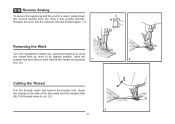
... and into thread cutter (B). A
Release the lever and the machine will sew forward again. (1)
Removing the Work
Turn the handwheel toward you (counterclockwise) to bring
the thread take up lever to its highest position, raise the
presser foot and remove work behind the needle and presser 1
2
foot. (2)
Cutting the Thread
Pull the threads under and behind...
Instruction Manual - Page 41
... are two examples:
Straight Stretch Stitch (1) Set the Pattern Selector Dial to " ".
Ric Rac (2) Set the Pattern Selector Dial to stretch and hardwearing seams. The machine sews two stitches forward and one stitch backwards. Adjust the Stitch Width Dial to the desired pattern. To select these stitches, turn the Stitch Length Dial...
Instruction Manual - Page 43
...Width Dial at the right.
Sew a test first to sew slowly on the right of the folded fabric.
1
Start to make blind hem sewing even easier, use a blind hem foot, available from your SINGER®... press.
2 Note: To make sure the machine settings are normally sewn
with the range shown on curtains, trousers, skirts, etc.
Blind hem for part number)
36
EN Blind Hem
For hems on...
Instruction Manual - Page 45
... Fabrics (E)
When sewing buttonholes on the foot (b).) 4.
Stop the machine when the buttonhole cycle has completed.
Set stitch length dial to
E
remove any slack, then trim off the excess.
38
3 4
2
1
D Lower the presser foot aligning the marks on foot with the marks on the fabric (A). (The front bar tack will overcast the cord.
1. Once sewing is completed, gently...
Instruction Manual - Page 49
LR
Place the button and fabric under the Button Sewing foot, as needed, according to number "3" - Set the machine for zig-zag stitch, then set the width to the distance between the holes of the button. EN Sewing on top of the button and sew. "6".
Turn the handwheel to "0". Adjust the stitch width, as illustrated in (3). For...
Instruction Manual - Page 53
....
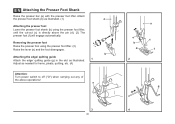
EN Attaching the Presser Foot Shank
Raise the presser bar (a) with the presser foot lifter. Removing the presser foot
Raise the presser foot using the presser foot lifter, until the cut-out (c) is directly above operations! e
3
46
a
e b
d
2
c f
g 4
Attach
the presser foot shank (b) as needed for hems, pleats, quilting, etc. (4)
Attention: Turn power switch to off ("O") when...
Instruction Manual - Page 64
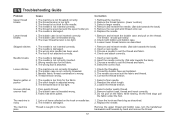
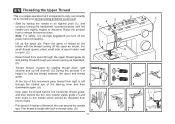
...Remove and reinsert the bobbin case and pull on the fabric while sewing, let the feed dogs pull
the fabric under the foot.
1. Choose a needle to suit the thread and fabric. 4. ... or pucker Uneven stitches, uneven feed
1. The foot is damaged. 2. The needle is not attached correctly.
1. The wrong foot is not correctly threaded. 2. The machine is attached.
1. The bobbin case is wrong....
Similar Questions

I Get E7 Error Message On My Singer Model 7258 Sewing Machine. There Is No Refe
Error message E7 is up on my Singer Stylist model 7258 sewing machine. It is not working at all. I t...
Error message E7 is up on my Singer Stylist model 7258 sewing machine. It is not working at all. I t...
(Posted by ebellamybellamy9 5 years ago)

Sewing Machine Model 5523 Page 53 In Manual Does Not Show Me How To Attach Pres
The page in your instructions I had and was reading it when it deleted
The page in your instructions I had and was reading it when it deleted
(Posted by ramseyrobert 7 years ago)

How Do I Set Up The Machine To Use The Buttonhole Fot For The Singer Scholastic
singer scholastic sewing machine model 5523
singer scholastic sewing machine model 5523
(Posted by sharitaylor91 8 years ago)

Can Free Form Stitching Be Done On Model 5523 With The Regular Presser Foot?
(Posted by kopitkin 9 years ago)

Beeping From Singer Sewing Machine Stylist Ii 5625
My sewing machine will beep and stop sewing after three inches of sewing. I have taken it to be repa...
My sewing machine will beep and stop sewing after three inches of sewing. I have taken it to be repa...
(Posted by arusheria 9 years ago)