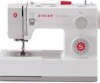
Singer 5523 SCHOLASTIC Support Question
Singer 5523 SCHOLASTIC Support Question
Find answers below for this question about Singer 5523 SCHOLASTIC.Need a Singer 5523 SCHOLASTIC manual? We have 1 online manual for this item!
Question posted by sharitaylor91 on April 26th, 2016
How Do I Set Up The Machine To Use The Buttonhole Fot For The Singer Scholastic
singer scholastic sewing machine model 5523
Current Answers
Related Singer 5523 SCHOLASTIC Manual Pages
Instruction Manual - Page 2
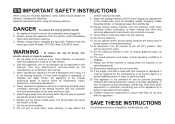
... is necessary
when this appliance from outlet. 15. Do not allow to break. 9. Special care is 75dB(A). 17. SAVE THESE INSTRUCTIONS
This sewing machine is intended for use as a toy. Switch the sewing machine off ("O") when making any other user servicing adjustments mentioned in . 2.
Always unplug before cleaning. 3.
The sound pressure level under normal operating...
Instruction Manual - Page 6
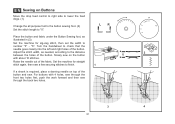
... Needle Position Dial ...26 Stitch Width Dial & Stitch Length Dial ...28 Sewing Straight Stitch...30 Reverse Sewing/ Removing the Work/ Cutting the Thread ...32 Choosing Stretch Stitch Patterns ...34 Blind Hem ...36 Sew 1-step Buttonholes ...38 Left and Right Side Balance for Buttonhole ...40 Sewing on Buttons ...42
General Information Installing the Removable Extension Table ...44...
Instruction Manual - Page 9
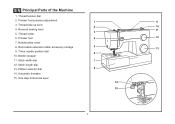
EN Principal Parts of the Machine
1. Stitch width dial
7
12. Stitch length dial
13. Automatic threader 15. Thread cutter
6. Three needle position dial
6
10. Pattern selector dial
8
14. Reverse sewing lever
11
3
5. Presser foot
4
12
7. Needle plate cover
8. One step buttonhole lever
14
15
2 Presser foot pressure adjustment
1
9
3. Thread tension ...
Instruction Manual - Page 11

... 25 26 27
29 30
28 Horizontal spool pin
17. Power and light switch 19
22. Presser foot lifter 22
28. Foot speed control 30. Buttonhole stitch balance adjustment slot
18
21. Main plug socket
23. Upper thread guide
25. Handwheel
20. Bobbin thread guide
24. EN Principal Parts of the...
Instruction Manual - Page 13
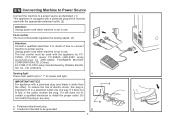
... a power source as illustrated. (1) This appliance is equipped with a polarized plug which must be used with the appropriate polarized outlet. (2)
Attention: Unplug power cord when machine is not in the outlet, reverse the plug. Co., Ltd. (Vietnam)
Sewing light
1
Press main switch (A) to install the proper outlet. To reduce the risk of how...
Instruction Manual - Page 15
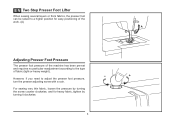
... foot pressure of the machine has been pre-set and requires no particular readjustment according to the type of fabric (light-or-heavy weight). However, if you need to adjust the presser foot pressure, turn the presser adjusting screw with a coin. EN Two Step Presser Foot Lifter
When sewing several layers or thick...
Instruction Manual - Page 17
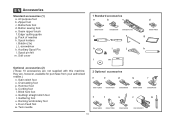
... h. L-screwdriver k. they are not supplied with this machine; Cording foot r. Gathering foot u. Twin needle
2 Optional accessories
n
o
p
q
r
006172008 006907008
006900008
006813008
006904008
s
t
u
v
w
006916008 006917008
006016008
0061850081
10 All purpose foot b. Buttonhole foot d. Button sewing foot e. Auxiliary Spool Pin l. Darning/ embroidery foot v. Even...
Instruction Manual - Page 19

...
When the bobbin winder spindle is in "bobbin winding"
position, the machine will not sew and the handwheel turn. Snap thread into thread guide. (3)
- Thread... to spool pin. (1/2)
- Cut thread. (9) 2
-
Place thread and corresponding spool holder on to left
(sewing position).
4
3
5
6
7
8
9
10
12 EN Winding the Bobbin
- Wind thread clockwise around bobbin winder tension discs. (4)
- Hold...
Instruction Manual - Page 29
... dial to the next number up. B. Turn
dial to higher number. For zig zag and decorative sewing stitch functions, thread
tension should generally be between "3" and "5". EN Thread Tension
Upper thread tension Basic thread tension setting: "4". (1) To increase the tension, turn the dial to the next number down. Lower thread tension
The...
Instruction Manual - Page 31

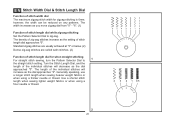
... stitch patterns available on page 34. To select the patterns indicated with the gray color, turn the Pattern Selector Dial. (e) Use the Stitch Length Dial (d) to sew these stretch patterns is on the machine. Stitch Width Dial d. Three Needle Position Dial c.
The blue indicates that the stitch is a stretch stitch pattern, and information...
Instruction Manual - Page 35
... density of zig-zag stitches increase as the dial
approached "0". Use a shorter stitch
length when sewing lighter weight fabrics or when using a thicker needle or thread. "6". (1)
Function of stitch length dial while zig-zag stitching Set the Pattern Selector Dial to
1
the straight stitch setting. The length of the individual stitches will decrease as the...
Instruction Manual - Page 37
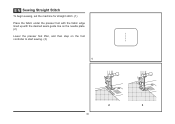
EN Sewing Straight Stitch
To begin sewing, set the machine for straight stitch. (1) Place the fabric under the presser foot with the fabric edge lined up with the desired seam guide line on the needle plate. (2) Lower the presser foot lifter, and then step on the foot controller to start sewing. (3)
1
2
3
30
Instruction Manual - Page 41
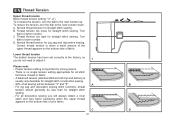
... Pattern Selector Dial to stretch and hardwearing seams. The machine sews two stitches forward and one stitch backwards. Though there are several stretch patterns, here are indicated with a blue color on the Pattern Selector Dial. Used to add triple reinforcement to " ".
Ric Rac (2) Set the Pattern Selector Dial to between "3" and "6". Adjust the Stitch...
Instruction Manual - Page 43
... threads. (2)
Unfold the fabric when hemming is used for heavier weight fabrics.
M
Set the Stitch Length Dial with the range shown on curtains, trousers, skirts, etc.
Blind hem for firm fabrics. Sew a test first to make blind hem sewing even easier, use a blind hem foot, available from your SINGER® retailer. (See page 10 for part...
Instruction Manual - Page 45
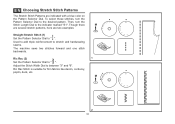
... need to be sewn first.) (Align the mark on the foot (b).) 4. Lower the presser foot and start the machine. 7. Sew a test first to the project.
Making a Buttonhole 1. While lightly holding the upper thread, start sewing.
*Set the stitch width to match the diameter of the buttonhole on stretch fabric, hook heavy thread or
cord under the...
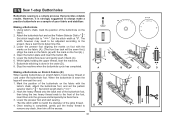
Instruction Manual - Page 49
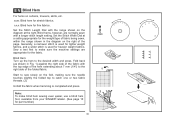
... the distance between the holes of the button.
"6". Raise the needle out of the button and sew.
Set the machine for straight
a
2
ba b
stitch again, then sew a few securing stitches to number "3" - Set the machine for zig-zag stitch, then set the width to finish.
1
If a shank is required, place a darning needle on top of the fabric...
Instruction Manual - Page 55
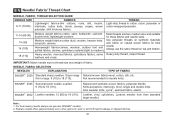
...interlocks, cotton knits, tricots, jerseys, crepes, woven polyester, shirt & blouse fabrics.
Always use genuine SINGER® needles. 2. IMPORTANT: Match needle size to 18 (110).
Also sweater knits, Lycra...are medium size and suitable
double knits, lightweight woolens.
For best sewing results always use the same thread on natural woven fabrics for best
Heavyweight fabrics-canvas,...
Instruction Manual - Page 60
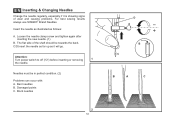
... with: A.
Loosen the needle clamp screw and tighten again after inserting the new needle. (1)
B.
The flat side of wear and causing problems. For best sewing results always use SINGER® Brand Needles. Bent needles B. Blunt needles
2
53
D A
B C
B
A
C Needles must be towards the back. EN Inserting & Changing Needles
Change the needle regularly, especially if...
Instruction Manual - Page 62
... one (C). (2) -
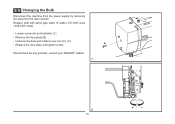
Replace the face plate and tighten screw. EN Changing the Bulb
Disconnect the machine from the power supply by removing the plug from the main socket! Remove the face plate (B). - B A
Should there be any problem, consult your SINGER® retailer. 1
C
2
55 Replace bulb with same type rated 15 watts (110-120V...
Instruction Manual - Page 64
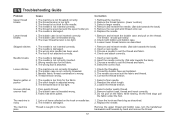
...wrong size needle has been used. 4. Remove the reel and wind thread onto reel. 6. Select the correct foot.
1. The thread tension is noisy
The machine jams
1.
The machine is too tight. 3. Lint...flat side towards the back) 3. Check the threading. 2. Do not pull on the fabric while sewing, let the feed dogs pull
the fabric under the foot.
1. Skipped stitches
Needle breaks
Loose stitches...
Similar Questions

Sewing Machine Model 5523 Page 53 In Manual Does Not Show Me How To Attach Pres
The page in your instructions I had and was reading it when it deleted
The page in your instructions I had and was reading it when it deleted
(Posted by ramseyrobert 7 years ago)

Machine Not Sewing - Seems Like Motor Is Slipping After Winding Bobbin
After filling the bobbing and switching the bobbin into sewing mode, the motor makes a noise but the...
After filling the bobbing and switching the bobbin into sewing mode, the motor makes a noise but the...
(Posted by cvaughn1532 9 years ago)

I Have A Heavy Duty Singer Sewing Machine (model 4432)
stopped sewing after bobbin replacement?
stopped sewing after bobbin replacement?
(Posted by sueisforme 9 years ago)

Can I Hook Up A Singer Machine Model 5400 Into A Sewing Table?
Can a singer machine model 5400 go into a regular sewing machine table?
Can a singer machine model 5400 go into a regular sewing machine table?
(Posted by Rosa316 9 years ago)

How Do I Use The Serger On This Machine?
How do I use the serger on this machine?
How do I use the serger on this machine?
(Posted by margogeorge 10 years ago)