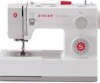
Singer 5523 SCHOLASTIC Support Question
Singer 5523 SCHOLASTIC Support Question
Find answers below for this question about Singer 5523 SCHOLASTIC.Need a Singer 5523 SCHOLASTIC manual? We have 1 online manual for this item!
Question posted by cvaughn1532 on March 21st, 2015
Machine Not Sewing - Seems Like Motor Is Slipping After Winding Bobbin
After filling the bobbing and switching the bobbin into sewing mode, the motor makes a noise but the needle will not move. When I switch the winder to bobbin filling mode, the bobbin winder spins. It is like it is not engaging with the needle when it is switched to sewing mode. Any suggestions?
Current Answers
Related Singer 5523 SCHOLASTIC Manual Pages
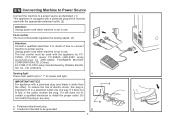
Instruction Manual - Page 2
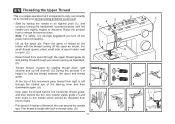
... or a similar qualified person in the needle area, such as threading needle, changing needle, threading bobbin, or changing presser foot, and the like. 10. Special care is damaged, it must be replaced by or near children. 2. Do not pull or push fabric while stitching. Switch the sewing machine off ("O") when making any air openings blocked. If the supply...
Instruction Manual - Page 6
......6 Two Step Presser Foot Lifter/ Adjusting Presser Foot Pressure...8 Accessories...10
Threading the Machine Winding the Bobbin...12 Inserting the Bobbin ...14 Threading the Upper Thread...16 Automatic Needle Threader ...18 Raising the Bobbin Thread ...20 Thread Tension ...22
Sewing How to Choose Your Pattern...24 Three Needle Position Dial ...26 Stitch Width Dial & Stitch Length Dial ...28...
Instruction Manual - Page 9
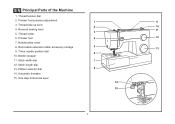
...3. Stitch length dial
13. Thread cutter
6. Removable extension table/ accessory storage
5
13
9. Thread take-up lever 2
10
4. Reverse sewing lever
11
3
5. Needle plate cover
8. Three needle position dial
6
10. Pattern selector dial
8
14. One step buttonhole lever
14
15
2 Stitch width dial
7
12. Presser foot
4
12
7. EN Principal Parts of the Machine
1.
Instruction Manual - Page 11

...21. Bobbin winding spindle
16
18. Hole for second spool pin
17
19. Power and light switch 19...
22. Drop feed control
29. Presser foot lifter 22
28. Handwheel
20. Upper thread guide
25. Power cord
4
23 24 25 26 27
29 30
28 Face plate
20
26. Foot speed control 30. EN Principal Parts of the Machine
16. Horizontal spool pin
17. Main plug socket
23. Bobbin...
Instruction Manual - Page 13
Co., Ltd. (Vietnam)
Sewing light
1
Press main switch (A) to fit in doubt of electric shock, this plug is intended to " l " for power and light. If it still does not fit, contact a qualified electrician to be grounded
2
6
A 3 Unplug power cord when machine is equipped with a polarized plug which must be used with a polarized plug (one...
Instruction Manual - Page 15
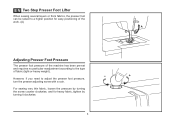
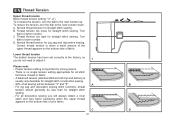
... Step Presser Foot Lifter
When sewing several layers or thick fabrics, the presser foot can be raised to a higher position for heavy fabric, tighten by turning the screw counter clockwise, and for easy positioning of the work. (A)
A
Adjusting Presser Foot Pressure
The presser foot pressure of the machine has been pre-set...
Instruction Manual - Page 17
...needle
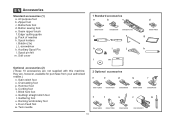
2 Optional accessories
n
o
p
q
r
006172008 006907008
006900008
006813008
006904008
s
t
u
v
w
006916008 006917008
006016008
0061850081
10 Auxiliary Spool Pin l. Cording foot r. All purpose foot b. Overcasting foot p. Zipper foot c. Seam ripper/ brush f. Blind hem foot s. Bobbin... not supplied with this machine; EN Accessories
Standard accessories (1) a.
Instruction Manual - Page 19

... thread end. (7) 1
- Please Note:
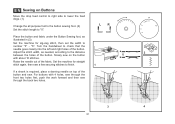
When the bobbin winder spindle is in "bobbin winding"
position, the machine will not sew and the handwheel turn. Snap thread into thread guide. (3)
- Thread bobbin as illustrated and place on foot control pedal. (8)
- Step on spindle. (5)
- Push bobbin spindle to the left (10) and remove. EN Winding the Bobbin
- Place thread and corresponding spool holder...
Instruction Manual - Page 21
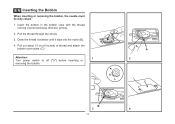
... the thread clockwise until it slips into the notch (B).
4. Pull out about 15 cm (6 inches) of thread and attach the bobbin cover plate. (C)
Attention:
1
Turn power switch to off ("O") before inserting or
removing the bobbin. Pull the thread through the slit (A).
3. EN Inserting the Bobbin
When inserting or removing the bobbin, the needle must be fully raised...
Instruction Manual - Page 23
... pass the thread behind the horizontal thread guide, and then behind the thin wire needle clamp guide (7) and then down right channel and up left through pre-tension spring as illustrated. (4)
- Start by not doing so several sewing problems could result.
-
Draw thread from right to left channel. (5) During this movement pass...
Instruction Manual - Page 29
... the tension, turn the dial to the next number up. Lower thread tension
The bobbin tension has been set correctly at the factory, so you will be less than for straight stitch construction sewing.
- 90% of all decorative sewing you do not need to adjust it.
1
Please note:
- C
D
22 A. Correct thread tension is...
Instruction Manual - Page 31

Reverse Sewing Lever b.
Three Needle Position Dial c.
Stitch Length Dial e. Use the Stitch Width Dial (c) to adjust the stitch length as desired. a
b
c d e
a. Pattern Selector Dial
...Pattern Selector Dial. (e) Use the Stitch Length Dial (d) to adjust the width of the diagram are indicated on the machine.
Stitches in the top of the stitch as desired for the project.
Instruction Manual - Page 33
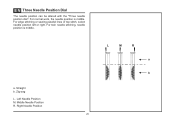
... For normal work, the needle position is middle.
Left Needle Position M. For edge stitching or sewing parallel lines of top stitch, select needle position left or right. a. Zig-zag L. EN Three Needle Position Dial
The needle position can be altered with the "Three needle position dial". Right Needle Position
26
L
M
R
a b For twin needle stitching, needle position is middle.
Instruction Manual - Page 37
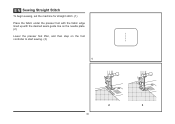
EN Sewing Straight Stitch
To begin sewing, set the machine for straight stitch. (1) Place the fabric under the presser foot with the fabric edge lined up with the desired seam guide line on the needle plate. (2) Lower the presser foot lifter, and then step on the foot controller to start sewing. (3)
1
2
3
30
Instruction Manual - Page 39
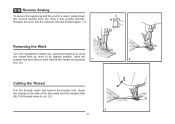
... lever and the machine will sew forward again. (1)
Removing the Work
Turn the handwheel toward you (counterclockwise) to bring
the thread take up lever to cut. (3)
32
B 3 Guide the threads to the side of a seam, press down to its highest position, raise the
presser foot and remove work behind the needle and presser...
Instruction Manual - Page 41
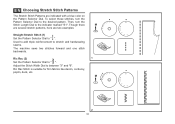
Then, turn the Pattern Selector Dial to the desired pattern. Ric Rac (2) Set the Pattern Selector Dial to stretch and hardwearing seams. The machine sews two stitches forward and one stitch backwards.
Used to add triple reinforcement to " ". Adjust the Stitch Width Dial to the indicator marked "S1". Though there ...
Instruction Manual - Page 43
...
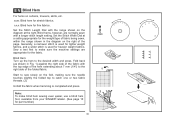
(as shown in the diagram on the right of the folded fabric.
1
Start to sew slowly on the fold, making sure the needle touches slightly the folded top to catch one or two fabric threads. (2)
Unfold the fabric... weight
fabrics, and a wider stitch is completed and press.
2 Note: To make sure the machine settings are normally sewn
with the range shown on curtains, trousers, skirts, etc.
Instruction Manual - Page 45
... gimp thread.
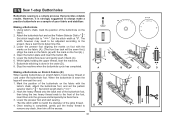
4. Lower the presser foot and start the machine. 7. EN Sew 1-step Buttonholes
Buttonhole sewing is sewn the
legs will be adjusted according to the project... front bar tack will overcast the cord.
1. a
b
A
PUSH
B
C
Making a Buttonhole on Stretch Fabrics (E)
When sewing buttonholes on a sample of the buttonhole on the foot (b).) 4. Buttonhole stitching is...
Instruction Manual - Page 49
..."3" - Set the machine for straight
a
2
ba b
stitch again, then sew a few securing stitches to the distance between the holes of the button. Slowly sew on top of the button and sew. Raise the needle out of the fabric...feed dogs. (1)
Change the all purpose foot to the button sewing foot. (2) Set the stitch length to check that the needle goes cleanly into the left and right holes of the button...
Instruction Manual - Page 64
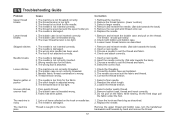
... reel and wind thread onto reel. 6. Check both bobbin and bobbin case. 3. Insert a new needle. 3. The needle size must suit the fabric and thread. 4. Correct the thread tension.
1. Select a better quality thread. 2.
The thread is too thick for the fabric. 4. The needle is wrong. 4. The needle is adjusted wrong. 3. The stitch length is damaged. 2. Rethread the machine...
Similar Questions

My Brand New Machine Has Totally Jammed Up. There Is No Thread In Needle Or Bobb
The machine jammed. Light works. Currently upper thread and bobbin removed. No thread jams. How can ...
The machine jammed. Light works. Currently upper thread and bobbin removed. No thread jams. How can ...
(Posted by pturteal 4 years ago)

Sewing Machine Model 5523 Page 53 In Manual Does Not Show Me How To Attach Pres
The page in your instructions I had and was reading it when it deleted
The page in your instructions I had and was reading it when it deleted
(Posted by ramseyrobert 7 years ago)

How Do I Set Up The Machine To Use The Buttonhole Fot For The Singer Scholastic
singer scholastic sewing machine model 5523
singer scholastic sewing machine model 5523
(Posted by sharitaylor91 8 years ago)

Error Code 88 While Winding Bobbin On Singer 7466
when I try to wind a bobbin on my machine, the bobbin turns 2.5 Times, then it stops, the machine al...
when I try to wind a bobbin on my machine, the bobbin turns 2.5 Times, then it stops, the machine al...
(Posted by joymarvel02512 8 years ago)
Trying To Wind Bobbin With Green Light On, But No Success. What Am I Doing Wrong
The LCD panel iluinated bobbin wind, but I get no power to wind even though I pushed the green start...
The LCD panel iluinated bobbin wind, but I get no power to wind even though I pushed the green start...
(Posted by joycejones1 10 years ago)