
Instruction Manual
Page 3
... the machine if it is not working properly, if it to persons: 1. To unplug, grasp the plug, not the cord. 16. Please turn all moving parts. DANGER -To reduce the risk of the appliance by or near children. 2. Do not allow to the off ("O") when making any adjustments in the needle...
... the machine if it is not working properly, if it to persons: 1. To unplug, grasp the plug, not the cord. 16. Please turn all moving parts. DANGER -To reduce the risk of the appliance by or near children. 2. Do not allow to the off ("O") when making any adjustments in the needle...

Instruction Manual
Page 4
CONTENTS PRINCIPAL PARTS OF THE MACHINE 1 MACHINE CONTROL BUTTONS 2-3 Operation buttons (see page 24/25 2 Function buttons (see page 26/27/28 2 Selection buttons (see page 29/30 3 ...
CONTENTS PRINCIPAL PARTS OF THE MACHINE 1 MACHINE CONTROL BUTTONS 2-3 Operation buttons (see page 24/25 2 Function buttons (see page 26/27/28 2 Selection buttons (see page 29/30 3 ...

Instruction Manual
Page 6
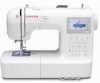
PRINCIPAL PARTS OF THE MACHINE Tension dial Face plate Operation buttons A Thread cutter Buttonhole lever Auto needle threader Needle plate cover Sewing table and accessory box Hole for second spool pin Handwheel Main power switch Power cord socket Foot controller connector 1 Bobbin winder spindle Speed limiting adjustment lever LCD screen B Function buttons C Selection buttons B Function buttons Pattern plates Horizontal spool pin Handle Presser foot lifter Drop feed lever
PRINCIPAL PARTS OF THE MACHINE Tension dial Face plate Operation buttons A Thread cutter Buttonhole lever Auto needle threader Needle plate cover Sewing table and accessory box Hole for second spool pin Handwheel Main power switch Power cord socket Foot controller connector 1 Bobbin winder spindle Speed limiting adjustment lever LCD screen B Function buttons C Selection buttons B Function buttons Pattern plates Horizontal spool pin Handle Presser foot lifter Drop feed lever

Instruction Manual
Page 14
..., contact a qualified electrician. To disconnect, turn the power switch to the electric outlet. 3. The sewing lamp will fit in use and before inserting or removing parts. ON OFF Connecting the machine Before connecting the power supply, make sure that the voltage and frequency shown on the machine is on a stable surface...
..., contact a qualified electrician. To disconnect, turn the power switch to the electric outlet. 3. The sewing lamp will fit in use and before inserting or removing parts. ON OFF Connecting the machine Before connecting the power supply, make sure that the voltage and frequency shown on the machine is on a stable surface...

Instruction Manual 2
Page 111
... Dressweight Tailor Tack Foot Even Feed Foot General Purpose Foot Special Purpose Foot Straight Stitch Foot Zipper Foot Presser Foot Lifter Screw Shank Principal Machine Parts Quilting Reverse Stitching Continuous Instant Reinforcing End of Seam Symbol Satin Stitch Scalloping Edges Seam Finish Seam Guide Seams Chainstitch Curved Lingerie Overedge Straight Straight...
... Dressweight Tailor Tack Foot Even Feed Foot General Purpose Foot Special Purpose Foot Straight Stitch Foot Zipper Foot Presser Foot Lifter Screw Shank Principal Machine Parts Quilting Reverse Stitching Continuous Instant Reinforcing End of Seam Symbol Satin Stitch Scalloping Edges Seam Finish Seam Guide Seams Chainstitch Curved Lingerie Overedge Straight Straight...

