
Instruction Manual
Page 2
... Machine Specification 4 2.3 Motor, Motor Pulley and V-Belt Specifications 4 3 Setup and Adjustment Instructions 5 3.1 Table Cut-Out Drawing 5 3.2 Oil Reservoir Installation 6 3.3 Belt Cover and Bobbin Winder Installation 7 3.4 Lubrication 8 3.5 ThreadTake-up Lever Oil Supply Adjustment 8 3.6 Rotating Hook Oil Supply Adjustment 9 3.7 Needle Attachment 10 3.8 Bobbin Case Attachment 11 3.9 MachineThreading 11 3.10 Stitch Length Adjustment 12 3.11 ThreadTension Adjustment 12 3.12 ThreadTake-Up Spring Adjustment 13 3.13 Knee Lifter Height Adjustment 14 3.14 Presser...
... Machine Specification 4 2.3 Motor, Motor Pulley and V-Belt Specifications 4 3 Setup and Adjustment Instructions 5 3.1 Table Cut-Out Drawing 5 3.2 Oil Reservoir Installation 6 3.3 Belt Cover and Bobbin Winder Installation 7 3.4 Lubrication 8 3.5 ThreadTake-up Lever Oil Supply Adjustment 8 3.6 Rotating Hook Oil Supply Adjustment 9 3.7 Needle Attachment 10 3.8 Bobbin Case Attachment 11 3.9 MachineThreading 11 3.10 Stitch Length Adjustment 12 3.11 ThreadTension Adjustment 12 3.12 ThreadTake-Up Spring Adjustment 13 3.13 Knee Lifter Height Adjustment 14 3.14 Presser...

Instruction Manual
Page 4
... be made by the needle or replacing the bobbin or looper. • Replacing the needle, presser foot, throat plate, feed dog and sliding plate. • When the machine is in maintenance. • When the operator is damaged, the machine should be immediately stopped. • Before starting the machine in its safety devices. • The machine should not be run with attention all relevant safety specifications are able to perform...
... be made by the needle or replacing the bobbin or looper. • Replacing the needle, presser foot, throat plate, feed dog and sliding plate. • When the machine is in maintenance. • When the operator is damaged, the machine should be immediately stopped. • Before starting the machine in its safety devices. • The machine should not be run with attention all relevant safety specifications are able to perform...
Instruction Manual
Page 5
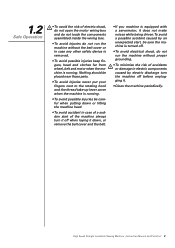
High Speed Straight Lockstitch Sewing Machine | Instruction Manual and Parts List 2 1.2 Safe Operation • To avoid the risk of electric shock, do not open the motor wiring box and do not touch the components assembled inside the wiring box. • To avoid injuries do not run the machine without the belt cover or in electric components caused by electric discharge turn it off . • To...
High Speed Straight Lockstitch Sewing Machine | Instruction Manual and Parts List 2 1.2 Safe Operation • To avoid the risk of electric shock, do not open the motor wiring box and do not touch the components assembled inside the wiring box. • To avoid injuries do not run the machine without the belt cover or in electric components caused by electric discharge turn it off . • To...

Instruction Manual
Page 7
2.2 Machine Specification Table 1 - Machine Speed vs. Machine Specification Singer Model Application Maximum Speed [spm] Stitch Length [mm] Height of Presser Foot by hand / by knee [mm] Needle Bar Stroke [mm] Hook Type Hook Origin Needle Cat. Lubrication Lubrication Oil 191D-20 Light to medium 191D-20C Standard 5,000 5.0 5.5/13.0 30.7 1955-01 #14 Koban/ Hirose Regular 191D-30 Medium to heavy 4,500 5.0 5.5/13.0 35.0 191D-30C Standard Koban/ Hirose 1955-01 #18 Fully Automatic Lubrication Singer "C" type oil 191D-70 Heavy 191D-70C Standard...
2.2 Machine Specification Table 1 - Machine Speed vs. Machine Specification Singer Model Application Maximum Speed [spm] Stitch Length [mm] Height of Presser Foot by hand / by knee [mm] Needle Bar Stroke [mm] Hook Type Hook Origin Needle Cat. Lubrication Lubrication Oil 191D-20 Light to medium 191D-20C Standard 5,000 5.0 5.5/13.0 30.7 1955-01 #14 Koban/ Hirose Regular 191D-30 Medium to heavy 4,500 5.0 5.5/13.0 35.0 191D-30C Standard Koban/ Hirose 1955-01 #18 Fully Automatic Lubrication Singer "C" type oil 191D-70 Heavy 191D-70C Standard...
Instruction Manual
Page 10
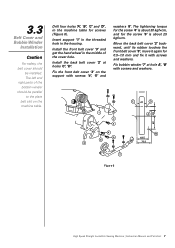
... again for 0.5~1.0 mm and fix it with screws and washers. 3.3 Belt Cover and Bobbin Winder Installation Caution For safety, the belt cover should be installed. Figure 6 High Speed Straight Lockstitch Sewing Machine | Instruction Manual and Parts List 7 Insert support '1' in the threaded hole in the machine table for the screw '5' is about 30 kgf×cm, and for screws (Figure 6). Install the back belt cover '2' at hole A', 'B' with screws and washers. Install the front belt cover '3' and get the hand...
... again for 0.5~1.0 mm and fix it with screws and washers. 3.3 Belt Cover and Bobbin Winder Installation Caution For safety, the belt cover should be installed. Figure 6 High Speed Straight Lockstitch Sewing Machine | Instruction Manual and Parts List 7 Insert support '1' in the threaded hole in the machine table for the screw '5' is about 30 kgf×cm, and for screws (Figure 6). Install the back belt cover '2' at hole A', 'B' with screws and washers. Install the front belt cover '3' and get the hand...

Instruction Manual
Page 11
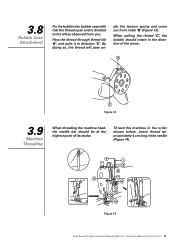
... oil is adequate. Figure 8 High Speed Straight Lockstitch Sewing Machine | Instruction Manual and Parts List 8 When you operate the machine after lubrication, you first operate your machine after set up or after an extended period of disuse, run your machine at 2,000 to 2,500 spm for about 10 minutes for the purpose of bread-in. Figure 7 3.5 Thread Take-up Lever Oil Supply Adjustment Adjust the amount of oil supplied to the thread...
... oil is adequate. Figure 8 High Speed Straight Lockstitch Sewing Machine | Instruction Manual and Parts List 8 When you operate the machine after lubrication, you first operate your machine after set up or after an extended period of disuse, run your machine at 2,000 to 2,500 spm for about 10 minutes for the purpose of bread-in. Figure 7 3.5 Thread Take-up Lever Oil Supply Adjustment Adjust the amount of oil supplied to the thread...

Instruction Manual
Page 13
... (Figure 12). Insert the needle in the direction of the arrow until the needle bar reaches the highest point of its indented part 'A' facing exactly to the count of thread and the type of the needle is facing exactly to the left in direction 'D'. Figure 12 High Speed Straight Lockstitch Sewing Machine | Instruction Manual and Parts List 10 3.7 Needle Attachment Caution Choose a proper needle size according to the right in direction 'B'. Make sure the...
... (Figure 12). Insert the needle in the direction of the arrow until the needle bar reaches the highest point of its indented part 'A' facing exactly to the count of thread and the type of the needle is facing exactly to the left in direction 'D'. Figure 12 High Speed Straight Lockstitch Sewing Machine | Instruction Manual and Parts List 10 3.7 Needle Attachment Caution Choose a proper needle size according to the right in direction 'B'. Make sure the...
Instruction Manual
Page 14
... direction 'C'. 3.8 Bobbin Case Attachment Fix the bobbin into bobbin case with that the thread open end is directed to the left as observed from notch 'B' (Figure 13). Pass the thread through thread slit 'A', and pulls it in the needle (Figure 14). Figure 14 High Speed Straight Lockstitch Sewing Machine | Instruction Manual and Parts List 11 By doing so, the thread will pass un- Thread the machine in the direction of its stroke. When pulling the thread 'C', the bobbin...
... direction 'C'. 3.8 Bobbin Case Attachment Fix the bobbin into bobbin case with that the thread open end is directed to the left as observed from notch 'B' (Figure 13). Pass the thread through thread slit 'A', and pulls it in the needle (Figure 14). Figure 14 High Speed Straight Lockstitch Sewing Machine | Instruction Manual and Parts List 11 By doing so, the thread will pass un- Thread the machine in the direction of its stroke. When pulling the thread 'C', the bobbin...
Instruction Manual
Page 15
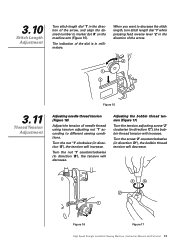
... thread tension (Figure 17) Turn the tension adjusting screw '2' clockwise (in direction 'A'), the tension will increase. 3.10 Stitch Length Adjustment Turn stitch length dial '1' in the direction of the arrow, and align the desired number to different sewing conditions. Figure 16 Figure 17 High Speed Straight Lockstitch Sewing Machine | Instruction Manual and Parts List 12 Figure 15 3.11 Thread Tension Adjustment Adjusting needle thread tension (Figure 16) Adjust the tension of needle thread using tension adjusting nut '1' according to marker dot 'A' on the machine arm...
... thread tension (Figure 17) Turn the tension adjusting screw '2' clockwise (in direction 'A'), the tension will increase. 3.10 Stitch Length Adjustment Turn stitch length dial '1' in the direction of the arrow, and align the desired number to different sewing conditions. Figure 16 Figure 17 High Speed Straight Lockstitch Sewing Machine | Instruction Manual and Parts List 12 Figure 15 3.11 Thread Tension Adjustment Adjusting needle thread tension (Figure 16) Adjust the tension of needle thread using tension adjusting nut '1' according to marker dot 'A' on the machine arm...

Instruction Manual
Page 16
... High Speed Straight Lockstitch Sewing Machine | Instruction Manual and Parts List 13 Adjusting the pressure of the thread take-up spring '1' (Figure 19) Loosen setting screw '2' and take -up spring will be increased. 3.12 Thread Take-Up Spring Adjustment The adjustment of the stroke of the thread take out thread tension assembly '5'. Turn the tension post '3' clockwise (in direction 'A'), the stroke of the thread take-up spring (Figure 18) Loosen setting screw '2'. Turn the thread tension post '3' counter-clockwise (in direction 'B'), the pressure...
... High Speed Straight Lockstitch Sewing Machine | Instruction Manual and Parts List 13 Adjusting the pressure of the thread take-up spring '1' (Figure 19) Loosen setting screw '2' and take -up spring will be increased. 3.12 Thread Take-Up Spring Adjustment The adjustment of the stroke of the thread take out thread tension assembly '5'. Turn the tension post '3' clockwise (in direction 'A'), the stroke of the thread take-up spring (Figure 18) Loosen setting screw '2'. Turn the thread tension post '3' counter-clockwise (in direction 'B'), the pressure...

Instruction Manual
Page 19
... surface of feed dog and the top end of needle eyelet are flush with top surface of the arrow, and firmly tighten the screws '2' and '3' (Figure 25). To delay the feed timing in order to prevent uneven material feed, move the feed eccentric cam in the direction from the arrow. Figure 25 High Speed Straight Lockstitch Sewing Machine | Instruction Manual and Parts List 16 3.16 Feed Timing Adjustment Caution If...
... surface of feed dog and the top end of needle eyelet are flush with top surface of the arrow, and firmly tighten the screws '2' and '3' (Figure 25). To delay the feed timing in order to prevent uneven material feed, move the feed eccentric cam in the direction from the arrow. Figure 25 High Speed Straight Lockstitch Sewing Machine | Instruction Manual and Parts List 16 3.16 Feed Timing Adjustment Caution If...

Instruction Manual
Page 24
... right tension. High Speed Straight Lockstitch Sewing Machine | Instruction Manual and Parts List 21 Check if all safety devices are properly installed and adjusted. 4 Maintenance 4.1 Machine Head Cleaning Clean the machine periodically with a soft and dry cloth to remove the excess of topics 3.4 to the instructions of dust on the machine head. Do not use any kind of lacquer thinner to wipe the surface. 4.2 Lubrication If the machine was idle for a long time...
... right tension. High Speed Straight Lockstitch Sewing Machine | Instruction Manual and Parts List 21 Check if all safety devices are properly installed and adjusted. 4 Maintenance 4.1 Machine Head Cleaning Clean the machine periodically with a soft and dry cloth to remove the excess of topics 3.4 to the instructions of dust on the machine head. Do not use any kind of lacquer thinner to wipe the surface. 4.2 Lubrication If the machine was idle for a long time...

Instruction Manual
Page 25
... needle plate and presser foot 1. Rethreaded the machine correctly 4. Installed needle correctly 4. Readjust the feed dog 5. Low quality thread 2. Thread tension disc, thread guide, needle, hook point and needle plate are burred 8. Thread tension is too thick 1. Needle is too strong 2. Readjust needle and hook point 2. Replace by a new parts 8. Use proper needle for fabric and thread High Speed Straight Lockstitch Sewing Machine | Instruction Manual and Parts List 22 Readjust the thread tension nut 4. Readjust the presser foot pressure 4. Use proper needle...
... needle plate and presser foot 1. Rethreaded the machine correctly 4. Installed needle correctly 4. Readjust the feed dog 5. Low quality thread 2. Thread tension disc, thread guide, needle, hook point and needle plate are burred 8. Thread tension is too thick 1. Needle is too strong 2. Readjust needle and hook point 2. Replace by a new parts 8. Use proper needle for fabric and thread High Speed Straight Lockstitch Sewing Machine | Instruction Manual and Parts List 22 Readjust the thread tension nut 4. Readjust the presser foot pressure 4. Use proper needle...

Instruction Manual
Page 28
... Two-hole thread eyelet guide Singer "S" cameo Screw SM3/16 x 28 L=6 Right arm thread guide Screw SM11/64 x 40 L=6 Thread tension regulator assembly Thread tension regulator assembly Tension adjusting nut Tension disk stopper Tension spring Tension spring Tension disk holder Thread tension disk Tension post Thread take-up spring Tension post socket Screw SM9/64x40 L=5.5 Screw SM15/64x28 L=7 Tension releasing pin Throat plate Throat plate Throat plate Screw SM11/64 x 40 L=8.5 Left arm thread guide Screw SM11/64x40 L=6 Rubber plug Screw SM3/16x28 L=9 Slide plate assembly Slide plate Slide plate...
... Two-hole thread eyelet guide Singer "S" cameo Screw SM3/16 x 28 L=6 Right arm thread guide Screw SM11/64 x 40 L=6 Thread tension regulator assembly Thread tension regulator assembly Tension adjusting nut Tension disk stopper Tension spring Tension spring Tension disk holder Thread tension disk Tension post Thread take-up spring Tension post socket Screw SM9/64x40 L=5.5 Screw SM15/64x28 L=7 Tension releasing pin Throat plate Throat plate Throat plate Screw SM11/64 x 40 L=8.5 Left arm thread guide Screw SM11/64x40 L=6 Rubber plug Screw SM3/16x28 L=9 Slide plate assembly Slide plate Slide plate...
Instruction Manual
Page 30
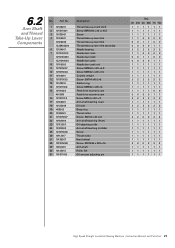
... L=15 Arm shaft Roller felt Oil amount adjusting pin Qty. 20 20C 30 30C 70 70C 111111 111111 111111 110000 001100 000011 222222 110000 001100 000011 111111 111111 111111 111111 222222 111111 111111 111100 000011 222222 111111 222222 111111 111111 222222 111111 111111 111111 111111 111111 111111 222222 111111 111111 111111 High Speed Straight Lockstitch Sewing Machine | Instruction Manual and Parts List 27
... L=15 Arm shaft Roller felt Oil amount adjusting pin Qty. 20 20C 30 30C 70 70C 111111 111111 111111 110000 001100 000011 222222 110000 001100 000011 111111 111111 111111 111111 222222 111111 111111 111100 000011 222222 111111 222222 111111 111111 222222 111111 111111 111111 111111 111111 111111 222222 111111 111111 111111 High Speed Straight Lockstitch Sewing Machine | Instruction Manual and Parts List 27

Instruction Manual
Page 32
... Bobbin Bobbin Upright shaft bushing (upper) Screw SM3/16 x28 L=9 Upright shaft bushing (lower) Hook shaft bushing (rear) Rotating hook Rotating hook Rotating hook Rotating hook Rotating hook Rotating hook Thrust collar Screw SM I 1/64x 40 L=4 .8 Position finger Position finger Screw SM11/64 x 40 L=9.5 Hook shaft bushing (front) Screw Thrust collar Screw SM 11/64 x40 L=3.5 Hook shaft Hook shaft Bobbin case Bobbin case Bobbin case Oil wick Oil seal screw Screw SM3/16 x 28 L=12 Needle bar slid block guide Screw SM11/64x40 L=8 Qty. 20...
... Bobbin Bobbin Upright shaft bushing (upper) Screw SM3/16 x28 L=9 Upright shaft bushing (lower) Hook shaft bushing (rear) Rotating hook Rotating hook Rotating hook Rotating hook Rotating hook Rotating hook Thrust collar Screw SM I 1/64x 40 L=4 .8 Position finger Position finger Screw SM11/64 x 40 L=9.5 Hook shaft bushing (front) Screw Thrust collar Screw SM 11/64 x40 L=3.5 Hook shaft Hook shaft Bobbin case Bobbin case Bobbin case Oil wick Oil seal screw Screw SM3/16 x 28 L=12 Needle bar slid block guide Screw SM11/64x40 L=8 Qty. 20...

Instruction Manual
Page 36
... ring Spring Spring Snap ring Feed reverse arm assembly Screw Snap ring Screw SM9/64x 40 L=6 Pin Link Link Feed adjust link assembly Feed adjust link shaft Screw SM15/64x28 L=7 Screw SM9/64x40 L=6 Feed bar shaft Retaining ring Feed dog Feed dog Feed dog Screw SM1/8X44 L=6 Feed bar assembly Feed spring hook plate Feed rock shaft Pin Screw SM9/64x 40 L=6 Nut SM9/32X 28 Feed rock shaft crank Feed rock shaft crank Screw SM3/16 X 28 L=15.5 Feed lifting rock shaft crank (back) Screw SM3/16 x 28 L=15.5 Screw Feed...
... ring Spring Spring Snap ring Feed reverse arm assembly Screw Snap ring Screw SM9/64x 40 L=6 Pin Link Link Feed adjust link assembly Feed adjust link shaft Screw SM15/64x28 L=7 Screw SM9/64x40 L=6 Feed bar shaft Retaining ring Feed dog Feed dog Feed dog Screw SM1/8X44 L=6 Feed bar assembly Feed spring hook plate Feed rock shaft Pin Screw SM9/64x 40 L=6 Nut SM9/32X 28 Feed rock shaft crank Feed rock shaft crank Screw SM3/16 X 28 L=15.5 Feed lifting rock shaft crank (back) Screw SM3/16 x 28 L=15.5 Screw Feed...

Instruction Manual
Page 38
... oil tube Screw SM11/64 x 40 L=9.5 Oil tube joint Oil wick set plate screw Oil wick set plate assembly Presser plate Screw Qty. 20 20C 30 30C 70 70C 111111 111111 111111 111111 111111 111111 111111 111111 111111 111111 111111 111111 111111 111111 111111 111111 111111 333333 111111 111111 333333 111111 111111 111111 111111 111111 111111 111111 111111 222222 111111 111111 111111 High Speed Straight Lockstitch Sewing Machine | Instruction Manual and Parts List...
... oil tube Screw SM11/64 x 40 L=9.5 Oil tube joint Oil wick set plate screw Oil wick set plate assembly Presser plate Screw Qty. 20 20C 30 30C 70 70C 111111 111111 111111 111111 111111 111111 111111 111111 111111 111111 111111 111111 111111 111111 111111 111111 111111 333333 111111 111111 333333 111111 111111 111111 111111 111111 111111 111111 111111 222222 111111 111111 111111 High Speed Straight Lockstitch Sewing Machine | Instruction Manual and Parts List...

Instruction Manual
Page 42
... Washer Screw Washer Bobbin winder assembly Thread tension bracket Screw SMI 1/64 x 40 L=7 Tension disk Tension spring Tension nut Screw SMI 1/64' x 40 L=5 Rubber brake bracket Rubber brake Bobbin winder spring Hinge screw SMI/Sx44 L=12.5 Screw Screw Washer Bobbin winder base Bobbin winder pulley Bobbin winder post Screw Washer Thread stand assembly Rubber cap Spool post (lower) Spool post (upper) Spool post joint Spool arm (upper) Spool arm (lower) Screw Thread guide Spool pin Spring washer Washer Nut Spool rest Spool retainer Washer Spring washer Nut Screw Nut Spool rest cushion Qty. 20 20C...
... Washer Screw Washer Bobbin winder assembly Thread tension bracket Screw SMI 1/64 x 40 L=7 Tension disk Tension spring Tension nut Screw SMI 1/64' x 40 L=5 Rubber brake bracket Rubber brake Bobbin winder spring Hinge screw SMI/Sx44 L=12.5 Screw Screw Washer Bobbin winder base Bobbin winder pulley Bobbin winder post Screw Washer Thread stand assembly Rubber cap Spool post (lower) Spool post (upper) Spool post joint Spool arm (upper) Spool arm (lower) Screw Thread guide Spool pin Spring washer Washer Nut Spool rest Spool retainer Washer Spring washer Nut Screw Nut Spool rest cushion Qty. 20 20C...

Instruction Manual
Page 44
...-001 10 10111011 11 1011105500 12 10131001 Description Machine hinge plate Machine hinge rubber cushion Nail Set Needle #14 Needle #18 Needle #21 Screw driver (large) Screw driver (medium) Screw driver (small) Bobbin Bobbin Dust cover Machine rest pin Oil container Oil reservoir magnet Qty. 20 20C 30 30C 70 70C 222222 222222 444444 330000 003300 000033 111111 111111 111111 333300 000033 111111 111111 111111 111111 High Speed Straight Lockstitch Sewing Machine | Instruction Manual and Parts List 41 6.9 Machine Accessories No.
...-001 10 10111011 11 1011105500 12 10131001 Description Machine hinge plate Machine hinge rubber cushion Nail Set Needle #14 Needle #18 Needle #21 Screw driver (large) Screw driver (medium) Screw driver (small) Bobbin Bobbin Dust cover Machine rest pin Oil container Oil reservoir magnet Qty. 20 20C 30 30C 70 70C 222222 222222 444444 330000 003300 000033 111111 111111 111111 333300 000033 111111 111111 111111 111111 High Speed Straight Lockstitch Sewing Machine | Instruction Manual and Parts List 41 6.9 Machine Accessories No.


