
XR-32S | XR-32X Operation Manual
Page 8
...(RS-232C 46 Fan Mode Setting 46 System Lock Function 46 Checking the Lamp Life Status 47 Keylock Function 47 Troubleshooting with the Remote Control .... 32 Displaying and Setting the Break Timer 32 Displaying the Pointer 32 Using the Spot Function 32 Switching the Eco+Quiet Mode...(Auto Sync Adjustment) ..... 33 Freezing a Moving Image 33 Selecting the Picture Mode 33 Displaying an Enlarged Portion of an Image 33 Using the Remote Control as the Wireless Computer Mouse 34 Menu Items 35 Using the Menu Screen 38 Menu Selections (Adjustments 38 Picture Adjustment ("Picture" Menu) ......
...(RS-232C 46 Fan Mode Setting 46 System Lock Function 46 Checking the Lamp Life Status 47 Keylock Function 47 Troubleshooting with the Remote Control .... 32 Displaying and Setting the Break Timer 32 Displaying the Pointer 32 Using the Spot Function 32 Switching the Eco+Quiet Mode...(Auto Sync Adjustment) ..... 33 Freezing a Moving Image 33 Selecting the Picture Mode 33 Displaying an Enlarged Portion of an Image 33 Using the Remote Control as the Wireless Computer Mouse 34 Menu Items 35 Using the Menu Screen 38 Menu Selections (Adjustments 38 Picture Adjustment ("Picture" Menu) ......
XR-32S | XR-32X Operation Manual
Page 14
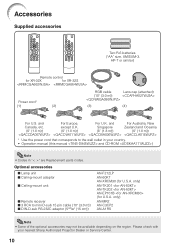
except U.K. only) AN-TK201 AN-TK202 AN-EP101B (for XR-32S Power cord* (1) (2) RGB cable Lens cap (attached) (10' (3.0 m)) (3) (4) For U.S. Optional accessories I Lamp unit I Ceiling-mount adaptor I Ceiling-mount unit I Remote receiver I DIN-D-sub RS-232C adaptor (5 57/64" (15 cm)) AN-F212LP ...AN-60KT AN-XRCM30 (for U.S.A. Please check with your country. • Operation manual (this manual and CD-ROM ) Note • Codes in your nearest Sharp Authorized Projector Dealer or...
except U.K. only) AN-TK201 AN-TK202 AN-EP101B (for XR-32S Power cord* (1) (2) RGB cable Lens cap (attached) (10' (3.0 m)) (3) (4) For U.S. Optional accessories I Lamp unit I Ceiling-mount adaptor I Ceiling-mount unit I Remote receiver I DIN-D-sub RS-232C adaptor (5 57/64" (15 cm)) AN-F212LP ...AN-60KT AN-XRCM30 (for U.S.A. Please check with your country. • Operation manual (this manual and CD-ROM ) Note • Codes in your nearest Sharp Authorized Projector Dealer or...

XR-32S | XR-32X Operation Manual
Page 15
... Numbers in Z refer to attach or remove. 11 ENTER button For setting 38 items selected or adjusted on and putting the projector into standby mode. Remote control 15 sensor Exhaust vent 49 25, 50 Lamp indicator 50 Temperature warning indicator 32 ECO+QUIET button For lowering the noise of the lens...
... Numbers in Z refer to attach or remove. 11 ENTER button For setting 38 items selected or adjusted on and putting the projector into standby mode. Remote control 15 sensor Exhaust vent 49 25, 50 Lamp indicator 50 Temperature warning indicator 32 ECO+QUIET button For lowering the noise of the lens...

XR-32S | XR-32X Operation Manual
Page 16
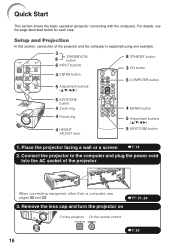
... a Kensington Security Standard connector for use it to secure the projector. 12 Shared for COMPUTER/COMPONENT) Terminal for connecting a monitor. * XR-32X only 22 S-VIDEO input terminal Terminal for connecting video equipment with an S-video terminal. 24 RS-232C terminal Terminal for controlling the ...projector using the supplied remote control as the computer mouse. 23 AUDIO 2 input terminal (AUDIO input terminal for XR-32S) 22 VIDEO input terminal Terminal for 22 DVI digital RGB and digital component signals. ...
... a Kensington Security Standard connector for use it to secure the projector. 12 Shared for COMPUTER/COMPONENT) Terminal for connecting a monitor. * XR-32X only 22 S-VIDEO input terminal Terminal for connecting video equipment with an S-video terminal. 24 RS-232C terminal Terminal for controlling the ...projector using the supplied remote control as the computer mouse. 23 AUDIO 2 input terminal (AUDIO input terminal for XR-32S) 22 VIDEO input terminal Terminal for 22 DVI digital RGB and digital component signals. ...

XR-32S | XR-32X Operation Manual
Page 17
...38 ENTER button For setting items selected or adjusted on a computer keyboard, when with the USB connection (using a USB cable or the optional remote receiver). • For returning to the previous menu screen during menu operations. 38 MENU/HELP button 48 For displaying adjustment and setting screens,... help screen. 30 RESIZE button For switching the picture size (NORMAL, BORDER, etc.). 33 PICTURE MODE button For selecting the appropriate picture. * XR-32X only 13 Introduction PAGE UP/PAGE 34 DOWN buttons Same as the [Page Down] and [Page Up] keys on the menu. 34 R-...
...38 ENTER button For setting items selected or adjusted on a computer keyboard, when with the USB connection (using a USB cable or the optional remote receiver). • For returning to the previous menu screen during menu operations. 38 MENU/HELP button 48 For displaying adjustment and setting screens,... help screen. 30 RESIZE button For switching the picture size (NORMAL, BORDER, etc.). 33 PICTURE MODE button For selecting the appropriate picture. * XR-32X only 13 Introduction PAGE UP/PAGE 34 DOWN buttons Same as the [Page Down] and [Page Up] keys on the menu. 34 R-...
XR-32S | XR-32X Operation Manual
Page 18
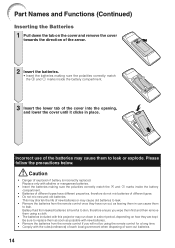
...Replace only with this projector may cause them as soon as leaving them in place. Please follow the precautions below. Battery fluid from the remote control once they are kept. Incorrect use of the batteries may run out, as possible with new batteries. • Remove the batteries from... the remote control if you wipe them first and then remove them using the remote control for a long time. • Comply with the rules (ordinance) of each local government when disposing of...
...Replace only with this projector may cause them as soon as leaving them in place. Please follow the precautions below. Battery fluid from the remote control once they are kept. Incorrect use of the batteries may run out, as possible with new batteries. • Remove the batteries from... the remote control if you wipe them first and then remove them using the remote control for a long time. • Comply with the rules (ordinance) of each local government when disposing of...
XR-32S | XR-32X Operation Manual
Page 19
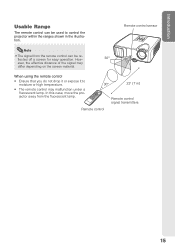
... a fluorescent lamp. When using the remote control • Ensure that you do not drop it or expose it to control the projector within the ranges shown in the illustration. In this case, move the projector away from the remote control can be reflected off a screen... for easy operation. Introduction Usable Range The remote control can be used to moisture or high temperature. • The remote control may differ depending on the screen material. Remote control sensor Note • The signal...
... a fluorescent lamp. When using the remote control • Ensure that you do not drop it or expose it to control the projector within the ranges shown in the illustration. In this case, move the projector away from the remote control can be reflected off a screen... for easy operation. Introduction Usable Range The remote control can be used to moisture or high temperature. • The remote control may differ depending on the screen material. Remote control sensor Note • The signal...
XR-32S | XR-32X Operation Manual
Page 20
... the computer). Place the projector facing a wall or a screen _P. 18 2. Remove the lens cap and turn the projector on On the projector On the remote control _P. 25 16 For details, see pages 22 and 23. _PP. 21, 24 3. Setup and Projection In this section, connection of the projector When...
... the computer). Place the projector facing a wall or a screen _P. 18 2. Remove the lens cap and turn the projector on On the projector On the remote control _P. 25 16 For details, see pages 22 and 23. _PP. 21, 24 3. Setup and Projection In this section, connection of the projector When...

XR-32S | XR-32X Operation Manual
Page 21
... is set to put the projector into standby mode. On the On the remote projector control INPUT list INPUT COMPUTER D DVI-D Computer On-screen display (RGB) COMPUTER RGB * 1024 × 768 D DVI-D Video *XR-32X only • When you press INPUT on 8. Adjust the projected image... with the Setup Guide 1 After the projector turns on the remote control. On the remote control _P. 28 6. See page 44.) 2 Follow the steps in the...
... is set to put the projector into standby mode. On the On the remote projector control INPUT list INPUT COMPUTER D DVI-D Computer On-screen display (RGB) COMPUTER RGB * 1024 × 768 D DVI-D Video *XR-32X only • When you press INPUT on 8. Adjust the projected image... with the Setup Guide 1 After the projector turns on the remote control. On the remote control _P. 28 6. See page 44.) 2 Follow the steps in the...
XR-32S | XR-32X Operation Manual
Page 29
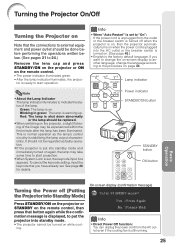
... the AC outlet even if the cooling fan is displayed, to put into Standby Mode) Press STANDBY/ON on the projector or STANDBY on the remote control, then press that button again while the confirmation message is still running. 25 Green: The lamp is warming up. Info • Direct Power ... performing the operations written below. (See pages 21 to 24.) Remove the lens cap and press STANDBY/ON on the projector or ON on the remote control. • The power indicator illuminates green. • After the lamp indicator illuminates, the projec- If you have already set , the keycode input box ...
... the AC outlet even if the cooling fan is displayed, to put into Standby Mode) Press STANDBY/ON on the projector or STANDBY on the remote control, then press that button again while the confirmation message is still running. 25 Green: The lamp is warming up. Info • Direct Power ... performing the operations written below. (See pages 21 to 24.) Remove the lens cap and press STANDBY/ON on the projector or ON on the remote control. • The power indicator illuminates green. • After the lamp indicator illuminates, the projec- If you have already set , the keycode input box ...
XR-32S | XR-32X Operation Manual
Page 33
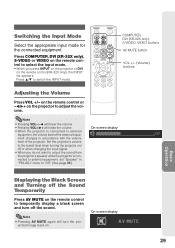
... the projector. On-screen display 29 Press P/R to adjust the volume. jected image back on the remote control (XR-32X only), the INPUT list appears. Press COMPUTER, DVI (XR-32X only), S-VIDEO or VIDEO on the remote control to external equipment, the volume level of the external equipment changes in "PRJ-ADJ" menu to...
... the projector. On-screen display 29 Press P/R to adjust the volume. jected image back on the remote control (XR-32X only), the INPUT list appears. Press COMPUTER, DVI (XR-32X only), S-VIDEO or VIDEO on the remote control to external equipment, the volume level of the external equipment changes in "PRJ-ADJ" menu to...

XR-32S | XR-32X Operation Manual
Page 36
... Eco+Quiet mode. 32 Note • Break Timer does not function while the pro- Note • Refer to "Lamp Setting" on the remote control to move the pointer. • Press EFFECT to change the spot area size (3 types). 1/9 1/25 1/8 2 Press P /R /O... /Q to adjust the length of the break time. • Increases with P or Q 5 minutes s 6 minutes s 60 minutes • Shortens with the Remote Control BREAK TIMER button FREEZE button Displaying the Pointer MAGNIFY buttons POINTER button SPOT button Adjustment buttons (P/R/O/Q) EFFECT button PICTURE MODE button ECO+QUIET button...
... Eco+Quiet mode. 32 Note • Break Timer does not function while the pro- Note • Refer to "Lamp Setting" on the remote control to move the pointer. • Press EFFECT to change the spot area size (3 types). 1/9 1/25 1/8 2 Press P /R /O... /Q to adjust the length of the break time. • Increases with P or Q 5 minutes s 6 minutes s 60 minutes • Shortens with the Remote Control BREAK TIMER button FREEZE button Displaying the Pointer MAGNIFY buttons POINTER button SPOT button Adjustment buttons (P/R/O/Q) EFFECT button PICTURE MODE button ECO+QUIET button...

XR-32S | XR-32X Operation Manual
Page 37
... picture mode. * "sRGB" is displayed only when RGB signal is helpful when providing more detailed explanations. 1 Press MAGNIFY on the remote control to cancel the operation. • The magnification then returns to ×1. This is input. 33 Selecting the Picture Mode You ... When the input signal resolution and refresh rate (vertical frequency) change the location of the enlarged image using P, R, O and Q. 2 Press RETURN on the remote control. • Enlarges the image. • Pressing or MAGNIFY enlarges or reduces the projected image. Note Press . ´1 ´2 ´3 ´...
... picture mode. * "sRGB" is displayed only when RGB signal is helpful when providing more detailed explanations. 1 Press MAGNIFY on the remote control to cancel the operation. • The magnification then returns to ×1. This is input. 33 Selecting the Picture Mode You ... When the input signal resolution and refresh rate (vertical frequency) change the location of the enlarged image using P, R, O and Q. 2 Press RETURN on the remote control. • Enlarges the image. • Pressing or MAGNIFY enlarges or reduces the projected image. Note Press . ´1 ´2 ´3 ´...

XR-32S | XR-32X Operation Manual
Page 38
...or R-CLICK. Press PAGE UP or PAGE DOWN. Connecting with a USB cable Computer To USB terminal Remote receiver To USB terminal (optional, AN-MR2) or USB cable (commercially available or available as Sharp service part QCNWGA014WJPZ) The mouse pointer can use this function does not work with the Microsoft®... Windows® 95 • Versions earlier than Windows® NT4.0 • Versions earlier than Mac OS® 8.5 • You cannot use the remote control as the [Page Up] and [Page Down] keys on a computer keyboard. For details, see the operation manual of the receiver.
...or R-CLICK. Press PAGE UP or PAGE DOWN. Connecting with a USB cable Computer To USB terminal Remote receiver To USB terminal (optional, AN-MR2) or USB cable (commercially available or available as Sharp service part QCNWGA014WJPZ) The mouse pointer can use this function does not work with the Microsoft®... Windows® 95 • Versions earlier than Windows® NT4.0 • Versions earlier than Mac OS® 8.5 • You cannot use the remote control as the [Page Up] and [Page Down] keys on a computer keyboard. For details, see the operation manual of the receiver.

XR-32S | XR-32X Operation Manual
Page 44
... high fidelity reproduction of image for 0 more enhanced presentations. ADJ Help 1 Picture Mode Standard Contrast 0 Bright 0 Color 0 2 Tint 0 Sharp 0 Red 0 Blue 0 Q PAGE2 Menu operation n Page 38 Picture SCR - ENTER END SEL./ADJ. For additional information about the sRGB...press PICTURE MODE on an original image, when "sRGB" is an international standard of each item in a natural tint based on the remote control to your preference. Picture Adjustment ("Picture" Menu) Q PAGE1 Picture SCR - Setting 4 C.M.S. 5 Progressive 6 DNR 7 Lamp ...
... high fidelity reproduction of image for 0 more enhanced presentations. ADJ Help 1 Picture Mode Standard Contrast 0 Bright 0 Color 0 2 Tint 0 Sharp 0 Red 0 Blue 0 Q PAGE2 Menu operation n Page 38 Picture SCR - ENTER END SEL./ADJ. For additional information about the sRGB...press PICTURE MODE on an original image, when "sRGB" is an international standard of each item in a natural tint based on the remote control to your preference. Picture Adjustment ("Picture" Menu) Q PAGE1 Picture SCR - Setting 4 C.M.S. 5 Progressive 6 DNR 7 Lamp ...

XR-32S | XR-32X Operation Manual
Page 47
...Menu operation n Page 38 SEL./ADJ. Select "Keystone" on -screen displays are not displayed. 43 Q button O button You can also press RESIZE on the remote con- Useful Features O button Q button Note • This function only works in some RESIZE modes. (See pages 30 and 31.) Note • The ...ADJ PRJ - are displayed. trol to set to "Normal"). • You can also press KEYSTONE on the remote control or on the projector to an angle of approximately ±40 (XR-32X)/ ±20 (XR-32S) degrees (when "Resize" is set the resize mode. (See page 30.) 2 Adjusting the Image Position...
...Menu operation n Page 38 SEL./ADJ. Select "Keystone" on -screen displays are not displayed. 43 Q button O button You can also press RESIZE on the remote con- Useful Features O button Q button Note • This function only works in some RESIZE modes. (See pages 30 and 31.) Note • The ...ADJ PRJ - are displayed. trol to set to "Normal"). • You can also press KEYSTONE on the remote control or on the projector to an angle of approximately ±40 (XR-32X)/ ±20 (XR-32S) degrees (when "Resize" is set the resize mode. (See page 30.) 2 Adjusting the Image Position...
XR-32S | XR-32X Operation Manual
Page 49
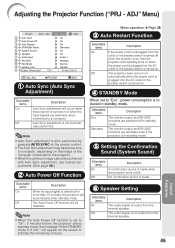
... more than 15 minutes, the projector will automatically enter standby mode. Note • Auto Sync adjustment is also performed by pressing AUTO SYNC on the remote control. • The Auto Sync adjustment may take some time to complete, depending on the image of the computer connected to a computer. will be achieved...
... more than 15 minutes, the projector will automatically enter standby mode. Note • Auto Sync adjustment is also performed by pressing AUTO SYNC on the remote control. • The Auto Sync adjustment may take some time to complete, depending on the image of the computer connected to a computer. will be achieved...

XR-32S | XR-32X Operation Manual
Page 50
.... Audio 2 The AUDIO 2 input terminal is turned on the projector for each button on the remote control or on the projector to enter the preset keycode in setting your nearest Sharp Authorized Projector Dealer or Service Center (see page 65). ADJ Setting the System Lock Old Code New ...times. Note • If you used as an audio input terminal. 8 Selecting the Transmission Speed (RS-232C) 3 Press the 4 buttons on the remote control or on the projector. When "Fan Mode" is 4 R buttons on the projector to enter the new keycode in a safe place where only ...
.... Audio 2 The AUDIO 2 input terminal is turned on the projector for each button on the remote control or on the projector to enter the preset keycode in setting your nearest Sharp Authorized Projector Dealer or Service Center (see page 65). ADJ Setting the System Lock Old Code New ...times. Note • If you used as an audio input terminal. 8 Selecting the Transmission Speed (RS-232C) 3 Press the 4 buttons on the remote control or on the projector. When "Fan Mode" is 4 R buttons on the projector to enter the new keycode in a safe place where only ...
XR-32S | XR-32X Operation Manual
Page 51
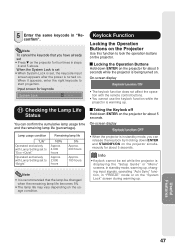
... buttons on the projector for four times in steps 4 and 5 above. When it appears, enter the right keycode to "Eco +Quiet" Operated exclusively with the remote control buttons. • You cannot use the keylock function while the projector is turned on . On-screen display Lamp usage condition "Life" Operated exclusively with...
... buttons on the projector for four times in steps 4 and 5 above. When it appears, enter the right keycode to "Eco +Quiet" Operated exclusively with the remote control buttons. • You cannot use the keylock function while the projector is turned on . On-screen display Lamp usage condition "Life" Operated exclusively with...

XR-32S | XR-32X Operation Manual
Page 53
..., as these can easily get damaged, be careful not to remove, soak a cloth in the plastic may discolor, warp or damage the coating on the remote control and put the projector into standby mode. The effects of some of the agents in a mild detergent diluted with water Wax Thinner Info •...
..., as these can easily get damaged, be careful not to remove, soak a cloth in the plastic may discolor, warp or damage the coating on the remote control and put the projector into standby mode. The effects of some of the agents in a mild detergent diluted with water Wax Thinner Info •...


