
XR10S|XR10X|XR20S|XR20X Operation Manual
Page 7
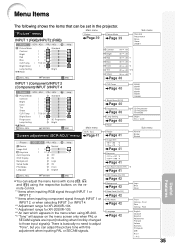
...; This operation can connect and operate all models in this Operation Manual I The specifications are simplified for setting up and operating the projector. Example: "Picture" screen menu for INPUT 1 (RGB) mode Menu item 2 Press Q or O and select "Picture" to... Contrast Bright Red Blue CLR Temp Bright Boost Lamp Setting Reset 0 0 0 0 7500K 1 Standard Bright Help SEL./ADJ. Using the Menu Screen ENTER button Adjustment buttons (P/R/O/Q) MENU/HELP button Adjustment buttons (P/R/O/Q) MENU/HELP button ENTER button RETURN button • Press l RETURN to return to adjust. However...
...; This operation can connect and operate all models in this Operation Manual I The specifications are simplified for setting up and operating the projector. Example: "Picture" screen menu for INPUT 1 (RGB) mode Menu item 2 Press Q or O and select "Picture" to... Contrast Bright Red Blue CLR Temp Bright Boost Lamp Setting Reset 0 0 0 0 7500K 1 Standard Bright Help SEL./ADJ. Using the Menu Screen ENTER button Adjustment buttons (P/R/O/Q) MENU/HELP button Adjustment buttons (P/R/O/Q) MENU/HELP button ENTER button RETURN button • Press l RETURN to return to adjust. However...
XR10S|XR10X|XR20S|XR20X Operation Manual
Page 39
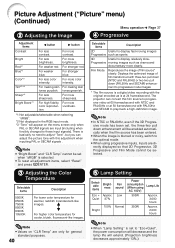
... Mode Contrast Bright Color Tint Sharp CLR Temp Bright Boost Progressive Lamp Setting Reset SEL./ADJ. 0 0 0...adjust the picture tone with icons ( , , and ) using the respective buttons on the menu screen only when PAL or SECAM signals are input (including...XR-20X. *6 "Tone" will appear on the remote control. *1 Items when inputting RGB signal through INPUT 1 or INPUT 2. *2 Items when inputting component signal through INPUT 1 or INPUT 2, or when selecting INPUT 3 or INPUT 4. *3 Adjustment range for XR-20X/XR-10X. *4 Adjustment range for XR-20S/XR-10S. *5 An item which appears in the projector...
... Mode Contrast Bright Color Tint Sharp CLR Temp Bright Boost Progressive Lamp Setting Reset SEL./ADJ. 0 0 0...adjust the picture tone with icons ( , , and ) using the respective buttons on the menu screen only when PAL or SECAM signals are input (including...XR-20X. *6 "Tone" will appear on the remote control. *1 Items when inputting RGB signal through INPUT 1 or INPUT 2. *2 Items when inputting component signal through INPUT 1 or INPUT 2, or when selecting INPUT 3 or INPUT 4. *3 Adjustment range for XR-20X/XR-10X. *4 Adjustment range for XR-20S/XR-10S. *5 An item which appears in the projector...

XR10S|XR10X|XR20S|XR20X Operation Manual
Page 41
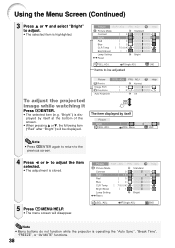
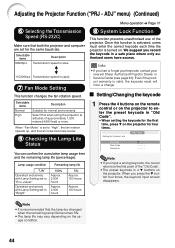
... input mode is displayed. Menu Selections (Adjustments) Example: Adjusting "Bright". • This operation can also be performed by using the buttons on the projector. 1 Press BMENU. • The "Picture" menu screen for INPUT 1 (RGB) mode Menu item 2 Press Q or O... Contrast Bright Red Blue CLR Temp Bright Boost Lamp Setting Reset 0 0 0 0 7500K 1 Standard Bright Help SEL./ADJ. Using the Menu Screen ENTER button Adjustment buttons (P/R/O/Q) MENU/HELP button Adjustment buttons (P/R/O/Q) MENU/HELP button ENTER button RETURN button • Press l RETURN to return to adjust. ADJ...
... input mode is displayed. Menu Selections (Adjustments) Example: Adjusting "Bright". • This operation can also be performed by using the buttons on the projector. 1 Press BMENU. • The "Picture" menu screen for INPUT 1 (RGB) mode Menu item 2 Press Q or O... Contrast Bright Red Blue CLR Temp Bright Boost Lamp Setting Reset 0 0 0 0 7500K 1 Standard Bright Help SEL./ADJ. Using the Menu Screen ENTER button Adjustment buttons (P/R/O/Q) MENU/HELP button Adjustment buttons (P/R/O/Q) MENU/HELP button ENTER button RETURN button • Press l RETURN to return to adjust. ADJ...
XR10S|XR10X|XR20S|XR20X Operation Manual
Page 42
.... 0 Rtn. ADJ Picture Mode Contrast Bright Red Blue CLR Temp Bright Boost Lamp Setting Reset 0 15 0 0 7500K 1 Standard Bright SEL./ADJ. Single ADJ Help END Note • Menu buttons do not function while the projector is operating the "Auto Sync", "Break Time", "FREEZE", or "AV MUTE" functions.... 38 Single ADJ Items to be displayed. ADJ PRJ - ADJ Picture Mode Contrast Bright Red Blue CLR Temp Bright Boost Lamp Setting Reset 0 0 0 0 7500K ...
.... 0 Rtn. ADJ Picture Mode Contrast Bright Red Blue CLR Temp Bright Boost Lamp Setting Reset 0 15 0 0 7500K 1 Standard Bright SEL./ADJ. Single ADJ Help END Note • Menu buttons do not function while the projector is operating the "Auto Sync", "Break Time", "FREEZE", or "AV MUTE" functions.... 38 Single ADJ Items to be displayed. ADJ PRJ - ADJ Picture Mode Contrast Bright Red Blue CLR Temp Bright Boost Lamp Setting Reset 0 0 0 0 7500K ...
XR10S|XR10X|XR20S|XR20X Operation Manual
Page 44
.... For weaker blue. For high fidelity color reproduction. For more contrast. The projector can adjust the picture tone with this film source to progressive video at 60 frames... digital video recording with the original encoded as is selected. • To reset all adjustment items, select "Reset" and press hENTER. Note • In NTSC or PAL60Hz, even if ... 37 2 Adjusting the Image 4 Progressive Adjustment Items Contrast Bright Red*1 Blue*1 Color*2 Tint*2 *3 Sharp*2 Bright Boost*1 O button Q button For less contrast. Note • "Bright Boost" and "CLR Temp" cannot be selected. 3 ...
.... For weaker blue. For high fidelity color reproduction. For more contrast. The projector can adjust the picture tone with this film source to progressive video at 60 frames... digital video recording with the original encoded as is selected. • To reset all adjustment items, select "Reset" and press hENTER. Note • In NTSC or PAL60Hz, even if ... 37 2 Adjusting the Image 4 Progressive Adjustment Items Contrast Bright Red*1 Blue*1 Color*2 Tint*2 *3 Sharp*2 Bright Boost*1 O button Q button For less contrast. Note • "Bright Boost" and "CLR Temp" cannot be selected. 3 ...
XR10S|XR10X|XR20S|XR20X Operation Manual
Page 48
... activated, users must enter the correct keycode each time the projector is valid, the keycode reset will incur a charge. When you lose or forget your keycode, contact your nearest Sharp Authorized Projector Dealer or Service Center (see page 61). Info • If you press the R button four times, the keycord input screen disappears. Lamp usage...
... activated, users must enter the correct keycode each time the projector is valid, the keycode reset will incur a charge. When you lose or forget your keycode, contact your nearest Sharp Authorized Projector Dealer or Service Center (see page 61). Info • If you press the R button four times, the keycord input screen disappears. Lamp usage...
XR10S|XR10X|XR20S|XR20X Operation Manual
Page 50
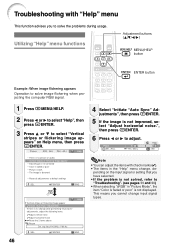
Utilizing "Help" menu functions Adjustment buttons (P/R/O/Q) MENU/HELP button ENTER button Example: When image flickering appears Operation to solve image flickering when projecting the computer RGB signal. 1 Press BMENU/HELP. 2 Press O or Q to select... with "Help" menu This function advises you cannot change after performing "Auto Sync" adjustments, adjust the following items. Adjust vertical noise Adjust horizontal noise Reset the 2 items above Return Cur. This means you to default settings SEL. Troubleshooting with check marks (✔). • The items in "Picture Mode...
Utilizing "Help" menu functions Adjustment buttons (P/R/O/Q) MENU/HELP button ENTER button Example: When image flickering appears Operation to solve image flickering when projecting the computer RGB signal. 1 Press BMENU/HELP. 2 Press O or Q to select... with "Help" menu This function advises you cannot change after performing "Auto Sync" adjustments, adjust the following items. Adjust vertical noise Adjust horizontal noise Reset the 2 items above Return Cur. This means you to default settings SEL. Troubleshooting with check marks (✔). • The items in "Picture Mode...
XR10S|XR10X|XR20S|XR20X Operation Manual
Page 56
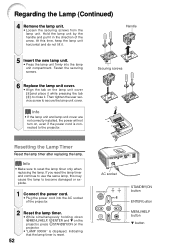
... • Press the lamp unit firmly into the AC socket of the arrow. AC socket STANDBY/ON button ENTER button MENU/HELP button R button Securing screws 2 1 Resetting the Lamp Timer Reset the lamp timer after replacing the lamp. Hold the lamp unit by the handle and pull it . ...Fasten the securing screws. 6 Replace the lamp unit cover. • Align the tab on the projector. • "LAMP 0000H" is...
... • Press the lamp unit firmly into the AC socket of the arrow. AC socket STANDBY/ON button ENTER button MENU/HELP button R button Securing screws 2 1 Resetting the Lamp Timer Reset the lamp timer after replacing the lamp. Hold the lamp unit by the handle and pull it . ...Fasten the securing screws. 6 Replace the lamp unit cover. • Align the tab on the projector. • "LAMP 0000H" is...


