XR10S|XR10X|XR20S|XR20X Operation Manual
Page 5
... use the STANDBY/ON button on the projector or the STANDBY button on the remote control. CAUTION RISK OF ELECTRIC SHOCK. During normal operation, when putting the projector into the beam of light, or view directly. DURING NORMAL OPERATION, NEVER TURN THE PROJECTOR OFF BY DISCONNECTING THE POWER CORD. FAILURE TO OBSERVE THIS WILL RESULT IN PREMATURE LAMP FAILURE. 1 DO NOT REMOVE SCREWS EXCEPT SPECIFIED USER SERVICE SCREW. The lightning flash with the projector. 1. ONLY WARNING: The cooling fan...
... use the STANDBY/ON button on the projector or the STANDBY button on the remote control. CAUTION RISK OF ELECTRIC SHOCK. During normal operation, when putting the projector into the beam of light, or view directly. DURING NORMAL OPERATION, NEVER TURN THE PROJECTOR OFF BY DISCONNECTING THE POWER CORD. FAILURE TO OBSERVE THIS WILL RESULT IN PREMATURE LAMP FAILURE. 1 DO NOT REMOVE SCREWS EXCEPT SPECIFIED USER SERVICE SCREW. The lightning flash with the projector. 1. ONLY WARNING: The cooling fan...

XR10S|XR10X|XR20S|XR20X Operation Manual
Page 6
... Concerning Lamp Replacement See "Replacing the Lamp" on the picture screen. Disposal of these materials may be determined by one or more of the following conditions: (1) This device may not cause harmful interference, and (2) this device must conform to. This SHARP projector uses a DMD panel. This very sophisticated panel contains 786,432 (XR20X/XR-10X) / 480,000 (XR-20S/XR-10S) pixels (micromirrors). These limits are located...
... Concerning Lamp Replacement See "Replacing the Lamp" on the picture screen. Disposal of these materials may be determined by one or more of the following conditions: (1) This device may not cause harmful interference, and (2) this device must conform to. This SHARP projector uses a DMD panel. This very sophisticated panel contains 786,432 (XR20X/XR-10X) / 480,000 (XR-20S/XR-10S) pixels (micromirrors). These limits are located...

XR10S|XR10X|XR20S|XR20X Operation Manual
Page 8
... 18 Ceiling-mount Setup 18 Projection (PRJ) Mode 19 Screen Size and Projection Distance .. 20 Connections Connections 21 Samples of Cables for Connection ..... 22 Connecting to a Computer 23 Connecting to Video Equipment ......... 24 Connecting to a Monitor with RGB Input Terminal 25 Controlling the Projector by a Computer 26 Connecting the Power Cord 26 Using Basic Operation Turning the Projector On/Off 27 Turning the Projector on the Projector (Keylock Function 45 Troubleshooting with the Remote Control .... 34 Displaying and Setting the Break Timer 34 Auto Sync (Auto Sync...
... 18 Ceiling-mount Setup 18 Projection (PRJ) Mode 19 Screen Size and Projection Distance .. 20 Connections Connections 21 Samples of Cables for Connection ..... 22 Connecting to a Computer 23 Connecting to Video Equipment ......... 24 Connecting to a Monitor with RGB Input Terminal 25 Controlling the Projector by a Computer 26 Connecting the Power Cord 26 Using Basic Operation Turning the Projector On/Off 27 Turning the Projector on the Projector (Keylock Function 45 Troubleshooting with the Remote Control .... 34 Displaying and Setting the Break Timer 34 Auto Sync (Auto Sync...

XR10S|XR10X|XR20S|XR20X Operation Manual
Page 12
... screen for replacement. I For minimal servicing and to maintain high image quality, SHARP recommends that it is from -4°F to 140°F (-20°C to the normal operating condition. Caution concerning the setup of the projector I Position the screen so that it is regularly cleaned, use the projector in a high position, ensure that this can affect the longevity of the adjustment foot. 8 Avoid locations with thin air, set...
... screen for replacement. I For minimal servicing and to maintain high image quality, SHARP recommends that it is from -4°F to 140°F (-20°C to the normal operating condition. Caution concerning the setup of the projector I Position the screen so that it is regularly cleaned, use the projector in a high position, ensure that this can affect the longevity of the adjustment foot. 8 Avoid locations with thin air, set...

XR10S|XR10X|XR20S|XR20X Operation Manual
Page 13
... picture. ject it . I If the projector starts to overheat due to the projector, make the connections. visual equipment to setup problems or blockage of the air vents, " " and " " will enter standby mode. Temperature monitor function I Do not carry the projector by double clicking the mouse, start Adobe® Reader® first, then specify the desired file using the projector, be opened by holding the lens. Accessing the PDF Manuals...
... picture. ject it . I If the projector starts to overheat due to the projector, make the connections. visual equipment to setup problems or blockage of the air vents, " " and " " will enter standby mode. Temperature monitor function I Do not carry the projector by double clicking the mouse, start Adobe® Reader® first, then specify the desired file using the projector, be opened by holding the lens. Accessing the PDF Manuals...

XR10S|XR10X|XR20S|XR20X Operation Manual
Page 15
...Projector Top View Power indicator 27, 48 STANDBY/ON 27 button For turning the power on the menu. Front View Focus ring 28 For adjusting the focus. HEIGHT 29 ADJUST lever 27, 48 Lamp indicator 48 Temperature warning indicator 30 Volume buttons (-O/Q+) For adjusting the speaker sound level. 30 INPUT button (P/R) For switching input mode 1, 2, 3 or 4. 37, 46 MENU/HELP button For displaying adjustment and setting screens, and help screen. 37 Adjustment buttons (P/R/O/Q) For selecting menu items. 47 Intake vent 28 Zoom ring For enlarging/ reducing the picture. 15 Remote control...
...Projector Top View Power indicator 27, 48 STANDBY/ON 27 button For turning the power on the menu. Front View Focus ring 28 For adjusting the focus. HEIGHT 29 ADJUST lever 27, 48 Lamp indicator 48 Temperature warning indicator 30 Volume buttons (-O/Q+) For adjusting the speaker sound level. 30 INPUT button (P/R) For switching input mode 1, 2, 3 or 4. 37, 46 MENU/HELP button For displaying adjustment and setting screens, and help screen. 37 Adjustment buttons (P/R/O/Q) For selecting menu items. 47 Intake vent 28 Zoom ring For enlarging/ reducing the picture. 15 Remote control...

XR10S|XR10X|XR20S|XR20X Operation Manual
Page 31
... input box appears. Red: The lamp is set . STANDBY button ON button Turning the Power off (Putting the Projector into Standby Mode) 1 Press SSTANDBY/ON on the projector or eSTANDBY on the remote control, then press that button again while the confirmation message is displayed, to put into standby mode. 2 Unplug the power cord from the AC outlet after the cooling fan stops. • The power indicator on the projector blinks in green: The lamp is the factory default language. Blinking in green...
... input box appears. Red: The lamp is set . STANDBY button ON button Turning the Power off (Putting the Projector into Standby Mode) 1 Press SSTANDBY/ON on the projector or eSTANDBY on the remote control, then press that button again while the confirmation message is displayed, to put into standby mode. 2 Unplug the power cord from the AC outlet after the cooling fan stops. • The power indicator on the projector blinks in green: The lamp is the factory default language. Blinking in green...
XR10S|XR10X|XR20S|XR20X Operation Manual
Page 38
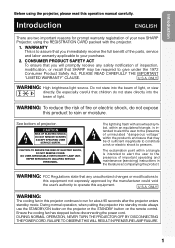
...the projected image, such as movie or video game. Selecting the Picture Mode You can be achieved with the Remote Control Adjustment buttons (P/R/O/Q) BREAK TIMER button FREEZE button PICTURE MODE button AUTO SYNC button Auto Sync (Auto Sync Adjustment) Auto Sync function works when detecting input signal after the projector turns on the picture mode. * "sRGB" is displayed only when RGB signal is input. 34 Operating with Auto Sync adjustment, use the help menu for manual adjustments. (See page 46.) Displaying and Setting the Break Timer 1 Press k BREAK TIMER. • The timer starts...
...the projected image, such as movie or video game. Selecting the Picture Mode You can be achieved with the Remote Control Adjustment buttons (P/R/O/Q) BREAK TIMER button FREEZE button PICTURE MODE button AUTO SYNC button Auto Sync (Auto Sync Adjustment) Auto Sync function works when detecting input signal after the projector turns on the picture mode. * "sRGB" is displayed only when RGB signal is input. 34 Operating with Auto Sync adjustment, use the help menu for manual adjustments. (See page 46.) Displaying and Setting the Break Timer 1 Press k BREAK TIMER. • The timer starts...
XR10S|XR10X|XR20S|XR20X Operation Manual
Page 44
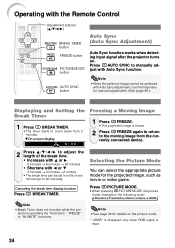
... source to those input signals). reddish inPcandescent-like images. Quiet 87% 100% Bright Fan sound Low Normal Power consumption (When using progressive inputs, inputs are only for cooler, bluish, fluorescent-like R For higher color temperature for general standard purposes. 40 5 Lamp Setting Selectable items Brightness Eco + Approx. For making skin tones greenish. For stronger red. For stronger blue. There is selected. • To reset all adjustment items, select "Reset...
... source to those input signals). reddish inPcandescent-like images. Quiet 87% 100% Bright Fan sound Low Normal Power consumption (When using progressive inputs, inputs are only for cooler, bluish, fluorescent-like R For higher color temperature for general standard purposes. 40 5 Lamp Setting Selectable items Brightness Eco + Approx. For making skin tones greenish. For stronger red. For stronger blue. There is selected. • To reset all adjustment items, select "Reset...
XR10S|XR10X|XR20S|XR20X Operation Manual
Page 47
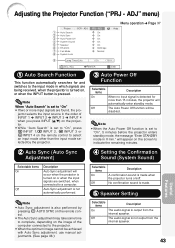
... projector enters standby mode, the message "Enter STANDBY mode in which signals are being received, when the projector is turned on the image of INPUT 1 n INPUT 2 n INPUT 3 n INPUT 4 when you press INPUT (P/R) on /off. will automatically enter standby mode. The audio signal is turned on the screen to the projector. • When the optimum image cannot be disabled. ADJ" menu) Picture SCR - ADJ Auto Search Auto Sync Auto Power Off System Sound Speaker RS-232C Fan Mode System Lock PRJ - Auto Sync adjustment is set to a computer. The Auto Power...
... projector enters standby mode, the message "Enter STANDBY mode in which signals are being received, when the projector is turned on the image of INPUT 1 n INPUT 2 n INPUT 3 n INPUT 4 when you press INPUT (P/R) on /off. will automatically enter standby mode. The audio signal is turned on the screen to the projector. • When the optimum image cannot be disabled. ADJ" menu) Picture SCR - ADJ Auto Search Auto Sync Auto Power Off System Sound Speaker RS-232C Fan Mode System Lock PRJ - Auto Sync adjustment is set to a computer. The Auto Power...
XR10S|XR10X|XR20S|XR20X Operation Manual
Page 48
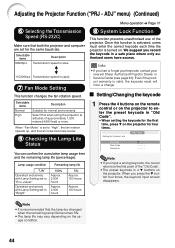
... 4 R buttons on the projector. We suggest you press the R button four times, the keycord input screen disappears. Info • If you input a wrong keycode, the cursor returns to "High", the fan rotation speeds up, and the fan noise becomes louder. 9 Checking the Lamp Life Status You can confirm the cumulative lamp usage time and the remaining lamp life (percentage). When "Fan Mode" is turned on the usage condition. 44 Setting the System Lock PRJ...
... 4 R buttons on the projector. We suggest you press the R button four times, the keycord input screen disappears. Info • If you input a wrong keycode, the cursor returns to "High", the fan rotation speeds up, and the fan noise becomes louder. 9 Checking the Lamp Life Status You can confirm the cumulative lamp usage time and the remaining lamp life (percentage). When "Fan Mode" is turned on the usage condition. 44 Setting the System Lock PRJ...

XR10S|XR10X|XR20S|XR20X Operation Manual
Page 53
... the lamp may change and this function is controlled automatically. Appendix 49 The lamp does not illuminate. Maintenance indicator Temperature warning indicator Normal Off Abnormal Red on (Standby) Lamp indicator Green on (Green blinks when the lamp is warming up or turning off for a brief moment due to your nearest Sharp Authorized Projector Dealer or Service Center (see page 61) for repair. • Please exercise care when replacing the lamp. • Securely install the cover...
... the lamp may change and this function is controlled automatically. Appendix 49 The lamp does not illuminate. Maintenance indicator Temperature warning indicator Normal Off Abnormal Red on (Standby) Lamp indicator Green on (Green blinks when the lamp is warming up or turning off for a brief moment due to your nearest Sharp Authorized Projector Dealer or Service Center (see page 61) for repair. • Please exercise care when replacing the lamp. • Securely install the cover...
XR10S|XR10X|XR20S|XR20X Operation Manual
Page 54
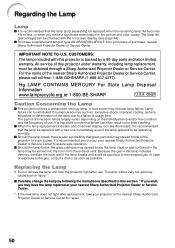
... of time up to failure largely varies depending on -screen display icon are illuminated, it is recommended you may have the lamp replaced at your place of purchase, nearest Sharp Authorized Projector Dealer or Service Center. It is important to note that the lamp be replaced with a new one immediately, even if the lamp appears to be operating normally. I This projector utilizes a pressurized mercury lamp. A loud sound...
... of time up to failure largely varies depending on -screen display icon are illuminated, it is recommended you may have the lamp replaced at your place of purchase, nearest Sharp Authorized Projector Dealer or Service Center. It is important to note that the lamp be replaced with a new one immediately, even if the lamp appears to be operating normally. I This projector utilizes a pressurized mercury lamp. A loud sound...
XR10S|XR10X|XR20S|XR20X Operation Manual
Page 56
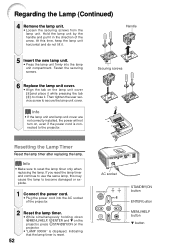
... displayed, indicating that the lamp timer is connected to the projector. If you reset the lamp timer and continue to use the same lamp, this time, keep the lamp unit horizontal and do not tilt it in the direction of the projector. 2 52 Reset the lamp timer. • While simultaneously holding down UMENU/HELP, TENTER and R on the projector, press SSTANDBY/ON on , even if the power cord is reset. Then tighten the user service screw...
... displayed, indicating that the lamp timer is connected to the projector. If you reset the lamp timer and continue to use the same lamp, this time, keep the lamp unit horizontal and do not tilt it in the direction of the projector. 2 52 Reset the lamp timer. • While simultaneously holding down UMENU/HELP, TENTER and R on the projector, press SSTANDBY/ON on , even if the power cord is reset. Then tighten the user service screw...

XR10S|XR10X|XR20S|XR20X Operation Manual
Page 59
..._ 1 0 : Normal, 1 : Temp High, 8 : Lamp Life 5% or less, 16 : Lamp Burnt-out, 32 : Lamp Ignition Failure RETURN Lamp Status T L P S _ _ _ 1 0 : Off, 1 : On, 2 : Retry, 3 : Waiting, 4 : Lamp Error Lamp Power Status T P O W _ _ _ 1 1 : On, 2 : Cooling, 3 : Shutting Down Lamp Quantity TLPN___1 1 Lamp Usage Time (Hour) T L T T _ _ _ 1 0 - 9999 (Integer) Lamp Life (Percentage) T L T L _ _ _ 1 0% - 100% (Integer) Model Name Check T N A M _ _ _ 1 XR10S / XR10X /XR20S / XR20X Model Name Check M N R D _ _ _ 1 XR-10S / XR-10X / XR-20S / XR-20X Projector Name Setting 1 P J N 1 * * * * OK...
..._ 1 0 : Normal, 1 : Temp High, 8 : Lamp Life 5% or less, 16 : Lamp Burnt-out, 32 : Lamp Ignition Failure RETURN Lamp Status T L P S _ _ _ 1 0 : Off, 1 : On, 2 : Retry, 3 : Waiting, 4 : Lamp Error Lamp Power Status T P O W _ _ _ 1 1 : On, 2 : Cooling, 3 : Shutting Down Lamp Quantity TLPN___1 1 Lamp Usage Time (Hour) T L T T _ _ _ 1 0 - 9999 (Integer) Lamp Life (Percentage) T L T L _ _ _ 1 0% - 100% (Integer) Model Name Check T N A M _ _ _ 1 XR10S / XR10X /XR20S / XR20X Model Name Check M N R D _ _ _ 1 XR-10S / XR-10X / XR-20S / XR-20X Projector Name Setting 1 P J N 1 * * * * OK...

XR10S|XR10X|XR20S|XR20X Operation Manual
Page 63
... projector cannot be projected unless the signal output setting of the computer is switched to the external output. Troubleshooting Problem Check Page • Projector power cord is not plugged into the If the keylock is set to "ON", all the buttons are locked. 45 standby mode using , an image may appear depending on the computer. - • Cables incorrectly connected to the projector. • Volume is set to minimum. • When the projector is connected...
... projector cannot be projected unless the signal output setting of the computer is switched to the external output. Troubleshooting Problem Check Page • Projector power cord is not plugged into the If the keylock is set to "ON", all the buttons are locked. 45 standby mode using , an image may appear depending on the computer. - • Cables incorrectly connected to the projector. • Volume is set to minimum. • When the projector is connected...

XR10S|XR10X|XR20S|XR20X Operation Manual
Page 64
... you cannot select an input signal type, select "Color is dark. projector turns on INPUT 1 (RGB)/INPUT 2 (RGB). The lamp needs much • The lamp will eventually need to the projector or the connected equipment works improperly. • Select "Vertical stripes or flickering image appear" in red. Troubleshooting (Continued) Problem Check Picture is green on . time to a close, replace the lamp. If this happens frequently, replace the lamp. or poor" in the "Help" menu, after selecting an...
... you cannot select an input signal type, select "Color is dark. projector turns on INPUT 1 (RGB)/INPUT 2 (RGB). The lamp needs much • The lamp will eventually need to the projector or the connected equipment works improperly. • Select "Vertical stripes or flickering image appear" in red. Troubleshooting (Continued) Problem Check Picture is green on . time to a close, replace the lamp. If this happens frequently, replace the lamp. or poor" in the "Help" menu, after selecting an...

XR10S|XR10X|XR20S|XR20X Operation Manual
Page 65
... Singapore Sharp-Roxy Sales (S) Pte. Ltd. 1300-135-022 http://www.sharp.net.au New Zealand Sharp Corporation of Australia Pty. Sharp Middle East Fze 971-4-81-5311 [email protected].sharp.co.jp Thailand Sharp Thebnakorn Co. For SHARP Assistance If you encounter any problems during setup or operation of this operation manual does not answer your question, please contact the SHARP Service departments...
... Singapore Sharp-Roxy Sales (S) Pte. Ltd. 1300-135-022 http://www.sharp.net.au New Zealand Sharp Corporation of Australia Pty. Sharp Middle East Fze 971-4-81-5311 [email protected].sharp.co.jp Thailand Sharp Thebnakorn Co. For SHARP Assistance If you encounter any problems during setup or operation of this operation manual does not answer your question, please contact the SHARP Service departments...

XR10S|XR10X|XR20S|XR20X Operation Manual
Page 66
...) (including adjustment foot and projecting parts) Weight (approx.) 8.6 lbs. (3.9 kg) Replacement parts Remote control, Power cord for U.K. Specifications Product type Projector Model XR-20X/XR-20S/XR-10X/XR-10S Video system NTSC3.58/NTSC4.43/PAL/PAL-M/PAL-N/PAL-60/SECAM/DTV480I/DTV480P/ DTV540P/DTV576I/DTV576P/DTV720P/DTV1035I/DTV1080I/DTV1080I-50 Display method Single Chip Digital Micromirror DeviceTM (DMDTM) by Texas Instruments DMD panel Panel size: [XR-20X/XR-10X] 0.55" (14 mm), 1chip XGA DMD [XR-20S/XR-10S] 0.55...
...) (including adjustment foot and projecting parts) Weight (approx.) 8.6 lbs. (3.9 kg) Replacement parts Remote control, Power cord for U.K. Specifications Product type Projector Model XR-20X/XR-20S/XR-10X/XR-10S Video system NTSC3.58/NTSC4.43/PAL/PAL-M/PAL-N/PAL-60/SECAM/DTV480I/DTV480P/ DTV540P/DTV576I/DTV576P/DTV720P/DTV1035I/DTV1080I/DTV1080I-50 Display method Single Chip Digital Micromirror DeviceTM (DMDTM) by Texas Instruments DMD panel Panel size: [XR-20X/XR-10X] 0.55" (14 mm), 1chip XGA DMD [XR-20S/XR-10S] 0.55...

XR10S|XR10X|XR20S|XR20X Operation Manual
Page 68
... KEYSTONE button 31 Keystone Correction 41 64 Lamp 10, 50 Lamp indicator 48 Lamp Setting 40 Lamp Timer (Life 44 Lamp unit 51 Language (on-screen display language) ...... 42 Lens Cap 11 MENU/HELP button 37, 46 NORMAL 32, 33 ON button 27 Optional accessories 10 OSD Display 42 PDF 9 Phase 46 Picture Adjustment 39 Picture Mode 34, 39 PICTURE MODE button 34 Power cord 26 PRJ - ADJ 43 PRJ Mode 19, 42 Progressive 40 R-6 batteries 14 Rear adjustment foot 29 Red 40 Remote control...
... KEYSTONE button 31 Keystone Correction 41 64 Lamp 10, 50 Lamp indicator 48 Lamp Setting 40 Lamp Timer (Life 44 Lamp unit 51 Language (on-screen display language) ...... 42 Lens Cap 11 MENU/HELP button 37, 46 NORMAL 32, 33 ON button 27 Optional accessories 10 OSD Display 42 PDF 9 Phase 46 Picture Adjustment 39 Picture Mode 34, 39 PICTURE MODE button 34 Power cord 26 PRJ - ADJ 43 PRJ Mode 19, 42 Progressive 40 R-6 batteries 14 Rear adjustment foot 29 Red 40 Remote control...


