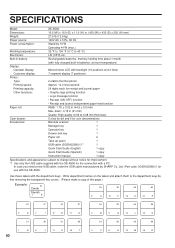
XE-A506 Operation Manual in English and Spanish
Page 6
...SCANNER Drawer lock Drawer SD card slot (Refer to page 71.) USB port Scanner port Use only the USB cable supplied with the XE-A506 for the connection with the cash register. Indicator Lights when a barcode is scanned, the indicator will light and beep. When the barcode is scanned.... Barcode scanner The barcode scanner is invalid. 4 Before connecting the barcode scanner, make sure to the scanner port mounted on the cash register. A button located at the rear side is supplied with a ...
XE-A506 Operation Manual in English and Spanish
Page 10
... plug into the mode switch and turn it before starting initialization.) Wait at the right side of the cash register when you connect or disconnect the barcode scanner. 3 Initializing the cash register In order for the first time. will be subject to the PGM... the power cord of the register. 2. Insert the connector of accessories, please refer to "Specifications" section. 2 Connecting the barcode scanner To scan barcodes, connect the included barcode scanner to operate properly, you operated the cash register before operating for the cash register to the ...
XE-A506 Operation Manual in English and Spanish
Page 11
... the paper roll cradle of the receipt side as illustrated above . 9 Install the paper rolls according to the procedure shown below with the power cord connected and the mode switch set the mode switch to a position other than "OFF" with the register. Make sure each paper roll. Remove the white retainer...
XE-A506 Operation Manual in English and Spanish
Page 14
.... FOR THE OPERATOR OVERVIEW OF FLOW OF DAILY SALES ENTRIES Things to do before starting sales entries: • Make sure the power cord is securely connected to the AC outlet. • Turn the mode switch to OP X/Z position and check if date and time are correctly set. • Replace the till...
XE-A506 Operation Manual in English and Spanish
Page 77
... the paper roll from the paper roll cradle of the paper roll is fixed with the power cord connected. 2. The use paper rolls specified by SHARP. Turn the mode switch to the REG position with a new one revolution (approx. 25 cm long). (How to cut 1. Cut the paper and remove the ...
XE-A506 Operation Manual in English and Spanish
Page 78
Be careful not to the REG position with the power cord connected. 2. Turn the mode switch to cut yourself. Remove the printer cover. 3. Cut off , follow the steps shown below: 1. Turn the mode switch to feed more ...paper if required.) 7. Set the paper correctly in the paper spool. (Press the key to the REG position with the power cord connected. 2. Insert the end of the paper into the slit in the paper roll cradle of the receipt side. 5. Remove the outer side of the printer...
XE-A506 Operation Manual in English and Spanish
Page 81
... the data and programmed settings stored in memory.) • Is power supplied to the electrical outlet? • Is the power cord plug out or loosely connected to the AC outlet? • Is a clerk code assigned to the register? • Is the mode switch set properly at the "REG" position? • Is...
XE-A506 Operation Manual in English and Spanish
Page 82
...: 32 °F to 104 °F (0 °C to 40 °C) Electronics: LSI (CPU) etc. Ltd. (Part code: 0GS5422580///) for the connection with backlight (16 positions and 2 lines) Customer display: 7-segment display (7 positions) Printer: Type: 2-station thermal printer Printing speed: Approx. 13.3 lines/... manual 1 copy Specifications and appearance subject to the department keys by SHARP Co. Write department names on the labels and attach them to change without notice for improvement. *1 Use only the USB cable supplied with the XE-A506 for use with the department keys.
Quick Start Guide
Page 1
...2. If the printer does not catch the paper, feed the paper while pressing } as illustrated in a position other than "OFF". English 1 Connecting the Barcode Scanner 2 Initializing the Cash Register A barcode scanner is provided with "PGM". Insert the connector of the barcode scanner into the paper chute... illustrated in the paper. 9. Set the spool on the bearing, and press the } key to take -up excess slack in step 2. 6. XE-A506 Quick Start Guide The following procedure: 1. Make sure the power cord plug is cut as illustrated right. The buzzer will sound three times and ...