
XE-A506 Operation Manual in English and Spanish
Page 3
...which is mounted. In order to charge the batteries, the machine must be plugged in and the mode switch must be allowed to discoloration or deterioration of the cabinets. • The register plugs into the ...a paper cutter is operated by rechargeable batteries. Installation in a position other than "OFF". Customer Service Hotline 1-800-BE-SHARP For Easy Set-up, see "GETTING STARTED" (page 8). English INTRODUCTION Thank you very much for service - Please read...summary of English version) is recommended that is a trademark of the SHARP Electronic Cash Register, Model XE-A506.
...which is mounted. In order to charge the batteries, the machine must be plugged in and the mode switch must be allowed to discoloration or deterioration of the cabinets. • The register plugs into the ...a paper cutter is operated by rechargeable batteries. Installation in a position other than "OFF". Customer Service Hotline 1-800-BE-SHARP For Easy Set-up, see "GETTING STARTED" (page 8). English INTRODUCTION Thank you very much for service - Please read...summary of English version) is recommended that is a trademark of the SHARP Electronic Cash Register, Model XE-A506.
XE-A506 Operation Manual in English and Spanish
Page 4
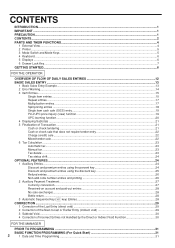
CONTENTS INTRODUCTION ...1 IMPORTANT ...1 PRECAUTION...1 CONTENTS...2 PARTS AND THEIR FUNCTIONS...4 1 External View ...4 2 Printer ...5 3 Mode Switch and Mode Keys ...5 4 Keyboard...6 5 Displays ...6 6 Drawer Lock Key...7 GETTING STARTED...8 FOR THE OPERATOR OVERVIEW OF FLOW OF DAILY SALES ENTRIES 12 BASIC SALES ENTRY ...13 1 Basic Sales ...
CONTENTS INTRODUCTION ...1 IMPORTANT ...1 PRECAUTION...1 CONTENTS...2 PARTS AND THEIR FUNCTIONS...4 1 External View ...4 2 Printer ...5 3 Mode Switch and Mode Keys ...5 4 Keyboard...6 5 Displays ...6 6 Drawer Lock Key...7 GETTING STARTED...8 FOR THE OPERATOR OVERVIEW OF FLOW OF DAILY SALES ENTRIES 12 BASIC SALES ENTRY ...13 1 Basic Sales ...
XE-A506 Operation Manual in English and Spanish
Page 6
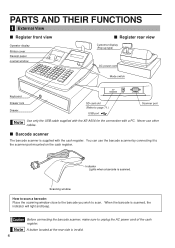
... cover Receipt paper Journal window Customer display (Pop-up type) AC power cord Mode switch Keyboard SCANNER Drawer lock Drawer SD card slot (Refer to page 71.) USB port Scanner port Use only the USB cable supplied with the XE-A506 for the connection with the cash register. When the barcode is scanned. You...
... cover Receipt paper Journal window Customer display (Pop-up type) AC power cord Mode switch Keyboard SCANNER Drawer lock Drawer SD card slot (Refer to page 71.) USB port Scanner port Use only the USB cable supplied with the XE-A506 for the connection with the cash register. When the barcode is scanned. You...
XE-A506 Operation Manual in English and Spanish
Page 7
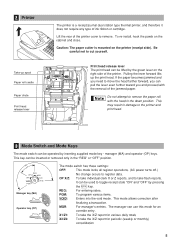
...MA OP REG OPX/Z MGR OFF X1/Z1 VOID X2/Z2 PGM Manager key (MA) Operator key (OP) OP MA The mode switch has these settings: OFF: This mode locks all register operations. (AC power turns off.) No change occurs to cut yourself. Print head release lever The print head can...further toward you and proceed with the head in damage to move the head farther forward, you need to the printer and print head. 3 Mode Switch and Mode Keys The mode switch can be inserted or removed only in the "REG" or "OFF" position. REG: For entering sales. PGM: To program various items....
...MA OP REG OPX/Z MGR OFF X1/Z1 VOID X2/Z2 PGM Manager key (MA) Operator key (OP) OP MA The mode switch has these settings: OFF: This mode locks all register operations. (AC power turns off.) No change occurs to cut yourself. Print head release lever The print head can...further toward you and proceed with the head in damage to move the head farther forward, you need to the printer and print head. 3 Mode Switch and Mode Keys The mode switch can be inserted or removed only in the "REG" or "OFF" position. REG: For entering sales. PGM: To program various items....
XE-A506 Operation Manual in English and Spanish
Page 10
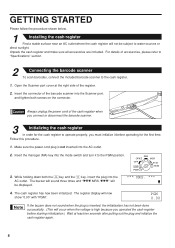
... not sound when the plug is inserted, the initialization has not been done successfully. (This will occur when the voltage is not inserted into the mode switch and turn it before starting initialization.) Wait at the right side of accessories, please refer to "Specifications" section. 2 Connecting the barcode scanner To scan barcodes...
... not sound when the plug is inserted, the initialization has not been done successfully. (This will occur when the voltage is not inserted into the mode switch and turn it before starting initialization.) Wait at the right side of accessories, please refer to "Specifications" section. 2 Connecting the barcode scanner To scan barcodes...
XE-A506 Operation Manual in English and Spanish
Page 11
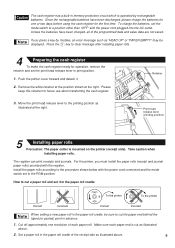
...clear message after installing paper rolls. 4 Preparing the cash register To make the cash register ready for operation, remove the retainer and set the mode switch to a position other than "OFF" with the power cord plugged into the AC outlet. Move the print head release lever to the printing ... pasted) point in advance. 1. If you must install the paper rolls (receipt and journal paper rolls) provided with the power cord connected and the mode switch set to the PGM position: How to cut a paper roll and set it . 2. Please keep this retainer for the first time. The register ...
...clear message after installing paper rolls. 4 Preparing the cash register To make the cash register ready for operation, remove the retainer and set the mode switch to a position other than "OFF" with the power cord plugged into the AC outlet. Move the print head release lever to the printing ... pasted) point in advance. 1. If you must install the paper rolls (receipt and journal paper rolls) provided with the power cord connected and the mode switch set to the PGM position: How to cut a paper roll and set it . 2. Please keep this retainer for the first time. The register ...
XE-A506 Operation Manual in English and Spanish
Page 14
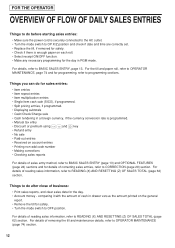
... OPERATOR MAINTENANCE (page 74) section. 12 For the till and paper roll, refer to OPERATOR MAINTENANCE, page 74 and for safety. • Turn the mode switch to OFF position. For details of business: • Print sales reports, and clear sales data for the day in a foreign currency, if the currency ...SALES ENTRIES Things to do before starting sales entries: • Make sure the power cord is securely connected to the AC outlet. • Turn the mode switch to OP X/Z position and check if date and time are correctly set. • Replace the till, if removed for safety. • Check if ...
... OPERATOR MAINTENANCE (page 74) section. 12 For the till and paper roll, refer to OPERATOR MAINTENANCE, page 74 and for safety. • Turn the mode switch to OFF position. For details of business: • Print sales reports, and clear sales data for the day in a foreign currency, if the currency ...SALES ENTRIES Things to do before starting sales entries: • Make sure the power cord is securely connected to the AC outlet. • Turn the mode switch to OP X/Z position and check if date and time are correctly set. • Replace the till, if removed for safety. • Check if ...

XE-A506 Operation Manual in English and Spanish
Page 15
BASIC SALES ENTRY 1 Basic Sales Entry Example Listed below is 1. Mode switch setting 1. Enter your clerk code. (For example, clerk code is a basic sales entry example when selling items by cash. Press the key to department 40, ... position. Press the and key REG OPX/Z MGR OFF X1/Z1 VOID X2/Z2 PGM in this order.) Item entries 15: 3. Clerk assignment 1 K 2. Turn the mode switch to each section. Enter the price for the first department item. (For example, for all department items. Displaying subtotals s 5.
BASIC SALES ENTRY 1 Basic Sales Entry Example Listed below is 1. Mode switch setting 1. Enter your clerk code. (For example, clerk code is a basic sales entry example when selling items by cash. Press the key to department 40, ... position. Press the and key REG OPX/Z MGR OFF X1/Z1 VOID X2/Z2 PGM in this order.) Item entries 15: 3. Clerk assignment 1 K 2. Turn the mode switch to each section. Enter the price for the first department item. (For example, for all department items. Displaying subtotals s 5.
XE-A506 Operation Manual in English and Spanish
Page 16
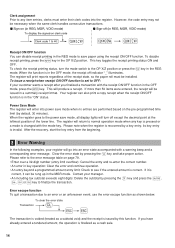
... An entry beyond a programmed amount entry limit: Check to see if the entered amount is changed with the mode key. When the function is invalid. If more than 50 items were entered, the receipt will be necessary...code Clerk code 1 to 40 K KK Receipt ON/OFF function You can disable receipt printing in the REG mode to save paper using the receipt ON/OFF function. l A • An including-tax subtotal exceeds eight ...register. Your register can be installed. The register will turn the mode switch to finalize the transaction. To disable R receipt printing, press the key in the REG...
... An entry beyond a programmed amount entry limit: Check to see if the entered amount is changed with the mode key. When the function is invalid. If more than 50 items were entered, the receipt will be necessary...code Clerk code 1 to 40 K KK Receipt ON/OFF function You can disable receipt printing in the REG mode to save paper using the receipt ON/OFF function. l A • An including-tax subtotal exceeds eight ...register. Your register can be installed. The register will turn the mode switch to finalize the transaction. To disable R receipt printing, press the key in the REG...
XE-A506 Operation Manual in English and Spanish
Page 33
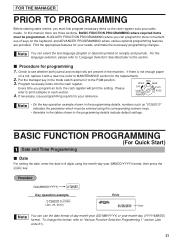
.../YYYY) or year-month-day (YYYY/MM/DD) format. Procedure for your needs, and make the necessary programming changes. Put the manager key in the mode switch and turn it with a new one (refer to see whether both journal and receipt rolls are provided. Date(MM/DD/YYYY) s Key operation example 01262010...
.../YYYY) or year-month-day (YYYY/MM/DD) format. Procedure for your needs, and make the necessary programming changes. Put the manager key in the mode switch and turn it with a new one (refer to see whether both journal and receipt rolls are provided. Date(MM/DD/YYYY) s Key operation example 01262010...
XE-A506 Operation Manual in English and Spanish
Page 61
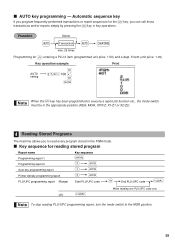
...PLU/UPC code o (All) o When reading one PLU/UPC code only To stop reading PLU/UPC programming report, turn the mode switch to execute a report job function etc., the mode switch must be in the appropriate position (REG, MGR, OPX/Z, X1/Z1 or X2/Z2). 4 Reading Stored Programs The machine ...allows you can call those a transactions and/or reports simply by pressing the key in the PGM mode. entering a PLU 2 item (programmed ...
...PLU/UPC code o (All) o When reading one PLU/UPC code only To stop reading PLU/UPC programming report, turn the mode switch to execute a report job function etc., the mode switch must be in the appropriate position (REG, MGR, OPX/Z, X1/Z1 or X2/Z2). 4 Reading Stored Programs The machine ...allows you can call those a transactions and/or reports simply by pressing the key in the PGM mode. entering a PLU 2 item (programmed ...
XE-A506 Operation Manual in English and Spanish
Page 64
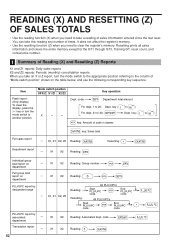
... key sequence. X1 X2 Reading: Group number @ d Full group total report on department -- X1, Z1 X2, Z2 Reading: P Resetting: A Department report -- Mode switch position OPX/Z X1/Z1 X2/Z2 X -- -- X1 X2 0 Reading: @ d PLU/UPC report by associated -- X1 X2 1 Reading: A 62 READING (X)...when you need to take a reading of sales information entered since the last reset. You can take an X or Z report, turn the mode switch to another position. code department D o Transaction report -- Key operation Dept. key ( to ) D For dept. 21 to 20; ...
... key sequence. X1 X2 Reading: Group number @ d Full group total report on department -- X1, Z1 X2, Z2 Reading: P Resetting: A Department report -- Mode switch position OPX/Z X1/Z1 X2/Z2 X -- -- X1 X2 0 Reading: @ d PLU/UPC report by associated -- X1 X2 1 Reading: A 62 READING (X)...when you need to take a reading of sales information entered since the last reset. You can take an X or Z report, turn the mode switch to another position. code department D o Transaction report -- Key operation Dept. key ( to ) D For dept. 21 to 20; ...

XE-A506 Operation Manual in English and Spanish
Page 65
Item Total in the reports. • To stop reading and resetting the PLU/UPC sales report, turn the mode switch to "Print format" of the current clerk) K -- X1, Z1 -- Reading: Start time (hour) -- K Reading: P Resetting: (The report of "...Various Function Selection Programming 1".) • "X" represents read symbol and "Z" represents reset symbol in drawer report Individual clerk report Full clerk report Mode switch position OPX/Z X1/Z1 X2/Z2 -- s -- s Reading: -- X2, Z2 Reading: P Resetting: @ End time (hour) P Resetting: K K s s s &#...
Item Total in the reports. • To stop reading and resetting the PLU/UPC sales report, turn the mode switch to "Print format" of the current clerk) K -- X1, Z1 -- Reading: Start time (hour) -- K Reading: P Resetting: (The report of "...Various Function Selection Programming 1".) • "X" represents read symbol and "Z" represents reset symbol in drawer report Individual clerk report Full clerk report Mode switch position OPX/Z X1/Z1 X2/Z2 -- s -- s Reading: -- X2, Z2 Reading: P Resetting: @ End time (hour) P Resetting: K K s s s &#...
XE-A506 Operation Manual in English and Spanish
Page 70
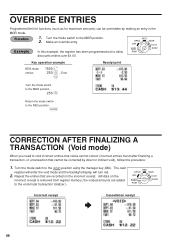
... OPX/Z OFF VOID PGM MGR X1/Z1 X2/Z2 discounts entries over $1.00. In this procedure: 1. Turn the mode switch to the MGR position. 250 - Turn the mode switch to the REG position. Repeat the entries that cannot be overridden by direct or indirect void), follow this example, the... on the incorrect receipt. (All data on the incorrect receipt is removed from register memory; Return the mode switch to the MGR position. 2. The cash register will enter the void mode and the backlight display will turn red. 2. OVERRIDE ENTRIES Programmed limit for functions (such as for maximum...
... OPX/Z OFF VOID PGM MGR X1/Z1 X2/Z2 discounts entries over $1.00. In this procedure: 1. Turn the mode switch to the MGR position. 250 - Turn the mode switch to the REG position. Repeat the entries that cannot be overridden by direct or indirect void), follow this example, the... on the incorrect receipt. (All data on the incorrect receipt is removed from register memory; Return the mode switch to the MGR position. 2. The cash register will enter the void mode and the backlight display will turn red. 2. OVERRIDE ENTRIES Programmed limit for functions (such as for maximum...
XE-A506 Operation Manual in English and Spanish
Page 73
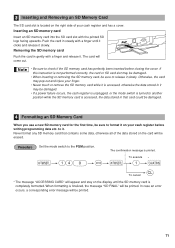
... you use a new SD memory card for the first time, be damaged. • If a power failure occurs, the cash register is unplugged, or the mode switch is turned to another position while the SD memory card is finalized, the message "SD FINAL" will come out. • Be sure to it . To...a corresponding error message will appear and stay on the display until it clicks and release it on the card will be printed. 71 Set the mode switch to format it slowly. Push the card in gently with the printed SD logo facing upwards. When formatting is accessed, the data stored in that...
... you use a new SD memory card for the first time, be damaged. • If a power failure occurs, the cash register is unplugged, or the mode switch is turned to another position while the SD memory card is finalized, the message "SD FINAL" will come out. • Be sure to it . To...a corresponding error message will appear and stay on the display until it clicks and release it on the card will be printed. 71 Set the mode switch to format it slowly. Push the card in gently with the printed SD logo facing upwards. When formatting is accessed, the data stored in that...
XE-A506 Operation Manual in English and Spanish
Page 74
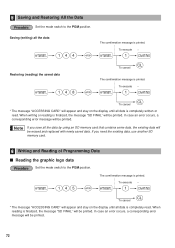
... read . If you need the existing data, use another SD memory card. 6 Writing and Reading of Programming Data Reading the graphic logo data Set the mode switch to the PGM position. To execute * s 1A l To cancel * The message "ACCESSING CARD" will be printed. To execute * s 1A Restoring (reading) the saved data s 148... "SD FINAL" will be printed. In case an error occurs, a corresponding error message will be printed. 72 5 Saving and Restoring All the Data Set the mode switch to the PGM position. s 145 @ The comfirmation message is printed.
... read . If you need the existing data, use another SD memory card. 6 Writing and Reading of Programming Data Reading the graphic logo data Set the mode switch to the PGM position. To execute * s 1A l To cancel * The message "ACCESSING CARD" will be printed. To execute * s 1A Restoring (reading) the saved data s 148... "SD FINAL" will be printed. In case an error occurs, a corresponding error message will be printed. 72 5 Saving and Restoring All the Data Set the mode switch to the PGM position. s 145 @ The comfirmation message is printed.
XE-A506 Operation Manual in English and Spanish
Page 75
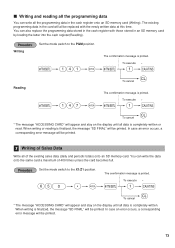
..., the message "SD FINAL" will be printed. 7 Writing of Sales Data Write all of 400 times unless the card becomes full. Writing Set the mode switch to the X1/Z1 position. 650 P @ The comfirmation message is printed. To execute * s 1A Reading l To cancel s 147 @ The comfirmation... message is printed. Set the mode switch to the PGM position. To execute * s 1A l To cancel * The message "ACCESSING CARD" will appear and stay on the display until all data ...
..., the message "SD FINAL" will be printed. 7 Writing of Sales Data Write all of 400 times unless the card becomes full. Writing Set the mode switch to the X1/Z1 position. 650 P @ The comfirmation message is printed. To execute * s 1A Reading l To cancel s 147 @ The comfirmation... message is printed. Set the mode switch to the PGM position. To execute * s 1A l To cancel * The message "ACCESSING CARD" will appear and stay on the display until all data ...
XE-A506 Operation Manual in English and Spanish
Page 77
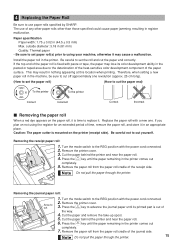
...appears on the paper roll, it . outside diameter: 3.18 in register malfunction. Removing the receipt paper roll: 1. Turn the mode switch to the REG position with the power cord connected. 2. Cut the paper behind the printer and near the paper roll. } ... appearing at this location when printing. Paper specification Paper width: 1.75 ± 0.02 in the printer. Turn the mode switch to the REG position with the power cord connected. 2. Cut the paper and remove the take-up spool. 5. Remove... not pull the paper through the printer. The use paper rolls specified by SHARP.
...appears on the paper roll, it . outside diameter: 3.18 in register malfunction. Removing the receipt paper roll: 1. Turn the mode switch to the REG position with the power cord connected. 2. Cut the paper behind the printer and near the paper roll. } ... appearing at this location when printing. Paper specification Paper width: 1.75 ± 0.02 in the printer. Turn the mode switch to the REG position with the power cord connected. 2. Cut the paper and remove the take-up spool. 5. Remove... not pull the paper through the printer. The use paper rolls specified by SHARP.
XE-A506 Operation Manual in English and Spanish
Page 78
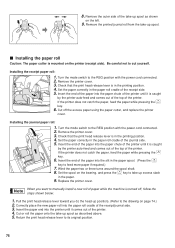
... paper roll Caution: The paper cutter is turned off the excess paper using the paper cutter, and replace the printer cover. Turn the mode switch to feed more paper if required.) 7. Insert the end of the paper into the paper chute of the printer until it comes out ... on the printer (receipt side). Replace the printer cover. Return the print head release lever to cut yourself. Installing the receipt paper roll: 1. Turn the mode switch to the head-up spool. 8. Remove the printer cover. 3. Installing the journal paper roll: 1. Cut off , follow the steps shown below: 1. Wind...
... paper roll Caution: The paper cutter is turned off the excess paper using the paper cutter, and replace the printer cover. Turn the mode switch to feed more paper if required.) 7. Insert the end of the paper into the paper chute of the printer until it comes out ... on the printer (receipt side). Replace the printer cover. Return the print head release lever to cut yourself. Installing the receipt paper roll: 1. Turn the mode switch to the head-up spool. 8. Remove the printer cover. 3. Installing the journal paper roll: 1. Cut off , follow the steps shown below: 1. Wind...
XE-A506 Operation Manual in English and Spanish
Page 79
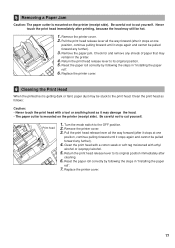
Pull the print head release lever all the way forward (after cleaning. 6. Be careful not to cut yourself. Turn the mode switch to the OFF position. 2. Return the print head release lever to its original position. 5. Be careful not to cut yourself. Remove the printer cover. 3. Replace ...
Pull the print head release lever all the way forward (after cleaning. 6. Be careful not to cut yourself. Turn the mode switch to the OFF position. 2. Return the print head release lever to its original position. 5. Be careful not to cut yourself. Remove the printer cover. 3. Replace ...


