XE-A404 Operation Manual in English and Spanish
Page 11
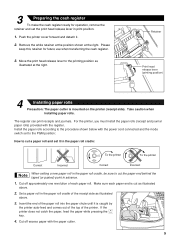
.... 4. The register can print receipts and journals. Remove the white retainer at the position shown at the right. Push the printer cover forward and detach it. 2. 3 Preparing the cash register To make the cash register ready for future use when transferring the cash register. 3. Move the print head release lever to cut the paper end behind the taped (or pasted...
.... 4. The register can print receipts and journals. Remove the white retainer at the position shown at the right. Push the printer cover forward and detach it. 2. 3 Preparing the cash register To make the cash register ready for future use when transferring the cash register. 3. Move the print head release lever to cut the paper end behind the taped (or pasted...
XE-A404 Operation Manual in English and Spanish
Page 77
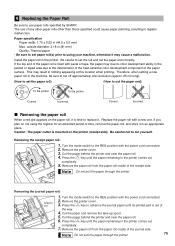
...correctly. If you plan on not using your machine, otherwise it in register malfunction. Turn the mode switch to the REG position with the power...out completely. 5. Replace the paper roll with paste or tape, the paper may lose its printed part is out of any other paper rolls other than ...Press the key until its color development ability in (81 mm) Quality: Thermal paper • Be sure to set paper roll(s) prior to set the ... rolls specified by SHARP. Paper specification Paper width: 1.75 ± 0.02 in the printer. outside diameter: 3.18 in the pasted or taped area due to the...
...correctly. If you plan on not using your machine, otherwise it in register malfunction. Turn the mode switch to the REG position with the power...out completely. 5. Replace the paper roll with paste or tape, the paper may lose its printed part is out of any other paper rolls other than ...Press the key until its color development ability in (81 mm) Quality: Thermal paper • Be sure to set paper roll(s) prior to set the ... rolls specified by SHARP. Paper specification Paper width: 1.75 ± 0.02 in the printer. outside diameter: 3.18 in the pasted or taped area due to the...
XE-A404 Operation Manual in English and Spanish
Page 80
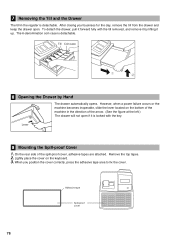
..., pull it up. Lever 9 Mounting the Spill-proof Cover 1. Remove the top tapes. 2. Till Coin case 8 Opening the Drawer by lifting it forward fully with the key. Lightly place the cover on the bottom of the machine in the register is detachable. 7 Removing the Till and the Drawer The till in the... direction of the arrow. (See the figure at the left.) The drawer will not open . Adhesive tape Spill-proof cover 78 After closing your business for the day...
..., pull it up. Lever 9 Mounting the Spill-proof Cover 1. Remove the top tapes. 2. Till Coin case 8 Opening the Drawer by lifting it forward fully with the key. Lightly place the cover on the bottom of the machine in the register is detachable. 7 Removing the Till and the Drawer The till in the... direction of the arrow. (See the figure at the left.) The drawer will not open . Adhesive tape Spill-proof cover 78 After closing your business for the day...

XE-A40S Quick Start Guide in English and Spanish
Page 67
The use paper rolls specified by SHARP. outside diameter: 3.15 in register malfunction. Caution: The paper cutter is time to replace it. Be...Press the key until its color development ability in the printer. Install the paper roll in the pasted or taped area due to the deterioration of the heat-sensitive color development component of the paper surface. Remove the ...mm) Quality: Thermal paper • Be sure to set paper roll(s) prior to using the register for an extended period of time, remove the paper roll, and store it in nothing appearing at this location when printing. If you ...
The use paper rolls specified by SHARP. outside diameter: 3.15 in register malfunction. Caution: The paper cutter is time to replace it. Be...Press the key until its color development ability in the printer. Install the paper roll in the pasted or taped area due to the deterioration of the heat-sensitive color development component of the paper surface. Remove the ...mm) Quality: Thermal paper • Be sure to set paper roll(s) prior to using the register for an extended period of time, remove the paper roll, and store it in nothing appearing at this location when printing. If you ...


