XE-A206 Operation Manual in English and Spanish
Page 10
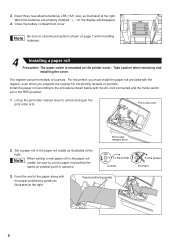
The register can print receipts or journals. Print roller arm Print roller release lever 2. When setting a new paper roll in the paper roll cradle, be sure to cut the paper end behind the taped (or pasted) point in the paper roll cradle as illustrated at the right. Feed the end of ... must install the paper roll provided with the AC cord connected and the mode switch set to the procedure shown below with the register, even when you program the register for not printing receipts or journals. To the printer Correct 3. Insert three new alkaline batteries LR6 ("AA" size) as illustrated...
The register can print receipts or journals. Print roller arm Print roller release lever 2. When setting a new paper roll in the paper roll cradle, be sure to cut the paper end behind the taped (or pasted) point in the paper roll cradle as illustrated at the right. Feed the end of ... must install the paper roll provided with the AC cord connected and the mode switch set to the procedure shown below with the register, even when you program the register for not printing receipts or journals. To the printer Correct 3. Insert three new alkaline batteries LR6 ("AA" size) as illustrated...
Quick Start Guide
Page 1
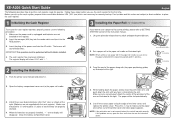
...in advance. 3. Install three new alkaline batteries LR6 ("AA" size) as shown at the right. XE-A206 Quick Start Guide English The following procedure: 1. The register display will show "0.00" with the cash register.) Make sure that positive (+) and negative (-) poles of the printer cover and clean paper appears. Lift...steps before you hear a click locking the arm. Push the printer cover forward and detach it to cut the paper end behind the taped (or pasted) point in the paper roll cradle as instructed above. Make sure you set up the print roller release lever to ...
...in advance. 3. Install three new alkaline batteries LR6 ("AA" size) as shown at the right. XE-A206 Quick Start Guide English The following procedure: 1. The register display will show "0.00" with the cash register.) Make sure that positive (+) and negative (-) poles of the printer cover and clean paper appears. Lift...steps before you hear a click locking the arm. Push the printer cover forward and detach it to cut the paper end behind the taped (or pasted) point in the paper roll cradle as instructed above. Make sure you set up the print roller release lever to ...


